Making of Silent Hill f Teaser Trailer
Date published: 2023.02.24
Source: CGWORLD.jp
Beautiful but Horrifying” - Japanese horror depicted by Shirogumi's meticulously detailed visuals - ‘SILENT HILL f’ Teaser Trailer Creator Interview
KONAMI's “SILENT HILL” series is the gold standard of Japanese horror games. Last October, “SILENT HILL f,” a completely new title in the series, was announced with a 2-minute teaser video, and we spoke with the production team at Shirogumi, which carefully constructed the video, which is set in Japan in the 1960s, based on historical research.
*This article is an addition to and restructuring of an article that appeared in CGWORLD vol. 294 (February 2023 issue).
The “SILENT HILL” series of horror games is popular not only in Japan, but around the world as well, and since its original release in 1999, each sequel has been a hot topic of discussion.
In fact, this series had not moved since February 2013, Japan time, but on Thursday, October 20, 2022, three games and other titles, including “SILENT HILL f,” were announced in the transmission program.
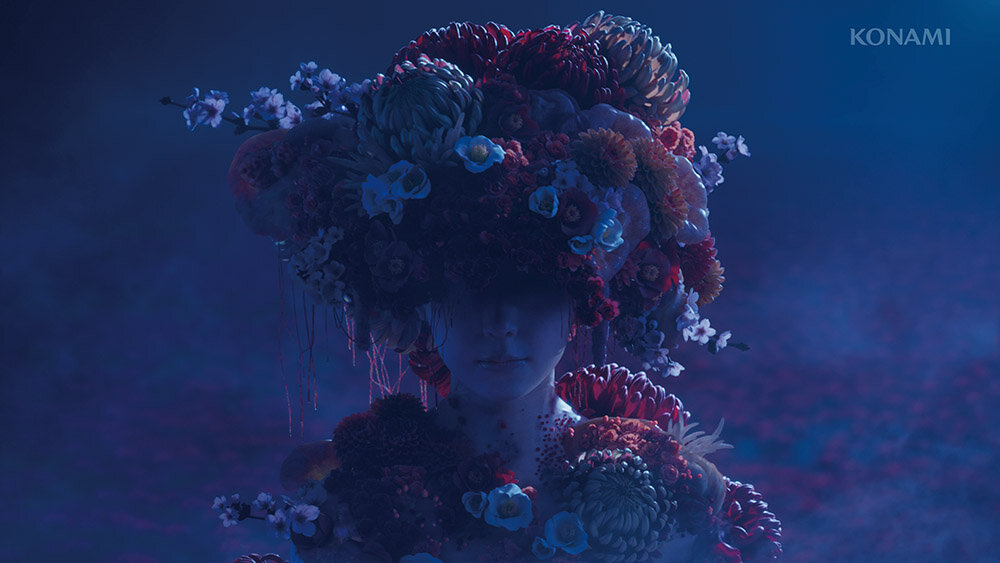
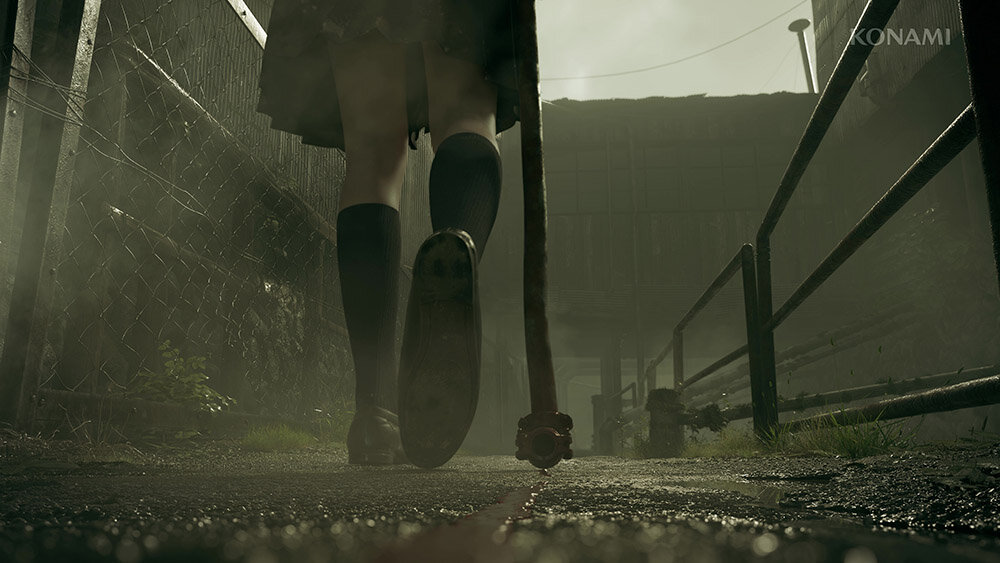
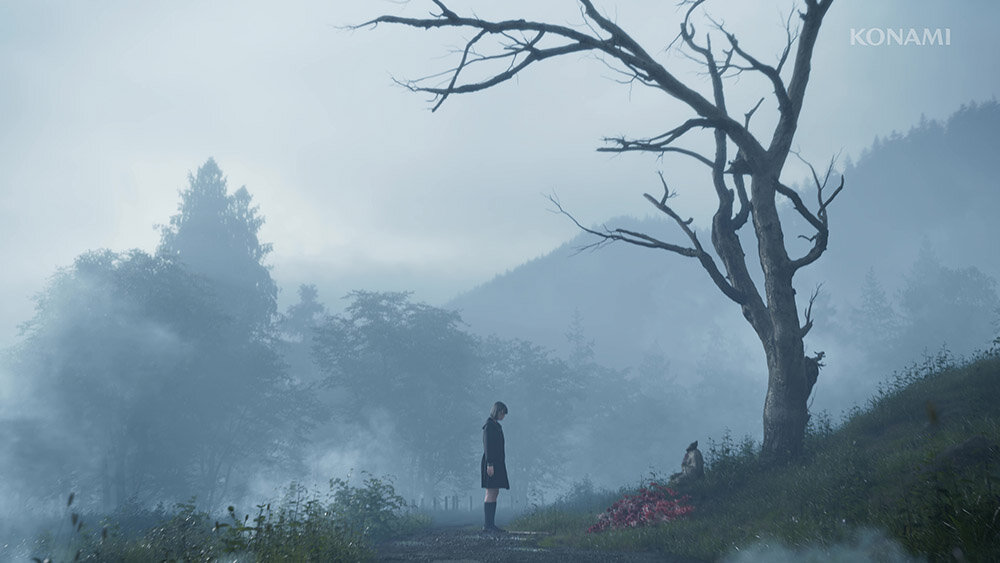
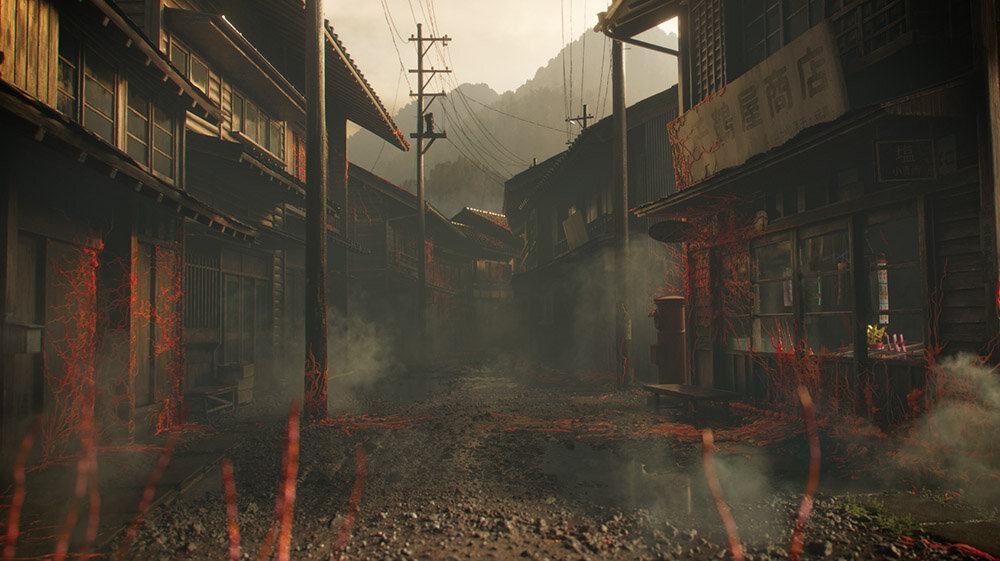
SILENT HILL f” is a completely new game set in Japan in the 1960's. The trailer video released on YouTube is a 2-minute 4K full CG video with the theme of ‘beautiful but horrifying’.
It has been viewed more than 240,000 times and received more than 16,000 likes on Twitter, creating a big buzz. The trailer was produced by Shirogumi, a company that has produced many high-quality CG/VFX works.
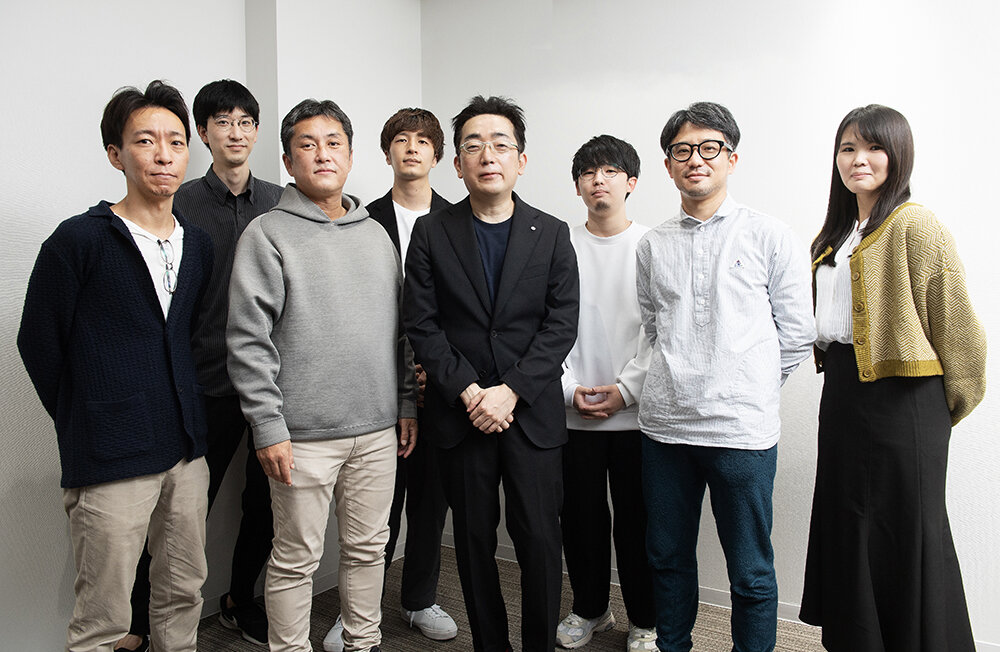 |
From left to right Yuta Hatsuka (Technical Supervisor), Moritaro Tanaka (Lighting Supervisor), Naoe Habara (Producer), Taku Fujimoto (Effects Artist), Motoi Okamoto (Producer/KONAMI), Taiga Ogura (Modeling Supervisor), Takahiro Komori (Director), Hinako Endo (Creative Coordinator) Director), Hinako Endo (Creative Coordinator) |
KONAMI producer Motoi Okamoto recalled the early days of the project.
"We decided from the very beginning of the game's development to create a teaser video. Since the title is set in Japan, we wanted a Japanese CG production company to produce the video, and Shirogumi, who had previously worked with us on KONAMI productions, seemed the most suitable."
In other countries, horrifying things tend to be depicted in a grotesque manner, but for this film, the filmmakers sought to create a “beauty x horror” style that is unique to Japan. In order to express the world of the film in an appealing manner, the filmmakers began with a period study of the 1960s, and then paid close attention to every detail of the film, from the artwork itself to the details.
|
"When I heard that it was a teaser for the “SILENT HILL” series, I knew I had to do it. Based on the limited materials we had, we discussed the scenario and visuals for the trailer with Mr. Okamoto. As a result, I think we were able to create a picture that fully utilizes our technology and specifications,” said director and VFX supervisor, Mr. Takahiro Komori of Shirogumi.
Let's take a look inside the delicate and beautiful visuals.
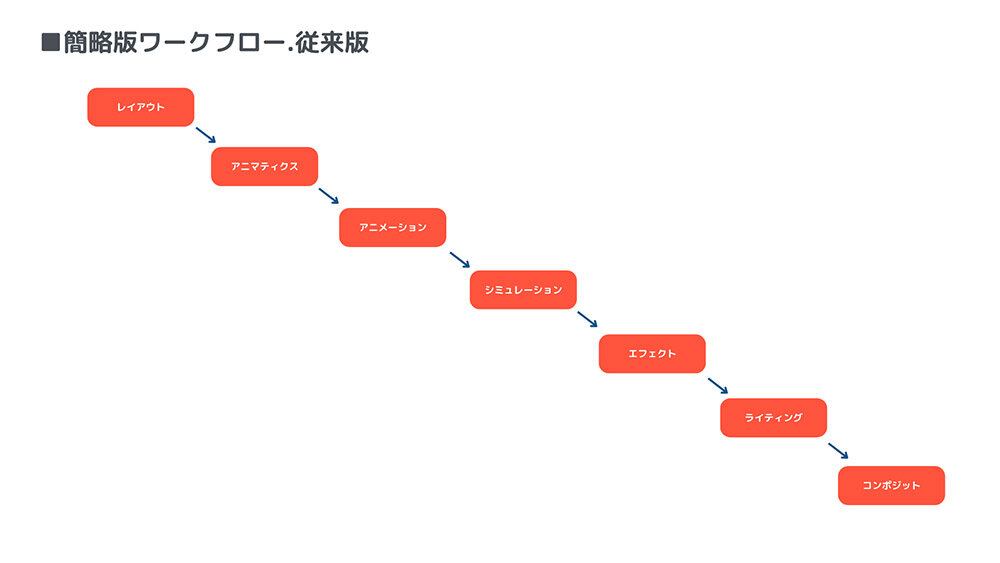
Production flow incorporating agile type
Working with an eye on direction, the challenges and benefits of the new workflow
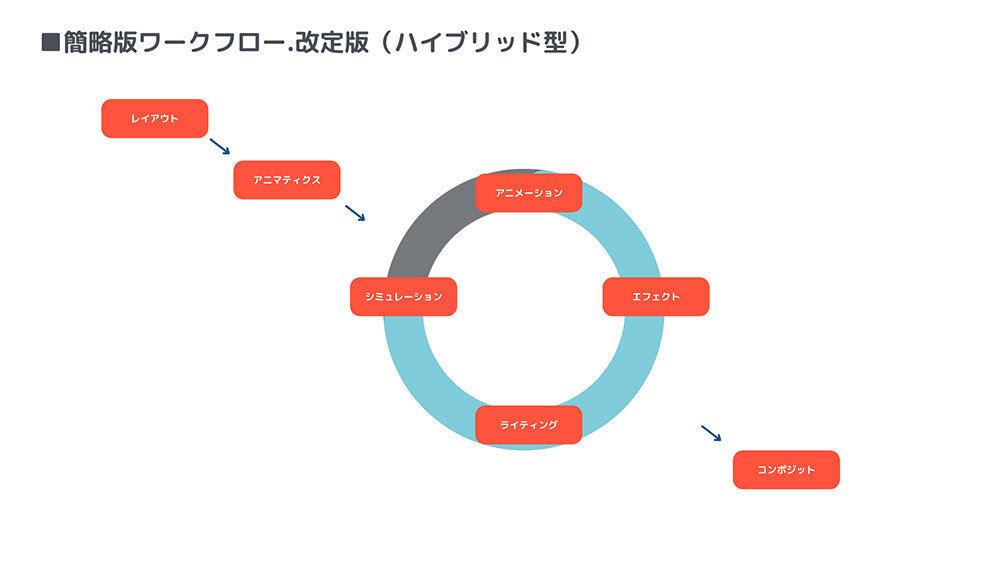
The production workflow for this video incorporates the agile method (a method in which each process is repeated in a short span of time) into the conventional waterfall method (a method in which each process is carried out in sequence from upstream to downstream).
Both waterfall and agile methods have their merits and demerits, but this hybrid specification extracts the merits of each. Specifically, the system automatically compiles and renders work data from the animation, effects, and lighting processes, enabling each process to work in parallel.
The new system, however, allows the final image to be constantly checked and shared over a short span of time.
 |
 |
|
| Conventional waterfall workflow, where each process proceeds in sequence | A new workflow that adopts an agile method in which each process is repeated in a short span of time |
This method is complicated to manage and share information. In this case, there were many problems during the process, such as rendering not starting because the data was too heavy. The ability to work in parallel and still have a visual representation of something close to the final image is a big advantage in terms of sharing information among workers and improving quality,” said Yuta Hatsuka, technical supervisor.
The weight of the data was overcome by optimization and by borrowing render resources from other departments within the company, but optimization will continue to be an issue in the future.
 |
 |
|
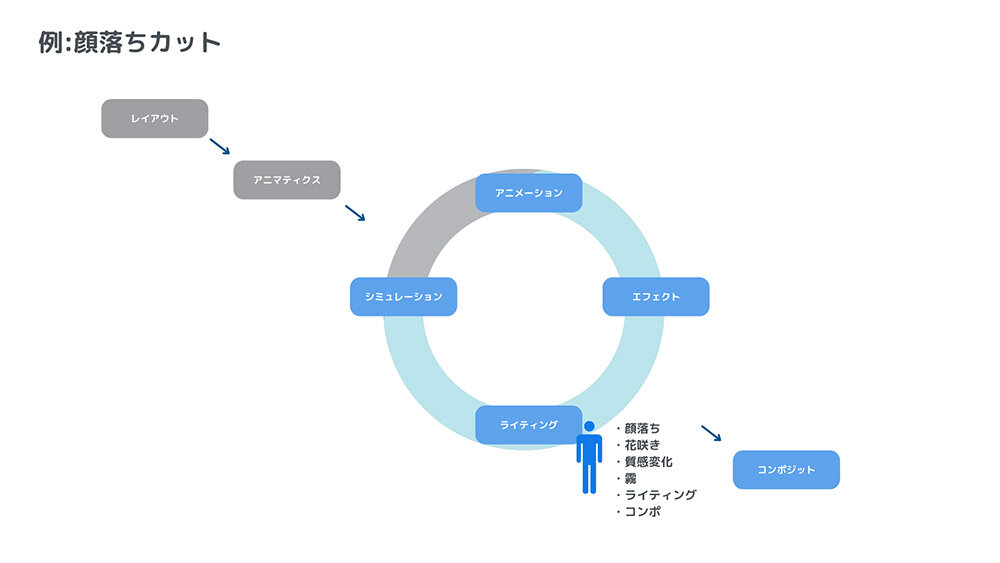
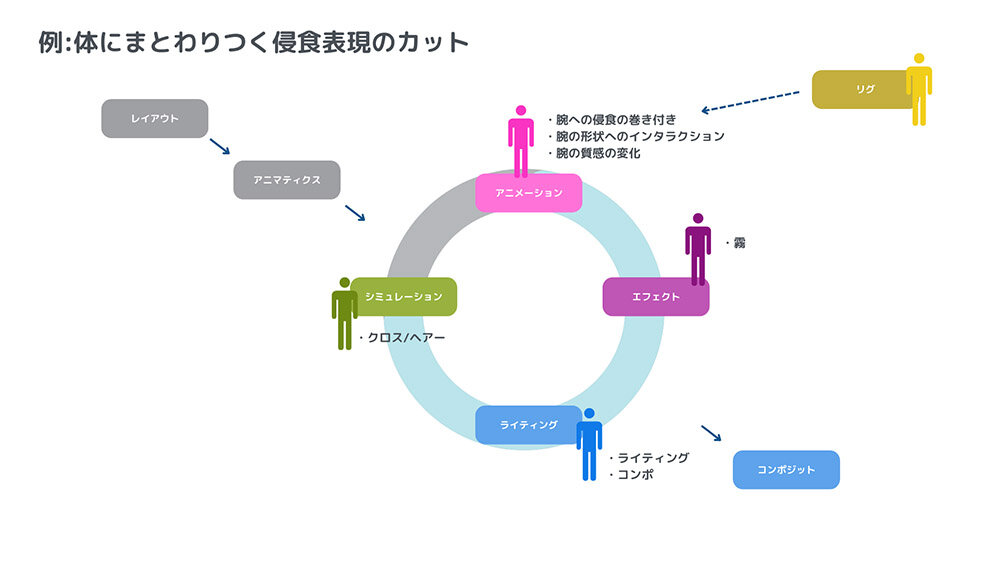
| Example of practice with face fall cut (see below) | Practical example of erosion expression cut clinging to the body (see below). By periodically rendering a series of images even in the middle of work, the final direction of the image can be checked as the work progresses. |
Carefully crafted girl's assets
Rich and realistic modeling down to the smallest detail
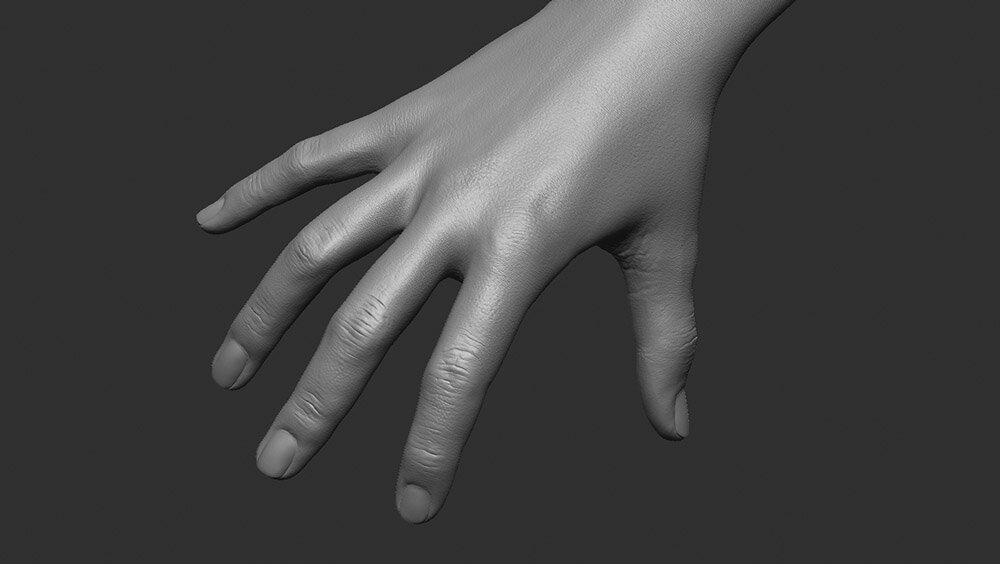
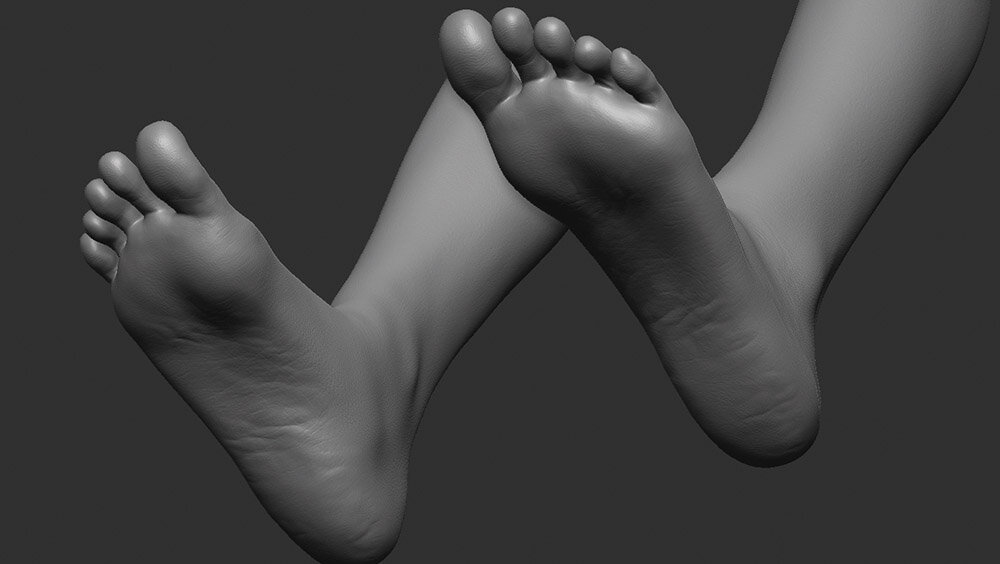
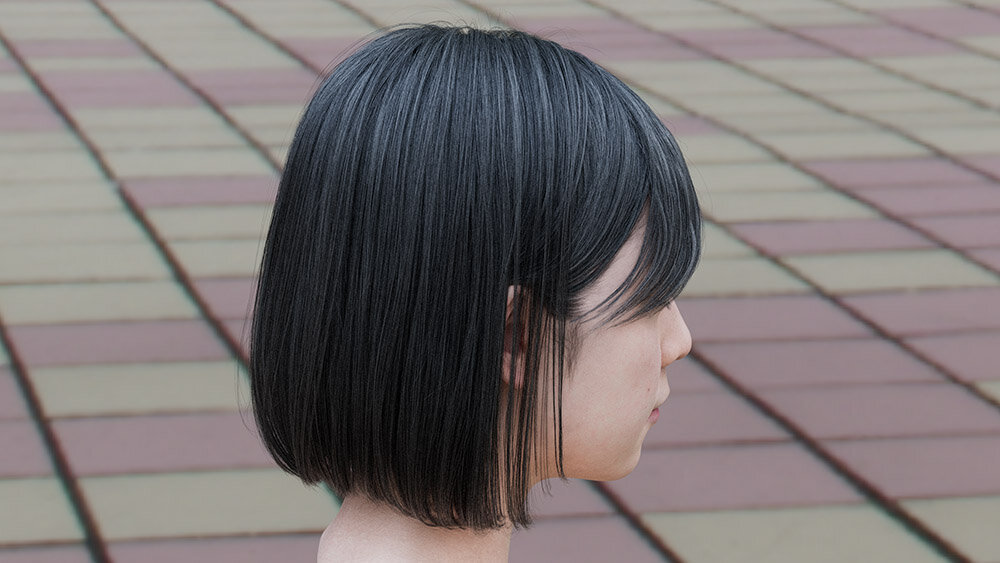
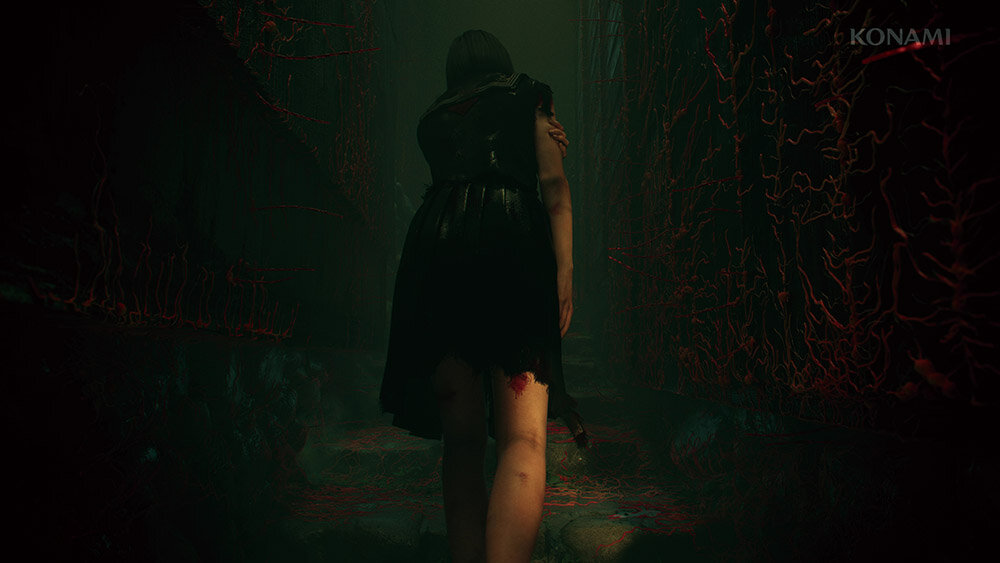
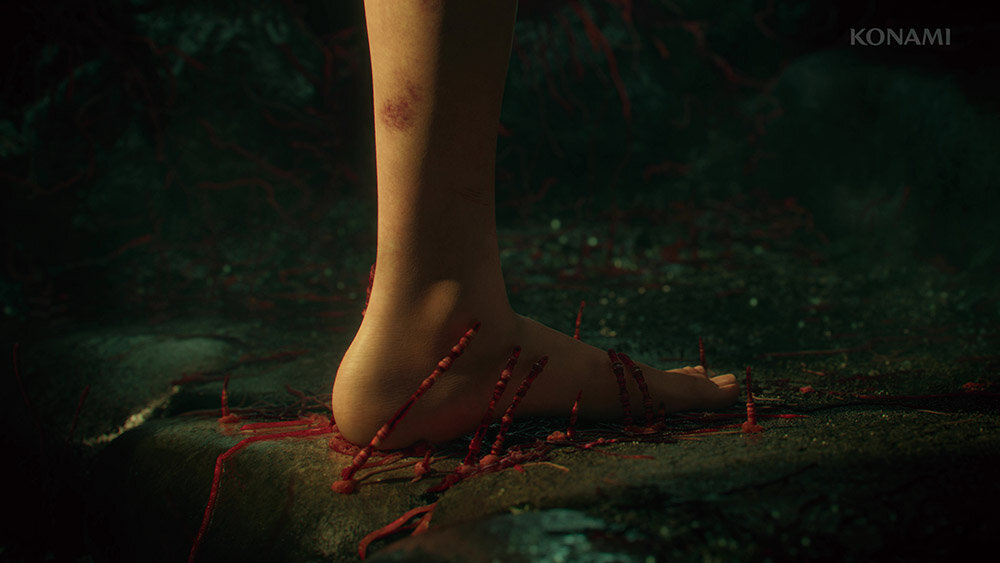
One of the main points of interest in this trailer is the realistic appearance of the girl, which was created with meticulous attention to detail, with the goal of “quality that doesn't look like CG. The assets are based on photogrammetric data taken at the “iris” 3D scanning studio in Toho Studios, and were adjusted and refined to match Kera's design drawings.
We took the best of both scans and drawings,” said modeling supervisor Ogura. We intentionally left the distortion of the scanned model's skeletal structure, while keeping the balance of arm length, hand size, body width, etc. as close to the design drawing as possible for a natural look,” recalls modeling supervisor Taiga Ogura.
|
In this trailer, in order to achieve a rich expression, normal and bump are not used in the production process; the sculpt by ZBrush is output as a displacement and assigned to 3ds Max, and the details that could not be reproduced by the displacement are expressed as normal by processing by automatic conversion in V-Ray. V-Ray automatically converts the details that could not be reproduced in the displacement to be represented as normal. The skin wrinkles, the waviness of the hands, and the exquisite modeling of the backs of the knees are all carefully crafted to withstand close-up shots.
When rigging, morph targets are created to create asymmetry and to crush areas that appear overweight. Mr. Ogura says, “For example, we use morphs to reproduce the way a leg collapses under its own weight, or to express changes in body shape and skin sinkage caused by the pressure of clothes and socks.
|
The hair was modeled using Ornatrix 3dsMax, a hair creation plug-in. Mr. Ogura said, “kera-san gave us a lot of detailed instructions, and we incorporated the feeling of bundles of hair and the expression of the natural habitual hair of each part. The animation was divided into parts and guides were created for each part before the hair simulation was executed.
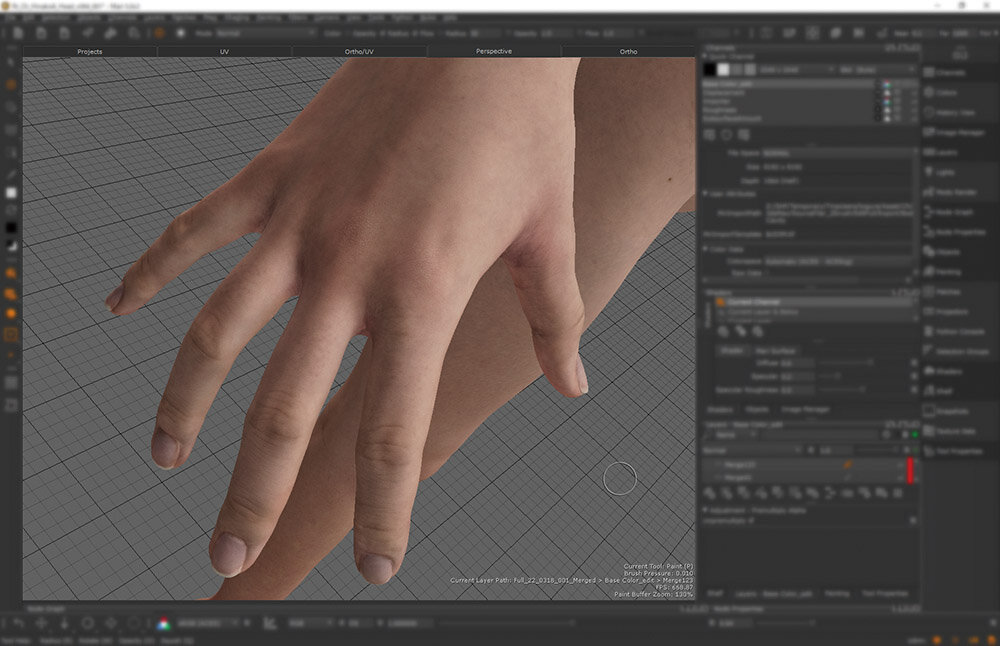
For texturing, he basically uses Mari, which UDIM handles more lightly, and uses Substance 3D Painter for some small objects such as shoes.
Based on the albedo of the scan data, we used ZBrush's cavity-based masks and other techniques to draw the figure. For the sculpted parts after the face was peeled off, we tried not to make them too grotesque, but aimed for a deja vu-like organ look,” said Ogura.
Rendering was done using V-Ray's SSS (Subsurface Scattering), and the accuracy was improved by look-devising in a six-pattern checklight environment.
A model that combines the best of photogrammetry and design drawing
The girl is the main character in this trailer and has been sculpted with great precision, from her body shape to the smallest details.
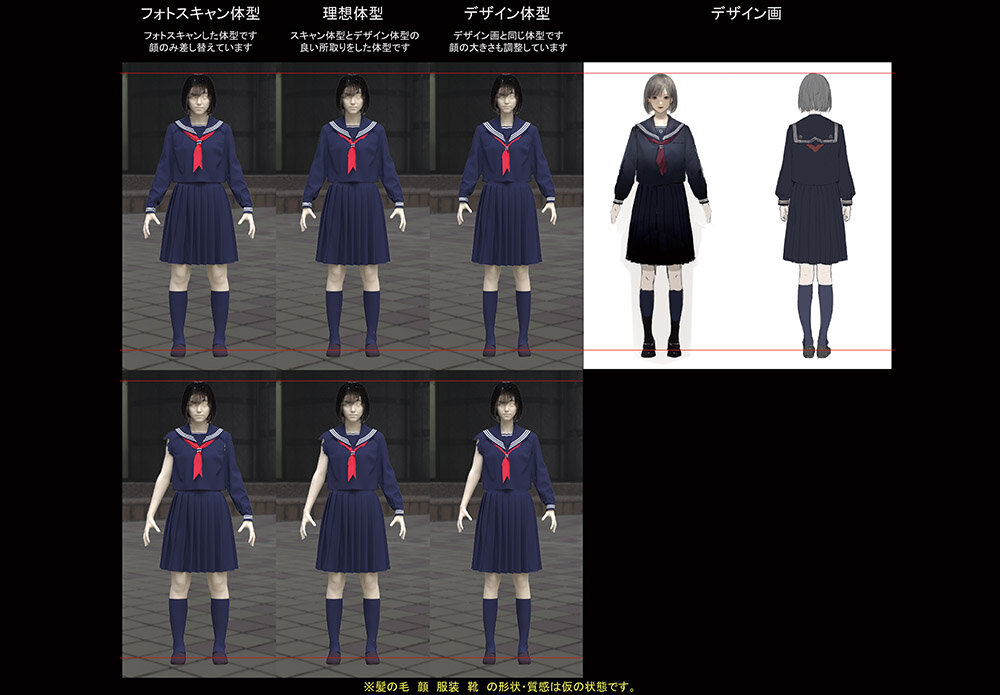 |
The girl's body shape is a good combination of the photoscan-based model and Kera's design drawings. The shape of the girl is a balance between the natural photorealism and the character. |
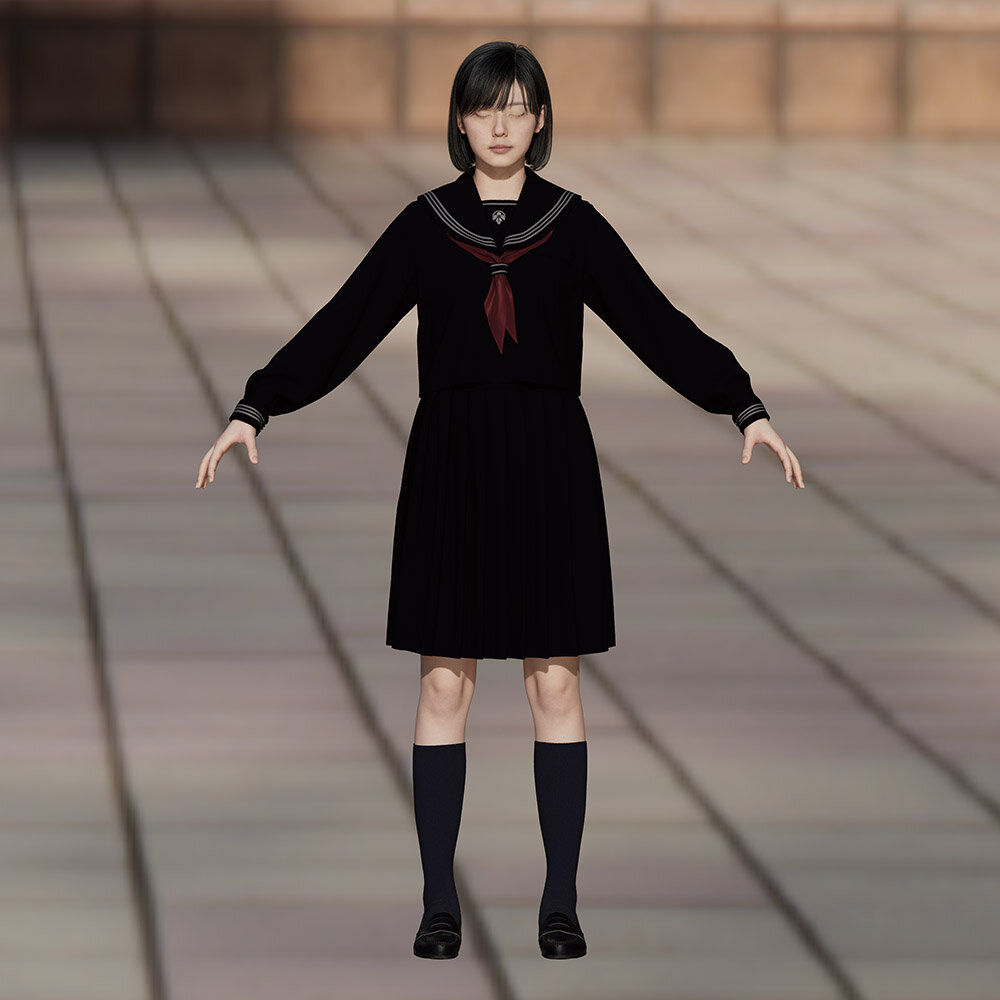 |
Completed model. Eyes are not shown in this trailer, so the model is made in a closed state. |
|
|
 |
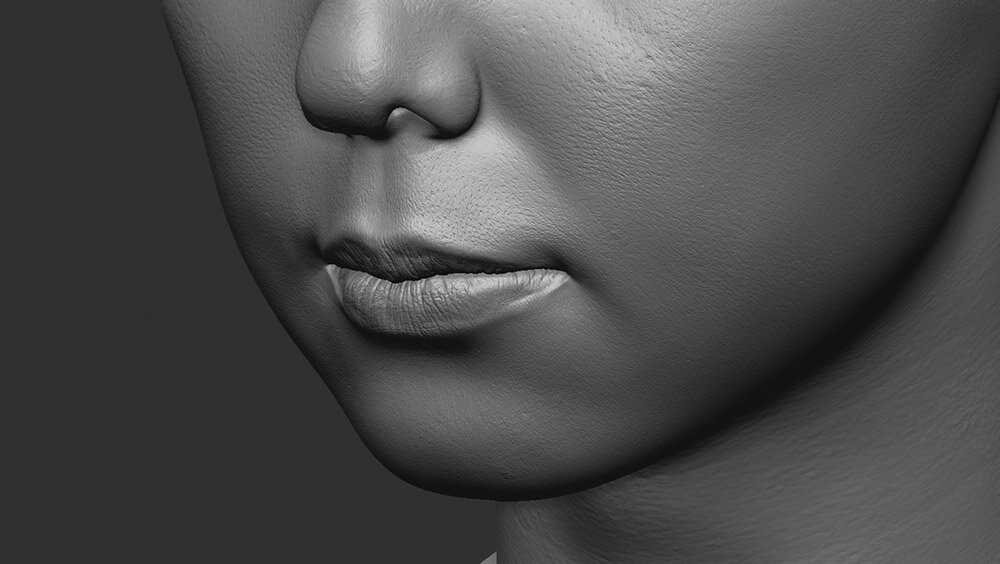
Skin detailing. The face has been completely re-sculpted to look like a person who does not exist. Everything from the wrinkles to the texture of the slight irregularities in the skin was sculpted with ZBrush. |
 |
 |
|
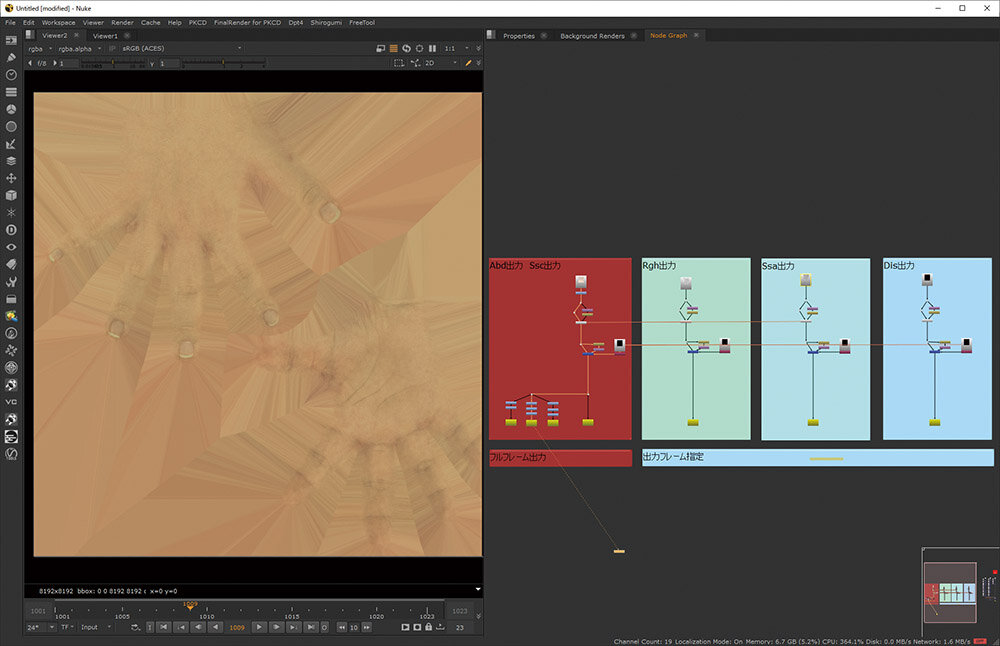
Automatic processing of textures in Nuke. |
Texture drawing in Mari. Even the subtle expression of the skin is precisely rendered. |
 |
 |
|
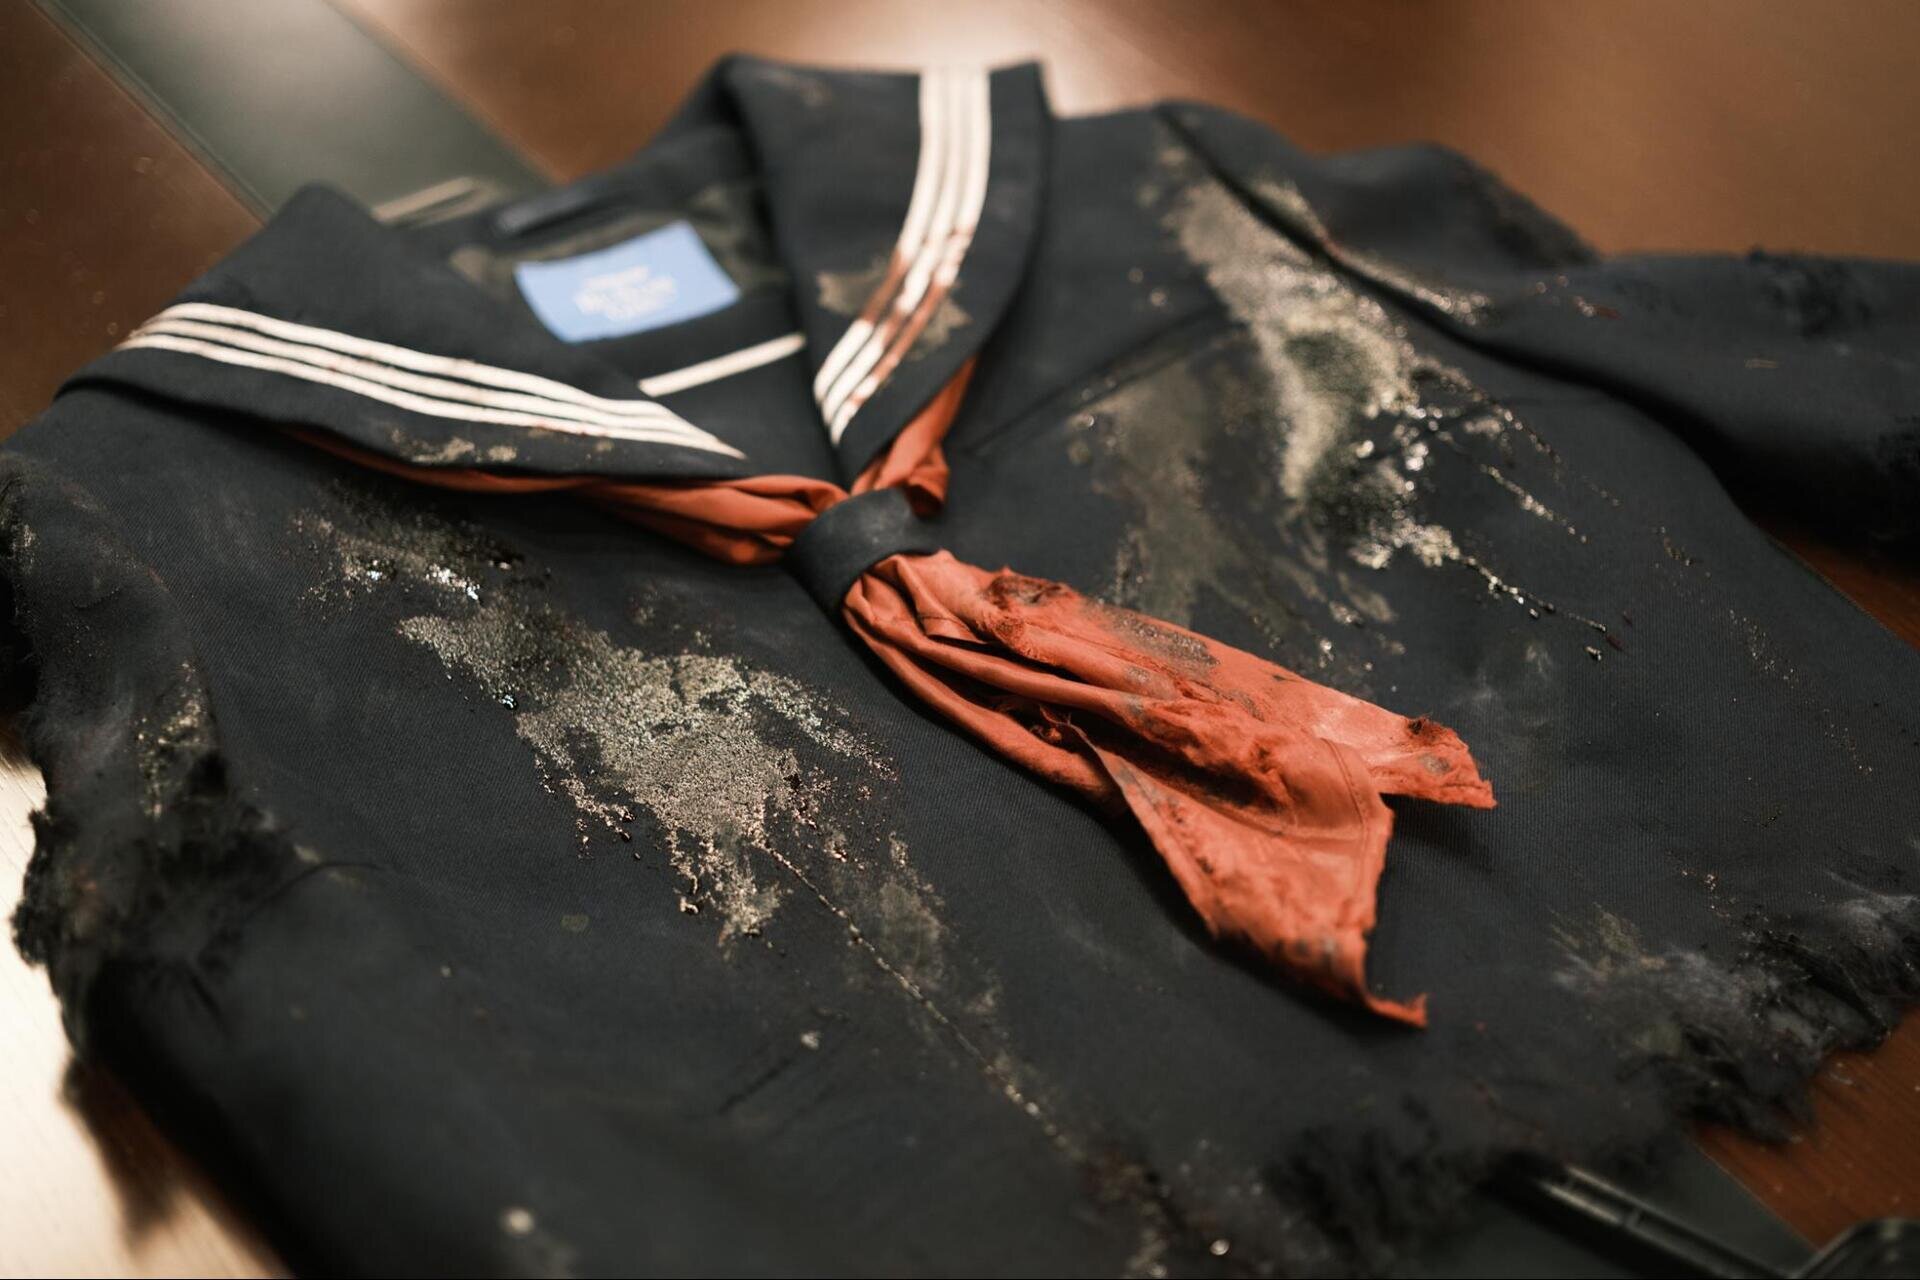
Actual uniforms produced for photogrammetry. It has been stained with blood and other stains.
|
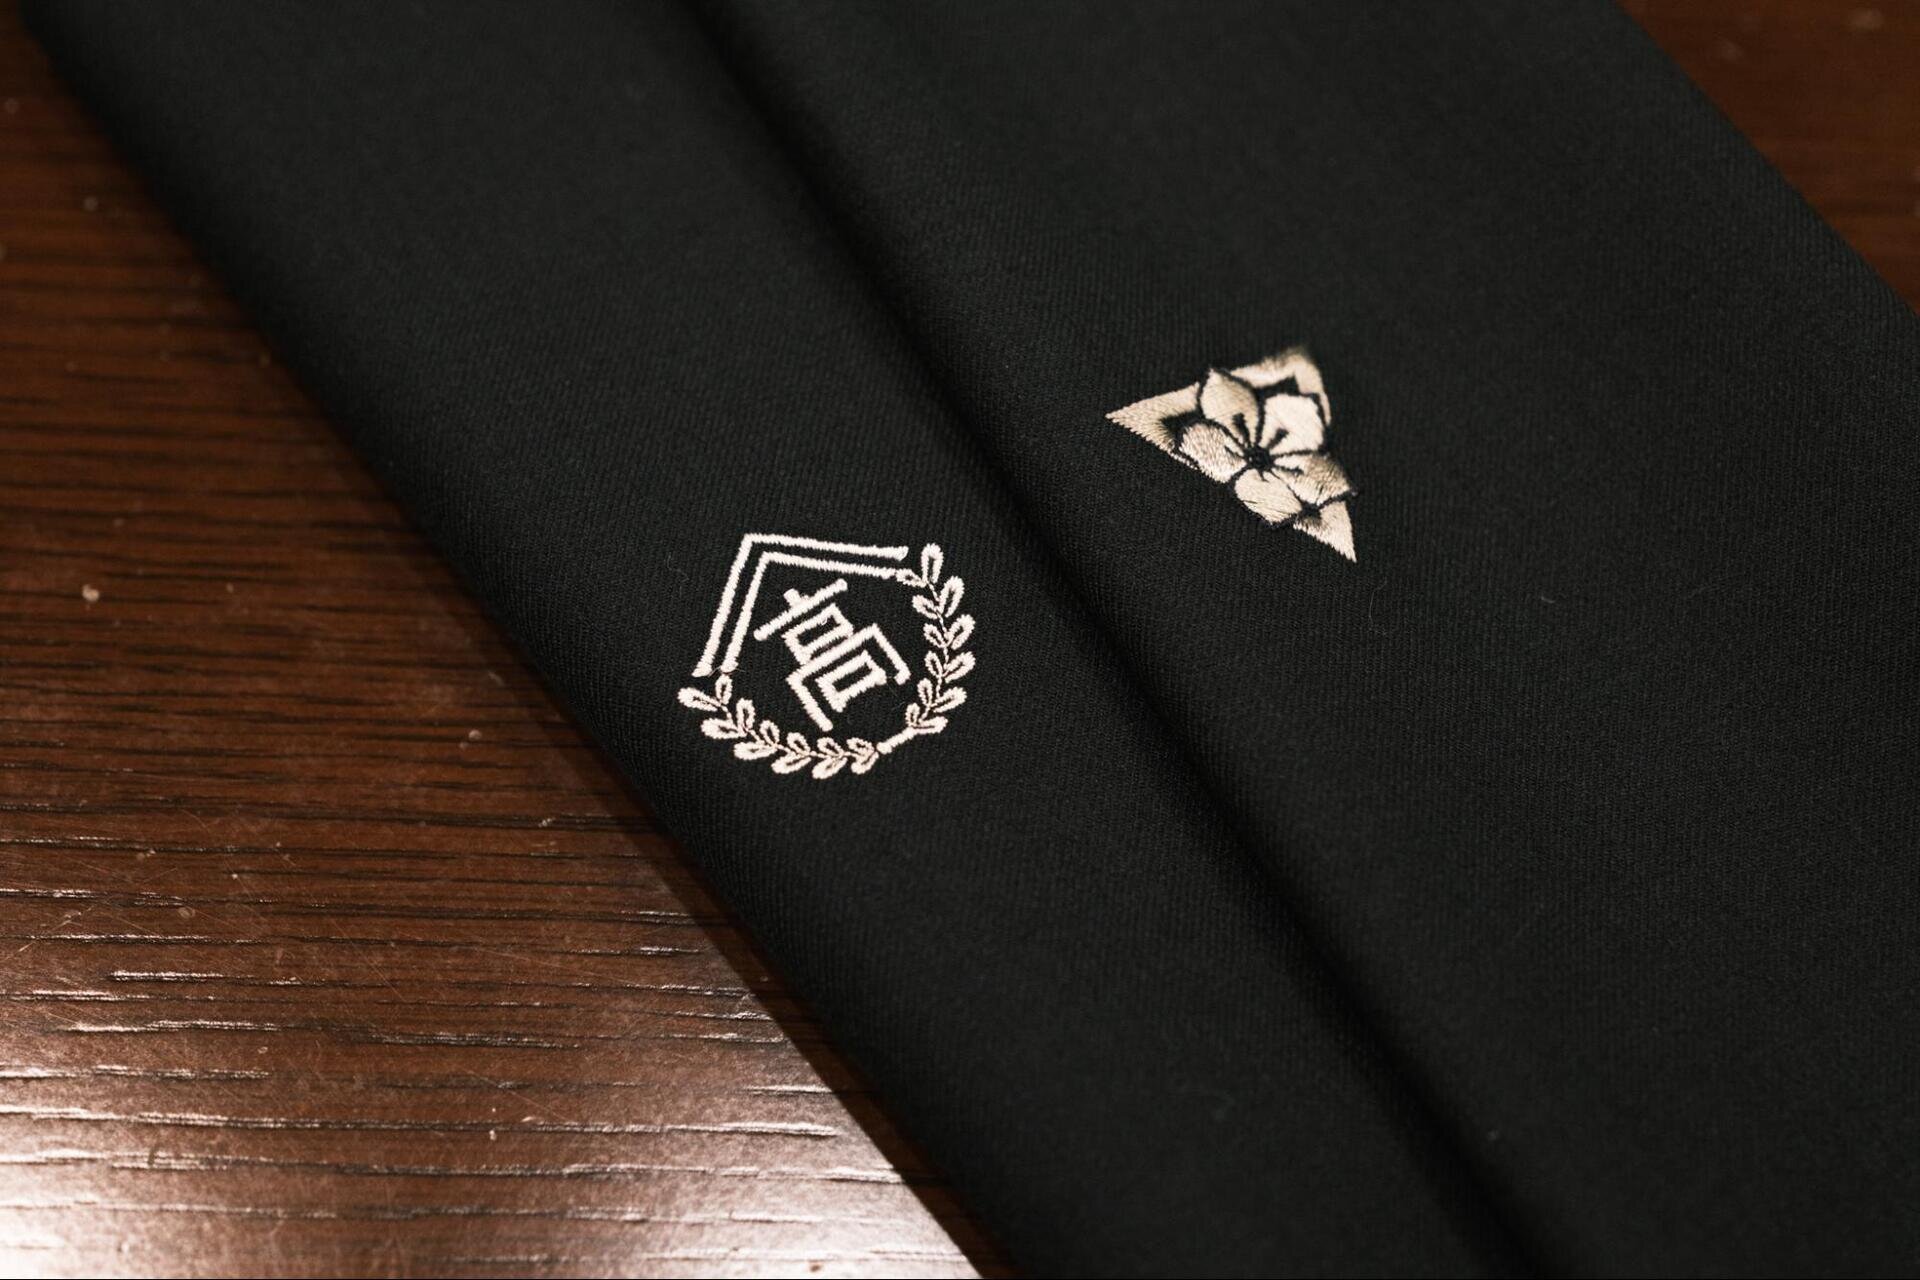
An embroidery design of a fictitious school emblem. This was also produced in real life and used as a texture. |
Hair expression
The hair was created using Ornatrix, a hair plug-in for 3ds Max, under the supervision of kera.
 |
 |
|
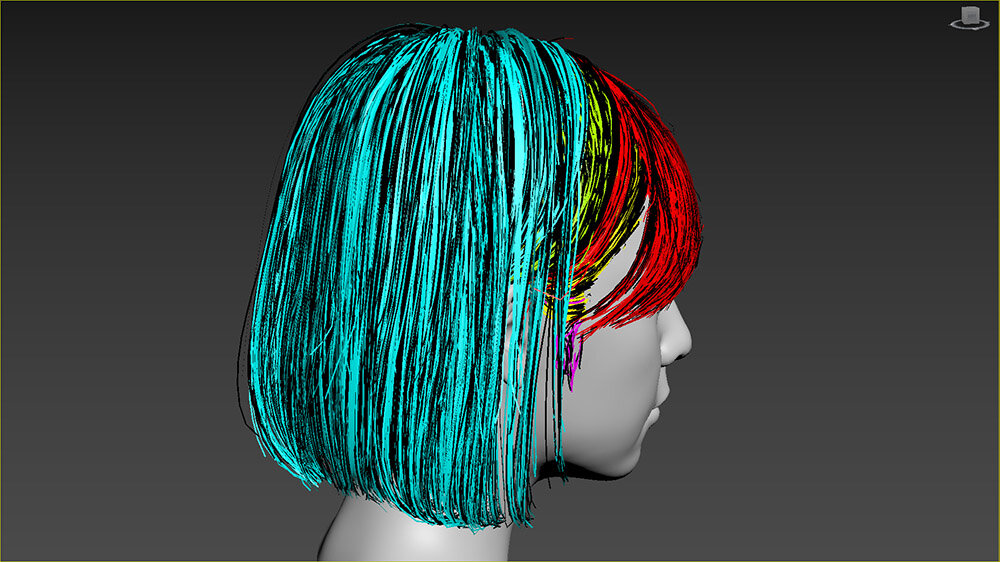
Simulation Guide. Adjusted to produce bundles and habit hairs for each part. |
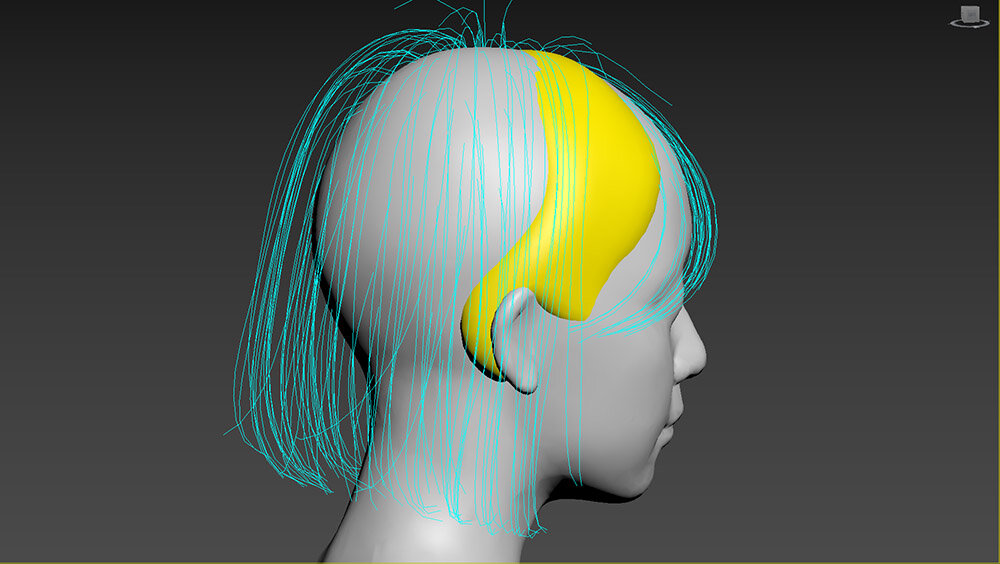
Viewport display. Back hair, side hair over the ears, and bangs are color-coded and displayed by part. |
 |
Render image. The result is natural and without artificiality. |
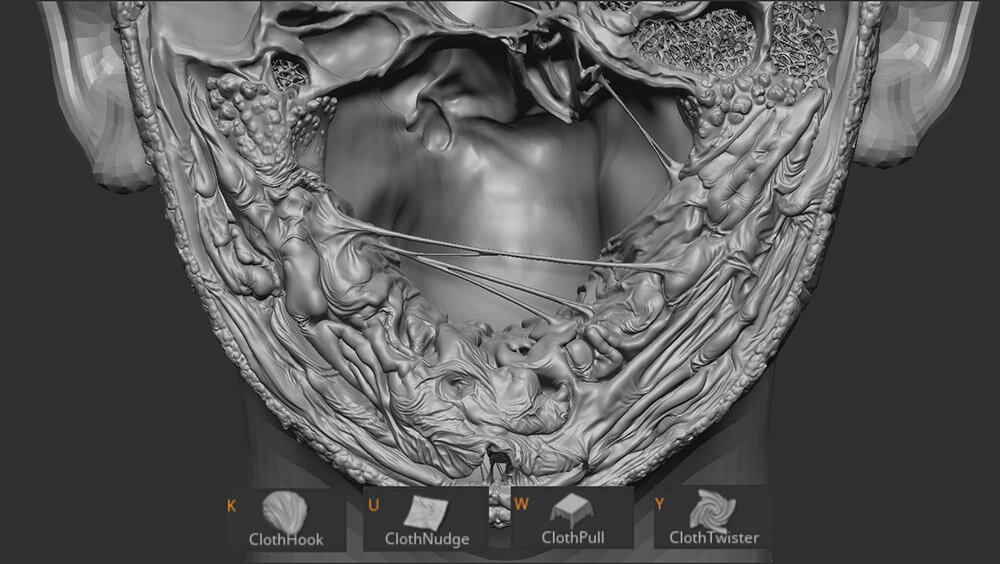
The back of the face peeled off
The interior of the head, which appears when the face is flipped off, was designed to be organ-like, as if it had been seen somewhere before, while being careful not to make it too grotesque.
 |
 |
|
Worked in ZBrush, using a combination of four different Cloth brushes for modeling. |
This is a shot of the full-length film. Although it is only a split-second shot, it is richly crafted with detailed modeling as well as a shiny feel. |
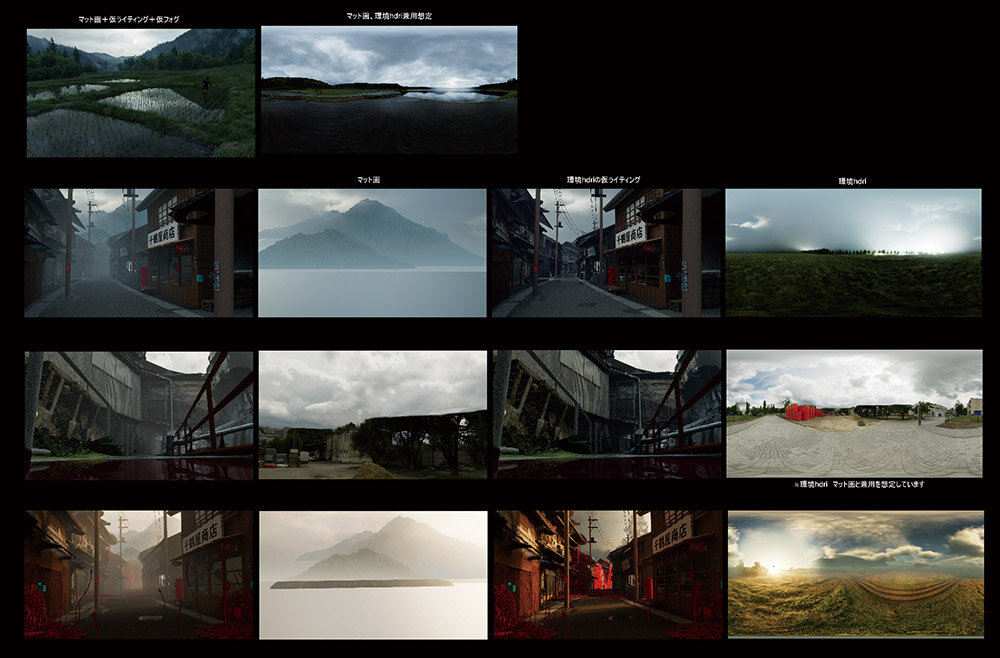
Creation of background assets that emphasize the atmosphere of the times
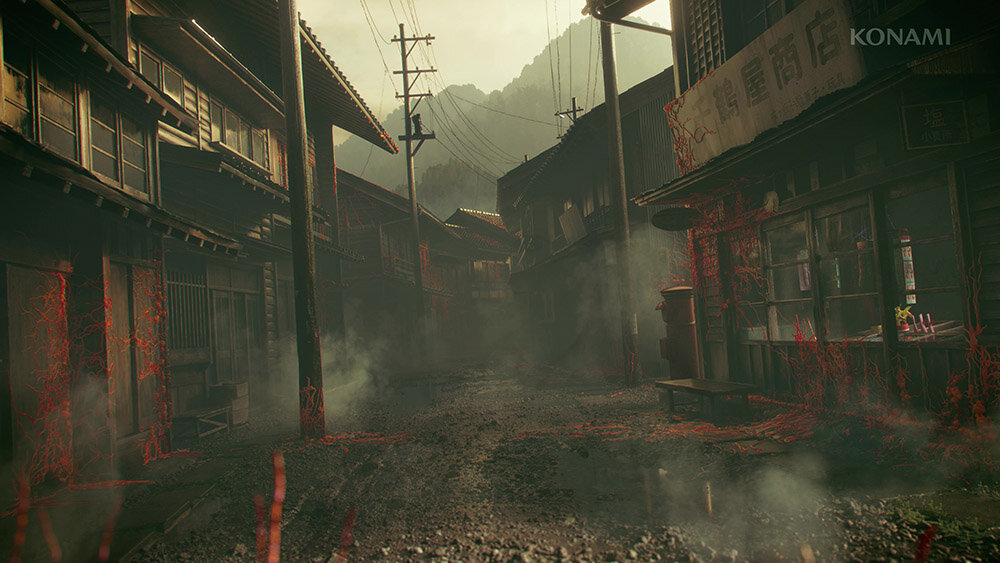
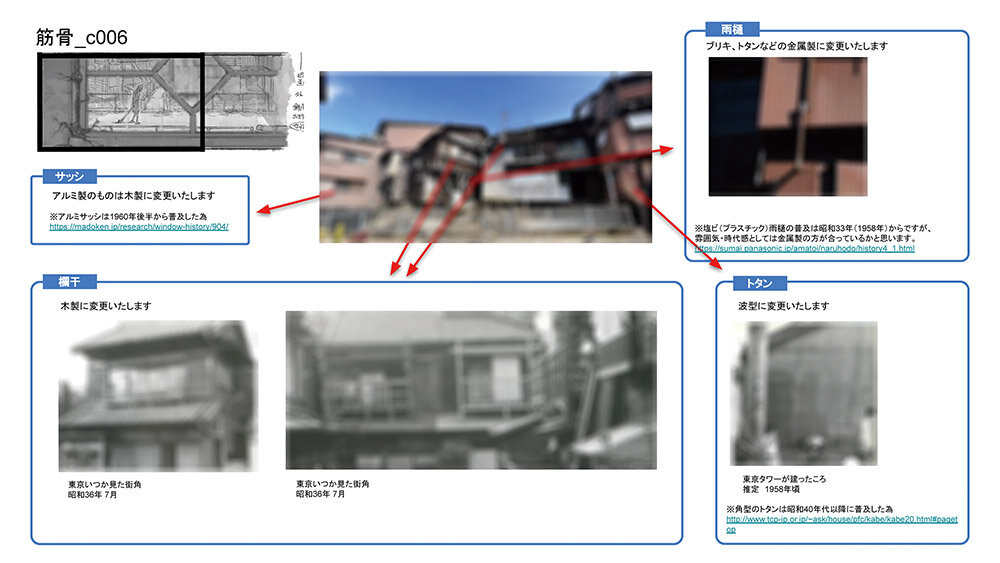
Japan in the 1960s depicted with careful historical research
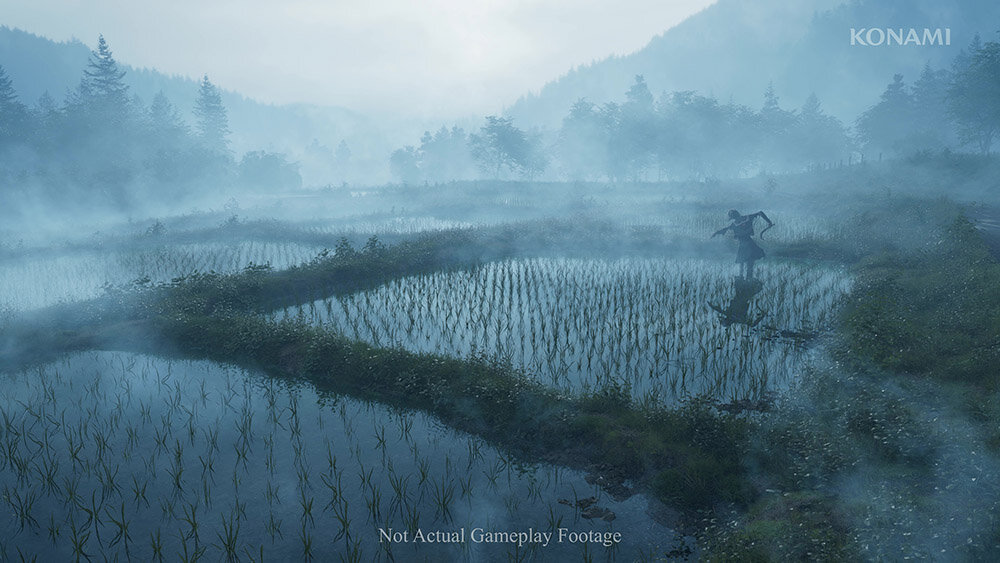
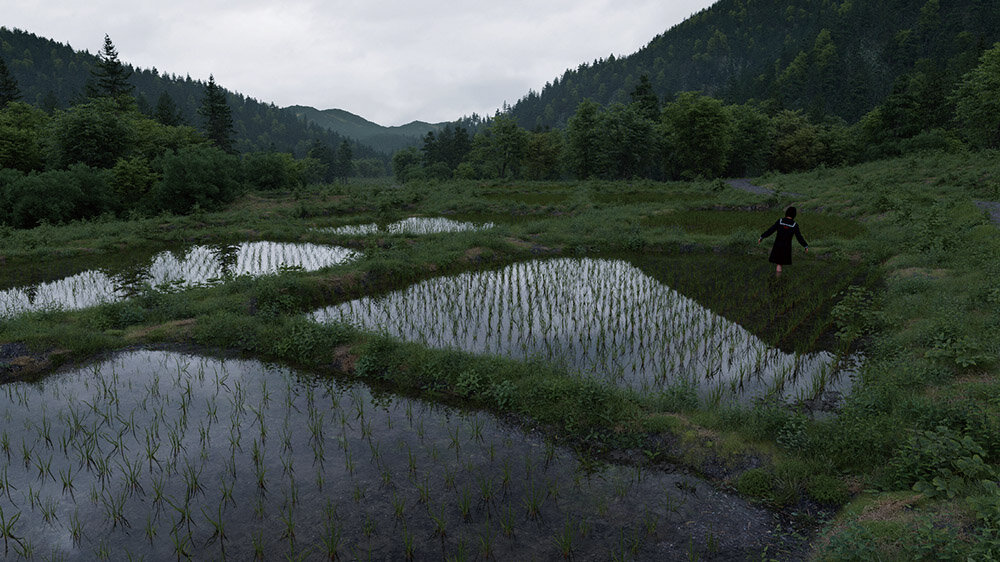
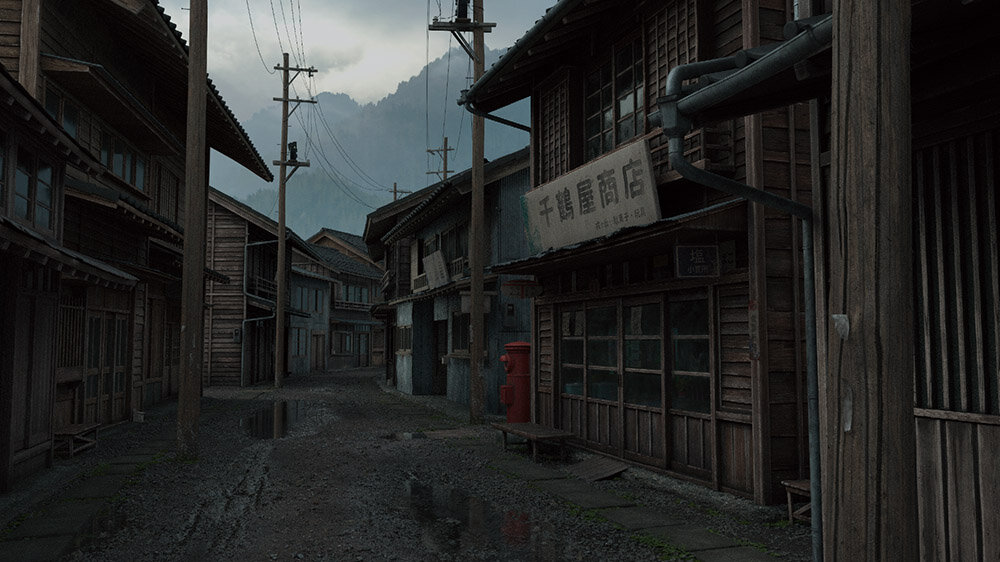
The setting of this trailer is good old Japan, around June in the 1960s, during rice planting season. Careful historical research was conducted to create a realistic and immersive background design.
Mr. Komori said, “Mr. Ogura took the initiative to visit libraries throughout Tokyo and collect many photographs from that period that matched the setting. We used more than 35 books as references, and from these we worked out in great detail the type of tin, the design of pipes and torii gates, and even the design of window frames and furniture edges,” said Komori.
The team also filmed on location photogrammetric reference photography in an area with old cityscapes. Photogrammetric data was basically used to cut and paste models to verify the scale and accuracy of reality. Some of the scanned data was used as base material for the props,” said Mr. Moritaro Tanaka, lighting supervisor for the film, who was also in charge of background production.
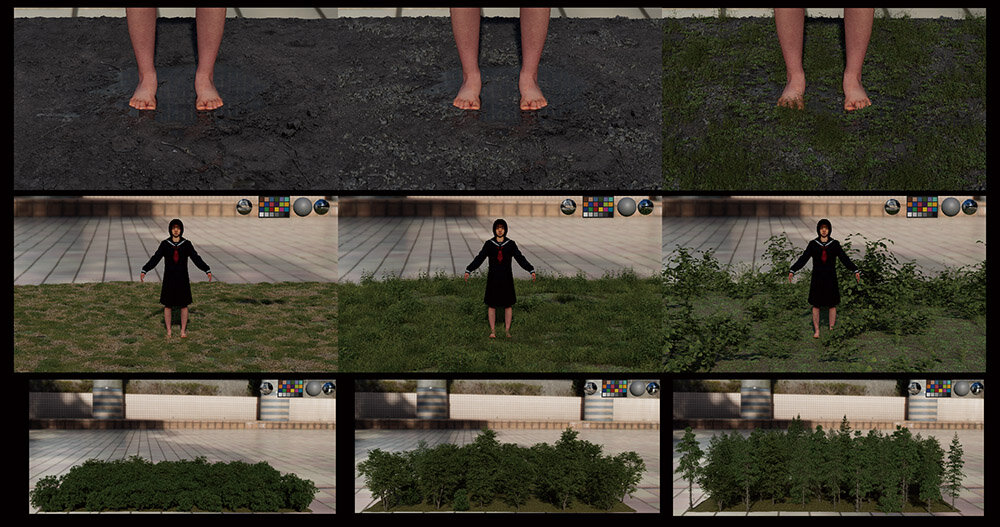
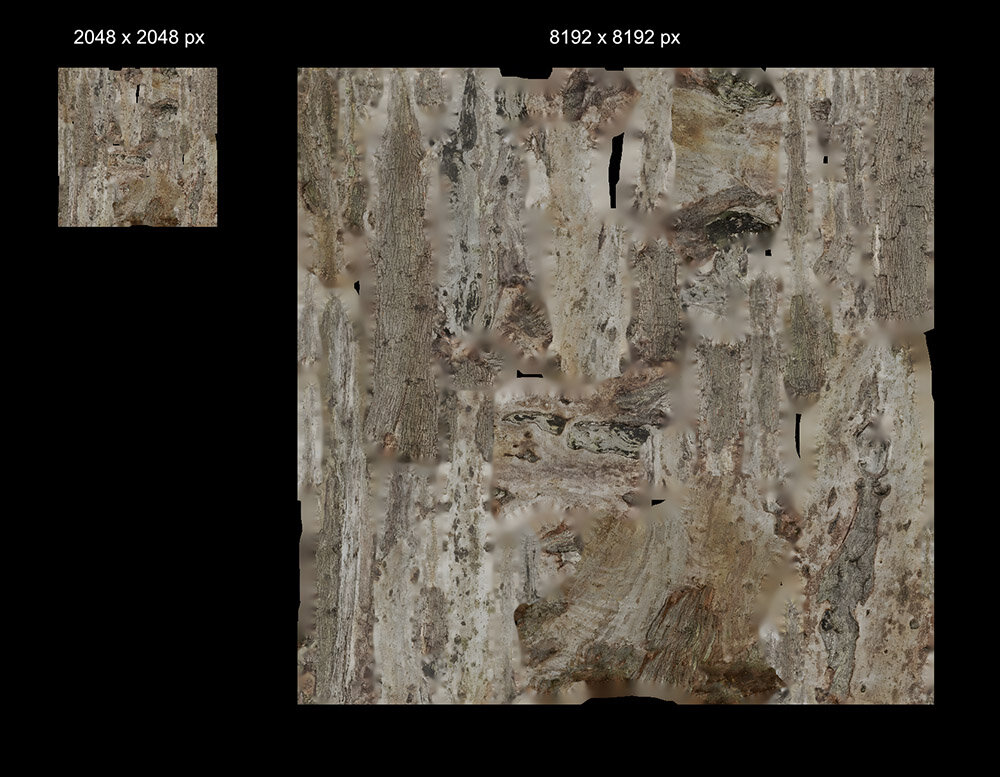
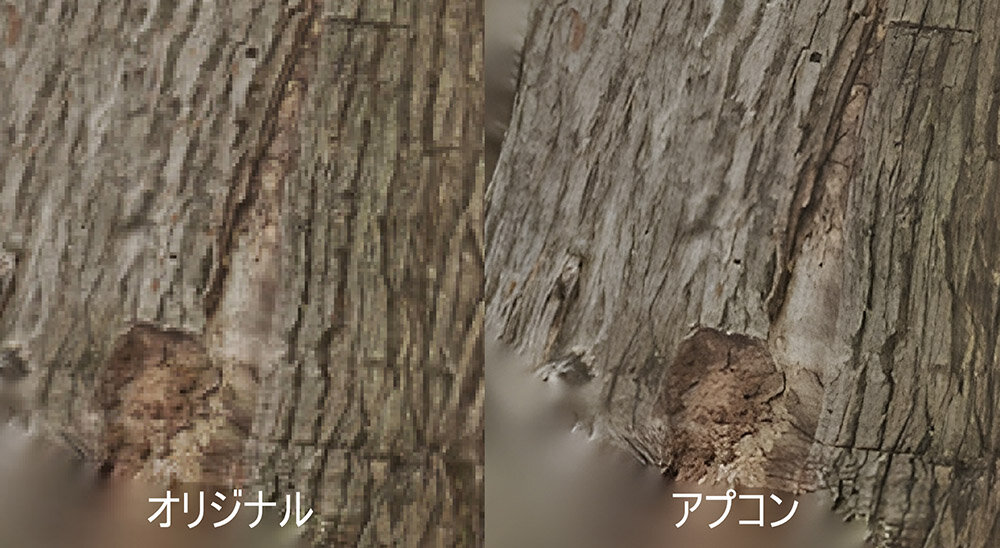
Because of the 4K rendering of this work, photogrammetric textures do not provide enough resolution. Therefore, AI's upconversion tool, Cupscale, was utilized for some of the textures. When I used it, I got the impression that it was not very good at upconverting man-made objects, but it did a fairly natural job of increasing the resolution of natural objects such as plants and stones,” Tanaka said.
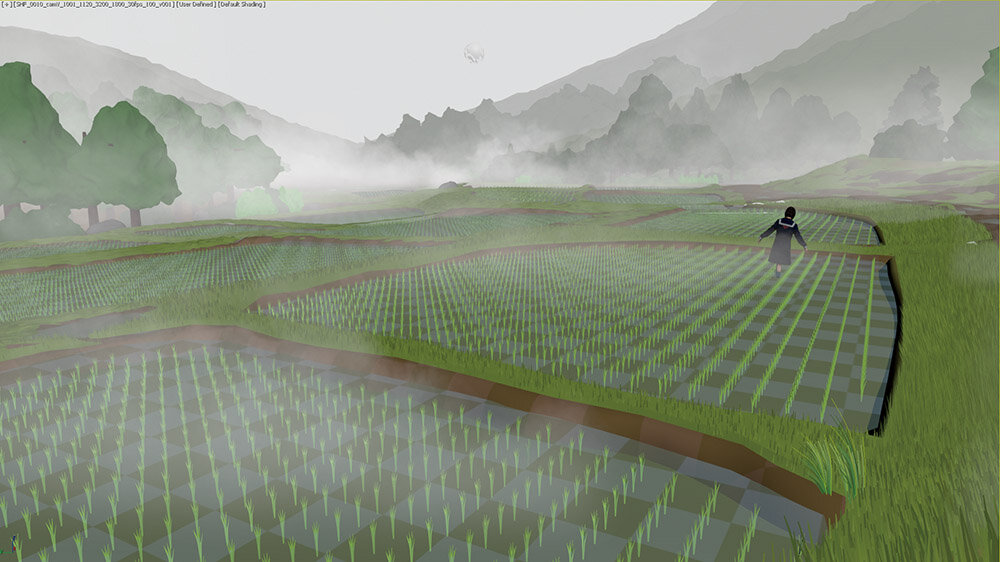
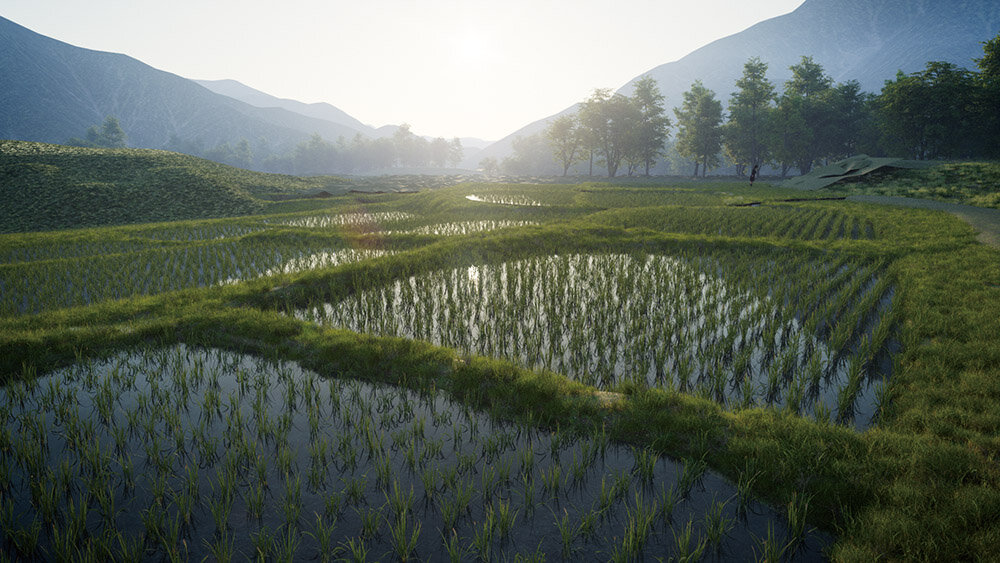
The rice paddies were cut using the Forest Pack plug-in for scattering (placement of large numbers of objects), but it took a lot of trial and error to create a scene that was uniquely Japanese.
What I wanted was an atmosphere that was as untouched as possible, a dense atmosphere typical of Japan in June. However, the standard presets alone made it look like a man-made garden. So, I created my own presets to create that kind of atmosphere.
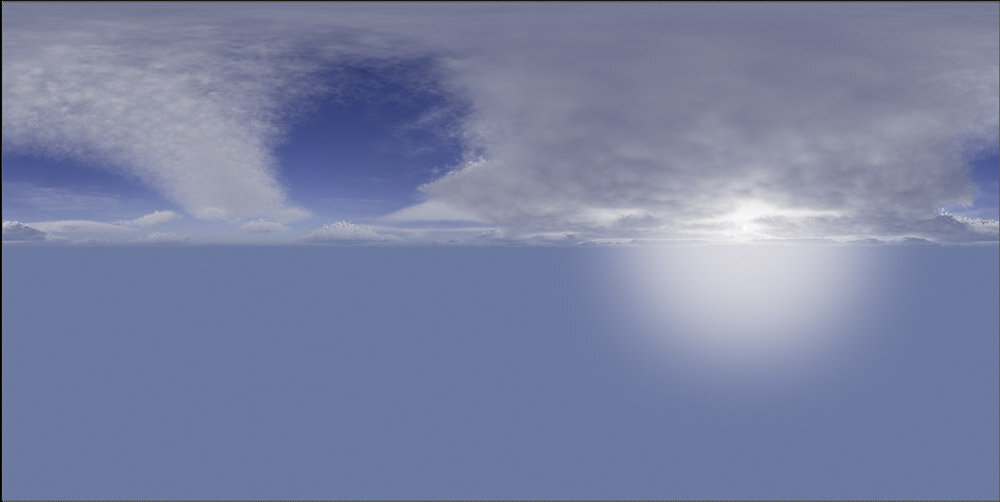
Unreal Engine 4 (hereinafter referred to as UE4) was used to generate matte images of the sky and distant mountains. For the sky, the paid asset Ultra Dynamic Sky was used. This workflow is great because it's easy to try and error. We can also use it as an HDRI and matte image with motion by creating a series of linear all-sky images,” said Komori.
On the other hand, there were some difficulties. The generated images did not look CG-like and did not have enough color. To solve this problem, we used NUKE to composite live-action sky material onto the images output by UE4 + UltraDynamic Sky. This succeeded in improving the quality of the images.
Careful examination of the 1960s from a large amount of data
Careful archival research was conducted to make the 1960s setting compelling. A large amount of material was collected for each cut, along with storyboards.
 |
 |
|
An examination of the rural landscape. Collected references such as weed density and road texture. |
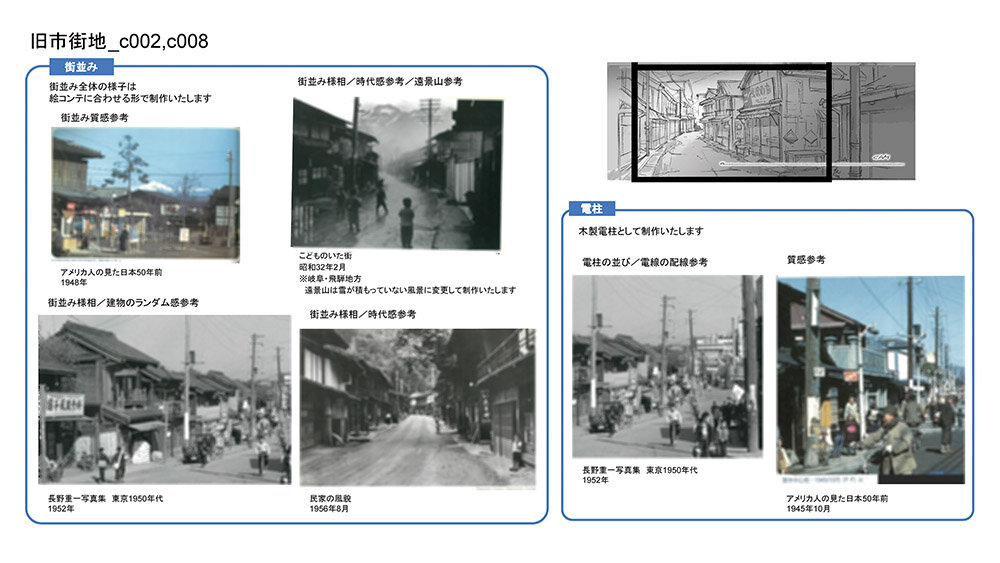
Old Town Archeology. Analyzing streetscapes, textures, utility pole textures and wiring, etc. |
 |
 |
|
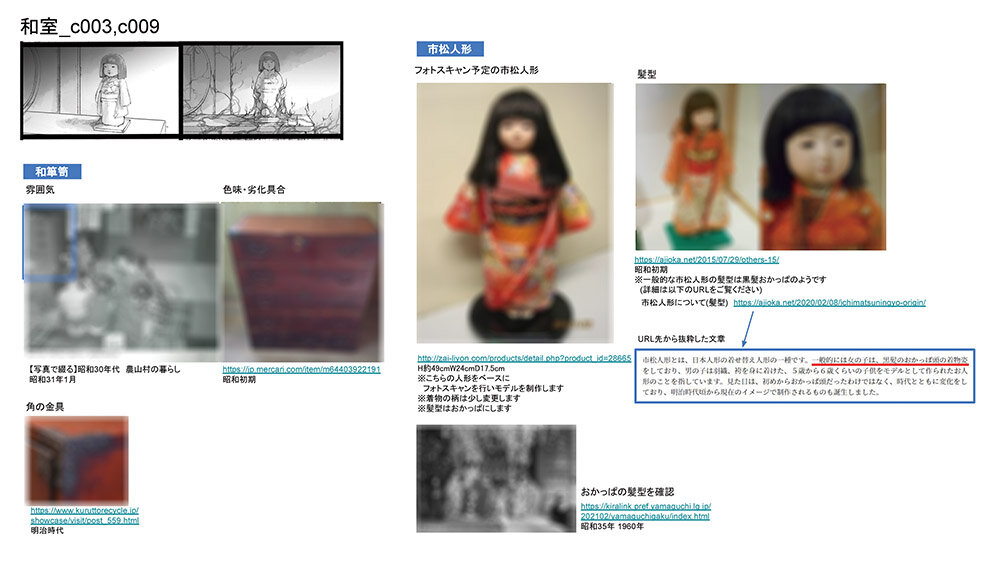
Japanese-style room consideration. The deterioration of chests and metal fittings. For the Ichimatsu Dolls, even the fashionable hairstyles of each period were examined in great detail. |
Based on the cityscape shot on location, we carefully researched and created the scenery of the period, including the booklets, tin sheets, and rain gutters. |
Representation of rice fields using Forest Pack
The Forest Pack is customized and used to recreate the dense Japanese countryside in June.
 |
 |
|
Layout model created based on storyboards. This served as a guideline for composition and picture creation. |
An early test render image generated using the Forest Pack preset. It is said to have ended up looking like a pruned garden. |
 |
 |
|
Customize presets to match the atmosphere of Japanese vegetation. |
Result of applying the customized preset. Compared to the pre-applied preset, the result is a very Japanese-like image. |
 |
Composite result. |
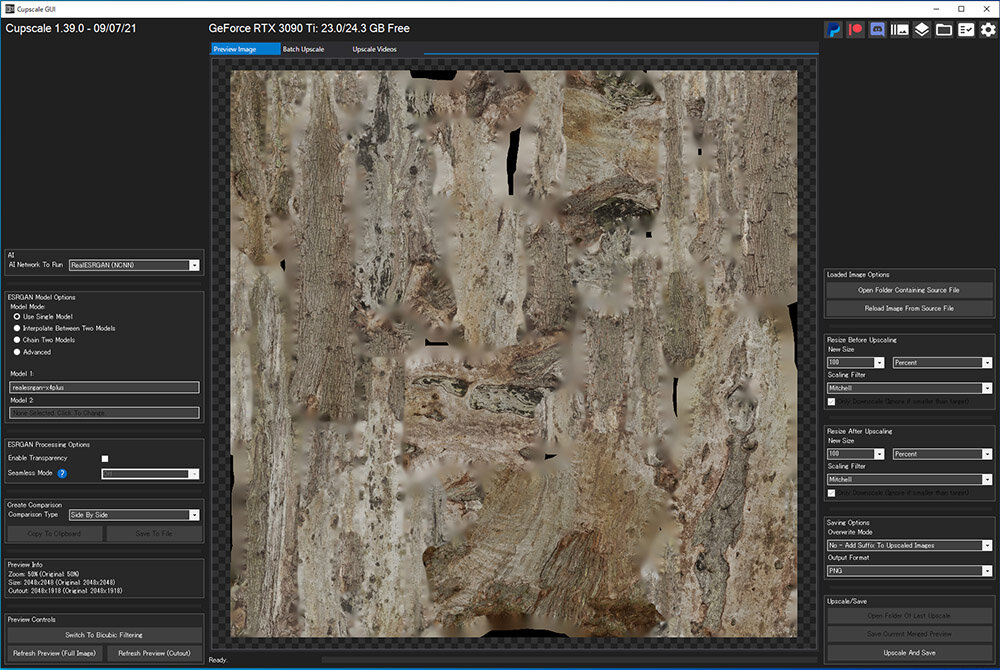 |
Photogrammetric textures were made higher resolution using the upconversion tool Cupscale. |
 |
 |
|
Going from 2K to 8K gave a sense of detail that is not uncomfortable even when approaching. |
Comparison with the original. Among them, natural objects were able to be upconverted with fairly high accuracy. |
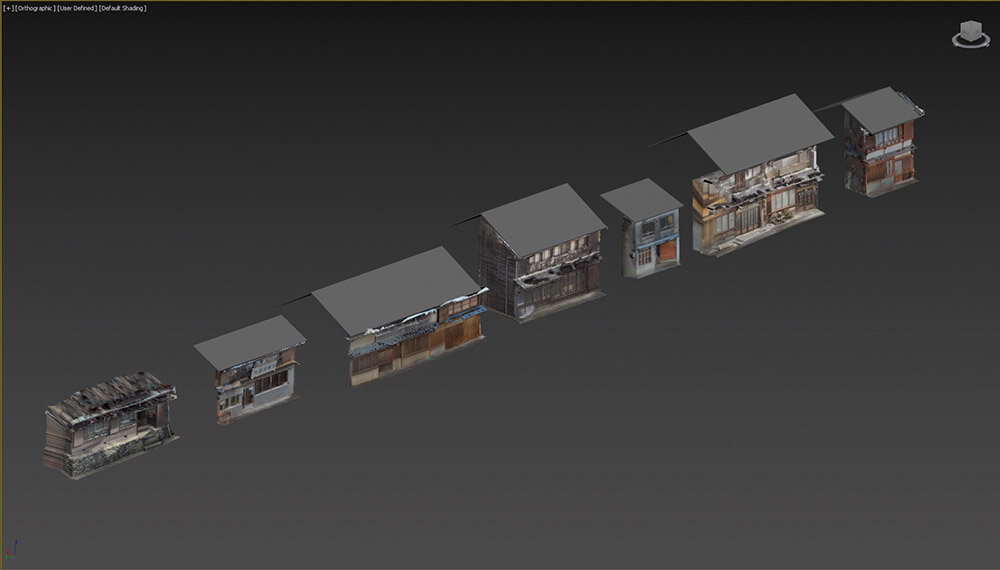
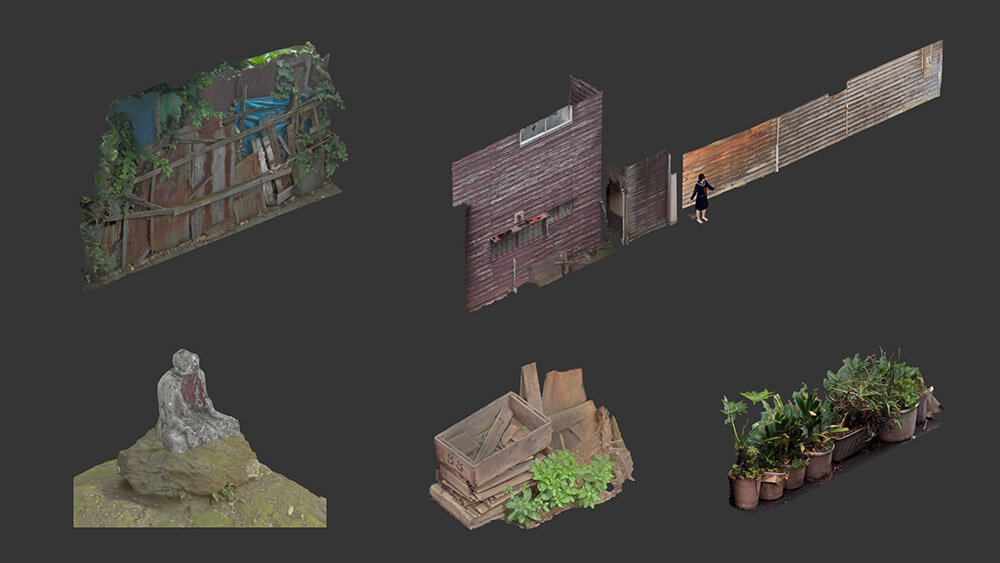
Background model with photogrammetric reference
The old streetscape is photogrammetrically created and cut and pasted to create a three-dimensional reference.
 |
 |
|
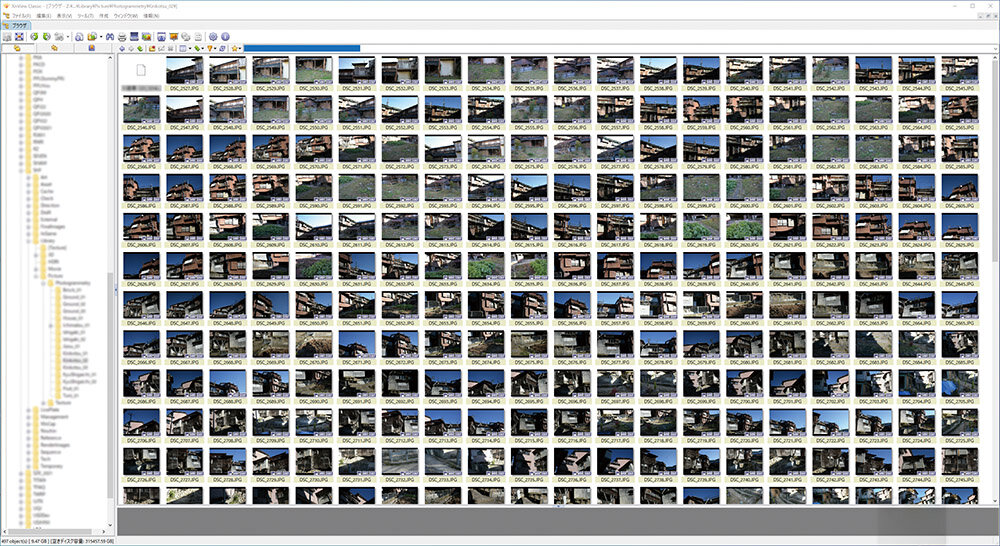
Photography data. Multiple staff members divided the shooting by compartment. |
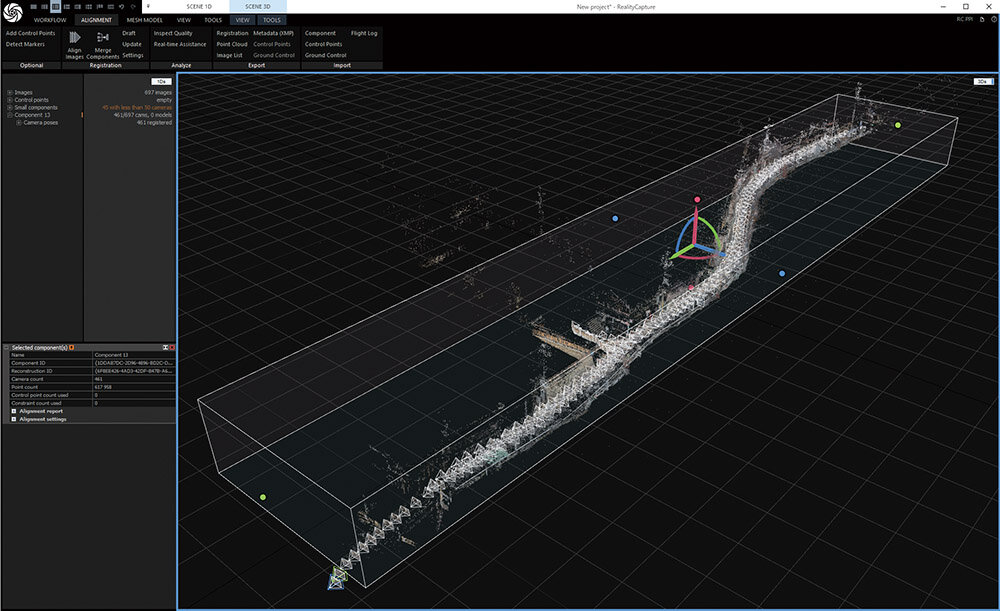
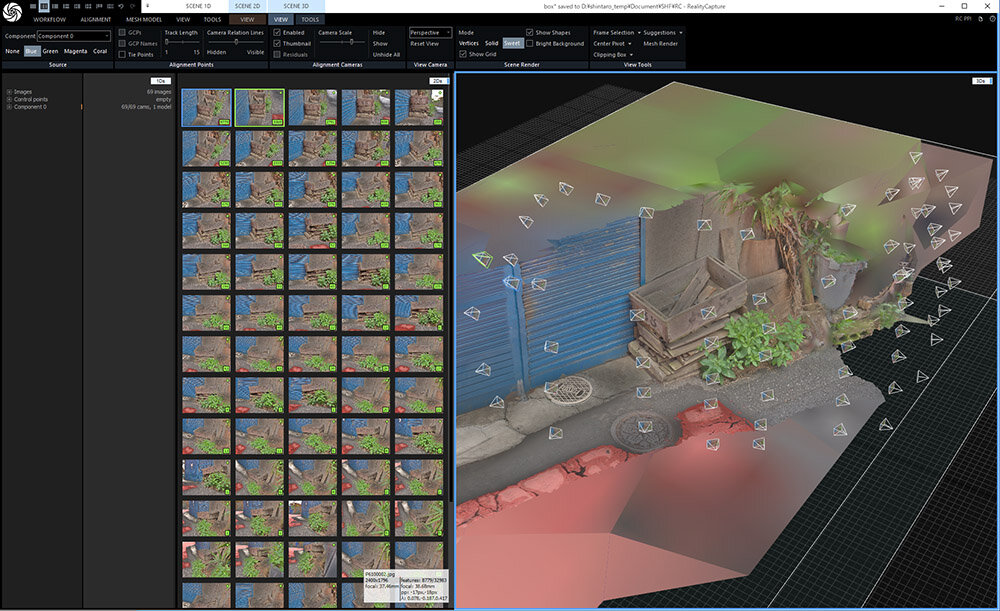
A view of alignment by RealityCapture. You can see the curvature of the road. |
 |
 |
|
Model in small blocks. |
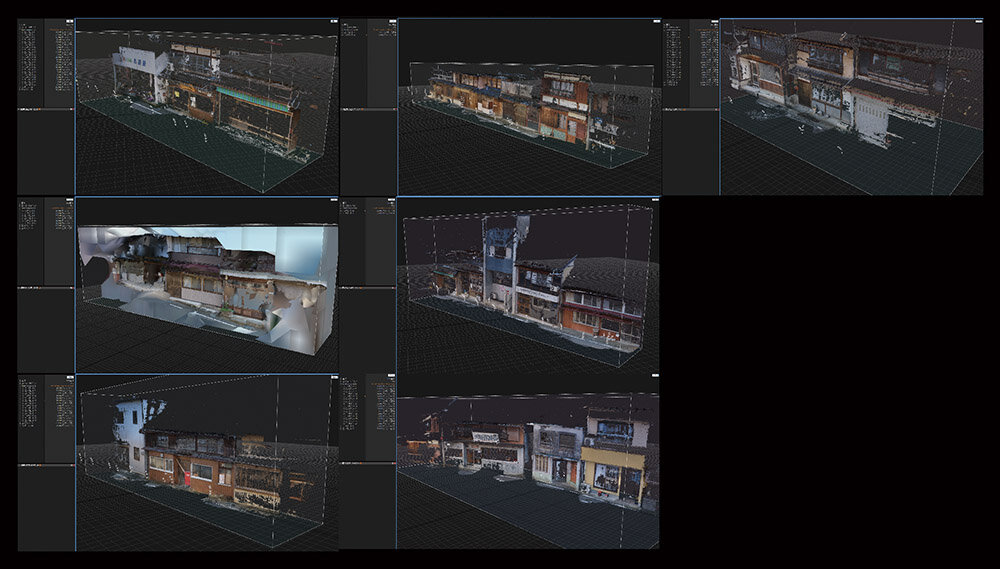
Modeling by RealityCapture. The clapboarding on the wall is also shaped. |
 |
 |
|
The building has been selected and laid out. |
Model list. |
 |
 |
|
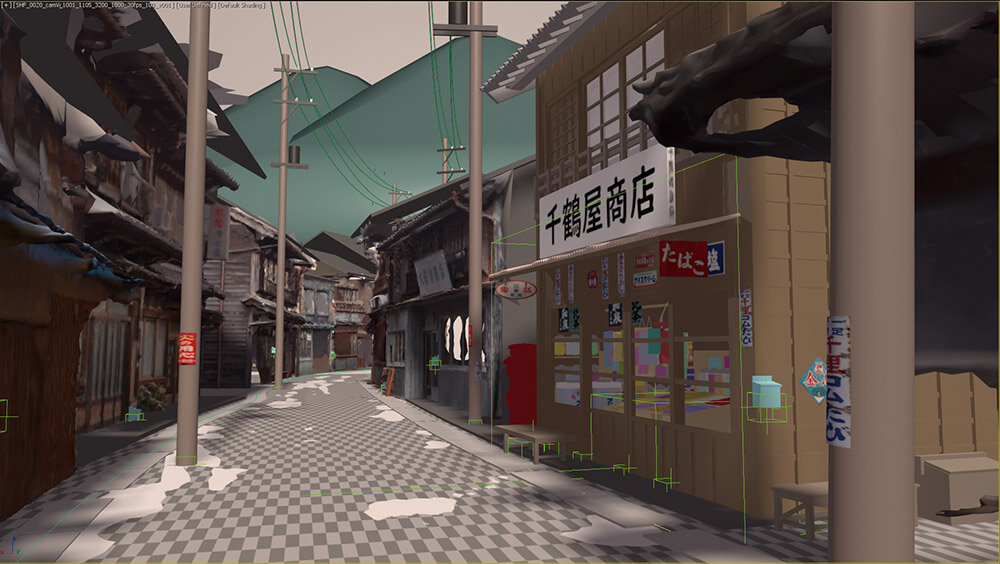
Temporary model of the game is diverted and placed. |
The photogrammetric model has been replaced by a photogrammetric model. |
 |
 |
|
Modeling was done based on photogrammetry, and temporary lighting was done. |
The shot was completed with the addition of fog. The attention to detail raises the persuasiveness of the picture. |
Prop production by photogrammetry
For the props, the photogrammetric model was used directly for scene production.
 |
 |
|
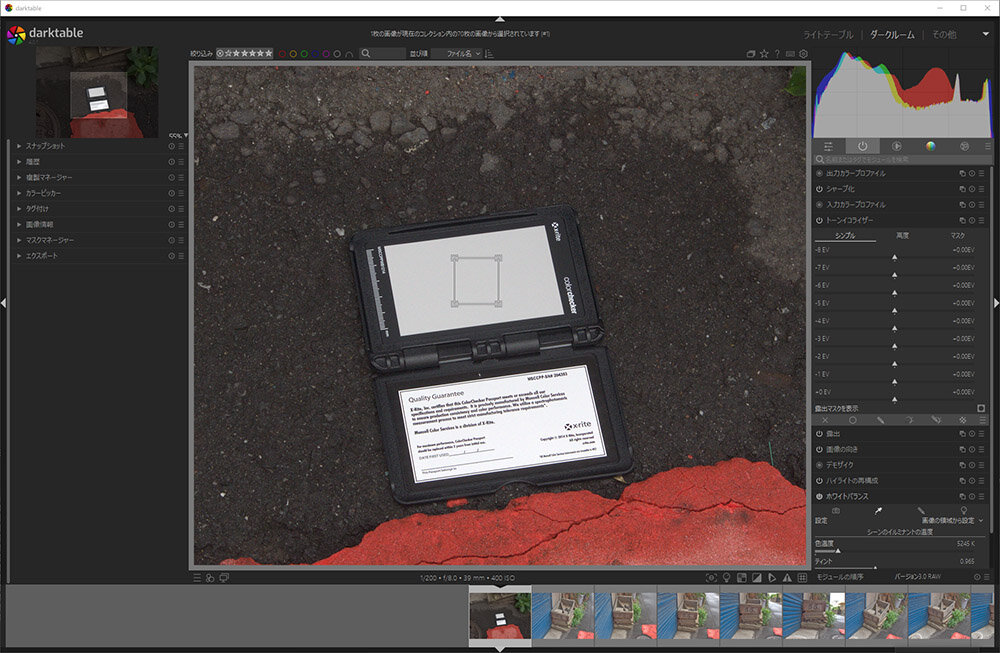
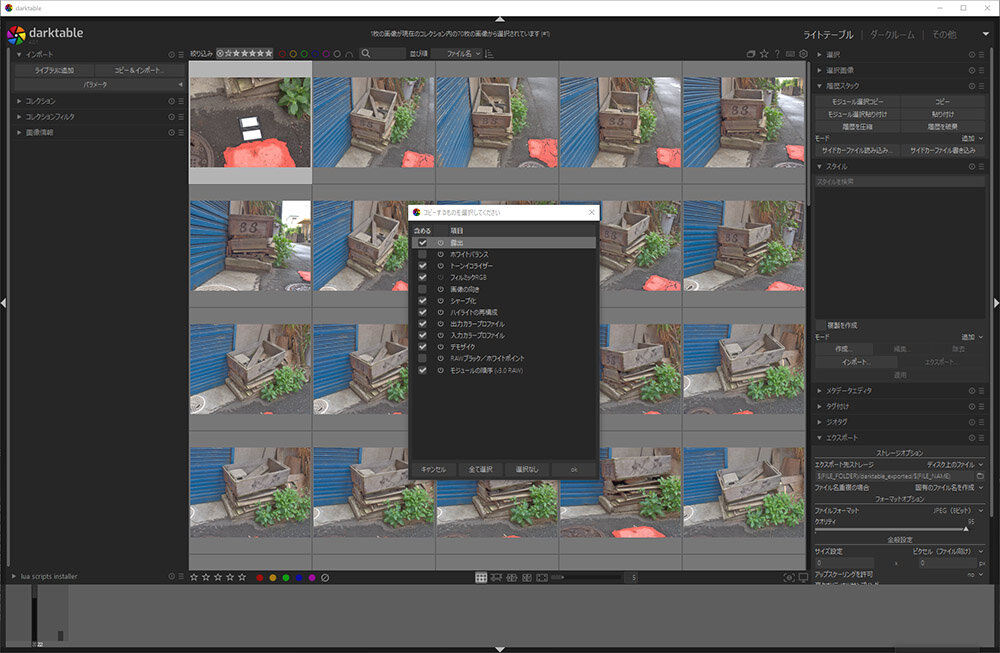
Darktable was used to develop the image. The white balance is set in the chart and the image is developed to jpg. |
Various processes (modules) such as white balance, highlight restoration, disabling tone mapping, shadow removal, etc. are applied at once during development. |
 |
 |
|
Photogrammetry by RealityCapture. Small objects are easy to photograph from all directions, so their shapes tend to come out beautifully. |
Various prop models loaded into 3ds Max. |
Sky and distant mountains created with UE4
The sky and distant mountains are represented by matte paintings utilizing UE4.
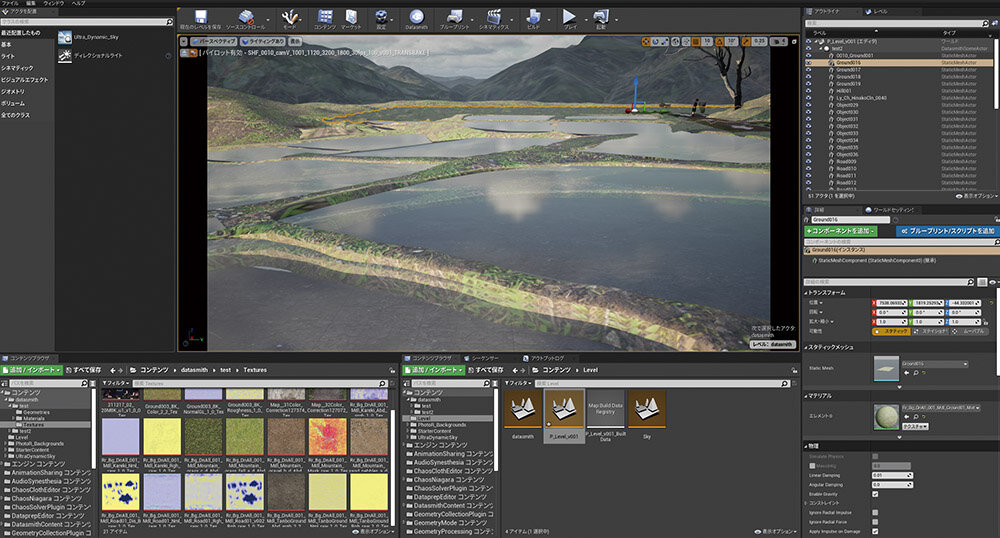 |
Import models created in 3ds Max into UE4 via Datasmith. |
 |
 |
|
Cloud expressions using UE4's paid asset Ultra Dynamic Sky. The ease of trial-and-error with real-time rendering is a major advantage. |
HDRI Material. |
 |
Composite result. The area seen by the camera is based on the UE4 matte painting. |
 |
Some of the scenes utilizing these matte paintings, UE4 was excellent for fog expression. |
Effects expression utilizing Houdini and volume
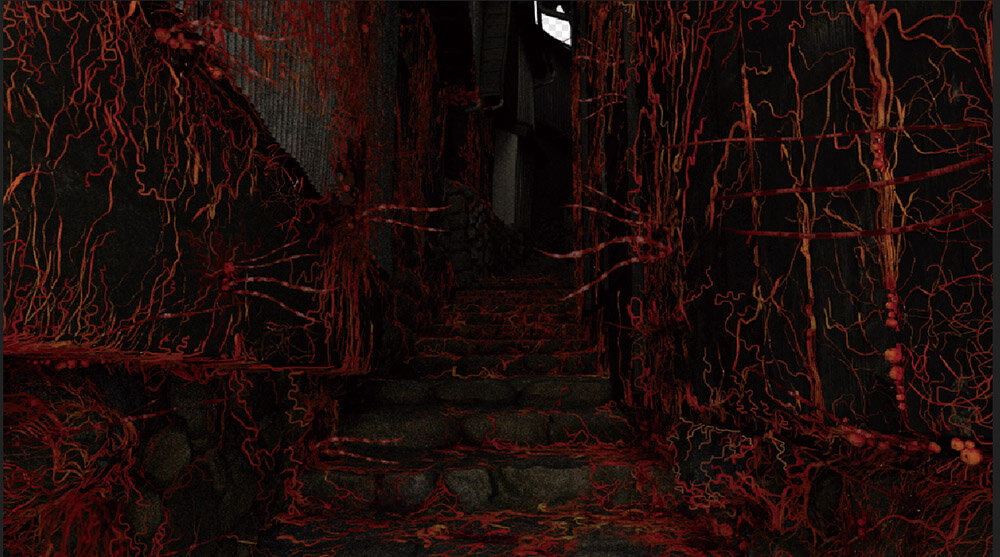
A procedurally realistic depiction of horror and beauty.
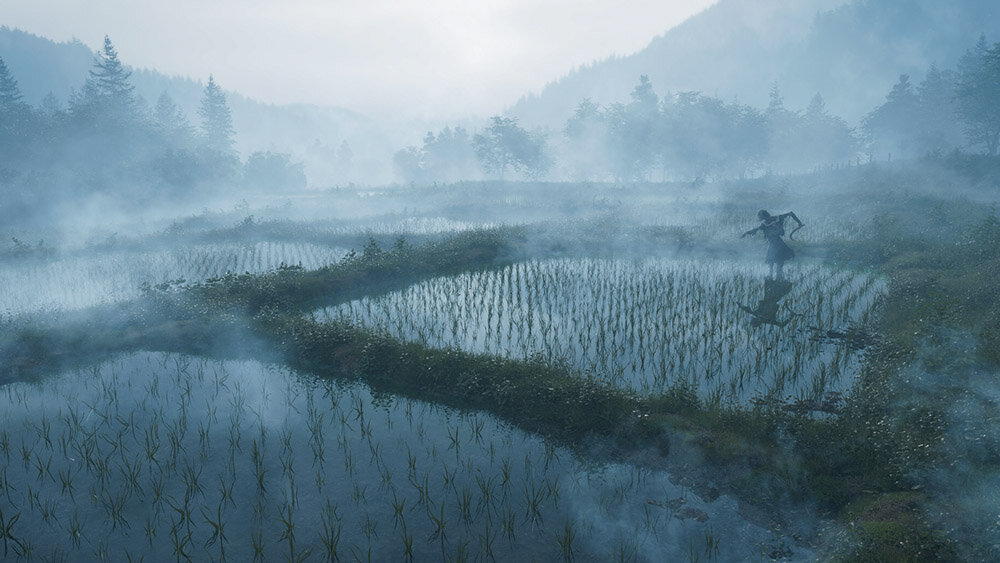
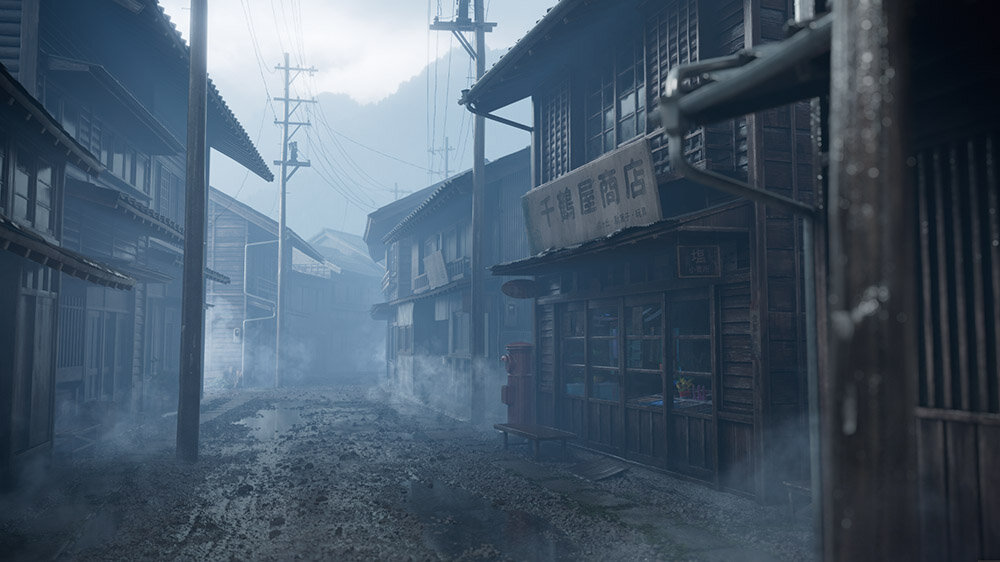
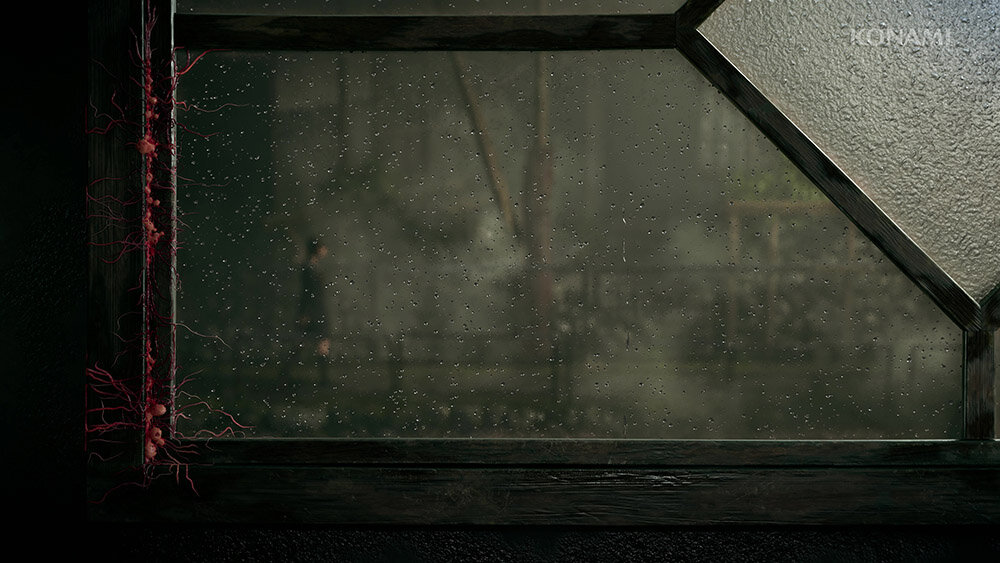
Fog is an important element in the “SILENT HILL” series. Fog in full CG works is usually expressed by compositing using a depth pass, but in this trailer, the fog is expressed in a straightforward manner using volume.
We tried a depth pass, but the colors looked dull and smoky, and the fog was not reflected in the reflections. So, we decided to use volume fog, although it is more heavily rendered,” said Lighting Supervisor, Mr. Moritaro Tanaka.

As a result, the lighting was beautifully visible even in scenes with dense fog, and the deeper you go, the more the highlights disappear and the more blurred the outlines become, resulting in a very realistic rendering. However, because MultiMatteElement and other elements are also affected by fog in V-Ray's Environment Fog, it was necessary to render twice, once for the fog and once for the various elements.
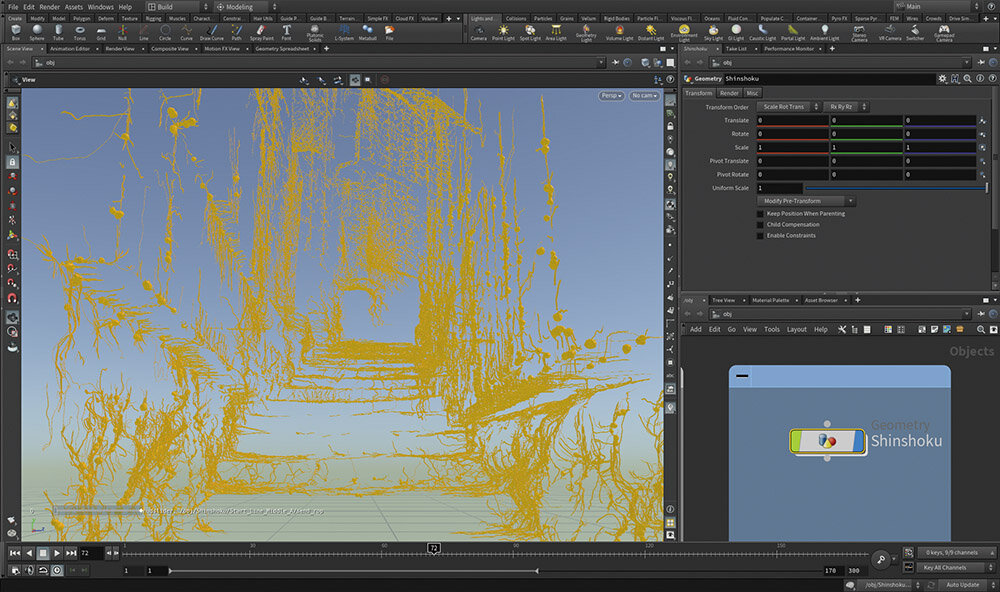
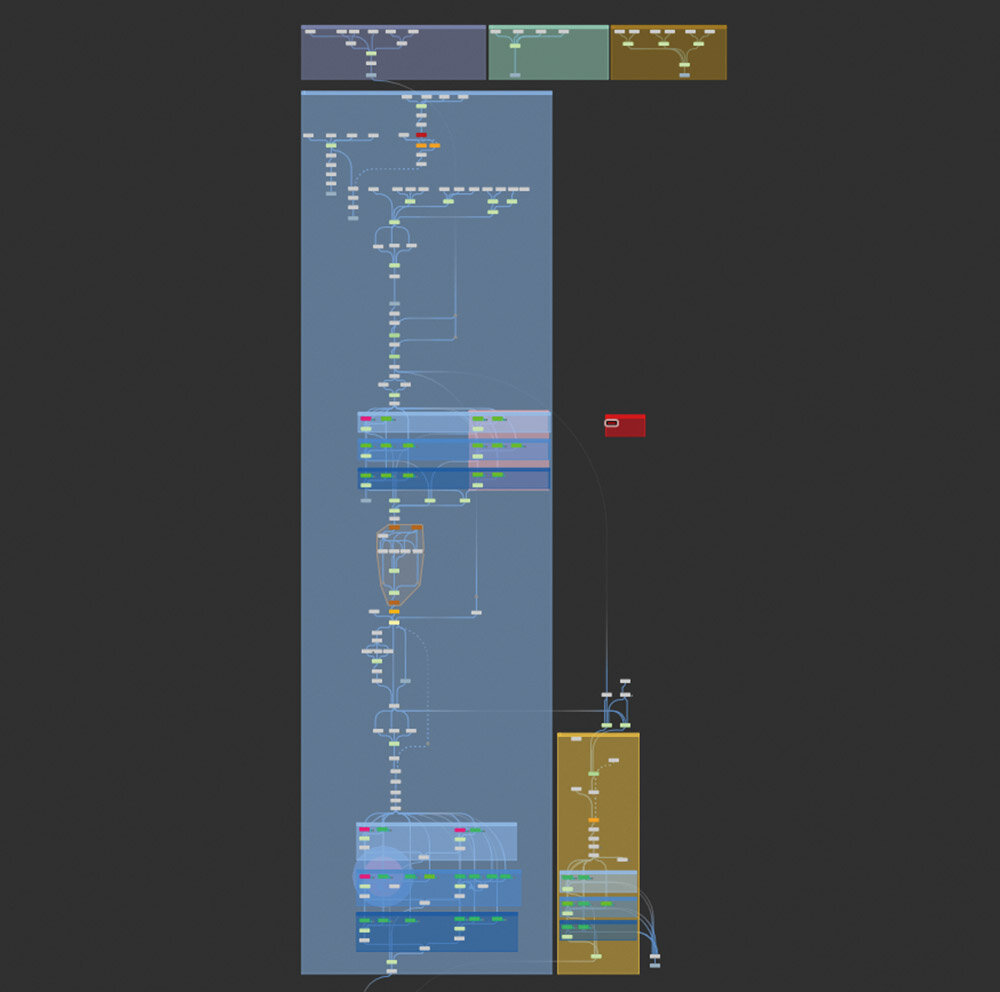
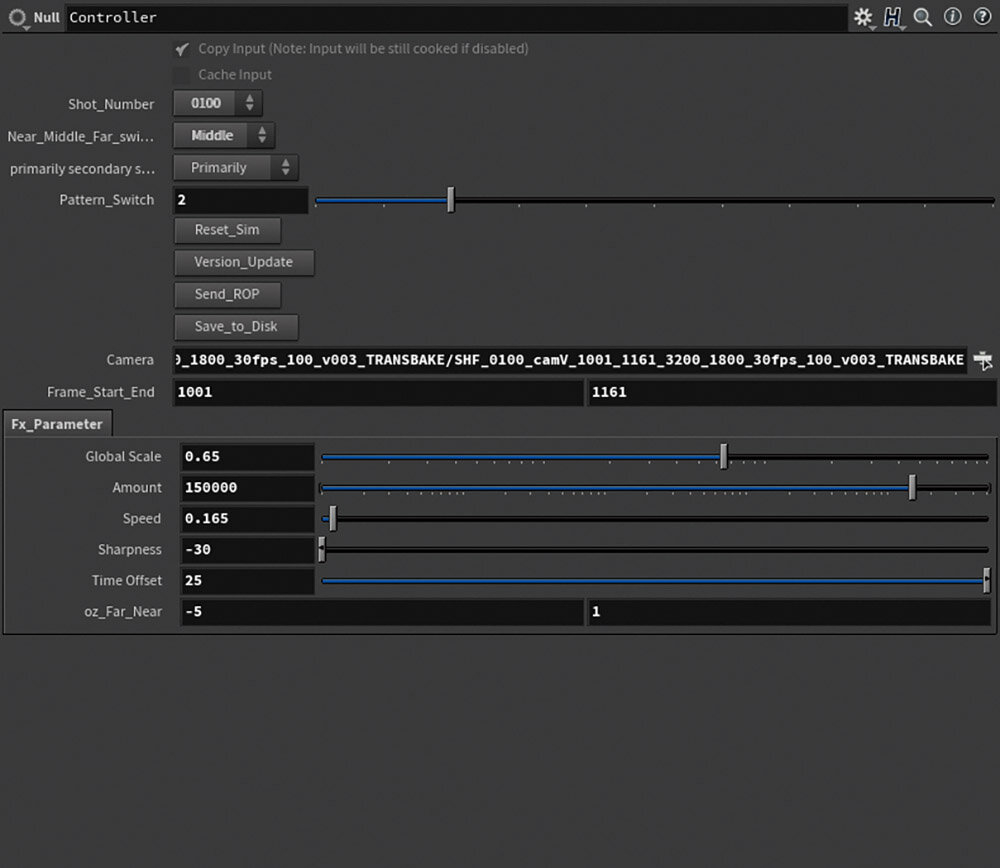
The erosion effects, which were inspired by slime mold, were created in Houdini. Effects artist Tak Fujimoto said, “We needed to generate a large number of erosion effects to match the background model, so we adopted Houdini as a procedural approach.
This erosion system is designed so that the amount, speed, and base point of erosion can be freely controlled by properties. We control the movement of the erosion effect for each cut according to the direction of the camera so that the scene appears to be at a certain speed when viewed as a series of streams,” said Fujimoto.
Erosion effects by mysterious creatures
Erosion effects are procedurally created using Houdini.
 |
Working in Houdini |
 |
 |
|
Panoramic view of the node tree |
Controller. Detailed setting options allow you to customize each cut as you envision it. |
 |
 |
|
Retouching with Photoshop |
Converting retouched images into numerical information |
|
 |
Finished shot. The beauty and the horror coexist in a splendid expression of erosion. |
Rich fog expression
Volume fog is utilized for the “fog” that is essential to “SILENT HILL”.
 |
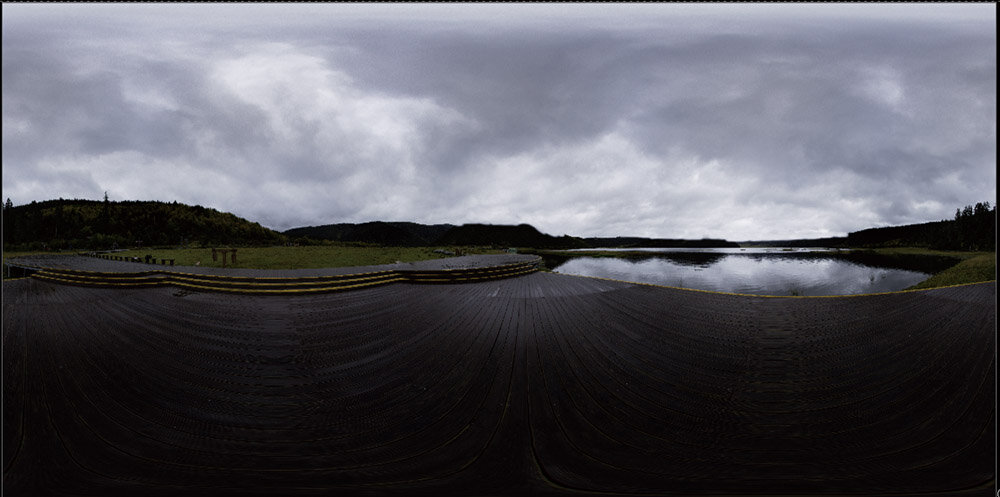
Reference image taken by Komori |
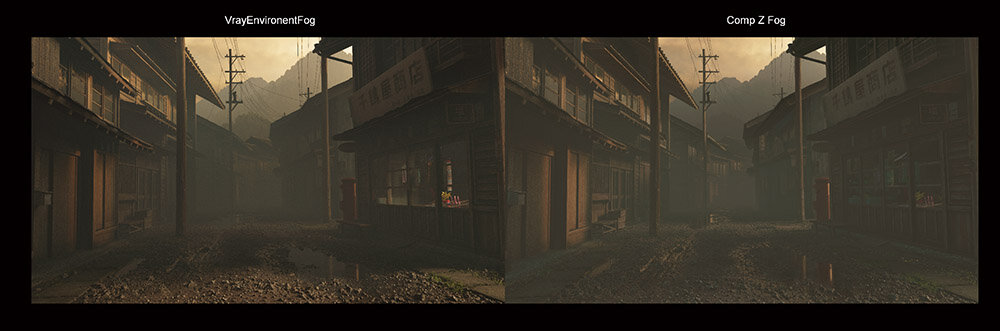 |
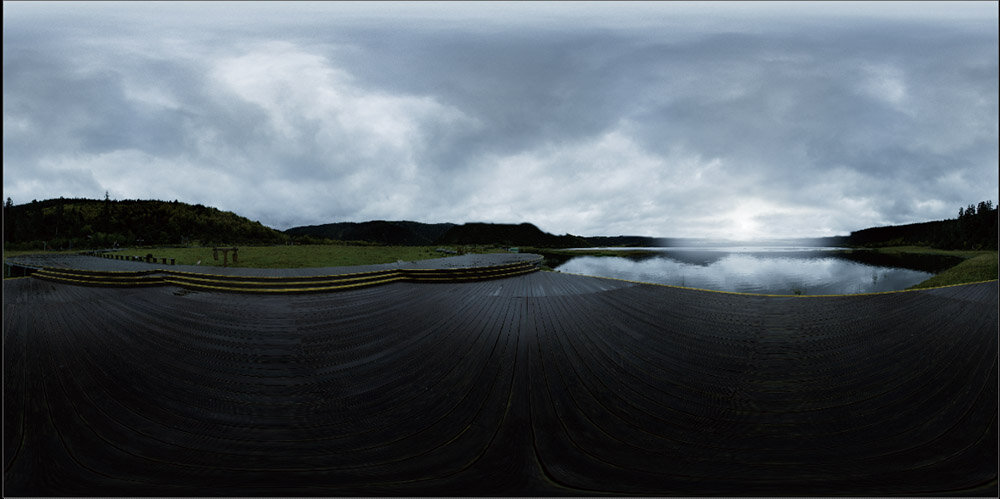
Difference between V-Ray's volume fog (left) and composite representation using depth pass (right). The highlights and reflections in the back and the light penetration are very different. |
 |
 |
|
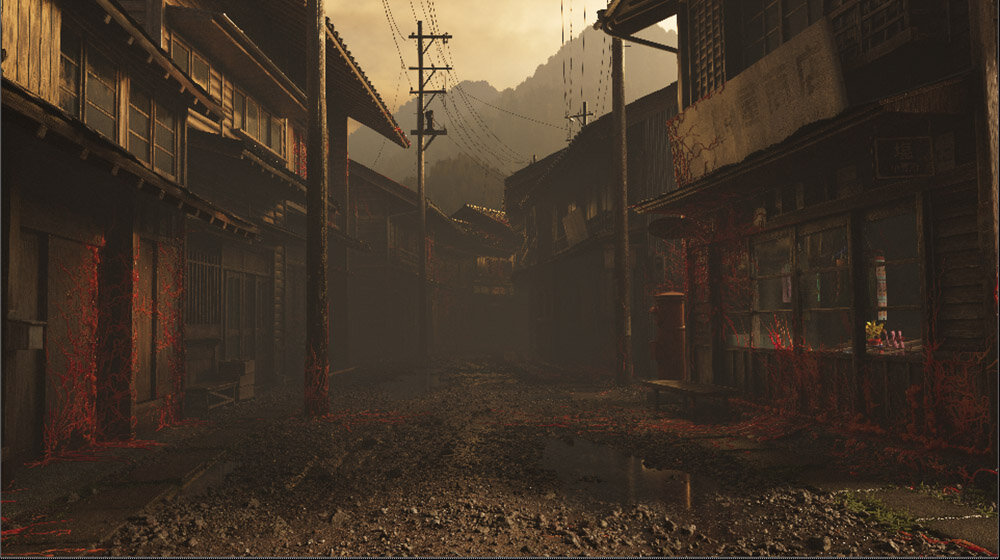
Composite Breakdown. Beauty Path |
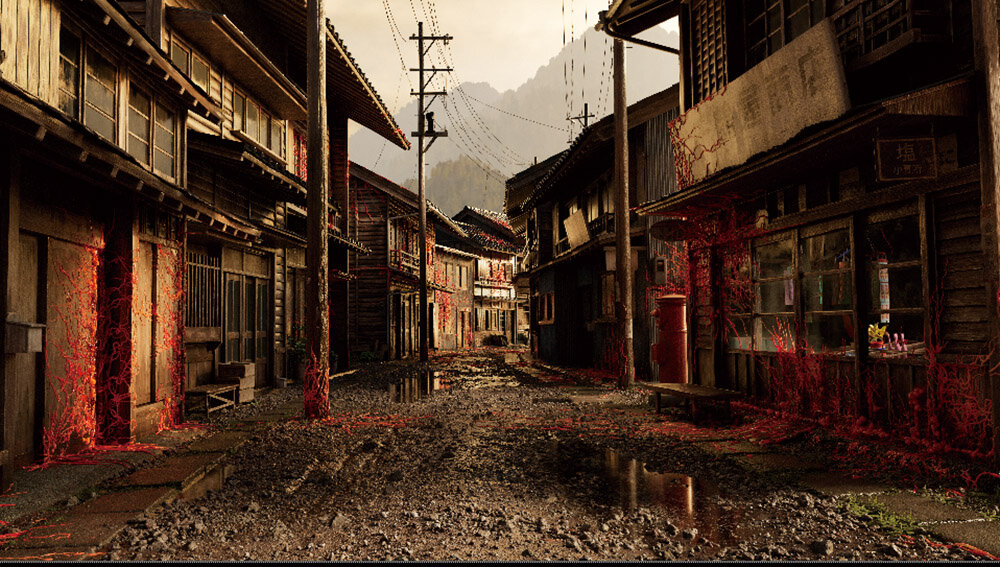
Image rendered with fog turned off to bring out each element |
 |
 |
|
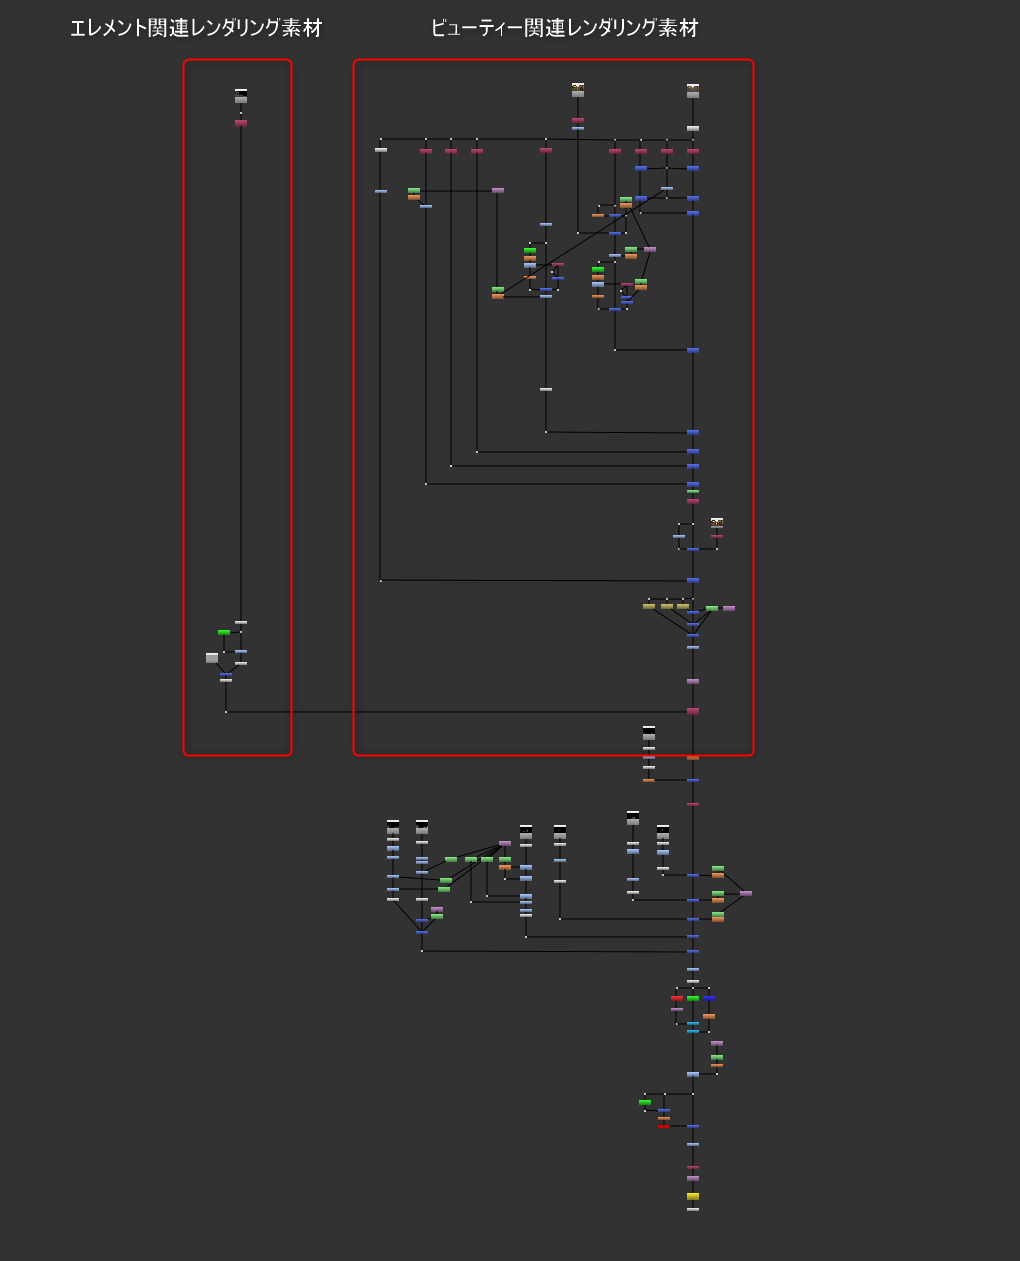
NUKE composite tree. Element-related materials on the upper left side, beauty-related materials on the upper center. |
Finished shot. Beautiful lighting and rich fog coexist. |
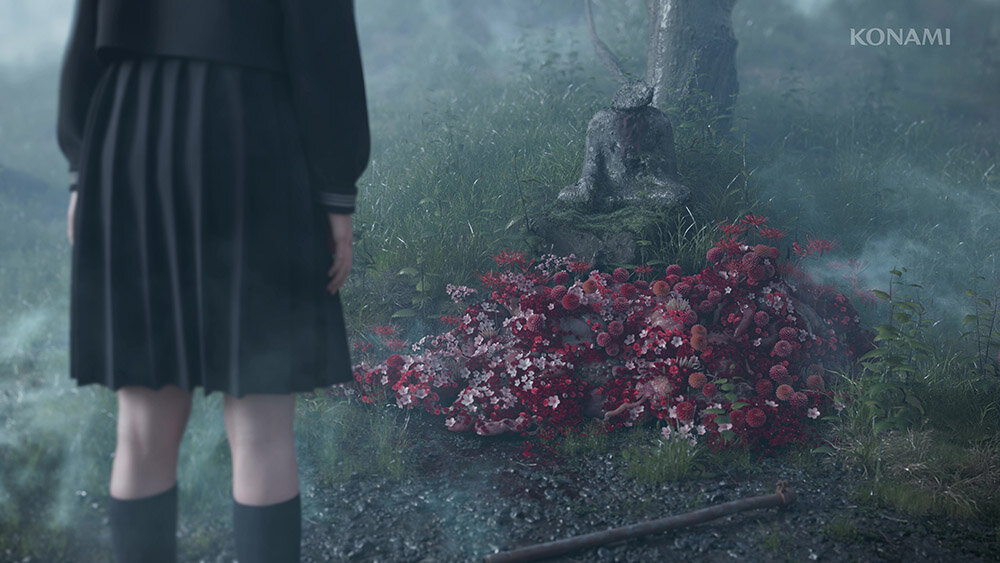
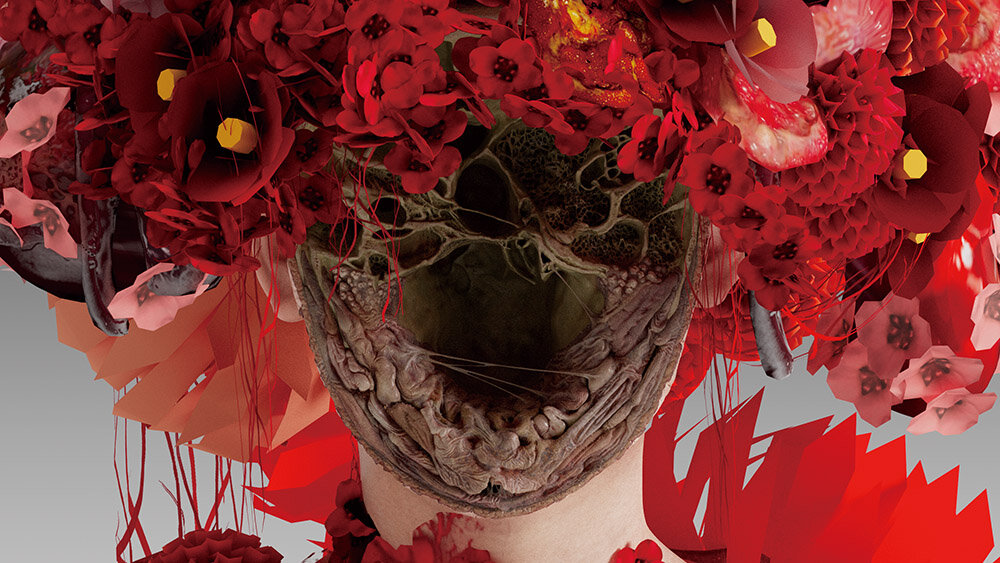
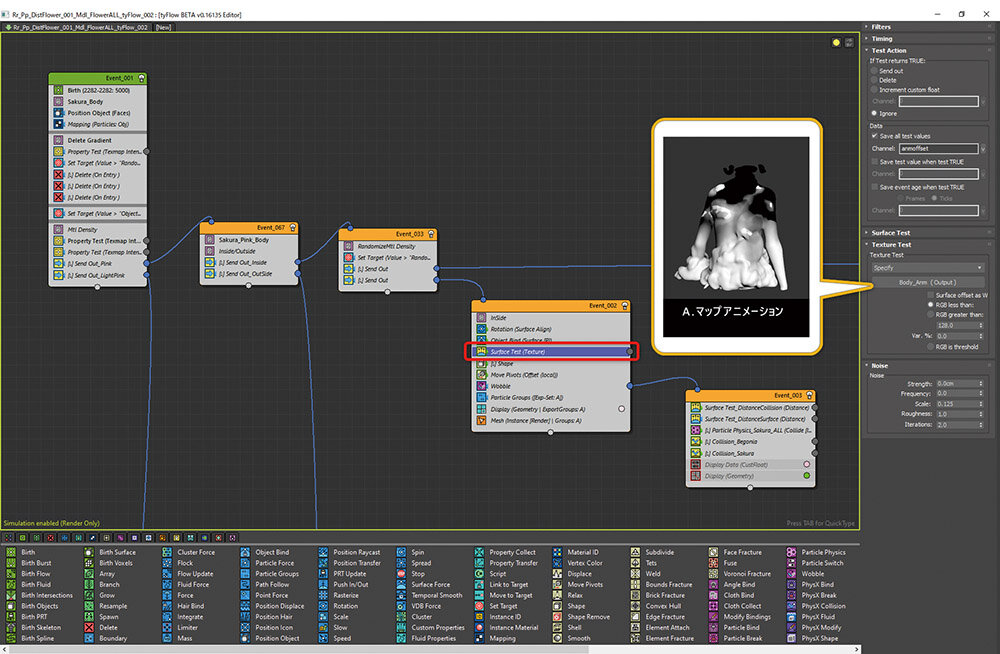
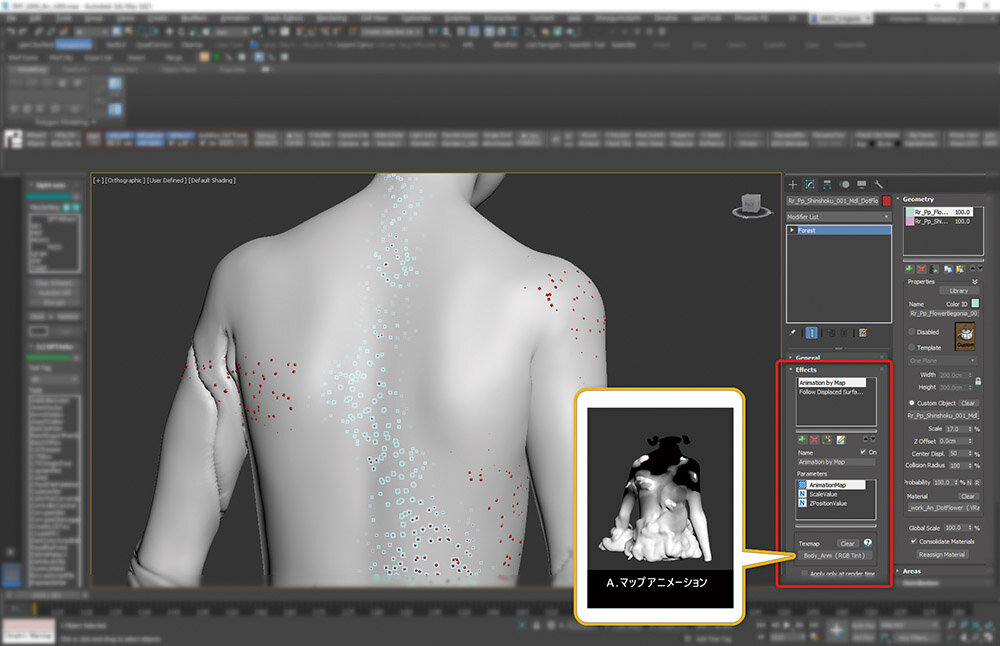
Flowers bloom one after another from the body
The expression of flowers blooming one after another through holes in the skin, which has a strong impact, was created by tyFlow.
The workflow is to apply the values of the prepared map animation (left) to both specifying when the flower blooms (center) and changing the texture of the bruise (right). |
 |
 |
|
Flowering is controlled by tyFlow, and the figure shows the mainstream node. Map animation is built into the node. |
Expression is incorporated into the Effects function of the Forest Pack to synchronize the appearance of skin pits with the timing of blooming of the tyFlow. |
©Konami Digital Entertainment