09. Riverside Motel
- Enter the Reception, take the Room 306 Key from the key rack.
- Head to the Room 306, use the mirror to go to the Otherworld.
- Head to the Room 503, use the mirror to go to the Normal World.
- Go to the Maintenance Corridor and take the Office Key from the table in the end.
- Go to the Manager's Office and exit through the other door.
- Get the Redeemer from the Room 108.
- Go to the Kitchen to fight the Butcher.
- Exit to the pool yard, go to the Game Room and take the Token from the pinball machine.
- Enter the Laundro Mat, solve the washing machine puzzle to get the Cleopatra Key.
Washing Machine Puzzle
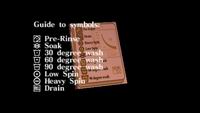 The hints for this puzzle are in the Janitor's Note and in the Washing Machine Manual. The note tells us that in order to reset the machine the washing cycle must be: low spin, 60 wash, drain, pre-rinse. In the manual you can learn about the symbols for each cycle. The machine has a turning handle and for each cycle you should pull the handle, turn it to the right symbol and then push. The order of the turns on the base of the clock dial are: The hints for this puzzle are in the Janitor's Note and in the Washing Machine Manual. The note tells us that in order to reset the machine the washing cycle must be: low spin, 60 wash, drain, pre-rinse. In the manual you can learn about the symbols for each cycle. The machine has a turning handle and for each cycle you should pull the handle, turn it to the right symbol and then push. The order of the turns on the base of the clock dial are:
- 8 o'clock (low spin)
- 4 o'clock (60 wash)
- 10 o'clock (drain)
- 1 o'clock (pre-rinse)
If you did it right, you'll get the Cleopatra Key from the machine.
|
- Enter the Cleopatra room, jump down through the hole and use the mirror to go to the Otherworld.
- Exit to the inner yard, go to the empty pool to pick up the Jeweled Heart.
- Go to the Diner and take the Dagger.
- Use the Dagger on the Nero room's door and enter it, jump down through the hole.
- Go to the Room 503 and use the mirror to go to the Normal World.
- Go to the Maintenance Room, crack the Jeweled Heart with the vice to get the Wedding Ring.
- Return to the Reception to solve the rotary calendar puzzle to get the Room 500 Key.
Rotary Calendar Puzzle
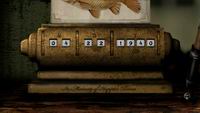 The hints for the puzzle come from the three objects: The hints for the puzzle come from the three objects:
• Wedding Ring
• Wall calendar in the Room 500
• Travis' Lucky Quarter
Each object has the key to the date: day, month and year. The Wedding Ring has the inscription "To my June bride. Love forever, Richard". The month is June. The wall calendar in Room 500 that can be seen through the peephole in the Maintenance Corridor has the day 12 marked on it. And the year can be learned from Travis’ Lucky Quarter which he received in the year his parents died. It has the number 61 scratched on it. As the result, the date is such: June 12, 1961.
Put these digits into the rotary calendar: 06-12-1961. After this place the Wedding Ring into the oval depression at the bottom of the calendar and take the Room 500 Key from the key rack behind.
|
- Go to the Room 503 to return to the Otherworld through the mirror.
- Head to the Room 500 to fight the Sad Daddy.
- Pick up the Truth Piece after the fight.
- After the cutscene pick up the Present Piece and solve the puzzle of Flauros.
Flauros Puzzle
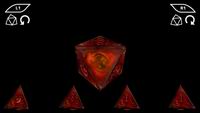 The four Flauros pieces must be attached correctly to the core piece. Each piece must be attached so that its symbols would match the neighboring symbols on the core piece which are combined from the three symbols of the attached pieces. The correct order of actions: The four Flauros pieces must be attached correctly to the core piece. Each piece must be attached so that its symbols would match the neighboring symbols on the core piece which are combined from the three symbols of the attached pieces. The correct order of actions:
|
- Pick the 3rd piece and turn it twice.
- Press R1 to turn the core.
- Pick the 1st piece and rotate it twice.
- Press R1 to turn the core.
- Pick the 2nd piece and rotate it twice.
- Press R1 to turn the core.
- Pick the 4th piece and rotate it once.
You get the assembled Flauros as the result. |
|
 The hints for this puzzle are contained within the Bloody Note and the three wall inscriptions with the names of women and their ages. The note features the line "Age before beauty" which means that the three women should be arranged according to their age from greater to lesser: Amy - 31, Lucy - 23, Sarah - 19. As the result, the code to the box will be 312319. Enter it and get the last necessary organ - the Plastic Heart.
 In this puzzle, the plastic organs must be inserted into the anatomy model in the correct order. The insertion order is hinted in the Student's Mnemonic: "
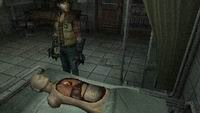 So, the plastic organs must be inserted in this order: intestine, stomach, liver, heart, lungs. After the correct insertion of all the organs, the model's eyes will open. Approach the model's head and take the Glass Eyes.
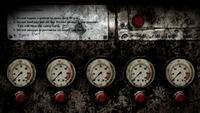 The machine's indicators should be adjusted in such a manner that all the indictors would be in the red zone to initiate the overload. Each indicator's button not only raises the value of its indicator but also the values of the neighboring indicators - only half as much. To solve this puzzle you should press these buttons (numeration from left to right):
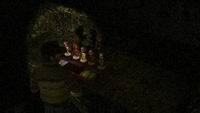 To open the box you must insert pills of the right colour into each figure's mouth. The hints to the puzzle are contained in the five rooms of the Male Seclusion and the Clipboard. First, let's remember the interiors of the rooms:
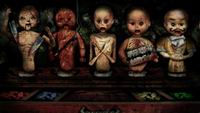 Now examine the figures to correlate them with the rooms:
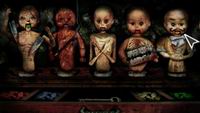 And finally, see the Clipboard to learn which medicine is prescribed to each patient. In the end we have:
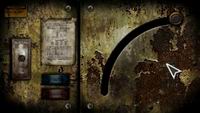 Next to the catwalk there are four spotlights marked with letters ‘A, B, C, D’. Four bulbs should be fixed into them in the correct order according to their power requirements (125W, 250W, 500W, 750W). To solve the puzzle you should study the Wiring Notes:
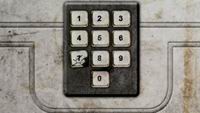
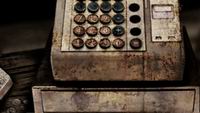 The сash register holds the key inside it. To obtain the key you must input the correct digit combination into the register. From looking at the Shop Note it can be seen that the combination is the number of the Greenfield apartment of the shop's owner. The number will be the one which has the letterbox overfilled with letters. That box's number is 213. Put this number in to get the Bookstore Key.