Puzzles
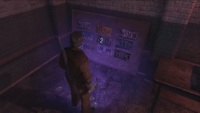
Motel's Safe (Devil's Pitstop)
Easy
Normal
Hard
After you open the door, the safe will reveal a Colt. |
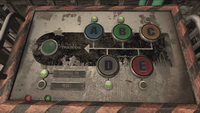
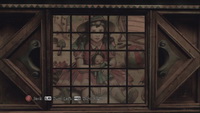
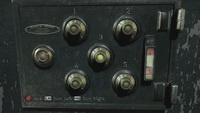 The safe's door has five dials. Not all dials turn as they should - some skip numbers and some affect other dials as they are turned. The code to this safe comes from the number on the window -
 Ticket Machine (Devil's Pitstop)
|
 You need to place three balls into the corresponding slots in the upper area as the water rises. The configuration of the game field depends on your chosen puzzle difficulty the configuration, but the goal is the same. It shouldn't be too difficult.
Water Wheels (Devil's Pit)
Easy
Normal
Hard
|
 To power up the lift you need to move water chutes in proper positions to direct water. The board near the valves shows the statuses of three mechanisms: power, elevator, pumps. Before you power the lift, you can direct the power to the pumps to drain the flooded cave. In the cave you'll find a
 Train Controls (Devil's Pit)
Easy
Normal
Hard
|
 To activate the train you need to press the appropriate colored buttons in the right sequence. The help comes from the Poem you've found on the body. The contents of the poem are different for different puzzle difficulties and so is the right sequence.
Envelopes (The Centennial Building)
|
 There are six envelopes with fragments of numbers on the desk. To learn the original combination you must arrange the envelopes. Depending on the chosen puzzle difficulty a different number of the envelops will be already in place. After some trial and error you should
align the envelops in the right way and get the code -
There are six envelopes with fragments of numbers on the desk. To learn the original combination you must arrange the envelopes. Depending on the chosen puzzle difficulty a different number of the envelops will be already in place. After some trial and error you should
align the envelops in the right way and get the code - Vault Door (The Centennial Building)
Easy Normal Hard No matter what puzzle difficulty you chose, the combination is going to be the same - IX, VI, I (9, 6, 1). |
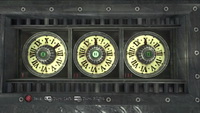 The
vault door has three numbered dials. The code to the door is learnt from the slides you picked up earlier. Once inserted, the projector cycles through a series of three slides. To decipher the combination, you must determine the digit and dial indicated by each of the slides.
The
vault door has three numbered dials. The code to the door is learnt from the slides you picked up earlier. Once inserted, the projector cycles through a series of three slides. To decipher the combination, you must determine the digit and dial indicated by each of the slides. Theater Play (St. Maria's Monastery)
If you perform the wrong action, you'll have to start the whole sequence again. After you complete the proper sequence, the theater will transform into the play’s setting. |
 You need to start the play. In order to do that, you need to do things in a certain order. The order is revealed in the Technician’s Notes as well as some help comes from the labeled cue lights, however most of the tags are illegible (the number of illegible tags depends on your chosen puzzle difficulty). Here is the right sequence of actions:
 Cottage Chest (St. Maria's Monastery)
|
You can rotate each puzzle block left or right. It takes some trial and error, but in the end you should get a portrait of a girl sitting on the beach. |
 You need to assemble a picture of Gretel. Depending on your chosen puzzle difficulty the number of blocks will be different:
X-Ray Machine (St. Maria's Monastery)
Note: If you try examining the wrong Screamer it will trigger a fight with it and you'll have to defeat the enemy before resuming the search. |
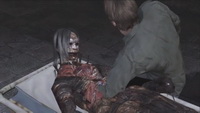 To find which Screamer has the key you need to scan them in the X-ray machine. Roll a gurney into the machine and activate the control panel to the left to scan the body. Once you determine the appropriate Screamer, pull the gurney out and begin searching the body. Follow the on-screen instructions to search the belly of the Screamer. When you find the right spot, push the button to get a
 Watchtower Safe (Overlook Penitentiary)
Easy
Normal
Hard
After you open the safe, it reveals a Small Key and a Quarter Dollar. Use the Small Key to unlock the gun rack in the watchtower and get a Shotgun. |
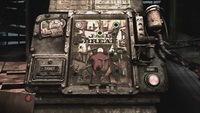
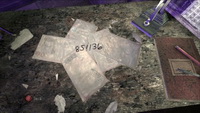
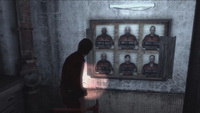 Clear the planks from the board with the mug shots. You'll see that Murphy’s prisoner number is illegible on the photo. Look at his jumpsuit to learn the number and that's gonna be the code to the safe -
 Workshop Storage Keypad (Overlook Penitentiary)
The spots, where you should look for the digits, are:
The keypad code is:
While walking in the workshops, some machines may switch on themselves. When this happens, quickly turn off the active machine, as the noise coming from it attracts creatures to the workshops. |