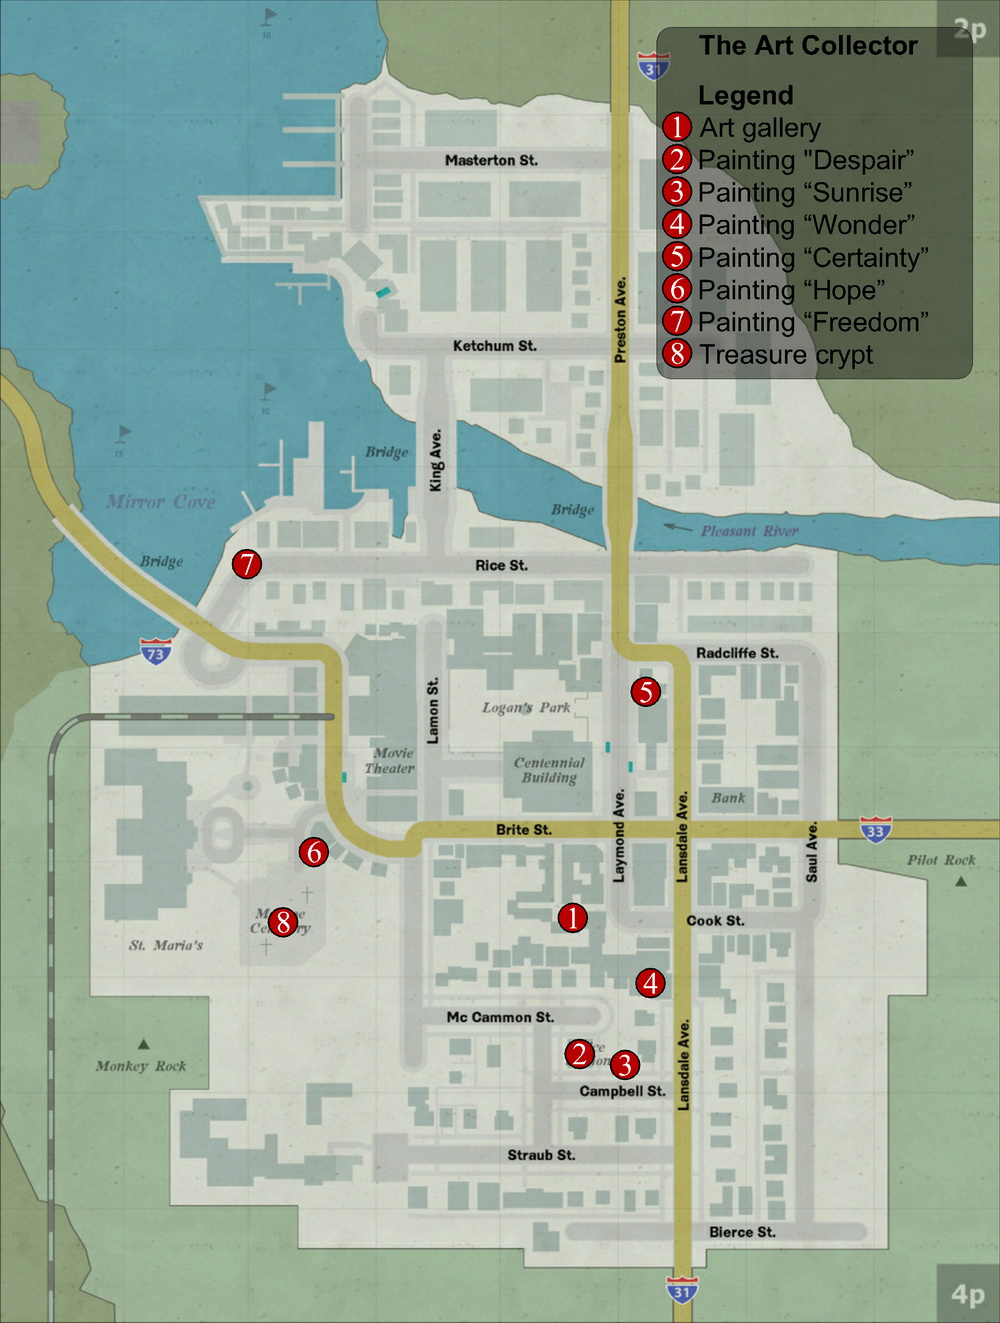
The Art Collector
Achievement/trophy: Art Appreciation
Reward: Tomahawk
 The quest starts in the art gallery located in the alley south of the Centennial Building and to the west of corner of Cook Street and Laymond
Avenue. Find the back door and enter the gallery. Go into the second room to the left to collect two Mystery items: the Gallery Letter (1) from the couch and the Gallery Owner’s Note from the desk. Proceed down the hallway into the exhibition area to find the Gallery Letter (2) on the counter. Now return back to the hall and find the stairs to the basement. In the basement approach a large table to start the side quest. Examine the table to find a 3x3 grid on top of it and three paintings. You need to find another six. The quest starts in the art gallery located in the alley south of the Centennial Building and to the west of corner of Cook Street and Laymond
Avenue. Find the back door and enter the gallery. Go into the second room to the left to collect two Mystery items: the Gallery Letter (1) from the couch and the Gallery Owner’s Note from the desk. Proceed down the hallway into the exhibition area to find the Gallery Letter (2) on the counter. Now return back to the hall and find the stairs to the basement. In the basement approach a large table to start the side quest. Examine the table to find a 3x3 grid on top of it and three paintings. You need to find another six.
Find the missing paintings
The six paintings are scattered around the town:
- “Despair” - Hillside, Police Station, in a barricaded room near the dispatcher’s office.
- “Sunrise” - Hillside, underground entrance, in the booth.
- “Wonder” - apartment building through which you enter Pearl Creek, the painting is hanging in the kitchen of the 1st floor apartment.
- “Certainty” - Pearl Creek, in the storage unit on Laymond Avenue to the north of the Pearl Creek underground entrance. To open the door you need a code which is hinted in the Addressed Envelope, found on the pavement to the north of the storage unit. The keypad code is 827 (circled numbers in the address on the envelope).
- “Hope” - Chastain Heights, in the storage room of the hardware store east of St. Maria’s Monastery. To unlock the storage room you need to collect the Storage Room Key from the cash register in the store. The painting is hidden in the pillar behind the crate - move the box away to get it.
- “Freedom” - Pleasant River, in the back of the van on Rice Street where the street bends.
Once you’ve collected all of the paintings, return to the art gallery to begin the next stage of the side quest.
Arrange the paintings on the table
Put all the paintings on the table
and start arranging them. The red symbols on each painting help you to put them in the right places on the grid. Once you arrange all the paintings correctly, you're no longer able to move them. Switch to UV light from your forensic flashlight to reveal a town map with a marked location on it.
Find the location of the crypt
The location indicated by the map is in Monroe Cemetery outside of St. Maria's Monastery. Go there, find the crypt with an open gate between two statues (Note: If you didn't arrange the paintings on the table correctly, the gate will be locked). Climb down the ladder and proceed down the passage to the locked gate.
Unlock the crypt's secret
There
are nine stone tiles with symbols on the wall to the left of the gate. To unlock the gate you need to press the tiles with the right symbols which come from the paintings. Depending on the puzzle difficulty there might be additional hints to complete the task. In any case, the right tiles will be:
- Tile in the top left.
- Tile
in the center
- Tile in the bottom left.
- Tile in the bottom right.
Activate the tiles and the gate will unlock. Beware a Weeping Bat behind the gate. Continue your way into the burial chamber and collect some reward items here: a First Aid Kit and a box of Shotgun Shells on the ground. The main reward for the quest is the Tomahawk in the sarcophagus in the middle. |