13. Strategies
Bosses
Split Worm
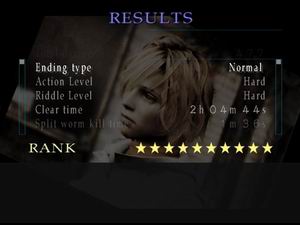
Time Limit: 2 minutes
The tricky thing about this fight is that since it's so early in the game, it'll likely be before your first save, so if you don't beat the time limit you'll have to start all over again. Therefore it's imperative to have a great understanding of this boss fight before attempting your run, and you should probably even do a few practice attempts of just this boss immediately before your run to give you the confidence.
Now, there are two strategies that can be employed here and they're both completely different. One is the more traditional strategy with the Handgun which is much easier mechanically but very unpredictable for time, either cutting it very close or sometimes going over since it's always a risk. I'd even go as far as saying it's just not worth the risk of putting your 10-20 minutes of gameplay before this point on the line since it might not work out with the Handgun, especially since the timer counts an additional 10 seconds after the worm dies to make it even worse.
The other involves the Steel Pipe, and if executed properly you will end the fight easily in time, but it requires very precise positioning and also timing for both your attacks and blocks. Either way, you will need a ton of practice in this boss fight before attempting your run, so consider trying them both out but ultimate I recommend the Pipe. Read them both below.
Steel Pipe Strategy:
First things first, equip the Steel Pipe and use an Ampoule before descending the ladder. The Ampoule will max your stamina for the full fight, giving you full running speed and faster attacks, very much needed to pull this off. Additionally I recommend the Bulletproof Vest to prevent all damage while blocking since you'll be doing it so many times. But I'd suggest getting in position before equipping the vest since it really slows you down and can totally ruin the fight if you can't get to the first hole in time.
In the arena, hold L2 to find the correct hole and understand that timing is everything here. Immediately run to the hole where the worm will emerge from. Equip the vest as you arrive and stand close enough so that you can smack the worm but not close enough that it'll bowl you over when it emerges (some spots may have some scratches on the floor that are a good marker). As soon as it arrives, deliver back to back thrust attacks with the pipe (R2 + up + X hold). If you're not quick enough, it'll headbutt and knock you over, keeping you down for about 10 seconds. This wastes time and costs you damage, so avoid it at all costs.
Therefore you must act quickly, and consider even anticipating its head arriving by attacking before he's even fully there. Get in your two thrusts and then release the attack button. Wait about a half second and then block (Square) just as the worm lunges forward. Heather will block the attack while the vest will prevent any damage whatsoever (or it'll do just a tiny bit without it; less than a point).
Immediately after your block, perform the two thrusts again and then wait that half-second to block its counter, and from there it's just repetition of the thrust-thrust-block routine until the fight ends. If you take too long to get back to thrusting after the block, again it'll knock you over. Be as quick as possible to perform every attack, while blocking is the only move that requires non-immediate timing. It may take some practice to get right, but trust me that when you do get the hang of it, it becomes rather trivial. And it's always better to block slightly early than too late, since it has a fairly large block window.
Also if you take too long to return to thrusting, the worm may retreat and switch holes (if it doesn't hit you instead), wasting more time but it's not a huge deal since you'll have at least a 30 second buffer to perform the strategy. However if this happens, I recommend unequipping the vest since it slows you down so much and will make it difficult to get to the next hole in time, and if you don't... you will get knocked over and waste more time on top of taking damage. So get in position asap and reequip the vest once you're there. Always be mindful that the worm will knock you down if you take too long to attack, and understand that the Ampoule is also important in keeping your attack speed up.
After all is said and done, it'll take 28 pipe thrusts to kill the worm, but remember that the boss timer keeps going for another 10 or so seconds. So make sure you kill it well clear of 1m50s. With perfect execution it should take you no longer than 1m20. If you're finding this too difficult and considering the Handgun instead, I suggest just giving it more practice, even including stepping away and coming back another time with a fresh mind where it may very well become easier to you. It was that way for me.
Handgun Strategy:
Be warned that this strategy while easy to pull off mechanically is awfully unpredictable and risky for time, often either cutting it very close or even going over. Additionally, the boss timer continues for another 10 or so seconds after the final blow, making it even more ridiculous to rely on. While it is possible to get a little lucky and end this fight with a time of 1m30-40s, it's much more common to be in the range of 1m50s-2m10s and not rare at all to take more than that, even if you've done all you could. Therefore I recommend the pipe strategy, but this one does still remain as possible if it all works out.
Always hold L2 to focus the camera at the worm, even when it's offscreen. It will clue you to the hole the worm will emerge from a few seconds before it does. When you get the signal, position yourself in front of the correct hole and back up to a safe distance to avoid being near the worm or it might bite you.
When it opens its mouth, fire two bullets at it. Do not fire a third or it will go back in the hole and waste more precious time -- this is key to reaching the target time. After firing twice, back up as far as you can and to either side (preferably towards the middle of the arena when on the sides) and reload with R3 (Handgun ammo equipped). Wait for the worm to either just keep sitting there or pound the ground.
If it keeps sitting there for 2-3 seconds without action, fire two more shots and repeat. After that it may either leave, do nothing again (less likely the second time but possible) or get ready to pound the ground this time. Note that you need to wait 2-3 seconds before firing again whenever it stays or else it'll leave down the tunnel. Now it may do so anyway when you shoot but there's always a chance it stays if you wait first.
When it pounds the ground, you'll be briefly stunned but it's fine. It'll then screech and prepare for its insta-kill attack. This is why it's important to already be well-positioned that you're out of reach -- just at the side or offscreen -- but if not just sidestep now to avoid it. But as it does screech, shoot the worm once while its mouth is open, or even try to get two shots, then stop. You can shoot its open head just as it starts to pull back after the attack, but this makes it more likely to leave when it returns to the hole after another shot or two, so I'd suggest not shooting there.
Once returning to the hole after the insta-kill attack, shoot it twice more and repeat the strategy if it remains. That said, the worm is very unpredictable and will sometimes stay and sometimes leave either way and waste a bunch of time resetting to another tunnel. If it does, use L2 to clue you to the next hole and arrive and set station before it does. If it crawls through the arena to another hole, empty a full clip or more into it. It doesn't do much damage this way but it does do something, so take whatever you can get at all times. Always be prepared to strafe out of the way to avoid it, especially if it charges to the tunnel straight ahead of it. Ultimately, the worm should drop dead after around 40-50 Handgun bullets, depending on how much you shot it from where.
With this strategy, time is so incredibly marginal and there's always a chance you'll go over. Therefore timing yourself (stopwatch, phone, etc.) is 100% imperative, whether practicing or on a real run, since you'll otherwise not know if you've made it. Even executing perfectly you can always hit bad luck where the worm leaves quickly too many times and wastes too much time in the tunnels. If things go really well you can net a time in the 1m30s range, but this is very rare and lucky. Good execution can regularly net you results in the 1hm50s-2m00s range, while one extra trip to the tunnels will put you over through no real fault of your own.
And that is always the risk with this strategy unfortunately... It's so marginal and literally never a guarantee. I found on some repeated attempts I could keep it to around 1m50s to the final blow, but this is still dangerous territory cause the timer adds another 10 or so seconds after the final hit. So understand if you do this strategy that it just might not work out and waste your 15-20 minutes invested until this point. Either way, I honestly recommended forgetting this risky strategy and just using the Steel Pipe. It may seem hard at first, but it becomes a formality with enough practice.
Missionary
Time Limit: 2 minutes
This fight can be a bit unpredictable and have you take a fair amount of damage if things go wrong, making it an ideal spot to save just before. That said, there's a fairly reliable method that handles him efficiently and safely, also ending the battle in well under a minute if executed properly.
First, equip the Shotgun since Heather switches to the Handgun in the cutscene. Also consider using an Ampoule since it'll boost your stamina to max for the full fight, giving you the extra speed to be quick on your feet. You should have at least one, or even two if you didn't use one on the Split Worm, and they are best used in this way when going for 10 stars since the health recovery is not important with a cap already at 500 points in damage.
At the start, approach the Missionary head on, perhaps stuttering for a bit in front of him to more likely bait him into an attack, and continue past as he swings the other way. Immediately stop when you pass him, aim and blast his rear to knock him down. You should always get another free blast while he's down just this one time, so approach him and take it, but first align yourself right behind his butt for the prime position. Don't get any other ideas though...
After taking the free shot while he's down, the Missionary will stand up and almost certainly swing both arms at you. This is when you need to block the attack (R2 + Square), just after he starts standing and not too late when the attack's already on its way. This is the key to this strategy, and if you're put off by blocking, just give it a real shot because it becomes incredibly trivial once you get the timing right and it's frankly crucial to getting this fight right.
Note that you'll lose the tiniest sliver of health (less than 0.5 of a point) for each block, which is extremely negligible and worth the tradeoff. However you can also equip the Bulletproof Vest to eliminate all damage with blocks, but the speed is rather important here, especially if he slips away.
Immediately after blocking, keep R2 held and prepare to shoot, but first you must wait and observe what he does. If he tries to run away with his back to you, blast him asap and it should knock him down. Do the same if he sort of lingers around you with his back facing you. But importantly, if he turns towards you which he will absolutely do some of the time, DO NOT SHOOT. Instead, lower your weapon and either strafe or run a bit out of the way as he prepares to attack in a very telegraphed manner, which is beyond easy to avoid by not standing where he's aiming. Use this time to blast him from the rear or side and knock him down.
This time, quickly position yourself right behind his butt again but do not shoot since you will rarely ever get a free shot again outside of that first instance (sometimes you will though, so if he doesn't stand up after a second or two of squirming, blast him). Once you position yourself, just wait for him to stand without shooting and prepare that same block move. After blocking, do the same strategy of observing him and immediately shooting once you see him try to run away, or move aside if he turns to you. Note that you cannot shoot too early or it will not knock him down while also leaving you totally exposed if he's close.
Now, you can get lucky with just automatically shooting every time he stands (waiting a second first since he can't get knocked down immediately after standing), but this is way too risky since probably a quarter of the time he will turn towards you just as you're wanting to shoot. And if you shoot... easy block from him and you are completely exposed and will one hundred percent take a big hit. The key to this strategy is to quickly observe what he's doing and react accordingly, knowing that if you let him turn towards you and he tries to attack, you have plenty of time to get out of the way and get in an easy blast. And if he goes the other way, perfect; just blast him right away.
If he ever does get a chance to slip away, cause sometimes Heather will just straight up miss and he can be quick, I recommend immediately running towards him to close the distance, but aim slightly at his left to avoid a head on attack. Immediately once he runs by you, aim and try to blast him (or if you miss, try again or see if his back is facing you now). Once he gets knocked down, reset to his butt and wait for him to stand and then block. Repeat the strategy as mentioned above.
Remember that you should always get a free blast the first time he's down, and while you may sometimes get lucky with free blasts on additional downs, it's never guaranteed and you shouldn't ever expect it. So always just get in position and prepare to block in all other cases, only shooting if you see he's not getting up right away. And I suggest being super ready to shoot with an itchy trigger finger as he stands, knowing he runs away very quickly. But I cannot stress enough how important it is to wait to see if he turns towards you, cause if you shoot as he does it will totally ruin your attempt and he will hit you. I learned the hard way so many times until I realized patience is key in that moment, rather than relying on stupid luck.
Repeat this strategy and he should permanently drop after around 7-8 close-range Shotgun blasts, or perhaps a few more from farther range. Now you can decide if you want a fighting or shooting kill to finish him off with the final blow. I recommend fighting as those kills are harder to come by.
The more you're able to keep him grounded with the blocking strategy, the more you can limit the time this battle takes, keeping it safely around 40 seconds to a minute. And do not ever attempt to fire at him from the front since he'll block your shot and almost certainly get in a free smack with how slow the Shotgun is. Yes, it can be incredibly frustrating to deal with this boss until you totally nail the timing and strategy, but then it should be relatively straightforward. Be smart, be patient, and you will succeed.
Leonard
Time Limit: 3 minutes
This boss can be incredibly frustrating due to the tiny window you have to shoot him while down, and he can waste so much time stupidly swimming around the arena. That said, you have three minutes to beat him so just keep your cool, be patient and you should get many chances to end the battle in that time frame since he doesn't have much health.
You can use the Shotgun here and I have seen effective strategies where he's knocked down at the start and then just kept pinned down with repeated shots until his death (about 20 shots), but in my experience he just seems to get up before you can get the second blast off, at least at the beginning of the fight. Go ahead and give it a go while practicing if you wish to try, but I honestly recommend the SMG strategy over anything else. With the SMG magazine in the hospital basement and the two on the roof you should have 480 bullets with x5 adjust. All you'll need is around 200-230 to pull this off with some margin for error.
Immediately at the start, pump a burst of bullets into Leonard, but only about half the mag since that's all it takes to knock him down and you can finish your mag on him after he's down. Wait for him to drop and even anticipate him hitting the ground, or use the time to move a bit closer. Then continue firing while aiming down at his body with the goal of hitting him with enough bullets while down so that he remains pinned there as you reload and still there to pump another mag into (and more after that). This is honestly extremely hard to do but if you can hit him with 10-15 bullets while down you can pull it off. But still, it's harder than it sounds.
Note that after the first burst while standing, you can immediately stop firing and reload from the inventory to get a full mag, but understand that time is super precious to keep him pinned down and the concern is more about shooting him in time rather than having enough bullets (you do need enough but a half mag is sufficient, while a full mag is useless if you don't fire quickly enough). So immediately start firing after the reload (or don't reload if you have enough) and aim accordingly, knowing that you require some level of precision to effectively hit him enough times.
If you do it right or let's just say you get lucky, Leonard will remain down through your next reload and allow you to pump another full magazine into him, and by this time you should have him locked in until his death, repeatedly emptying magazines into him. Reloading in the game should be totally fine and is probably better than stopping and resetting with inventory reloads, so just keep going.
If executed perfectly, you can end this fight in under 20 seconds, but understand how ridiculously hard it is to pull off. So if Leonard does stand up after your initial burst, just relax knowing you have so much more time and many more attempts to keep trying. Just wait for your next opportunity and try the same thing. While hardest to pull off at the beginning, it will be much easier on subsequent attempts, especially if you can get closer.
When Leonard is swimming underwater, I know it can be frustrating but you have lots of time to handle this, so be patient. Follow him back and forth around the water and generally stay out of harm's way when you feel he may stand up. You never want to be right in front of or around him since he'll smack you as he stands. I'd recommend aiming to be behind him with a small gap for safety.
As soon as he rises, consider getting closer to him and give him an SMG sandwich. Remember, just a half-mag burst, then stop and aim your SMG down where he's falling. Once he hits the ground, continue firing. Keep your aim exactly trained on him as you reload in-game and continue firing the next mag into him. If he stays pinned down for that, you should be able to empty several more mags into him and end the fight, reloading in-game each time while keeping your aim trained on him. If not, follow him around again and try for another attempt when he stands.
Again, you can always stop firing as soon as he drops and rush into the inventory to reload to ensure you have enough ammo in the mag, but I want to stress you need to be lightning quick with your reactions and ready to start shooting while aiming down immediately after exiting the menu. Your goal is always to hit him (in time) with enough SMG bullets after the drop to keep him pinned down through your reload (either in-game or inventory), and if not you'll just have to keep trying.
Understand that this may take practice to get right and can be frustrating, but once you've got the hang if it, it becomes relatively straightforward. Pinning him at the first instance is incredibly hard so don't get hung up on that, but you should be able to do it the second or third time and end the fight there, with tons of time remaining. But still, things can happen so if it takes you a few more tries you should have enough time, so just be smart and avoid taking damage.
Memory of Alessa
Time Limit: 3 minutes
Perhaps the easiest fight of them all since you can just abuse the Shotgun and use up 20-25 shells (less than one pickup with x5 bullet adjust).
Equip the Shotgun at the beginning of the fight, raise it and approach Alessa or wait for her to come to you. As soon as she raises her arm to swing (making a distinct whipping sound), blast away and prepare to repeat every single time she swings. She'll drop after four to five close blasts and return in the next form. If she gets a chance to run away, chase after her and blast her from behind.
Give extra caution when Alessa carries a firearm since she'll try to shoot you from afar. Try to get in close to prevent this. If you do hear the cocking sound, try to duck behind a horse asap, wait her out and then reposition accordingly. But if you do get caught in a bad spot, just blast her as soon as you hear her gun cock.
Otherwise, get up close to her so she defaults to the whip attack instead, to which you can repeat the same strategy as the melee weapons by waiting for the attack to start and then blasting her. I'd avoid attacking her before her whip since she'll block it and in some cases, particularly with the pipe, might be able to swing and hit you even through your next blast. So stay safe and pick your shots well.
Each form should take 4-6 blasts at close range, or a few more at longer range. Sometimes you'll get a free shot at her as she's down so take it, but get ready to reset into the above strategy after. You should generally be able to wait for one form to die before you have to reload, and then you can easily do so in-game, but do count your bullets and reload in the inventory if you have to mid-form.
Overall, time shouldn't be an issue here as the Shotgun makes fairly quick work of her.
The God
Time Limit: 8 minutes
Normally a fairly tough and lengthy boss on PS2, the God becomes a trivial and quick fight in the PC version due to a safe zone on the right side of her head by her arm, along the low ledge. Read more about it below or skip to the more traditional PS2 strategy, which does not offer a safe zone.
PC Strategy:
With the Handgun equipped, fire three shots at the God while backing up and sidestepping to the right side of the black semi-circle line which she cannot physically reach you from (unless too far up). As she makes her way to her lower stance, equip the Katana and also use an Ampoule to max your movement and attack speed for the fight, which is rather crucial for timing and avoiding attacks.
As soon as she swings and misses in the lower stance, run to the right side of her head (her left side) and perform four thrust attacks right in her face. If you're not quick enough you may only be able to get in three safely, so consider if you want to be safe or risky. Immediately after, strafe right along the low wall right by her arm, and she'll swing right through you with no damage taken.
Now go back in for another three or four thrusts and repeat. Note that for the first three setups you can get four thrusts in but it may be a close call, so consider just taking three to be safe. After the first three setups, she'll attack you more quickly so you'll certainly want to limit it to three thrusts each time by then for sure. Even if there's a small gap before her arm swing after, it's probably not enough time to get in another swing and not worth it.
From here, just keep repeating the three thrusts and strafe dodge, and eventually the God will stand back up. Equip the Handgun and fire three shots at her while backing up to the right behind the black line as you did to start things off, or just make sure you get out of her swing range before firing to make sure. When she lowers to her hands and knees again, wait for her arm swing and then go in for your three thrusts, strafe dodge and then keep repeating until the fight ends. She may or may not stand up again, but just repeat the above strategy if so. Properly executed it should take 1m20-30s and serve as a relative formality, which is why your second save is probably better spent elsewhere in the PC version.
PS2 Strategy:
With no safe zone by the God's head on PS2, you will not be able to linger for continuous Katana attacks but otherwise it's similar in principle. To start things off, fire three Handgun shots at the God as you back up to either side behind the black semi-circle line. Equip your Katana, use an Ampoule to max movement and attack speed, and wait for her to swing her arm in her lower position, then go in and perform three thrusts and strafe exit back behind the line, preferably the farthest center point away from her.
Note that you may call it close with three thrusts and so two may be the safer option, but if you're super quick after her initial swipe and minimize the distance travelled, including starting your thrust from farther back, you can regularly escape safely by strafing beyond the black semi-circle before she gets a chance. Note that the Ampoule is crucial to pull this off, otherwise Heather won't attack quickly enough, at least beyond the first couple times.
Back at the line, the God will begin throwing fire at you. Sometimes you may have time for a quick Handgun shot here if you're quick to fire, especially if she swiped and missed you, but if she's already throwing the fire your bullet likely won't land for some reason, so forget about it otherwise.
Strafe to the other side to avoid the fire. You don't have to go too quickly in the earlier part of the fight so feel free to pace yourself for better efficiency. Once the fire stops you can often get in another shot or two before she throws more fire. Quickly strafe to escape and move back all the way to the other side.
By now she should rise to her standing position. Fire three Handgun shots to bring her back down while positioning yourself on the line in a close spot so you can soon run in. First wait for her arm swing while down and run in for your 2-3 Katana thrusts. Remember, if you react as soon as she misses and thrust from a distance while still hitting her, three hits is pretty doable, but stop at two any time you aren't lightning quick. Then strafe back behind the line and get ready to dodge fire.
Now it's just a matter of repeating this strategy as the fire attacks become faster. As they do speed up, you may have to strafe for longer, going all the way to the inner edge of the black semi-circle, where you can then cross over through the danger area very quickly to escape it. It can be tough to dodge the fire while also not throwing yourself right in front of the God where she can swing you, but when mastered it will serve you well. As soon as she rises, quickly get back behind the line, drop her with three more shots and get in your Katana thrusts. Repeat until she dies while dodging the fire, noting that the extra speed of the Ampoule will help you dodge more quickly.
Another option here is to use the Stun Gun and fire two shocks whenever she drops, or even three for the first few occasions. Always be sure to reload in the inventory when equipping it. Either way, both the Katana and Stun Gun strategies should take around 5-6 minutes of in-game time if well-executed, allowing for a bit of a buffer for mistakes. But of course, practice makes perfect and you'll want to limit damage taken here.
Note that if timing it on your own it may take upwards of 9-10 minutes, but rest assured that inventory time does not count towards boss clear times (while it does for your overall clear time). So even above 10 live minutes you're still probably well in the clear under 8 game minutes. Even if you're unsure, you might as well just finish and see what the ranking screen says.
While this is a fairly straightforward fight, it's not uncommon to get caught out by the fire, which is why it's highly recommended you use your second save here in the PS2 version. That said, if you master this boss fight ahead of time you can consider saving elsewhere, such as just before Leonard, but it's still a fairly big risk perhaps not worth taking.
Other Strategies
Bloody Transforming Underpass Hallways
In every Extra New Game playthrough, certain hallways of the Underpass will transform and damage Heather while inside them. To combat this, all you can do is run as fast as you can through them, ignoring any enemies on the way since you can't afford to lose any more health. Save yourself the extra damage by not healing anywhere in the Subway, and don't heal during these halls either as they will only drain your health but not kill you. Heal only when past them.
Nightmare Hilltop and Hospital Madness
Just like in Silent Hill 2, Brookhaven Hospital can be a nightmare to get through in a 10-star run due to its abundance of aggressive Nurses and also Slurpers, especially in its actual nightmare form. The Nightmare Hilltop Center is also a pain due to multiple tight hallways full of Slurpers, requiring careful advancing and strategies for weeding out one enemy at a time.
While fighting Slurpers, utilizing jerky can certainly serve as a helpful distraction to stop them in certain locations or prevent one from advancing while allowing another alongside it to continue towards you so that you can take it on individually. Although you may not even need too much jerky, pick them up when you see them and use them liberally in Nightmare Hilltop and Brookhaven in hallways with Slurpers. If the first part of the hallway is empty and the Slurpers are deeper in, this can work perfectly. Place jerky strategically and spread out in these empty spots, then get the attention of the Slurpers and run back to lead them to your traps.
Additionally you'll want to turn off your Flashlight regularly (and Radio for good) in these hallways and attach the Silencer to your Handgun to prevent Slurpers from finding you more easily. Never let them fool you by playing dead and instead keep firing at them until you hear their death note or see blood pour out from their bodies.
Alternatively there is a fairly reliable way to even get fighting kills off solo Slurpers. First unload 4-5 Handgun bullets into them until they start twitching their heads. You can fire another bullet or two as they do but then stop, use the time to reload and just let them regroup into their normal state. Now fire again with the Handgun until they start to twitch or play dead. Now you can cautiously approach and downward slice with the Katana, preferably from the slide. It'll usually take 1-3 swings, and make sure you don't touch their body or they may wake up to grab you. Even if they do awaken, it's better to be on the side so you can quickly escape.
Always retreat if possible when multiple Slurpers approach you, using jerky to keep them at bay. If you have no other option, use the Shotgun to stop them in their tracks at close range and use the opportunity to escape so that you can later take them on one by one. Also consider just running past them and getting your kills elsewhere if you can slip by in the crazier spots, especially in Nightmare Hospital if you've already gotten enough kills from the second floor respawn point (mentioned below).
In the final 4F hallway of Nightmare Hilltop, drop some jerky in the southwest corner of the west hall before advancing north since two Double Heads will spawn out of nowhere to come after you. The jerky will distract them and allow you to get easy block-Shotgun kills with them. Additionally, drop more jerky in ideal spots far away from the northwest door before entering the vending machine room so the newly-spawned Slurper and Double Heads will be distracted when you return.
Just as well in Nightmare Brookhaven, drop jerky in strategic spots in the 2F employee wing, which is empty when you arrive to grab the Plastic Bag from the Women's Locker Room but will be full of Slurpers when you come back out. Having them distracted will allow you to handle them more easily or even run past them. Also be mindful of the revolver Nurse that spawns with them, which is perhaps better to sprint past than fight.
You'll also find the SMG to be much more helpful with x5 bullet adjust, so be sure to collect all the ammo for it and prepare to use it on Slurpers when you need a quick kill or two in a confined space. Attach the Silencer to it to keep more from finding you easily. Do be sure to save 200-230 bullets for Leonard however.
Nurses on the other hand aren't quite as annoying as Slurpers, but they are still found in high frequency and often groups in the hospital. Always target and kill Nurses with revolvers first, ignoring those with pipes as you rush to them. Sadly the Shotgun is quite nerfed from SH2 with a narrower spread and weaker from a distance, but up close should handle Nurses fairly efficiently. If you ever need a quick kill of a Nurse that's raising her revolver and you're not quite close, consider pulling out the SMG to handle her quickly. And be sure to get the SMG ammo on the roof.
Note that sometimes you may enter a room with Nurses immediately ready to come after and smack you. Always have the Shotgun or SMG ready and always prepare to block and counter these situations when multiple Nurses are rushing you. Get in your block, blast, then switch targets and repeat if necessary. Keep switching targets to the Nurse the closest to you when found in groups, then kick them when they're down or finish them off with more shells or bullets.
2F Patient Wing and Room M5 Respawn
While there are enough enemies in the game to easily reach 150 kills, I'd say there's not enough in safe locations where you can avoid taking risks, especially without many other enemies roaming about. Further, fighting kills are much harder to come by since most enemies shot with the Handgun will die immediately upon falling.
There is however a respawn exploit in Brookhaven Hospital where you can respawn the same five Nurses over and over. I wouldn't even call it a glitch or an unfair advantage since you still have to kill them legitimately, two of them have revolvers, and three of them are in the same room and will charge you all at once.
But wait a minute, isn't this supposed to be helpful and not risky? Well, once mastered it's really trivial and relies on blocking which frankly almost makes this too easy. You'll want to clear out the 2F patient wing and M5 naturally when getting the Instant Camera from the case to lock in those five kills, but you'll have to wait until the "M" door appears after speaking to Leonard. Once it does, the two Nurses in the hall and the three in M5 will respawn every time you enter the hallway maze and then exit back to the 2F patient wing.
As a quick guide, I suggest equipping the Bulletproof Vest for all of this since it'll limit blocked damage taken to zero, and even if you do get hit it'll still save you some damage. To start off after returning from the M door, run down the hall and blast the revolver Nurse from behind with the Shotgun. She faces the other way so she shouldn't be a concern. Kick her to death (four kicks usually) and do the same to the pipe Nurse farther down. Fighting kills are harder to come by so always take them when you can. Now proceed to M5 where the magic happens.
Immediately when inside, run forward towards the Nurses. Yes, you want to position yourself so they can all or at least two of them can hit you. No, I'm not crazy, just listen. As soon as one or two or even all of them start to swipe at you, immediately block (R2 + Square) and counter blast with the Shotgun. One of the Nurses will surely fall down or sometimes two. Now be patient if two still stand and wait for one of them to swipe you, then block and shoot again. When it's just one standing you can do the same or just blast her without the block. Despite the far Nurse having a revolver she'll pretty much always try to run in and smack you, probably because the bed blocks her line of sight to you a bit which is great.
Now quickly rush to kick their corpses to lock them in as fighting kills, although sometimes one or two will get up too quickly and will die from your next Shotgun blast, making them shooting kills. You will probably still need some shooting kills at this point anyway, but generally you want more fighting kills if you can get them. Another option is to use the Katana and downward slice them while down, which may be more wisely done when it's just one Nurse left. Alternatively when one solo Nurse gets up, you can block her attack and counter swing with the Katana and then another time to kill her that way.
When done, exit M5, pass through the M door and return to the patient wing to respawn all 5 enemies and repeat the whole thing. Do this as many times as you need to. I recommend doing it until you have at least 65 shooting kills and 70 fighting kills, or perhaps even 71-72 to be safe, but there's still the God and some other enemies that can be fighting kills before the end anyway, while there should be multiple shooting kill chances before the end. Although I'd generally recommend running through the Nightmare Hospital hallways and ignoring kills when there's several enemies around.
If you start running out of Shotgun ammo, consider killing the second Nurse in the hallway with the Handgun (shooting kill), or try killing some Nurses with the Katana. Always be careful and block first while standing, unless you can safely get in a hit without a return attack.
Equipping the Perfume
The Perfume can be found in the open locker of the 2F Women's Locker Room of Brookhaven Hospital. When equipped, more monsters will spawn and be attracted to Heather's presence, particularly Nurses. Therefore if you're wishing to increase your kill count a bit more than normal, this can help you accomplish that. Of course it will put you in more danger at the same time so use it responsibly. And always unequip it once you're in the clear for kills.
Haunted House Spiky Roof
Just running through the spiky roof hallway of the Amusement Park's haunted mansion will spell certain death on Hard Action Level. Therefore you must hold R2 to lower Heather's stance as she walks through the hall when the spikes fall.
Red Glow Hallways
While the speed of the red glow in the haunted mansion is already increased on Hard Action Level, you'll also have to deal with Heather stumbling and falling into walls or doors in the process, making this hallway actually somewhat of a challenge, at least until you get the hang of it. I recommend giving it some practice runs on Hard to fully understand what it takes.
Firstly, consider removing any weapons (and certainly the Bulletproof Vest if wearing it) to speed Heather up just a bit. Make sure you know the hallway well and exactly where you need to turn at every corner before you get there so you're anticipating rather than reacting. When reaching a corner while moving at full speed, either briefly release the analog stick and continue pushing it, or quickly tap Square (with reverse Walk/Run Control; release Square otherwise) to induce a brief walk just as you get there before continuing to run. The latter method seems to work best and barely reduces your speed.
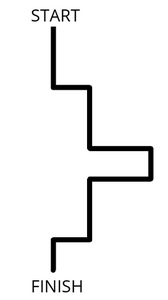
Don't worry about the instances where you don't have enough time to build up speed and instead restrict it to the corners with longer straights before them. Otherwise, refer to the graphic below for a reference of which way both identical hallways twist and turn. And remember the first door at the end of the first hallway has a broken lock and should be ignored.
Limiting Heather's Stumbles
Although Heather isn't quite as clumsy as James or Harry, she will still often stumble and fall into walls and doors while running at full speed on Hard Action Level. To counter this, simply release the analog stick for a very brief moment and continue pushing it as you near tight corners and doors, or even better, briefly press Square to make Heather walk before continuing in stride (if using reverse Walk/Run control; release Square if normal). It's a small thing but will save you some time and annoyance as you go on, but more importantly it might save you from being exposed to attacks after stumbling near enemies in some cases. Full disclosure: I once took a shot from a Nurse after stumbling into a wall. Don't make the same mistake. |