Walkthrough
01. Welcome Back to Silent Hill
02. Nightmare 1: To Levin Street
03. Lost in the Woods
04. Nightmare 2: Out of the Woods
05. Midwich High School
06. Nightmare 3: School
07. The Balkan and Dixon Bridge
08. Nightmare 4: Hospital
09. Nightingale Apartments
10. Nightmare 5: Toluca Mall
11. Toluca Mall and
Simmons Street
12. Nightmare 6: Nowhere
13. Lakeside Area
14. The “Orpheus” and the Lighthouse
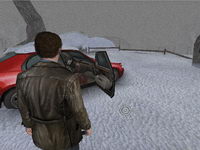
A red sedan loses control on an icy road and careens off road, plowing through a large snow bank and a chain link fence only coming to a stop when it slams straight into a light pole. The scene shifts and you find yourself in a first person view inside the office of Dr. K. He asks you to honestly fill out a Garner Sobel Personality Inventory Form (K) and questions your last answer on the form. With this initial test out of the way he’s ready to get started with the therapy session…are you? Walkthrough Notes |
Salvage Yard/ Crash SiteAfter your initial test the scene shifts back to Harry Mason waking from the accident we witnessed earlier. Harry panics when he realizes his daughter, Cheryl, who was sleeping in the back seat has wandered off into town while he was unconscious. Grabbing his flashlight from the wreck Harry calls out for his daughter starts his journey through Silent Hill to find her. Once you have control of Harry move away from the car wreckage and take a look at your surroundings. It looks like Harry has crashed into some some sort of salvage yard. If you turn around and take a peek back into Harry’s vehicle you will spot stuffed teddy bear that belongs to Cheryl in the front seat. (It has a striped tie! A PS1 Dahlia reference?) Continuing away from the crash site Harry may make comments on different items you stop to look at. Usually just commenting on whether or not something belongs to his little girl. If you hit the (A) button on the wii-mote Harry will call out for Cheryl in a variety of ways. Since Cheryl is obviously no longer in the salvage yard make your way over to the rusted gate and climb over. On the other side enter the unlocked green door into the building. |
Deisaco Fir Tree Filling StationOnce inside you realize that this building is some sort of auto garage. Turn to the left and move forward through the door on the other end of the room into a back hallway. Ahead of Harry is a broken payphone next to a poster of “Important Silent Hill numbers.” At this point of the game you don’t have access to Harry’s cellphone so make note of any numbers you wish to call later. Some numbers are pretty nice call backs to previous Silent Hill titles. To Harry’s right are the men and women restrooms, which you can explore if you are so inclined (the men’s room has some lewd graffiti on the stall walls) and to the left is the exit into the Fir Tree Filling Station front shop. Inside the shop walk towards the back chalkboard in the front of the room that lists a menu of types of coffee drinks for sale. Turn left and enter the door with the “Employees Only” sign. Walk through the next hallway and find a locked door and your first door challenge! To unlock the door grab top pin on a chain and remove it from the latch. Next grab the red knob and slide the bolt to the right. Presto! The door is now unlocked. |
Streets of Silent HillMove out to the streets of Silent Hill past the filling station pumps and and make a left. After you pass the Auto Repair shop on the left and cross Finney street you should see two lit shops ahead: Theresa’s New 4 You Clothes and Clear Picture Cameras TV and Appliances. Once you enter or open the door of either shop the other will be inaccessible for the rest of the game. |
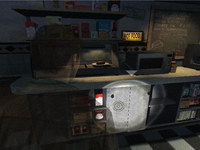
Enter Clear Picture Cameras TV and AppliancesMove down the red staircase and enter the door at the foot of the stairs. Walk towards the” Clear Picture” neon sign at the back of the store towards the back door. On the counter in front of the back door there’s an answering machine Harry can interact with and play a phone message. The tone and what the person in this message changes based on your profile! When you try the back door it’s locked so your only option is to go through ”Staff Only” door to the left. In the staff room is a room full of computer and video equipment. Walk to the security monitor ahead and take a closer look: turning the knob to the left shows several different security feeds of the store and to the bottom right of the screen is a large red button labeled “door release.” We want to exit the store so turn the knob to “3″ so you have a view above the locked door and hit the door release button so the light above the door turns green. Return into the main store and exit through the unlocked back door. Make a left and climb over the red fence to Harry’s right (ignore the “do not climb sign”) and go through the door straight ahead. In the next area turn to the left and climb over the wooden fence into a children’s playground. |
Enter Theresa’s New 4 You ClothesEnter the shop and move forward to the back counter at the back of the store. To the right is an answering machine Harry can interact with. Listen to the message and you find out that the key to unlock the back door is located in Jane’s coat. Good info to have!. Head through the door and make your way up the stairs to the second floor of the shop that looks more like an attic or storage area. To the left is a full length mirror and the locked exit door. If you had by passed the machine in the beginning there’s a helpful note reminding you that the key is located in Jane’s jacket. Turn around and look at the mannequins behind you modeling three different types of jackets. to find the key open one of the jackets, it doesn’t matter which one it will always be in the first jacket you select. With the key in hand exit the shop and climb down a ladder into a snowy alley. Move straight through the next door and then climb the fence into the children’s playground. |
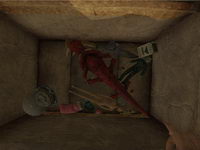
Children’s PlaygroundAhead and to Harry’s right is a swing hanging from a tree and directly to his right in the corner is a discarded bicycle with Cheryl’s (hey how did it get out of the car!) teddy bear hanging from the spokes. Across the playground is a locked door next to sign with the playground rules…looks like we need to find a key if we want to leave the playground. Walk over to the left side of the playground towards the red wagon with the “dead dog” graffiti. Walk around to the back and you should see three soda or beer cans. One of these cans hides the key to the playground door. Pick up and shake each can until you hear rattling inside. Turn the can that rattles over and dump out a small blue key inside. Pick up the key, unlock the door and exit the playground. On the next street there are two possible businesses open. To the left is the Diner 52 and to the right is the Good Old Days Tavern. Your psych profile to the point determines which will be lit and open to explore. If the tavern is open he will meet a red headed (unnamed) bartender. Inside Cafe 52 Harry will meet Officer Cybil Bennett. After Harry’s conversation with either you will now have access to Harry’s his snazzy smart phone. Be sure to check out all the cool functions: |
Phone Functions
|
In either business you can find the game’s first memento, Memento #1: A Winter Beacon of a small snow globe of a girl standing by a lighthouse. |
Mementos
|
 Throughout the game Harry will come across 25 objects that are significant in some way to his journey through Silent Hill. Collecting these mementos isn’t necessary but how many you find has an effect on the game’s ending.
Memento #1: A Winter Beacon
Walk around the diner counter and open the cabinet. Inside Harry should see the snow globe memento. |
As soon as Harry leaves either establishment his phone will beep. A waypoint to Harry’s home address on Levin Street has been marked on his GPS. Taking a look at the map it looks like we need to do some backtracking through the playground and Clear Picture or Theresa’s to start heading in the right direction to Levin Street. Enter the playground and look towards the swing hanging from the tree. See that staticy ghostly outline of a person? That’s a cue for you to whip out your phone and take a picture with Harry’s camera phone and reveal one of the many “echo photos” you can find during the game. |
Echo Messages and Photos
What’s most interesting about these echo messages is that many of them change with time you play. Some have up to 6 variations! |
 Through out the game Harry will come across “echoes” of past events that flesh out the back story of Silent Hill. These echos are triggered in two ways:
 Echo Photo #1: Girl On Swing
|
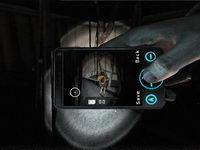 Take a photo of the empty swing and reveal Cheryl sitting on the swing clutching her teddy bear and wiping her eyes. Once the photo is successfully taken (you don’t need to save it) Harry will hear a voice message,
 Climb the back fence to exit the playground, walk through the alley and backtrack through Clear Picture or Theresa’s to discover . |
Echo Message #1: Happy Ever After / Prom
Theresa’s – Prom |
On leaving Clear Picture or Theresa’s walk toward Finney street and Harry will receive a phone call from “Home” it’s Cheryl and she desperately tells him he must run as the world freezes over. |
by Whitney Chavis (Always on My Mind) |
| 02. Nightmare 1: To Levin Street |