10-Star Ranking Guide
This section will take you through the basics of the ranking screen displayed at the end of the game, including what you can do to improve it and even obtain a perfect ranking of 10 stars.
Contents
01. Ranking Overview
02. Requirements
03. Difficulty Levels
04. Ending
05. Ending Clear
06. Saves
07. Total Time
08. Items
09. Defeating Enemies
10. Boat Stage Time
11. Total Damage
12. Walkthrough
13. Strategies
14. Puzzle Solutions
15. Hyper Spray Upgrades
01. Ranking Overview |
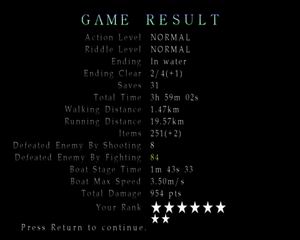
After finishing the game, a black screen will come up and display all of the following stats. |
| Action Level | The Action Level you chose at the beginning of the game |
| Riddle Level | The Riddle Level you chose at the beginning of the game |
| Ending | Which ending you received this time |
| Ending Clear | How many of the endings (and bonus endings) you've received |
| Saves | How many times you saved your game |
| Total Time | The total game clock time |
| Walking Distance | The total distance you walked |
| Running Distance | The total distance you ran |
| Items | How many items (and extra items) you collected |
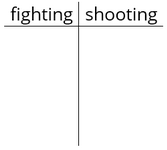
| Defeated Enemy By Shooting | How many enemies you killed by firearms |
| Defeated Enemy By Fighting | How many enemies you killed by melee |
| Boat Stage Time | The amount of time it took you to complete the boat stage |
| Boat Max Speed | The max speed you reached in the boat stage |
| Total Damage | The total damage you received |
| Your Rank | Your assessed ranking out of 10 (or 100) with large and small stars |
When your rank is displayed, at the bottom there will be large stars along with small stars. Each large star is worth 1 and each small star is worth 0.1. So if you have seven large stars and five small stars, your ranking is 7.5/10, or 75/100. Our goal here will be to achieve a perfect 10/10 or 100/100. What is your reward for achieving a 10-star ranking, you ask? Well, beyond the satisfaction you will also unlock the Green Hyper Spray, which can kill any enemy in the game in one spray, or end each boss fight in seconds. We'll cover the spray colours and required rankings at the end of this 10-star guide. Below are max amount of stars handed out in each category and what you will need for a perfect ranking. Note that 10 small stars equate to one large star.
|
02. Requirements
* GH/DC - Greatest Hits/Director's Cut (all versions except PS2 original) There's a lot of misinformation out there regarding this game's 10-star ranking so let's clarify a few things. The ending you receive does not matter as it awards no points, despite Dog and Rebirth being the only endings that will show up highlighted. Keep in mind Dog and UFO are the easiest routes through the game, bypassing the final two bosses to save you time and lots of potential damage. What does matter is that you have five main scenario endings in your save file. That's every ending in the original version for LMWRD and 4/4(+1). In the Greatest Hits/Director's Cut versions, you do not need any more endings, not UFO or even X for Maria's sub scenario -- 4/4(+1) with LMWRD will net you max points, while 4/4(+2) and 4/4(+3) will do the same. One wild card is that 3/4(+3) also nets you max points. This because each main scenario ending is worth 4 stars up to a max of 20, while Maria's X ending counts for 0. However you will need the X ending to acquire the Blue Gem and get all +8 extra items and highlight the bracketed item number, also allowing you to pick up fewer regular items. But understand that you do not need all extra items and thus the bracketed number highlighted for 10 stars. Now regarding items, it's not dependent on exact figures but instead a formula. This category awards a maximum of 15 small stars, handing out 1 star per 20 regular items and 1 star per extra item. The original version does not have the Blue Gem, therefore only +7 extra items can be found, which amounts to 7 stars. Therefore you'll need at least 8 stars from regular items in the original, which amounts to 160 items. 160(+7) is the fewest amount of items that will award 10 stars in this version, while 180(+6), 200(+5), 220(+4), 240(+3) and 260(+2) will also award 10 stars, as long as you don't go over in time searching for them. For the Greatest Hits/Director's Cut versions, the extra Blue Gem will allow you to score 8 stars from +8 extra items, therefore only requiring 7 more stars and thus 140 regular items as the minimum amount. But again, 160(+7), 180(+6), 200(+5), 220(+4), 240(+3) and 260(+2) will also net you max points. Note that the bracketed number will only be highlighted if all extra items have been found, but you do not need it highlighted for 10 stars. As for the regular item number, it must be highlighted yellow for a perfect ranking and it will only be so if the total number of stars are awarded for the full category. If you have 130(+8) for example, the bracketed number will be highlighted but the regular number won't be, since you'll be 1 star short of the max of 15 (10 more regular items needed), while 160(+6) will also net you 14 out 15 stars (+1 extra item or 20 regular items needed) and thus both item numbers will not be highlighted. This is also why it's impossible to highlight the item number in your first run, since there's not enough regular items in the game to meet the max points threshold for this category alone, nor even with just +1 extra item found. Another misreported fact is that using extra weapons will dock you points, which while true for other games does not apply here, since you can even abuse the Green Hyper Spray to easily get another 10-star ranking. I've personally gotten a 10-star ranking while using the Chainsaw (legitimately on Eddie) and the Hyper Spray (for testing purposes). Note that the PC version does not dock you for saves. The save number will only be highlighted if 2 or less, but 5 stars are always awarded by default in this version, perhaps to compensate for potential crashes. This allows you to save as many times as you wish and even abuse the quick save function that resets James' stamina to always run at full speed. And thus the quickest and easiest possible route through the game and a 10-star ranking is the PC version. This is why you may see ranking screens with saves in the thousands while stile achieving a perfect rank. But hey, if just going for any 10-star ranking, go for 2 saves to keep the challenge and the accomplishment meaningful. Lastly, Hard or Extra Riddle Level will both award you with max points, and while the Boat Stage Time must be under 1m 20s, your max speed does not directly matter. But of course a slow enough speed will prevent you from reaching the target time. MY STATS:
These are my personal stats for my first 10-star ranking, achieved on my second attempt. In my first real attempt, I ended up with a 9.9 after exceeding the maximum damage requirement by around 15 points. I was grabbed twice by the Abstract Daddy, which really frustrated me as it surely put me over, but the whole run had room for improvement and I did much better on the second attempt as seen here. For the record, I did attempt one practice run beforehand to familiarize myself with the run and attempt different strategies at a few tougher spots, but this was never a real attempt and I intentionally saved it at several key locations, removing a 10-star ranking as a possibility. Ultimately I did still end up with an 8.8, which was good for a practice run, and I certainly recommend trying this to ease yourself in rather than diving straight into the deep end. While fully learning the exact requirements, I've since gotten a few more 10-star rankings, reducing my time to under 2 hours while taking less than 300 points in damage and limiting kills and items to near the thresholds mentioned at the top, but these stats will remain here as a sign of my first accomplishment and also to show you something more within reach. Although keep in mind I collected way more items than necessary while adding over 30 extra kills. |
03. Difficulty LevelsTo achieve a perfect ranking you must play on Hard Action Level and either Hard or Extra Riddle level. Just to clarify, once you complete Easy, Normal and Hard Riddle Levels, you will unlock Extra. Extra will never appear in the main menu selection, but after unlocking it and choosing Hard Riddle Level that first time, it'll actually be Extra. You can verify this in the bottom right of the save/load menu while hovering over your save file to read "Riddle: Extra". Upon completing Extra, the next time you select Hard it will revert back to Hard and then alternate between Extra and Hard in each subsequent run. While it doesn't matter if you're on Hard or Extra for your ranking, you'll want to know your riddle level so you know what your puzzle solutions will be. If you're not sure which part of the cycle you're on, you can start a new game, save at the first save point (in a new save slot) and check it there. Then just start a fresh new game and go about your run, knowing exactly what your solutions will be. If you don't want to bother with that hassle, you could just wait until the old coin desk puzzle and read the memo to learn which difficulty you're on. Match your riddle memo with the correct one in that puzzle section of the walkthrough to confirm your difficulty, while the game is paused to not lose any time. And while Hard Riddle Level works just as well, it may be a little more rewarding to see the highest "Extra" Riddle Level listed in your ranking screen. So hey, why not go for the highest? |
04. EndingDespite what you may have heard elsewhere, a 10-star ranking is possible with any ending in the main scenario. This is because no points are awarded for the current ending received itself, but rather which endings you've achieved in your file including this run, illustrated with the next stat of Ending Clear. That said, Rebirth and Dog are the only endings that will appear highlighted when achieved, although no points are awarded for this. Either way, I strongly suggest going for the Dog ending since it bypasses the final two bosses of the game, making it even easier to meet the damage requirement, while also shaving off some time. Additionally the UFO ending in the Greatest Hits/Director's Cut versions does the same but you'll need to remember to use the Blue Gem at the three required locations, all while ending the game before the final extra item appears in Nightmare Hotel (book: "Crimson Ceremony" in the Reading Room), which is not required either way but can help your item count if playing it close. If skipping it, you'll need at least 160(+7) items otherwise. Therefore Dog is the simplest and least complicated way to go, but by all means if you think you can handle the final two bosses, go for it and get your bragging rights of completing the full game with 10 stars. |
05. Ending ClearThis category refers to how many regular and bonus endings you've received in your file. 4 stars are handed out for each main scenario ending up to a max of 20 stars, therefore making the requirement at least 5 endings. Here is how the stars are awarded for each ending:
* Greatest Hits/Director's Cut versions only Since the original PS2 version only has 5 total endings, which all award 4 points, they are all required for 4/4(+1) via LMWRD. In the Greatest Hits/Director's Cut versions, the point system works the same way and thus 4/4(+1) with LMWRD still nets the max score, while 4/4(+2) and 4/4(+3) will do the same but are not necessary, despite what you may have read elsewhere. As you can see, the BFAW X ending awards 0 stars, and therefore 4/4(+1) via LMWRX will award you with 16/20 stars for the category and thus is ineligible for a perfect ranking. 4/4(+1) via LMWRU is not possible since the UFO ending requires the Blue Gem which requires the X ending. However 4/4(+2) via LMWRUX awards 20 stars and is thus eligible. Note that in the GH/DC versions you actually don't require 4/4 main endings as 3/4(+3) is a possible combination that still awards 20 points. Refer to below for a full list of combinations that will show up highlighted and award you the max points. ELIGIBLE COMBINATIONS:
Note that all 5 ending combinations that have the X ending will not net max points, while any 6-7 ending combination will. So while 4/4(+1) works if Dog is the +1, it will not if +1 is X. Just make sure you understand that. And again remember that the UFO ending cannot occur without the X ending beforehand, while LMW or R are required to achieve the Dog ending. Any other combination with less than 5 endings obviously will not net you max points in this category. To keep it simple, just go for 4/4(+1) via LMWRD, while U and X can be added on if you wish for 4/4(+3). To verify which endings you have received in your game file, visit the save/load menu and press the left or right D-pad buttons to toggle the display at the right of the screen. Normally showing your current play time, switch until you see a display of letters side by side. Each letter corresponds to one ending as demonstrated at the top of this section. Always make sure you're loading the correct file before starting your run. Find your previous "Game Result" save in the Load menu, verify it has the needed endings in the save screen (or the result screen), load the file to see your previous ranking and ensure it's the file you will continue, then back out and start a New Game, highlighted in yellow. |
06. SavesYou must save a maximum of twice, so it's important that you choose very wisely where you're going to do this. I strongly suggest the following two locations.
Somewhere earlier in the hospital may also work in case you receive too much damage from the aggressive Nurses there. Pyramid Head in the basement is more or less a formality once you've got the hang of it, but who knows, mistakes can always happen. Your call but I suggest just keeping that one. If you're unsure about the Abstract Daddy fight you could save just before it instead of Eddie, although it's fairly straightforward to avoid any damage there or at least highly limit it with the strategy in this guide. And frankly, Eddie is way more unpredictable and difficult to avoid damage. If you feel better about the Abstract Daddy and Eddie fights but are concerned about the boat stage, you could instead save on the dock. But honestly, Eddie is a lot more unpredictable and naturally difficult than the boat stage which is entirely in your hands (and simply requires practice). And frankly, I recommend completely mastering the boat section in a practice run so it becomes more or less a formality anyway. Either way, choose the two spots that work best for you and stick to them. And be sure not to overwrite your first save with your second but rather use a new slot in case you want to revert back and try a section again without having to start all over. Note that the PC version not only allows you to manually save wherever you want without a specified save point (barring some areas), it also removes any save requirement from your ranking entirely and gives you the 5 stars for this category by default. Thus you can save however many times you like and still achieve a 10-star ranking, or also even abuse the quick save function that resets James' stamina and allows him to always run at full speed and achieve a faster time. This is why you may see ranking screens with saves in the thousands. But that's no fun, is it? |
07. Total TimeThis is one of the more automatic aspects of achieving 10 stars, which is beating the game in under 3 hours. Remember that the requirement in SH1 was 1h30m which made things very tight, so be thankful for the very generous extra time here. Assuming you're ready for a perfect ranking, you really should be able to go below 2h30m while meeting all other requirements, and that extra half hour or more just serves as an unneeded buffer. While you shouldn't be wasting any time while not killing enemies or collecting items, you really shouldn't be stressing for time either. So if you're cutting it close, you need to optimize your run by knowing exactly where to go, what supplies are worth picking up, and what enemies aren't necessary to spend time killing. That said, you really can't zoom right through the game either since you'll need to hit at least 150 kills while collecting at least 140-160 items. So find a balance where you're consistently increasing your kill and item counts between heading directly to the next objective. |
08. ItemsThis is the amount of regular item pickups you must collect plus extra items in brackets. Regular items include all key items plus ammo and health supplies, but not maps (however the required map of Silent Hill counts for some reason). Items in your starting inventory do not count. You may read this requirement as 150(+8) from other sources, and while this combo will net you gold in the category, it is incorrect as a threshold. There is no exact number of regular items nor extra items that you need, but rather you must obtain the maximum of 15 small stars in this category, which are awarded differently per number of regular items and extra items. It works like this:
As you can see, the more extra items you find, the fewer regular items you need to meet the threshold. This makes the bare minimum number of items 140(+8) in the Greatest Hits/Director's Cut versions (all versions with Maria's sub scenario), while the original black label PS2 version only has +7 extra items and thus the lowest requirement is 160(+7). Find a full list of item counts below along with the math that will net you the max 15 stars in this category.
* Greatest Hits/Director's Cut versions only Yes, that means you do not need all extra items to reach 10 stars. But it certainly makes your work easier to collect them as you'll need fewer regular items. And there's not enough regular items in the game to hit 280 so the combinations end with 260(+2). You may have also noticed on your first run ranking screen you can never have your item number highlighted, even if you've collected every item in the game. This is because without any valuable extra items, which are unlocked after your first run, you haven't hit the 15 star max of this category. Also note that if you have the original PS2 version and follow the supposed requirement you may see elsewhere of 150 regular items plus all extra items, you will end up with 14 out of 15 stars and not achieve a 10-star ranking. Instead you must aim for 160(+7) as the minimum or some other combination above. This is because the Blue Gem doesn't exist in this version and thus you can only get +7 extra items instead of +8, losing a potential full small star in the process. All that said, collecting items will be among the least of your concerns in this game's 10-star ranking, as you'll easily reach 180-200+ without making a concerned effort to go out of your way for anything. But even then you'll want as much ammo as you can find and you'll have a big time buffer, so by all means step into those side rooms and explore the streets a bit to stock up. But if you are interested in streamlining your 10-star run, turn to the above guidelines for whichever combination works for you and record your items as you go, either on a notepad or on a computer document alongside your kill counts. Keep in mind that health items are useless beyond a certain point since if you take over 500 damage you won't be making it anyway, although it's crucial to keep feeding your hungry firearms so you don't run out. So go ahead and ignore health items once you have enough and focus on ammo pickups, just as long as you're well aware of what the requirements are and you're capable of meeting them. Otherwise I'd suggest just picking up everything you see in your immediate surrounding anyway so it's not even a concern. While you should already know the game well enough, one tip is that James will aim his head at any item nearby, so you can use this to your advantage. Do keep in mind that he also stares at Maria and enemies. Extra Item LocationsBelow are the locations and order of every extra item found in the game. You should have them all unlocked before attempting a 10-star run but feel free to check their requirements in the Unlockables and Secrets section.
If going for the Dog ending and you're playing it very closely with the item count, don't forget to step down to the 2F Reading Room to grab the "Crimson Ceremony" book before entering the 3F Observation Room. Note that the UFO ending finishes the game before that book ever appears, so you'll need to ensure you've met the item count requirement without it if going for that ending. Also note that while using extra weapons in SH1 and SH3 can deduct from your ranking, the Hyper Spray and Chainsaw don't do the same here, despite what you may have read elsewhere. Although frankly the Chainsaw is rather difficult to use anyway (however it can be very helpful for Eddie) and the Hyper Spray does light damage to James when used, so perhaps it's best to just forget about them and play normally. But if you do wish to use them, have no fear of ruining your ranking. |
09. Defeating EnemiesThis is one of the more difficult aspects of a 10-star ranking since you must kill a total of at least 150 enemies, thus exposing yourself to potential attacks very often. These 150 enemies include 75 that must be defeated purely with bullets, and 75 that must at least be finished by a kick. So you can relax and keep those melee weapons on the shelf, just as long as you wisely deliver a whole lot of kicks after knocking enemies down. As for how your ranking screen calculates this, you are awarded 1 star per 5 kills in each category up to a maximum of 15 stars. 75+ each awards you with the max of 15 + 15 = 30 stars. "Shooting" vs "Fighting" KillsTo clarify, the most efficient way to kill by "fighting" is to shoot an enemy until it drops, then run up to it and kick it. Doesn't matter that you shot it since it was your foot that killed it before it could get back up. As for melee weapons, you will need to kill the first Lying Figure with one and they can be helpful for some boss strategies, but otherwise I suggest avoiding them completely as they expose you too much to potential enemy attacks. As for the "shooting" requirement, these enemies must die from bullets alone. Thus they will require more bullets than normal, with some enemies more resilient than others while most will regularly stand back up again between shots. And of course, even if you unload 10 bullets into an enemy, if it's still alive and you kick it, that will be a "fighting" kill. So do stay on top of which enemies you're killing by fighting and which by shooting. Only use the Handgun and Shotgun for shooting kills, leaving the slow Hunting Rifle for the final two bosses if playing the full game. Again, avoid melee weapons on regular enemies entirely after your first kill since they put you in dangerous, avoidable positions. Don't worry, it's fine to enter the apartments without killing anything beyond the first creature, since you'll meet many more enemies the rest of the way. Keeping Track of KillsKilling 75 enemies in each manner is not necessarily a walk in the park and you'll want to be sure you have enough by the end of the game, so I highly recommend grabbing a notepad and drawing a chart like so:
After clearing out a room, hallway, or grouping of enemies in the streets, press Select to pause the game (which stops the game clock) and jot down your kills. Be sure to use tally marks (|) so you can just keep adding them. Alternatively if you have a computer you can set it in front of you and keep updating your kill counts in a notepad application, pausing the game when doing so to freeze the timer. Note that the 3 Flesh Lips, Abstract Daddy and Mary/Maria all count as kills, but Eddie and both Pyramid Head boss fights don't. Perhaps this is because Eddie is not an enemy monster and James doesn't perform the killing blow on the Pyramid Heads, while the first battle is a stalemate. In the PC version, avoid counting the first Lying Figure you kill while getting the Radio, since the game doesn't seem to count it for some reason, perhaps since it just dies without a kick unlike other enemies. Because of this, it's actually possible to finish the game with 0 fighting kills, despite the encounter. Otherwise, in my experience the exact kill counts can be slightly off or sometimes count in the wrong category, so try to go for at least 5 insurance kills on each side just in case. Killing Each Enemy TypeWhile most of the enemies you'll be killing over your run will be humanoid creatures that involve near identical strategies, the approach for each can be slightly varied, while others are very different. Refer to the listed strategies for each enemy below. Lying Figure With the Shotgun, 1 close blast will usually knock them down while 3-4 overall close shots should kill them by shooting. Shoot once to knock down, run up and blast them on the ground, and if they start standing up, wait for them to fully rise and get in another blast, which will often kill them. But if not, a final 4th shot while on the ground should do it. You may sometimes get lucky with only two shots overall, perhaps if you're really close. Creeper Mannequin Bubble Head Nurse With the Shotgun you want to get close but not too close so that you get smacked before you shoot or in case they don't get knocked down. One blast usually will topple them, with another 2-3 to kill them. Get your first shot, get your next while down and wait for them to stand. Don't shoot before they're fully upright or you may get smacked while pumping. Blast them once up and they'll fall down again, sometimes dying. But if still kicking, one more shell should do the trick. Occasionally you may get a 2 blast kill, especially from ultra close range. Take them by surprise from right behind whenever you can. Mandarin Abstract Daddy Don't be intimidated when facing two of them in the hotel halls since the rear one will just turn around and head back the other way instead of charging through or alongside the first. Find that sweet spot where you wait for them to get somewhat closer for a high power first blast and enough time so that you can get off one more before they reach you and they'll go down. Respawning EnemiesNote that enemies will respawn on the regular throughout your run as you return to the same rooms and hallways multiple times. This is great for building up your kill counts and you can even exploit this by intentionally leaving and returning for more kills. This is why it's also a great idea to always clear out rooms and halls the first time so that you lock in those kills and get more to appear next time. The hospital becomes a dangerous place for respawns however, so always enter every room and hallway ready to fire in case a Nurse is within whacking range, which is no rarity. The same may happen in other locations, particularly with Lying Figures such as the one in the warden's office of the prison and several other halls there. Lying Figures will also often respawn in the prone position and crawl around at high speeds. To handle them most efficiently, 1-2 Handgun shots and a kick if close enough will handle them. I suggest forgetting about shooting kills in this case (with the Handgun or Shotgun) since they'll keep running around between shots and may damage you. Bullet AdjustOne of your biggest concerns should be always making sure you have enough ammo to keep firing away with your toys. While I suggest getting every ammo pickup you find in your immediate surrounding, it probably won't be nearly enough under normal circumstances. But with Bullet Adjust set to x3, you will receive 30 bullets for every Handgun pickup and 18 and 12 for the Shotgun and Rifle. Instead of 40 Handgun Bullets from the apartments safe you'll get 120, and 90 Shotgun Shells from the Trick or Treat box in the hospital rather than 30. To be frank, I don't see how you can achieve a 10-star ranking without doing this, as even with so much ammo you may still run out or be forced into strictly fighting kills to conserve ammo at some points. |
10. Boat Stage TimeThe requirement for the boat stage is to complete it in less than 1m20s, which requires a lot of skill and practice since you must use both analog sticks to control the boat on Hard in the console versions. Do note that the PC version allows you to control the boat normally with the D-pad or analog stick just like the other levels, if using a controller (or the arrow keys on a keyboard). Simply turn to the light and row ahead and you should have no problem hitting 1m00s or below in that case. Otherwise, you may have a hard time here on console. I highly recommend getting a ton of practice with this in a Hard practice run. Save on the dock after defeating Eddie and make sure you totally have this down before you attempt a 10-star ranking, otherwise you may provide yourself with a lot of frustration and have to redo the Eddie fight while undoing a lot of potential good work. As a refresher, you must rotate both analog sticks at the same time to row the boat. Rotate the left stick counter-clockwise and right the stick clockwise to move forward, both sticks clockwise to turn left and both sticks counter-clockwise to turn right. Each stick controls the appropriate oar, so turning one faster than the other will also help you with fine tuning if you need to make a slight adjustment. Once you understand the controls, practice it for a while. Turn for the the light and head all the way towards it, then use Soft Reset (Start + Select + L1 + R1) to reset the game and load your save file again. Forget about time and just focus on controlling the boat in those first attempts. Once you've got a hang of it, now use a stopwatch or cell phone timer to time yourself and aim for under 1m20s. Once you're under 1m20, don't stop there. Give yourself a buffer and see if you can get your time down to around 1m00-1m05s. It's not fully necessary for the ranking, but you really don't want to cut it close here and it's rather straightforward once you've nailed the execution. It should be all business in the boat. Get in and immediately turn to the right. Stop turning after a couple seconds and switch to forward movement, well before you can even see the light since the turning momentum will continue to carry you. If you wait until you see the light to stop turning, you'll likely overshoot it and require a big correction, so do anticipate the light coming into sight before it does. If you do sense that you are going to steer too far, fight it with a strong countersteer before you get there and try to stay straight on the light. Give it enough practice until you get that transition from turning to going straight since it's the key factor to getting this right. From there, rotate the analog sticks at a fast enough rate to hit full speed and make any small adjustments as you need to. Do your best to disregard what James appears to be doing at any given time in the boat, as it can look like he stops rowing to look behind him while you change rowing inputs. Rest assured that whatever action you are performing is working as intended even if James looks like he has stopped rowing. If you can do this in 1m05s or less, you're good to go and that's a great buffer. Keep in mind that when under pressure in your 10-star run without a save right at the dock to back you up, things can always go wrong and maybe you'll turn the boat too much and struggle with the corrections. This is why it's important to really be able to nail this stage with a time under 1m05s so that if you do have a bit of a slip up when it actually matters, you have those 15 seconds or so to deal with it. If you're having trouble with the controls and holding the controller, consider trying an alternate method: set the controller in your lap and use the inside of your palms to rotate the analog sticks. It may become tiring to keep using your thumbs and this can serve as an interesting alternative. Lastly, if you're really having trouble with this and can't hit under 1m20s regularly, you may consider saving here as your second allotted save, rather than my suggestion of right before the Eddie boss. I would stress to practice and practice the boat stage until you learn it right, but if it's just not clicking then consider this as an option. If this is your plan, do make sure you have a thorough understanding of the Eddie boss to prevent it from ruining your run instead, since it may be the most difficult single interaction during the run. If you're curious about boat max speed, it really doesn't matter but obviously if it's low enough you won't make the target time. And while speed is capped at 3.50m/s on Normal and lower, the new controls on Hard allow you to go a bit faster to upwards of ~3.90m/s in the console versions if you're really good at it. But don't get sidetracked as 3.50m/s is plenty enough to gold the stage. |
11. Total DamageThe damage requirement for 10 stars is receiving under 500 points of total damage. This is arguably the hardest part in achieving a 10-star ranking, which is something that wasn't even a concern in SH1. Certain parts of the game, especially the hospital, can overwhelm you with aggressive enemies that can be hard to efficiently manage, and at least one boss fight may be difficult to avoid heavy damage, which is Eddie (and that's why it's recommended to save right before him). For full boss strategies, refer to the Strategies section below. But enough with boss fights, let's talk about normal enemy damage. A single attack by Lying Figures, Mannequins and Nurses won't hurt you too much, but it can add up very quickly if you're taking hits every now and then. Attacks from these enemies will generally inflict around 10-20 points of damage, with Nurses at the highest end of that spectrum. You should be able to make it to the hospital without taking any damage, but it's not the end of the world if you don't, especially if it's just a few hits. Stay away from all enemies on the streets before the apartments and keep your distance when shooting enemies inside. There are two parts on the street where a Lying Figure will lunge out from under a vehicle: the white van on Martin Street and the Jeep Cherokee on Katz Street near Neely Street. Stay away from these vehicles by running along the walls near them. For the van, stay along the right wall while first passing and run back along the same wall. For the Jeep, hug the wall around the corner after moving under the low roof of the building right there, or just run around the vehicle itself. And watch out for any Creepers before you have a gun. Health should never be a problem whatsoever since there's enough health to heal 500 points many times over, and if you need that many health items then you likely won't be meeting the requirement. Since a Health Drink recovers a quarter of your health, a First-Aid Kit half and an Ampoule your full status, 500 points of health works out to the equivalent of eight Health Drinks and six First-Aid Kits. Or 20 Health Drinks or 10 First-Aid Kits or 5 Ampoules. So if you use more than that then you've likely gone over the requirement. Note that while Pyramid Head will knock you off the hospital rooftop and bring you to near death, this will not count towards your damage points. Therefore it is possible to beat the game with 0 damage points in a no hit run, and there is no benefit to avoid healing until that location. |
12. WalkthroughThis is a general walkthrough for balancing kills, pointing out key ammo pickups to get you started, and some of the more notable spots where you need to be cautious. For boss strategies and a few other specific location strategies, read the Strategies section just below, and find kill methods for every enemy type under Defeating Enemies above, although we'll cover some of that here too. Find the Puzzle Solutions section below as well, while the walkthrough or speed walkthrough will help you for anything related to the normal tasks you must accomplish. That said, you really should know what to do in every area if going for 10-stars. Lastly, while I will point out important ammo pickups during the early stages after getting the Handgun and Shotgun, it's up to you to keep finding your own pickups after that, which is frankly easy enough as they're everywhere. I'll throw in quick reminders for extra weapon/item pickups and ending triggers, but it'll be up to you to acquire enough items to meet the threshold as described in the Items section above. Now let's get started. Streets Before ApartmentsReminder: Grab the Blue Gem in the washroom if playing the Greatest Hits/Director's Cut version and it's unlocked (although it's not mandatory), plus the Chainsaw after the graveyard. Reminder: Although it tends to carry over during runs, consider ensuring your bullet adjust is set to x3 before picking up ammo. Try to start things off well with the first forced encounter with the Lying Figure at the construction site. Either wait for it to spit as you're just out of range, run somewhat around it to bait it into an attack, or rush around it and beat it up before it fully turns to you. After killing the first Lying Figure, run straight for the Apartment Gate Key and enter the apartments without fighting anything else since melee kills are too risky. Be ready to run around the Creeper in the alley while getting that key, and stay away from the car where a Lying Figure will dart out if near, as well as the Jeep Cherokee closer to the apartments. It's also important to get a head start on Handgun ammo under the roof on the northwest corner of Katz and Neely (30 bullets with x3 adjust). ApartmentsIn Wood Side, avoid the Creeper near the first Lying Figure and move past them both to get the Flashlight in 205 right near them. Keep the light off as you pass any more enemies in the hall until you get the Handgun. This makes them more unlikely to attack as you run by. Once you've got the Handgun, I recommend using it exclusively until the nighttime streets after the hospital, with the one exception of using the Shotgun for the Flesh Lips boss there. Lying Figures, Mannequins and Nurses will require 4-5 shots (sometimes 3) to knock down, while Creepers will take 2 to flip over. Since you won't have much ammo in the apartments, focus entirely on fighting kills by kicking all downed enemies. Keep track of your kills on a notepad or computer. Always shoot Lying Figures from a safe range and only approach while shooting if you're certain you have enough ammo in the clip to avoid a reload. And always go for a kick asap to prevent them from lunging away. If you kill them from just outside their spit range you'll always have just enough time to run in for the kick. Note that Lying Figures will regularly respawn when returning to hallways, often found in the prone position. To kill them, quickly target and shoot. If close enough, one bullet will do while followed with a quick kick. Otherwise, consider firing a few shots as you approach them. Always be careful in halls with Creepers, such as 2F of Wood Side. Take out other enemies quickly if possible, but be ready to aim and shoot the Creeper there if it approaches you (2 shots and a kick). And be careful of the Lying Figure that appears just inside the 3F hallway after ascending the north stairwell. Enter with your gun ready to fire and do so if it's there or you may be attacked. Lure the three Lying Figures to one side before jumping in the pool to grab the coin. I suggest not fighting them since it's too risky. There'll be two Lying Figures on your right just inside the north wing with another down the hall straight ahead. Immediately turn and down the first one, kick it and do the same to the next one after it. You must do this quickly to avoid getting spat at by the second one. Then return to kill the third one while there's another one the other way. Also be sure to grab these early Handgun Bullet pickups to remain adequately fueled:
All this ammo alone is enough for 50-70 kills, which can even get you through the hospital. You're welcome to look for more in Wood Side while killing enemies in side rooms but it's not entirely necessary. Once you crack the safe in Blue Creek, which is always 100% recommended, Handgun ammo should no longer be a concern for the rest of the game. Still keep picking it up when found, including in a few more spots in Blue Creek on your direct path, but you should have plenty to spare from here on out. Just inside the 1F Blue Creek hall, wait for the Creeper to come from James' right and kill it first. Always clear out halls one side at a time in terms of other enemies. You should have plenty of ammo to use 40-50 bullets on Pyramid Head and end that battle in 45 seconds or so and advance to Maria. Find the full strategy under Strategies below. Reminder: Grab the White Chrism from the kitchen of 105 in Blue Creek, while solving the coin puzzle. Streets Before HospitalAfter meeting Maria is a point where you can start getting shooting kills with the Handgun, but note that it takes 20-30+ bullets per enemy and a lot of time, thus I recommend just waiting for the Shotgun and going on a rampage in the dark streets where there's plenty of enemies to catch you right up. If going for Handgun shooting kills though, understand that reloading in your inventory and being super quick will save you time and ammo by preventing enemies from standing up if possible in some cases, at least for the second time. But either way they should end up dying after somewhere in the 20-30 bullet range. Again, just throwing the option out there but I recommend not wasting time with Handgun shooting kills. Instead just kill all enemies in the daytime streets by kicking, and don't waste your time going past Pete's Bowl-O-Rama unless you really want a ton of kills. 25-35 kills before the hospital is totally fine. Reminder: Grab the Dog Key across from Rosewater Park and the Book: "Lost Memories" at Texxon Gas. You'll also likely want the Steel Pipe for Eddie. HospitalThe hospital is potentially the most dangerous area of the game due to how aggressive Nurses are and how often you'll enter rooms or halls with them in attack range. Always enter every room and hall ready to shoot if necessary, and always play it safe by shooting Nurses from a safe range when you can, then run in for the kick. Alternatively you can approach them as you fire, but only ever do this if you are 100% certain you have enough ammo in your clip to drop them. Otherwise you may reload right in front of them and you WILL get smacked in this case. Trust me, this will happen regularly if you are not totally on top of it. I recommend reloading in the inventory after 1-2 kills max, knowing that Nurses generally take 4-5 shots to down. As a rule of thumb, if you are not 100% certain you have 5-6+ bullets in your Handgun, enter the inventory and RELOAD, or at the very least do not approach an enemy while firing. You have no idea how many times this will save you. You may be fine most of the time but suddenly will come a lapse in judgement and you'll reload at the worst time and definitely get smacked. Keep doing it and the damage will add up, while getting through the hospital unscathed is very doable if you just play it smart and avoid these mistakes. One wild card in the hospital is Maria. If she gets hit enough times by Nurses or accidentally shot by you, it's Game Over. Always be careful around her and consider immediately heading up to 3F to drop her off in S3 if you don't want to take any risks. If by chance you are going for the Maria ending, just spam and skip conversations with her in S3 after dropping her off and you'll be fine (do the same at the Labyrinth door). An important thing to stay on top of in the hospital is always being ready to fire when passing through doors. This is especially true when entering the employee wings either from the stairwell or the patient wing since Nurses will regularly be waiting already within range. If you're not quick to raise your gun and shoot you very well may take damage within a second of passing through these doors, especially on the third floor. It's the same thing in some optional rooms, but generally you don't need to risk it with those. You may have to be ready for the Nurse just outside M6 of the Nightmare Hospital if you kill her anywhere near the door before exiting since she sometimes regenerates. Same thing may apply to Nurses in other spots, so always be prepared. Be sure to heal immediately after getting knocked off the rooftop as you'll die if you take more damage. And don't worry, that fall does not count for any damage points despite having to heal. Remember to grab the Shotgun in the Women's Locker Room and be certain to grab at least two pickups of Shotgun Shells (36 shells at x3 adjust) for the Flesh Lips boss fight. The safest two are found in the empty rooms below:
There's another in the 1F Doctor's Lounge but the optional trip involving the Examination Room Key isn't fully necessary, plus there's one more pack in M6 but you'll have to fight two Nurses in close proximity, which is quite doable but it's your call and not totally necessary either. Reminder: Use the Blue Gem in the Nightmare Hospital Garden right after the Flesh Lips boss, if going for the UFO ending. This is the first of three locations to use it. After using most of those shells (and the 6 in the Shotgun), keep an eye out for more in the Nightmare Hospital to ready you for the streets. These should all be acquired:
Note that there's another pack in M4 but it's guarded by two Nurses and isn't fully necessary to take the risk, but that's your decision (it's certainly manageable without damage but you must be efficient). The above ammo is good for 30-40+ shooting kills alone, but you'll find plenty more pickups in the streets and the rest of the game to keep you stocked up. When clearing out the 2F and 3F Nightmare wings while starting from the elevator, go for the right side first and then back the other way. And be quick as you don't want to get snuck up on from behind. Enemies will regenerate fairly regularly as well, so get ready to kill them again after leaving rooms and other hallways. Reminder: Save your game in the employee wing stairwell right after collecting the Trick or Treat items in the 3F Storeroom and before meeting Pyramid Head in the basement, if using the recommended saves. Be sure to record your specific kill counts by this point in case you need to load and continue from here. Use 15-20 Handgun bullets to clear Pyramid Head in the basement (find the full strategy under Strategies below) and exit the hospital to begin your nighttime rampage. Dark StreetsIdeally you'll want to exit the hospital with around 55-65+ kills, which should generally all be by fighting. But now is where you'll begin your rampage by going only for shooting kills in the dark streets. There's enough enemies around to net you 50-60+ kills here alone and more or less balance out your kill categories. So don't rush this segment as it's the crucial part where you'll get most of your business done. And be sure to collect items appearing all over town, especially the ammo. This is also the point where you should officially switch to the Shotgun to kill everything at least up to entering the Historical Society. The Shotgun will allow you to get shooting kills from Nurses and Mannequins with just 2-4 shells, but make sure to carefully follow the below process. For Nurses, approach just outside of their whack range. Consider waiting just another second to let them get a bit closer but not so they can actually hit you, but try to get the hang of finding that sweet spot by running straight in without getting too close. Blast them once which will topple them if close enough. Now run up to them, preferably their side or rear and blast them while down. Sometimes they'll die here but most often they'll stand back up. Now hold your fire and WAIT for them to entirely stand up. DO NOT fire at them while they are standing up or you will screw yourself over since they won't get stunned and you'll be completely open to an attack. Wait until they finish standing and then blast again. If you're at their side or rear it gives you a little more of a buffer as they turn to you, in case they're otherwise quick to swipe or if your blast oddly doesn't topple them (may happen rarely). Sometimes they'll die on that 3rd shot as they fall to the ground and sometimes they'll require a final 4th shot on the ground to finish off. It's super important to stay on top of your loaded ammo count to avoid stepping in front of an enemy and reloading right in their face where you'll receive a smacking. So as a rule of thumb, if you're not 100% certain what your bullet count is in the gun, reload from your inventory. In general you'll want to reload after every 2 kills max, while when enemies take 4 shots you may want to reload after every kill. Trust me, being smart will save you from ever being caught with an in-game reload. So again, approach and blast them just outside of their attack range. Get close and blast once while downed. Wait for them to fully stand up and blast again. Then fire one more blast while downed. Some will die on the 2nd shot, many on the 3rd, and fair bit will require 4. They don't seem to require more than 4 unless you're shooting from too far away, which you may have to do if fighting 2 at the same time. Mannequins work the exact same way except they tend to die in 2-3 blasts more often. You can also get closer since they don't have pipes and are rather useless for a couple seconds after activating, but still don't get careless, and ALWAYS wait for them to fully stand before shooting or you're pretty much guaranteed to be hit. Mannequins will smack you if you give them a chance and Nurses in particular will absolutely abuse you if you don't do this properly. Sometimes you'll encounter two Nurses coming at you together. In these cases, play it safe and don't get too close while shooting. Try to knock one down then immediately the other. You'll probably only have time to shoot the second one while downed so go for that and step away and repeat the same method. Remember to pick up all or at least most ammo you see in the streets. One big spot in particular is the north side of Rendell Street between Carroll and Munson. There's an open lot where you'll find x2 Shotgun Shells and x1 Rifle Shells, plus x1 Rifle Shells and x1 Handgun Bullets just a bit down, and then a while after that x1 Shotgun Shells and x1 Health Drink on the sidewalk, several seconds after the delivery truck. Also be sure to keep an eye out for Mannequins since they don't make noise or move around until you find them. Look back and forth to get a good survey of the area and don't hesitate to venture off your path a bit to find enemies. Nurses while generally easier to find due to their noises can also easily sneak away and disappear in the dark in some cases, so stay on top of them by looking around. You'd be surprised how far away they can venture in a short period while you're distracted with another enemy. Reminder: Grab the Hyper Spray from the camper trailer in East South Vale. It's most efficient to wait until nighttime when passing through. You can also grab the Dog Key and Book: "Lost Memories" in West South Vale if you forgot them in the daytime. Historical Society and PrisonOnce you hit the Historical Society, you'll want to have around 50-60+ kills in each category, with at least one category close to or past 60. If one category is a bit behind the other, start trying to balance them out. While counting kills multiple times in this game I've noticed the counters to be a bit temperamental and some kills either don't seem to be counted or count in the wrong category. Just to be sure, make sure to aim for an extra 5-10 kills in each category. Reminder: Grab the Obsidian Goblet in the second exhibition room of the museum. Now that you'll be finding Lying Figures again, I suggest turning to the Handgun here and there to handle them in certain situations where you don't want to get too close, since their spit range is a bit more extended than Nurses with their pipes. Do understand though that they will fall on their stomachs with the Handgun, allowing them to crawl away. Meanwhile the Shotgun knocks them on their backs where they cannot crawl away. So be sure to find a balance between the two, and remember that they are to be treated the same way as Nurses, dying in 2-4 blasts and never shot at in the process of standing up from the ground. Be mindful of the Creeper between the Lying Figures in the hallway just before the hole. Utilize some combo of the Handgun for fighting kills and the Shotgun for shooting kills while in the prison. When approached by Lying Figures in relatively close proximity of each other, consider shooting and quickly kicking the first one (or two) so that you don't get ganged up on. The Handgun is great for this from a medium distance, while the Shotgun can knock them over in one blast from close enough. Be mindful of this in the brief sewers segment and through the entire prison. Remember that Lying Figures will again respawn often in the prone position. 1-2 shots and a kick is the best way to kill them, as shooting kills can be tough while they keep darting around and they may injure you. And remember the Lying Figure in the warden's office tends to respawn after getting the Hunting Rifle in the following room. It'll be right in your face when coming back so be ready to fire right away. That back room is also a great location with a lot of ammo for the Shotgun and Rifle (if you intend on using the latter). LabyrinthRemember to get the Great Knife (and x2 Shotgun Shells while there) if you plan to use it on Eddie. Take the left ladder and follow the left (up) path, or take the right ladder and take the right (down) path to avoid Pyramid Head. Play it safe with Lying Figures while balancing between the Handgun and Shotgun for fighting and shooting kills respectively. If you do start to run low on Shotgun ammo, you can turn to the Hunting Rifle for a few kills, but only in long hallways where you don't have to worry about being approached and spit at. But really, I wouldn't do this for more than a few kills as it's dreadfully slow and somewhat dangerous to use on regular enemies. On a few occasions in the watery corridors and the higher halls up the ladders you'll encounter Lying Figures in very close proximity and often just off camera. It's important in these cases to fire and down them right away. In the watery corridors, quickly kick the first enemy and handle the next, but up top you'll likely want to down both enemies, potentially more than once since it's hard to balance between them, and focus on killing one when they're both down, then turn to the other. By the time you reach Eddie you'll more or less want to have your 75-75 locked in since there's only a handful of enemies left in the hotel. If you need to make up a bunch of kills, consider pulling the wrong noose in the Free the Innocent Man puzzle. After doing so and checking the other room, 4 Lying Figures will spawn in the connecting hallway. Be warned though, 4 at once is a pretty risky threat and will take some effort to properly manage, but it can be done. Repeat a few times if needed, while 1-2 of them may regenerate anyway while moving back to check the other room (note that 4 only appear after you've confirmed you made the wrong choice by seeing all corpses remain in the other room). You may also consider avoiding combat once you're in the clear, but sometimes it can also be risky to run past an enemy that may attack you while doing so. Don't be afraid to get those insurance kills since time isn't a big concern, but go ahead and ignore enemies off your path once you're clearly good to go. Reminder: Save your game in the catacomb before fighting Eddie, if using the recommended saves. Again, record your kills up to now in case you need to load from here later on, and save in a new slot rather than overwriting your first save. Reminder: Use the Blue Gem on the dock by the boat before crossing to the hotel, if going for the UFO ending. This is the second of three uses. HotelBy now you really want to have your kill counts down, plus an extra buffer of 5-10 in each just in case your counts are off or the game interpreted some things differently. Other than the 4 obvious Abstract Daddies on 1F and 2F, you'll find 2 Mannequins in the storage on the first floor, plus 2 in the basement if you go there after getting the "Fish" Key. There's also 2 Mannequins in the employee basement but you'll need to backtrack with weapons later to kill them. If you're having difficulties with the Abstract Daddies, understand timing is key. First get in position and aim your Shotgun. Wait once they're close enough so that the first shot will do enough damage and you can still get off a second shot before they arrive, which will down them and sometimes kill them (otherwise you can go for a kick or shoot once, then run away and prepare to shoot more after they get back up). If you already have your kill counts and don't want to bother with them on the first floor, you can simply enter the Lobby after getting the "Fish" Key, but be sure to get the Thinner in the basement beforehand. And understand they'll still be there later after your trip through the employee wing and basement, but you can easily avoid them if quick. Lastly, a few insurance kills always help since both kill counts seem to be inconsistent and may not appear as you thought compared to your counts. There's unlikely to be a huge difference, but at least 5 kills each are always nice to compensate for anything otherwise unexpected. Remember to play it carefully with the Mannequins in the basement when you don't have any weapons. You can do this by approaching them without getting too close and they'll throw themselves into activation (which can land as a hit in some cases). Once activated, then slip by quickly. And if you left the Abstract Daddies on the first floor, slip through to the Lobby asap after going back up there. Reminder: Use the Blue Gem in room 312 before watching the Videotape if going for the UFO ending, which also ends the game. Or use the Dog Key in the hall for the Dog ending, but first consider if you need one more extra item below (which you can't get with UFO). Reminder: The Book: "Crimson Ceremony" will appear in the Reading Room after watching the Videotape, so be sure to grab it if playing it close with items or going for the Rebirth ending. If going for Leave, Maria or In Water, avoid getting it if you got three ceremonial items already. If playing the final two bosses, you'll have a few more chances to kill Lying Figures in the water in the flooded basement and then some risky Mandarins in the grated path soon after. From there, the Pyramid Heads don't count as kills but Mary/Maria does. |
13. StrategiesBossesPyramid Head Use the same basic strategy here of shooting a full clip in one corner and then running to the next to repeat, but the one catch for Hard mode is that you should do whatever you can to make sure the battle ends with the siren sounding as you're on the left side rather than the right so that you don't have to run past Pyramid Head with his insane post-siren accuracy. To do this, all you have to do is shoot a bit more than a full clip in each corner, not necessarily every time but at least once or twice. Just try to make it so that your 45th to 50th shots happen as you're on his left side. Here's a quick sample breakdown:
What this means is, fire 10 bullets at the start of the fight from the right side. Run to the left side, reload in your inventory and fire another full clip. Reload and fire 5 more. Run to the right side and do the same. Now you should be at 40 bullets fired. Simply run to the left side and fire at him until the siren sounds, which happens after firing between 45-50 bullets. Go ahead and modify this as you wish, such as shooting up to 20 bullets in a corner if you have the time. Just make sure that you're shooting 45-50 as you're in the left corner so you don't have to run past him after the siren sounds. Now, if you do get stuck on the wrong side, if you're close enough to him you can probably get to the other side in time. But if you're deep in the corner you may have to resort to special tactics to avoid his executioner swing. Try to bait him into attack if you have space. Move just in his range to make him ready the knife and then just step back out of the attack range, let it land and then run across. Alternatively you can fire another 5-10 bullets at him to slow him down and give you the time to escape. If you don't have time and space, do whatever you can to get to the other side asap. One trick here is that using 2D control gives you a lot more control for sudden movement changes and may help you avoid his crazy accuracy. Plus I've even experienced him aborting his swing when I ran in a super unpredictable and squiggly manner. Just avoid staying on the same spot so you're not an easy target either way. Now, I should explain an interesting glitch that happened in this battle when I did a practice run. First, I stood in the corner and let him approach, but he didn't swipe at me and kept on coming. As I ran away, he went right past me towards the stairs. As I waited in the other corner, he didn't appear, so I looked more closely to see he was stuck on the stairway. This lasted for the entire battle and he left without taking a single swing at me. I did try to trigger this on another run but was never able to repeat it, so it might've been a rare glitch. Interestingly, another glitch did occur in that same run in the hospital basement, which you can read under that strategy below. So while you can't count on this happening, do take note if it does and let the entire battle play out with him stuck in the corner. Flesh Lips You also must take into account that you must lower the Shotgun before you can run away, which takes a good second or so after shooting, otherwise you may get a strangling. So simply do not shoot if a Lip is closely approaching you cause it may get you after your shot. The creatures can also kick you from a farther distance, so pay attention to that as well. If you're shooting a Lip as it approaches, it isn't likely to kick unless it gets close, but the other one may go for a kick while you're distracted. Be smart and get away while you can. Avoid letting the other one flank you, and don't worry if it takes a bit longer to set up your next shot sometimes. Be smart and safe. Always track where both Flesh Lips are. If you're shooting one and another is coming from the side, it'll approach at a higher speed since your shots won't be pushing it back, so get out of there while you have a chance. Therefore it's helpful to move into a corner so that both Lips are in front of you, allowing you to stay on top of them but also damage both with each shot. Taking one or two hits here isn't too bad, but you should be able to get through the fight hitless. As an alternative to the Shotgun, the Handgun works fairly well here too, giving you a lot more maneuverability and decent stopping power at the cost of maybe taking a bit longer. You'll be able to get off more shots at a time but be sure to keep an eye on the other Lip and always reload in the inventory. Lastly, do be aware that if you take long enough while fighting the first two Lips, the third can actually drop in and join them! This actually happened to me on a run where I was being a bit too cautious and relying on single shots almost entirely. If this happens to you, single shots are best for all three together, but with two you should be able to take two at least relatively often. If you don't feel comfortable though, don't shy away from dodging to avoid potential damage. Abstract Daddy Always enter the battle with a fully-loaded Shotgun. Back into the left corner behind you and blast the creature once. Let it come closer to you so that you have more space in the next corner, and blast it again before it reaches you, knocking it down. Strafe around it to the back right corner (James' left) and run to the other corner on the right side along that wall, while Angela sits on the left. This time fire two shots asap to knock it down before it gets close, leaving it somewhat in the middle of the room. Although if you know what you're doing you can let it get a bit closer to give you more room in the next corner. Now strafe to the left along the boxes and in front of Angela, then run along the left wall to escape to the back left corner again. From here, repeat the same strategy, always timing the second shot in the far corner so that the creature falls closer to you and the corner that you're about to leave, while firing two shots asap in the other corner where there's less space to let you strafe and escape to the other. After firing six shots and the creature drops down, start running to the other side and reload in your inventory while doing so. From here, it'll take two to four more good shots to kill the thing. Most of the time it may take nine shots to kill the thing with fairly well-placed shots. It is possible to kill it in eight if your first shots are fairly close and second shots very close, but don't get too risky. It may also take 10 in some cases if your shots land at farther distances, so don't panic and stay focused. Never shoot the Abstract Daddy while it's getting up. It will do nothing but waste valuable time required to shoot the creature before it gets to you, messing up the first six shots strategy. This battle may seem to be difficult to execute perfectly every time, but the two keys are allowing it to go deep into the far corner before the second shot to buy you space in the next corner, where it's important to strafe left to escape since it should be closer to the right side of the room. Even so, receiving an attack isn't the end of the world as long as you mash the directional and shoulder buttons to escape the attack asap. But with the right practice, a no hit run of this boss is very doable and thus it's more practical to save after than before it. Eddie First Room Steel Pipe Strategy: Do not wait for him to even approach you the first time, but rather start swinging immediately and you'll hit him in time. Don't ever let go of the buttons since Eddie will keep running up, getting hit and knocked back, and running up for another beating. After 13 whacks, Eddie will bail to the next room. This room should be an automatic this way every time on console, so always grab the Steel Pipe at Texxon Gas. Otherwise if this is not working on you for PC, refer to the Chainsaw strategy below. Second Room Shotgun Strategy: With the Shotgun, the best method is to start by strafing just a bit right behind the meat rack so that Eddie can't shoot you, but not fully behind it so that Eddie tries to punch you from the side of it and actually hits the meat instead of James. As he runs up, start blasting away and he should try to return your fire with a punch that'll hit the meat rack. Keep firing back as long as you're getting free hits and he can't hit you, which can last the whole fight or sometimes he'll be able to hit you after a couple or more meat punches. If he starts actually hitting you, move and either try to reset to the same strategy or just find a balance of shooting him from a medium distance and dodging before he can run up and punch you. Be aware that there is the danger he might just shoot you if far enough away, such is the risk with this strategy. But if well-executed with the meat hit exploit you can perform very well here. That said, it can be somewhat finicky. In general I'd recommend the Great Knife strategy more, or perhaps even the Chainsaw, which may be best for PC. Second Room Great Knife Strategy: Keep taking your swings, slicing both the meat rack and Eddie through it whenever he comes from that side, and you may notice why this is a good position. If set right, Eddie will often approach you and go for a punch, hitting the meat rack instead of you, but this is hard to master and requires getting a bit lucky since Eddie will often walk around behind you and even venture away for a period here and there. But do what you can to reset to this position to both slice Eddie through the meat rack and set yourself up so he may punch the rack instead of you. If he does move around behind you, watch his movements and try to anticipate his approach and attacks with your own. Sometimes if he moves far away and then comes back relatively straight towards you, you'll even have the time to perform the more powerful executioner swing. Again, use the meat rack as cover so he can't shoot you on his way back, and stab right through it to hit him if need be. Fortunately this strategy can prevent Eddie from hiding at all since he takes damage so quickly without much time to process it, so the battle can end without having to move after the initial sidestep and just tracking him around your position. That said, sometimes it doesn't always work out and you may still have to finish him off while he's running and hiding, so pull out the Shotgun and give him one more good blast to end it. This strategy may overall require some luck and finding that sweet spot of a position, but if you get it right you can avoid damage or keep it down to one or two hits while killing Eddie in six swings. Even if he hits you three or four times that's really not bad after all is said and done. If you're going to try this method, I obviously recommend lots of practice beforehand. But even then if you use the recommended save in the catacomb, you can have as many attempts until you feel comfortable. Both Rooms Chainsaw Strategy: Start things off in the first room by running past Eddie to escape the corner where you don't want to get trapped. Then ready the Chainsaw and bait Eddie to punch. As he sets in place, step back to avoid it entirely and perform a forward thrust (R2 + tight X press on PS2, might have to figure it out on PC). Remember you must already have the Chainsaw running as you dodge his punch, and don't wait for him to miss but rather go for the thrust as soon as you move back. This way you can sometimes get multiple hits without resetting. In the first room Eddie will often walk away after being hit, and since it's a small room he can't go very far which is perfect. Take advantage of this and get in your free thrusts with the Chainsaw always running (or at least most of the time) by keeping R2 held. You can often get 2-3 or more free hits before he comes back for another attack, but if he does just step back and thrust again. He should run to the next room after 5 hits. In the next room just repeat the same strategy. Hide behind the meat rack so he doesn't shoot but runs up to you. Step back as he punches and thrust him. In this room Eddie regularly goes for back to back punches if you're still within range, so use this to your advantage. Sometimes you can get into two thrusts without resetting, but it doesn't hurt to prepare for him to punch again and just step back and repeat. Also do be cautious of him shooting at you which can happen. If you see him step back and freeze after a hit, he may be about to shoot. Immediately take cover behind a meat rack. This is also why it's a good idea to generally stay right beside a meat rack in case you need that sudden cover. Simply keep repeating the strategy, and after around 8 thrusts he'll probably go in hiding. At this point, consider just taking out the Shotgun and finishing him with 1-2 good blasts from close range after anticipating where he's going to run. It's important to understand the damage during this battle since it can have a major effect on your total damage. A single shot from Eddie's revolver drains a quarter of your health, so do whatever you can to avoid this. Meanwhile a punch inflicts around 12 points, which is much better than being shot. I'd say the sweet spot for this fight is trying to receive less than 100 points, if the rest of your run isn't too bad. But obviously if you can do even better and limit it to 20-30 points or less, you'll give yourself a ton of breathing room for all other situations. Pyramid Head Duo There are two or three solid strategies for this fight that are very different. The first is the standard Hunting Rifle strategy, which takes around four to five minutes and about 50 shells. Another is the Handgun which will take a whopping 300 or so bullets but you'll be shooting on the regular. The last is the Great Knife wall bouncing strategy, which can take under a minute and eight double Great Knife swipes if done right, but is very difficult to perform and can be frustrating if it's not working for you. Do note that on PC Hard mode the Pyramid Heads move at an insane speed, making it almost always impossible to take even one Rifle shot in each corner without taking a hit. Therefore in that version you may want to forget about the Rifle and just go with the Handgun strategy mentioned below, or perhaps even the difficult Great Knife strategy. Rifle Strategy: Strafe to the side and run to the corner with the most space available, and take this opportunity to reload in the inventory and keep counting off your shots. Take your 1-3 shots, dash to the next corner and repeat. Always strafe (or run to the sides with 2D control) to keep sideways momentum, only using the left stick to make slight forward and backward adjustments while doing so. Note that each time you shoot one of them three times in a row, it will stagger, giving you ample time to escape, and possibly get in another shot before doing so. Strafe around the one that staggers to give you the needed buffer to escape each time. Sometimes you might even be able to get off 4 shots in each corner, which you can take advantage of by shooting the closer Pyramid Head with the 3 shells and the other with 1, but not in that order. Instead, if you have the space of course, shoot the closer Pyramid Head twice, then switch targets with the left analog stick, shoot the other one once, then back to the other for the 4th shot, but as the 3rd shot on the first Pyramid Head it will stagger him, allowing you to escape. This can speed up the fight quite a bit if you can get in these extra shots, but don't get too greedy and always stay on top of how close the nearest Pyramid Head is. Repeat this strategy for the entire battle and they may both slow down towards the end, allowing you to consistently take 4 shots but also stagger from just 2. This may allow you to fire 5 shots in each corner, along with an inventory reload. Alternate each shot back and forth for even better spacing results. Eventually the battle will end after around 50 shells. Again, if you're finding the Pyramid Heads are way too fast for you, consider trying the Handgun or Great Knife. Handgun Strategy: Do recognize when your space is quickly erasing, especially with the other Pyramid Head flanking you, so don't shy away from bailing out after 2-3 shots or skipping an entire setup if you don't like what you see. Since it takes about 300 bullets, you'll just need to be patient and focus on your consistency, always reloading in the inventory as well while counting all your shots. Riskier Great Knife Strategy: With this strategy, the idea is to bring them into one corner by the wall and slice them with the standard swipe attack, then have the knife bounce off and slice them again, staggering and preventing them from attacking. While you recover from your swing, the Pyramid Heads will also be recovering from your attack, leaving enough time to repeat the strategy over and over. Sounds like fun, eh? Well, it's not that easy, trust me. Sometimes you can get it right and end the battle in 30 seconds, but sometimes you can get your ass kicked and really piss yourself off. The most important thing here is setup -- remember that for now. Anyway, let's go through the strategy step by step. Firstly, you must quickly run to the corner, so never enter the battle with the knife equipped. You'll also want to choose which corner you're going to do this in. It can be the first corner on your left or you may decide you want to buy more time and strafe around until you find one to your liking. So once set in your corner, equip the Great Knife and wait for your friends to arrive. Always hold L2 to focus the camera on them and have a sense of how far they are. Almost always, the lead Pyramid Head will be approach you from much closer and may smack you while out of your swiping range. This isn't too bad as it also allows the other to catch up so you can get the optimal setup, or you can consider delivering an executioner swing at the first one to prevent this entirely, also allowing the other to catch up. One way or another, wait for both Pyramid Heads to arrive. The creature that's closer should close in on you while the other goes around to reach your side. You may take a hit here while setting up but try not to fret too much while you wait for the other to come around. With both close enough, stay parallel to the wall and perform a normal across swing, which may or may not hit the second Pyramid on your side on the forehand swing, but should on the way back as it bounces off the wall. The primary Pyramid Head right in front of you should always receive double hits, on the forehand and off the wall bounce, and if you have the perfect setup wherein the side Pyramid Head is actually a bit ahead of you by your side, he should take double hits as well. Sometimes the second Pyramid Head will get stuck behind the first one and stay in that position to try to attack you, which is great news. Even though you'll deal half damage like this (unless he's close enough to take damage anyway), there's no worry of him being able to hit you. Once you get your first successful double swing, it's important to keep holding X to continue your swings, but don't push it too hard to avoid performing the executioner swing (tight X hold performs that swing, while regular X press or light hold performs the regular swipe). Pressing X each time also works, but stay on top of your timing. Some versions may work differently with their controls, so just do whatever you can to keep the same attack on repeat. Either way, after around eight double swings off the wall, the fight should end. Note that this strategy can also work perfectly just along a wall and not in a corner, but there's always the chance one of the Pyramid Heads can take a detour offscreen and sneak in behind you, screwing it all up (in which case you'll want to just reset into another corner). Therefore I'd advise just doing it in a corner. I could go on and on describing the difficulties and frustrations of this strategy including just getting the initial timing wrong and taking a beating, but I think I've gotten the message across that it takes some practice to get right. That said, it's certainly rewarding to pull off and cool to witness. But let me be clear: do not attempt this strategy in a 10-star run unless you fully understand what it takes and have practiced it successfully. Or else your run could end in tears unless you've modified it with a save just beforehand. Otherwise, I'd suggest going with the Rifle strategy, or the Handgun if the Pyramid Heads are moving super fast. Mary/Maria To be quite honest with you straight off the top, fighting this boss normally can be completely ridiculous to endure, with constant moth attacks and very brief attack windows in some cases. So be sure you have what it takes before attempting. That said, it can be learned. There is a catch however... if you use up all your ammo before the fight begins, there will be a secret 10 minute timer during the fight. All you have to do is run around the boss arena avoiding all attacks and the fight will end after 10 minutes, allowing you deliver the final blow. With this in mind, you may want to consider avoiding some ammo pickups so you spend less time wasting it at the end, but you'll need to do your calculations wisely. To be honest, even with ammo this fight will take around 10 minutes, so if damage is a concern you may just want to empty all your remaining ammo and take the easy way out. Either way, keep that in mind, but we'll continue ahead with normal strategies. If you're actually going to fight Mary/Maria, it's all about patience, patience, and more patience here, plus maybe a little bit of patience on the side. Most of your time will be spent either running from the fast-moving creature, or especially running from the near constant moth swarm attack, which you'll certainly grow to hate. While the Shotgun and Hunting Rifle are much more powerful, they're very slow to use here, so you may find yourself better off with the Handgun, which is my preferred strategy. Instead of running around for a minute just to get a gap for a single Rifle shot, you'll be able to take shots all the time while side or backstepping away. It's weaker, yes, but shooting something is better than nothing. To start things off you can get in a few free shots while backing up but be quick to escape. Always start strafing around the arena in a large circle as soon as you hear the screech sound that indicates the moth swarm is coming. This will happen in high frequency, so do try to hang in there. Always hold L2 to focus the camera on Mary/Maria and get a good sense of where she is, but do be mindful of the bed and the hole in the floor where the staircase was. Between moth attacks and a decent distance from Mary/Maria, hold R2 and start firing while backstepping away from her. If too close, she may pick you up and inflict a lot of damage with her strangulation attack, so be careful with your distance and know when to stop and run away. Always stop and escape once the moth screech sounds, although note that you can still get in a few Handgun shots before strafing away from a moderate distance. But you will need to be moving at full speed by the time the moths reach you. Also note you can sidestep while firing instead of moving back, which primes you up for a strafing exit any time you sense Mary/Maria about to attack or just get close to you. However, you'll notice James often misses some shots while sidestepping. Therefore I'd recommend backstepping as the more effective strategy, but in some cases while along the wall you may find the sidestep method helpful to get in a few shots before escaping. One interesting tidbit is that Maria will never attack you herself while she's spitting out her moths or they're flying around towards you. And once she spits them out, you actually have a decent couple seconds until they reach you to fire off 2-3 Handgun shots. She usually backs up each time she spits out the moths, which is great because it gives you more room and shots. You can get up to 3-4 depending on your timing if you can anticipate it. And while you should generally be able to avoid being hit by the moths by always being on the run (strafing around the arena), if you do trip up on the surroundings or just don't get away in time, a moth attack ain't so bad. Wiggle the shoulder and directional buttons to escape quickly, and use the new opportunity to fire away at Mary/Maria with some free shots since she won't attack immediately after. Additionally, if you are ever pulled by her grapple, it does do a fair bit of damage but does also give you a chance to get in at least six or seven Handgun shots as she backs up after. Either way, continue with the above strategy and she'll eventually drop, allowing you to finish her off. Now, looking at the Shotgun and Hunting Rifle strategies, we're dealing with the same things. These weapons do take a lot more time to fire and escape after, so you'll have to really get your timing right and be disciplined enough to keep running around before attacking in many cases. Fairly regularly you may only be able to take just one and sometimes two shots. If you're already aiming when the moths start to come, you may be able to take off one shot if you're far away, but otherwise probably not. One way or another Mary/Maria will eventually succumb to her injuries and drop. Additionally, there is a Great Knife strategy you can attempt (executioner swings only), but this is a really difficult fight to get it right on Hard since you'll always be in grab range and need to get on the move quickly to avoid the moths. So it's not really a method I'd recommend. But surely it can be mastered like all strategies. Honestly, I recommend the Handgun strategy well over the Shotgun and Rifle. It takes around 200 Handgun bullets and a lot of repetition, but at least you're able to get shots off all the time, and all those bullets do add up. After around 10 minutes with each strategy, Mary/Maria should fall to the ground. Quickly fire one more shot at her with your equipped weapon to finish the battle. Other StrategiesGetting the Snake Coin You probably won't have much ammo at this point to kill by shooting, so what you want to do is lure all three Lying Figures to one side by standing at one of the corners atop the pool. Be sure to stand well clear of the edge to avoid their spitting spray. Then jump in from the middle and grab the coin from the side the creatures aren't on. It's probably safest to lure them to the right corner, then jump in and grab the coin by the left. But you can also lure them to the left corner and grab it from the right side, then still have enough time to run along the far wall of the pool and up the steps to safety. It's really not worth killing these enemies since they're quite bundled up and perhaps pose too much of a threat. Pyramid Head in the Hospital Basement Remember that because you're on Hard Action Level, James will bump into walls while running at full speed, eating up valuable time and preventing you from just running through the corridor, since Maria will almost certainly be killed. While it may technically be possible to zoom through here perfectly, it's insanely difficult. Therefore you must slow Pyramid Head down by emptying a clip into him at two recommended spots along the path. First, take a few steps around the corner corner to spawn our buddy. Make sure Maria is out of the way by the right wall and unload a full Handgun clip into him. Then turn around and start your way down the hallway. Enter your inventory to reload and once you reach the fenced-window, pass around to the other side of it and unload another full clip into Pyramid Head. This will be enough and now let you run to the elevator at the end with Maria alive.
As an aside, a helpful glitch occurred at this part during a practice run of mine. I inadvertently pushed Maria as I ran ahead of her by the door and ran around the corner as usual. But then to my surprise, Pyramid Head walked around the corner first while I could not see Maria. I thought "all right then" and began running down the hallway. Noticing Pyramid Head wasn't going after Maria but instead actually running after me, I continued the full length of the hallway. It looked like he slowed down to start walking during the final stretch and I triggered the end cutscene to move on. Thus, I completed the segment without attacking Pyramid Head once. I tried to manufacture this again on other playthroughs but I could never get it to work (until once more many years later on PC). Interestingly, I believe it occurred in the same run as the other glitch mentioned in the Pyramid Head apartment battle, so perhaps something with the file was just off. Either way, while it's unlikely for you to experience this, if it does happen just run the entire hallway without worrying about Maria. Ditching Maria in the Hospital To avoid playing with matches in the hospital, consider skipping straight from the first floor to the third to drop Maria off in room S3 right off the bat. Grab the Roof Key while you're in there and feel free to get knocked off the roof before visiting the second floor, it's up to you. In the Nightmare Hospital, be sure to get all the kills you can before Maria rejoins you in the basement so that you can just run straight for the Lead Ring and Trick or Treat prizes, killing any respawning enemies on the way. Maximizing Ammo Efficiency Limiting James' Stumbles Generally it's not a big deal but keep in mind it costs you a couple seconds every time it happens. But more importantly, in some cases you may try to run past an enemy and then bump into a wall or door, only then to be completely exposed to an attack if the enemy is close enough. Normally this may not even cross your mind but it can totally catch you off guard, so consider getting into a good habit of breaking your stride near corners and doors to prevent any surprise tumbles and attacks. Screen Fade-In Therefore, always move clear of enemies before entering your inventory, and be prepared to start shooting enemies immediately as you enter a room. There are several rooms and hallways in the hospital where this is imperative, along with a few Labyrinth hallways, so always be on your toes and ready to shoot. |
 However if Maria does take more than one stabbing during all this process, you may want to move just a little farther and unload a few more shots in him, or perhaps do it instead a bit before the fenced-window before doing it there too. Either way, once you reach the final lengthy straight with Maria behind you, you're in the clear. Refer to below for a text map that will guide you through the entire hallway. The fenced-window area is the part where the hall pulls a U-turn and moves right beside itself.
 14. Puzzle SolutionsBelow you will find all the puzzle solutions for Hard and Extra for quick reference. Grandfather Clock: Use the Clock Key and set the hands to 9:10. Safe Combination: Turn to the first number, turn right to the second, left to third, right to the fourth. V means 5, X means 10, and any letters represent their numbered position in the alphabet plus 9. Old Coin Desk: Third Floor Patient Wing Keypad: The keypad code is 1328. "Louise" Box: Combine and use the "Purple Bull" Key and "Lapis Eye" Key. Enter typewriter code on the push-button lock. Enter bloody wall code on the turning lock. Trick or Treat Box: Button order from top to bottom - 3, 1, 3. Trap Door Keypad: Use the six possible combinations with the two or three illuminated numbers on the keypad to open the door. Box of Faces: Step into the metal room, opening it by turning the cube if it's not already open, and find two doorways exactly opposite each other. Turn the box of faces accordingly to put those two doorways in the position of the entrance and exit. Or simply use trial and error with the following face options and possible directions they can face: Innocent Man: Locked Briefcase: Use the Thinner on the photo on the bed and enter that code into the briefcase combination lock. Music Box: From left to right - Cinderella, Little Mermaid, Snow White. |
15. Hyper Spray UpgradesThe Hyper Spray is potentially unlocked in a number of ways. You can beat the game once on Hard, twice with at least one clear on Normal, or three clears on any level. It will then be found in the camper trailer at the west end of Saul Street in East South Vale, at daytime near the start of the game or when passing through at night. The colour and effectiveness of the Hyper Spray depends entirely on the ranking of your previous run through the game. They are each obtained through the following rankings:
You may read elsewhere that the Purple spray is unlocked with a ranking of less than 4 stars, which I can confirm is untrue and verify the requirement to be less than 2. In fact, it takes an extraordinary amount of effort to get a ranking that bad, trust me. That is likely why there is very limited information available regarding it and why the requirement has been wrongly identified, perhaps with assumptions being made and misinformation continually propelled. But you'd be surprised just how amazing the Purple spray is, second to only the Green spray, so you are certainly rewarded for your achievement of failure, perhaps with the game showing you pity by giving you a much easier time. In fact I highly recommend any serious player to actually unlock it and try it out. Read more about that below. Both the White and Yellow sprays are fairly ordinary and not too effective in comparison, while the Green spray is by far the best by killing enemies immediately. It will be your reward for a 10/10 ranking. Refer to a full list of what each spray entails below. Do be aware that despite James covering his mouth while using the Hyper Spray, using it will cause him gradual harm. It can potentially bring him down all the way into critical status if using it long enough, but the spray will never kill him directly. One enemy hit may do that instead at that point, however. So prepare to heal whenever using it. Lastly, understand that which Hyper Spray you will receive always depends on your previous ranking. Therefore you may lose a certain colour and receive another with a lesser ranking in another run. Sadly this means the Green Hyper Spray (and all other colours) is not a permanent reward and will be replaced by a lesser spray in your next run unless you achieve 10 stars again. This is why it's important you create a separate save for your Green Hyper Spray game clear (or all colours) so that you can use it in a new run whenever desired. As a silver lining, this effect is what allows you to achieve and use all Hyper Sprays, particularly the Purple one. Purple Hyper Spray (0.0-1.9 stars)
White Hyper Spray (2.0-7.9 stars)
Yellow Hyper Spray (8.0-9.9 stars)
Green Hyper Spray (10 stars)
Note that the standard immobilization periods depend on your difficulty level. That means 6-7 seconds on Hard and up to 10 seconds on Beginner. Despite what you may have heard, using the Hyper Spray (or the Chainsaw) will never deduct from your ranking in this game. Therefore you can even use it during a 10-star ranking, or even abuse the Green spray to get another easy 10-star run. That said, using the spray does lightly damage you which is not ideal, so I'd avoid it altogether for your first 10-star run. Sub 2-Star Ranking Guide: How to Actually Unlock the Purple Hyper SprayThis entire 10-star guide will help you get the Green spray, while the Yellow is easy enough if you just do a good, solid run or have a failed 10-star run, and the White spray is obtainable very easily basically just by unlocking the spray itself. But what about the Purple spray? How does one actually achieve a ranking below 2 stars? Good question, because it's quite the achievement itself... And as I said the spray is worth trying. So consider this... the Sub 2-Star Ranking Guide. To acquire this unicorn of a spray you'll have to intentionally have a genuinely awful run. You'll likely need to start a new file here since every main scenario ending you already have is worth 4 small stars. It's still doable with a few endings but you'll just have to compensate by doing worse. Although remember you'll first have to unlock the spray itself again in a new file. You can unlock it with one run on Hard, but to play on Hard while doing poorly puts you in a tough spot. You already want to limit items (such as health and ammo), you'll have no bullet adjust, and more damage taken is good, but these conflict while trying to survive Hard mode. You can find a balance by focusing more on tanking all the other stats (but you will get 5 stars alone for Hard mode), and by all means go for it if you think you can handle it, but it throws up several warning flags for me and could be a very frustrating run. For an easier time I suggest just doing a speed run through Hard (to unlock the Hyper Spray itself) and then doing your terrible run on Beginner. Then you can unlock the Purple spray after your second clear. Easy Riddle Level will award you with just 1 small star (0.1/10) and Beginner Action Level with 0, while the latter also prevents you from being killed other than Pyramid Head's executioner swing in the apartment battle. This way you can literally just stand in front of an enemy for hours on idle, driving up your damage points and clear time without the possibility of dying. To minimize your ending points further, go for the same ending the second time as your first to get no more points for it. Go for the In Water or Maria ending the first time so it can be easily replicated on the second. Just spam examine all the suicidal items and other requirements for In Water or spam convos with Maria and check her Labyrinth door on repeat. Why I suggest not doing Leave is that, while easy to achieve by default in a speed run, it's harder to lock into this ending when receiving tons of damage in your sub 2-star run, since there's otherwise no foolproof method like just examining the letter or talking to Maria over and over for those endings. In fact, avoiding damage (and healing regularly) IS the foolproof method for Leave, and you're doing the opposite. So it doesn't really compute. I suggest In Water since your run will be so suicidal in general anyway. Just make sure to spam examine Mary's photo, letter and Angela's Knife while doing some of the other requirements. Otherwise you can still end up with the Maria ending if you (accidentally) do a good job of protecting Maria, especially if you've cleared In Water and not Maria yet, making the latter easier to acquire. But anyway, by getting In Water once and then getting it again on your second run, you will get no extra points for it. So your total for Ending Clear will be 4 small stars for 1/4, which is the bare minimum on any run. Full disclosure, I personally achieved my sub 2-star ranking with 2/4 but only cause I had a solo Hard mode Leave clear already (Hyper Spray unlocked) and wanted to save some time, but I realized it was difficult to replicate Leave again (which I couldn't and ended up with Maria). Instead of starting fresh I just needed to compensate by doing worse with my other stats. So it's possible, just more difficult. Otherwise, leave your game idle for upwards of 16 hours (or way shorter if you just do really bad in other stats), take 2500-3000 or more damage, take 15+ minutes for the boat stage and collect no more than 79 items (1 star for 20 regular items gives you just 3 stars for 60-79), while you have to pick up around 60 something anyway. And don't collect any extra items, even the Hyper Spray, cause they each award 1 small star. Just be patient for your next run. If you kill all bosses by shooting you'll end up with at least 5 shooting kills (3 Flesh Lips, Abstract Daddy and Mary/Maria) which will award you with exactly 1 star (1 star per 5 kills in each category up to 15 stars each). But you can balance this by killing at least one of them by fighting. The Great Knife works well on the Abstract Daddy and Mary/Maria. That way you'll get 0 stars for kills, assuming you don't fight other monsters, which you shouldn't. Lastly, the PC version always gives you 5 stars automatically no matter how many times you saved, but on PS2 you can reduce this to zero stars. Do so by spamming saves up to 30 or more. Note that you don't have to get the bare minimum in all these stats just as long as you're still under 2 large stars (20 small stars total), which is easier on PS2, but on PC the default 5 stars for saves really makes you push for a crazy clear time and tons of damage. But I managed on PC with 2/4 endings as well (1.3 stars between those two stats alone), so it's very doable. For the record I ended up with a 1.9/10 ranking. Near the end, feel free to see how close you are by beating the game and checking your ranking, but absolutely make sure to keep at least one save late in the game that you can reload and do even worse. A good spot is on the dock so that you can ensure your boat time is terrible in case you did too well, while any room with enemies in the hotel can drive up your damage and is close to the end. Anywhere in the hotel will do to just stand there on idle and drive up your clear time. When you think you're finally in the clear, maybe save in a new file just in case there's some stat you can't do too much about anymore. If it's just clear time that's a concern then you can save before or after the Pyramid Heads and be sure not to overwrite it until you're in the clear. And that's it. Save your clear data of sub 2-stars, start another New Game (highlighted yellow) and grab the Purple Hyper Spray in the camper trailer. Good luck on your absolutely dreadful run through the game and enjoy your reward of the Purple Hyper Spray, knowing you're probably one of a very few amount of people who have actually achieved it. I know I had a fun time experimenting with it in my Purple spray run after otherwise knowing very little about it beforehand. It certainly exceeded all my expectations given it required such a poor ranking. |
| by Andrew Haffenden aka Conquerer (Silent Hill 2 FAQ/Walkthrough ) |