Walkthrough
Letter from Silent Heaven
01. East South Vale
02. Wood Side Apartments
03. Blue Creek Apartments
04. West South Vale
05. Brookhaven Hospital
06. Nightmare Hospital
07. Dark South Vale
08. Silent Hill Historical Society
09. Toluca Prison
10. The Labyrinth
11. Toluca Lake
12. Lake View
Hotel
13. Nightmare
Hotel
Born from a Wish
01. West South
Vale
02. Baldwin
Mansion
03. Blue
Creek Apartments
The Labyrinth
This is a walkthrough guide for the original Silent Hill 2. For the walkthrough for the Silent Hill 2 Remake (2024), please go to this page.
Contents
- First Corridor
- Pyramid Head's Lair
- Getting the Wire Cutter
- Cutting the Wires
- First Watery Corridor and Upper Hallway
- Second Watery Corridor and Upper Hallway
- Third Watery Corridor and Upper Hallway
- Fourth Watery Corridor and Upper Hallway
- Unlocking the Handcuffed Gate
- Beyond the Gate
- Catacomb
Video Walkthrough |
Complete Maps |
|
"James honey... Did something happen to you? After we got separated in that long hallway?"
First Corridor
Welcome to the beginning of a potentially very confusing maze of hallways and ladders. Hold onto your butts, pay close attention, and you just may make it through this one.
As you can see, the doorway directly across from the entrance to the Labyrinth is blocked by wires, and a ladder is visible behind it. Your goal is to find a tool to cut the wires. Since there is no official map for this maze of an area, James will have to draw his own as he goes. The Flashlight must be on so that James can see and draw the map, however (and you must have gotten the prison map to draw the map here for some reason).
Head left to encounter two Lying Figures walking around. Consider killing them now to make it easier when you come back later.
Pyramid Head's Lair
If you're interested in a new weapon (I'd say it's worth it even if it's not super practical) then take the left path and go down the northeast ladder on the map, or the one directly across from it (they both lead to the same area). Be careful down here because Pyramid patrols the outer walkway! This appears to be his lair. If you do bump into him, just turn around and head the other way since the path forms a full circle.
Anyway, head out into the outward path and circle around until you find the short path leading inward, and pass through the door to the center room – you can avoid Pyramid Head entirely by taking the upward path from the left ladder or the downward path from the right ladder. Find the ominous 43 Great Knife on the bloody table in the center room, as well as two packs of Shotgun Shells that Pyramid Head won't need.

If you want to try out the Great Knife, do note that it's extremely slow to swing due to its size and weight, and James must drag it behind him while moving so it's not very practical. But it is a pretty cool novelty to steal Pyramid Head's most noteworthy weapon. Nothing else is in here but scenery. Brace yourself, exit the room and head back up one of the ladders to the main area you came from.
Getting the Wire Cutter
Now follow the west path around the corner and this time follow the path to another ladder, ignoring the right path. Move down the ladder and blast the two Lying Figures out of your way down here. Head up the other ladder in the watery corridor to find a weird box with a bunch of faces on it. Move around to the other side to examine it.
Puzzle: Box of Faces (Labyrinth)

Firstly, looking at the odd cube in the center of the room, it contains several faces of different colours and can be rotated in almost any direction. You also may or may not notice a doorway along the indentation in the wall behind it that leads to a boxy, metallic room with door outlines all around it. If there is no doorway there, move the box around and it should appear. The doorway may also disappear if you move the box.
After investigating the cube in the main room and the large metallic room, you'll notice that whatever you do to the cube, the same thing is done to the metallic room. If you turn the cube 90 degrees to the right, the room will turn 90 degrees to the right exactly like the cube. This is where the positions of the doors come into play. Normally the doorways are dead ends unless they are positioned in the right spots.
The idea of this puzzle is to create a doorway on the other side of the room, directly opposite the entrance, while also keeping the entrance door to allow access. So you will need to think ahead and locate two doorways directly across from each other in the large metallic room and find a way to line those up with the entrance and exit, using the box of faces in the other room. If you cannot see any potential solutions on the walls or floor, flip it around so you can see what was on the roof.

Easy/Normal Riddle Level have preset solutions that will work every time, while Hard/Extra is randomized, but the box still operates in the exact same fashion. Do take note that you cannot make certain movements on the cube due to the axis it rotates from. The yellow and green faces can face any direction (left, right, up, down), while the red and blue faces can only face up or down due to the axis. Take this into account when figuring out a solution.
Easy/Normal
Here there is always the same potential solution that works both ways. Inside the metallic room, take a look around and find the two doorways on opposite sides. Then go to the box and turn it accordingly to line those doorways up to the entrance and exit. Those solutions are:
- Green-eyed upside-down face
- Yellow-eyed upside-down face
Each of these faces represents one of the doorways and they are on opposite sides, thus they work interchangeably. Once you turn the box to one of these faces, a doorway will open up at the entrance and exit of the room on the other side. You're finished here.
Hard/Extra
On Hard and Extra, the solution is randomly selected each time, so you'll have to use the manual method by searching for a spot in the metallic room with two doorways on opposite sides. Rotate the box in correspondence to these two doorways so that they align with the entrance and the exit on the opposite side.
It's hard to see the roof though, so if you can't see any potential solution on the walls and floor, flip the box to see what was on top. Once you align two doors properly, you'll notice the doorway and staircase at the other side of the metallic room.
If you want to go for the hit or miss method, feel free to do so. There are twelve possible faces on the cube and if you try them all you'll eventually come up with the solution that puts a doorway and staircase at the other end of the metallic room. Refer to below for all possible solutions. The colour of each face is stated, along with all the possible directions each one can... face.
- Yellow eyes - up, down, right, left
- Red eyes - up, down
- Green eyes - up, down, right, left
- Blue eyes - up, down
Once the two doorways are opened up in the metallic room, head down the staircase at the other end. Get ready for quite the surprise down here... Looks like we'll have to find another way to the other side.
Head back up the staircase to the box of faces and you should now hear electrical sounds and notice sparks coming from the breaker box by the ladder. Take the convenient 44 Wire Cutter stabbed into it, which will help us cut the wires from earlier. Head back down the ladder and up the other one at the end.
Cutting the Wires
Follow the path and take a left around the corner, then move forward to the wall and around the left corner to meet the doorway blocked by wires. Use the Wire Cutter from your inventory and move down the ladder.
First Watery Corridor and Upper Hallway
Follow the watery corridor past the Lying Figure and move up the ladder down the first right path. Follow the hallway to the right and down another ladder. Yes, there will be a lot more of this kind of navigation. Hang in there.
Second Watery Corridor and Upper Hallway
This room is shaped like a square with an angled corner, leading to another opening and ladder at the opposite corner from where you start. Take either path past any Lying Figures and move up the other ladder.
Quickly blast the Lying Figure in front of you up here and follow the corridor. Take the right path, move left around the fence (ignoring the Lying Figure to the right), and go down the ladder at the end of the pathway.
Third Watery Corridor and Upper Hallway
Watch out for the Lying Figure just offscreen, and follow the path around the corner. Take the first left, move past another Lying Figure, and go up the ladder at the end.
Quickly eliminate the two Lying Figures in front of you and get the Handgun Bullets by the ladder you came up. Move down the hallway and go down yet another ladder at the end on the right. Just a little bit more to go now...
Fourth Watery Corridor and Upper Hallway
Down here, simply take the first left immediately ahead and go up the ladder there. If you choose to keep exploring down here instead, you can grab two packs of Handgun Bulletsup the other ladder in the more open area of the path which circles back onto itself, but be aware that Pyramid Head patrols the waterways here, albeit quite slowly.
But anyway, up the first ladder on the left, we can take a break from the up and down madness and read a blood-soaked newspaper that's partially illegible. You may or may not be able to put it together that this article is quite relevant for a certain character, and we're about to delve even deeper into it. Be sure to use the Save Point on the wall since a boss fight is just ahead.
Inside, James finds himself in a very peculiar room with a lot of subliminal imagery, and notably Angela in the corner along with a creature called the Abstract Daddy. It's time for a boss fight.
Boss 3: Abstract Daddy (Labyrinth)
First of all, this is a very small room without much space to avoid the enemy, so you might find yourself having trouble manipulating your character efficiently. If using 3D control (tank controls), be sure to utilize the strafe buttons to move side to side and avoid the Abstract Daddy along with regular forward movement. If still having difficulty, feel free to try 2D control to free up your movement in any direction, but it's still very doable with 3D.
Right when the fight starts, quickly run to the far left corner and fire two Shotgun rounds at the creature. It's ideal to actually allow the creature to get somewhat close to you before firing the second shot, which knocks it down. This will give you more space to safely strafe and run along the right wall past it to the other corner.
There, pump two more shots into it asap before it gets too close, and try to escape along the left well after strafing across the boxes and Angela in the corner. If the right side has more space, take that route instead but the left seems to be the safer route most of the time. From here, just repeat the strategy, always allowing the creature to move deep into the far left corner before downing it to offer you as much time and space to get to the other corner and knock it down again there before it gets too close to you, since it's more crowded there.
Don't bother shooting the creature when it's on the ground as it will inflict no damage and just allow it to sneak closer to you. Just repeat the strategy above and the battle will end rather quickly.
Abstract Daddy's attacks:
The Abstract Daddy has one attack, which is lumbering and lifting its bed frame over James' head while mauling him. The range of this attack can be rather surprising, so stay as far away as possible. Even so, this is a very small room so don't be too bothered if he grabs you a couple times, but it is avoidable with the above strategy.
If looking for an alternate strategy on Easy, you can pull out the Great Knife right away and end the battle with one executioner swing (while holding R2, press and hold X firmly to deliver this blow). I wouldn't recommend this on Normal or Hard though, since there just isn't enough room and the creature is very quick.
On Normal, it should take eight Shotgun blasts to defeat the creature, or six on Easy and 9-10 on Hard. So it's not a very difficult boss fight, although it can be hard to avoid getting hit since it's such a small room. But anyway, a cutscene will play when the monster is defeated.
You may already have had some idea about Angela's past, but things should be very clear by now, sadly. After the fight, Angela leaves the room and runs away. Do the same and move through the other door at the end of the hall.
Unlocking the Handcuffed Gate
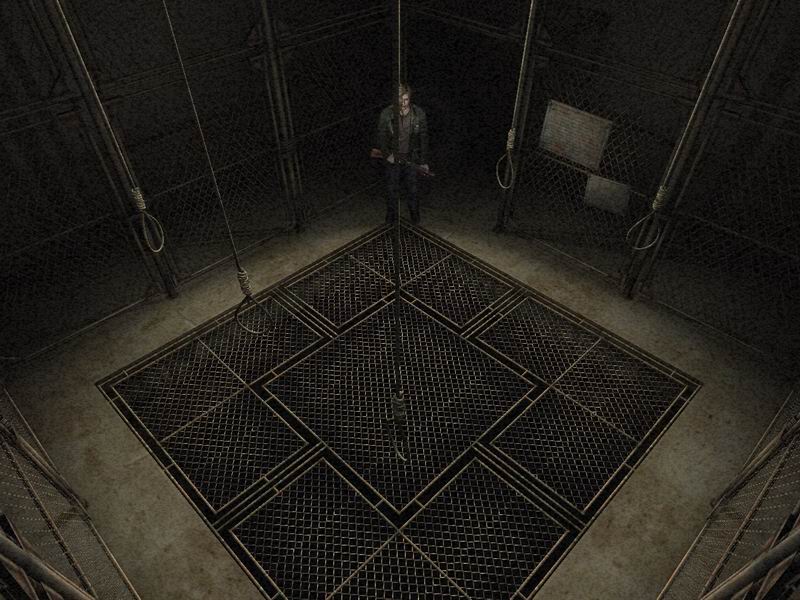
If you continue through the door at the end of this hallway, you'll find a pair of handcuffs attached to the lifting exit gate. So take the time to investigate the two rooms in this corridor.

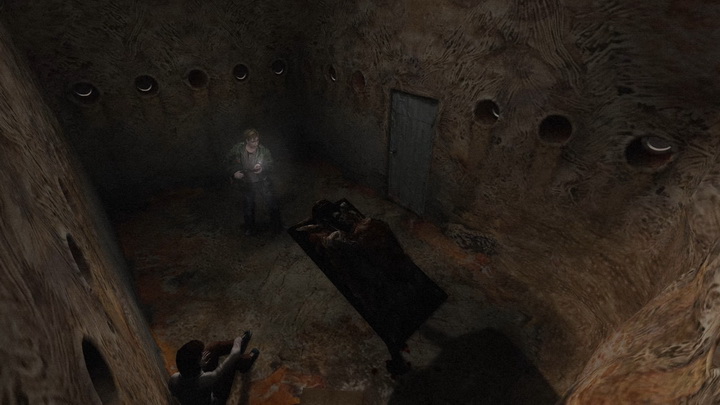
Upon examination, you will find one room with six corpses of men who were hanged and a room with six empty nooses that can be pulled down. It's time for another creative puzzle.
Puzzle: Free the Innocent Man (Labyrinth)

The first thing you'll want to do is examine the two signs on the fence in the room with the six nooses. They should give you a clue as to what you have to do. The small sign is the same on all riddle levels and reads as follows:
Only the sinless one
can help you here.
Mistakenly pull on
a criminal's rope and
your reward will be returned
to you in a shape most
wondrously strange.
Six men were hanged and their corpses remain in the first room, each with an identifying plate over his head. Five of them were guilty while one was actually innocent. In addition to the smaller instruction sign in the noose room, you will find an in-depth riddle on the larger sign beside it that is the key to solving the puzzle.
The idea is to determine which of the six hanged men was actually innocent by deciphering the riddle. Then you must locate that man's corpse in the corpse room, using the identification cards on their front sides. Then you must note the location of that corpse in respect to the other men and move to the noose room, where you must pull the corresponding noose in the same position relative to the other nooses. Upon doing so, a key will appear in the corpse room in the place of the innocent man.
The innocent man will be different on each riddle level, however it will always be the same on those individual riddle levels. Despite this, the positions of the corpses and thus the correct noose will be randomized each time.
Depending on your riddle level, six of eight different criminals will appear in the corpse room. These are:
- Kidnapper - one who steals a human being
- Bodily Injurer - one who causes physical harm or injury
- Arsonist - one who maliciously sets fire to property
- Counterfeiter - one who copies with intent of forgery
- Thief - one who steals, especially by stealth
- Swindler - one who cheats or defrauds of money or property
- Embezzler - one who takes money for own use in violation of trust
- Murderer - one who brutally kills another
The same six of these eight will always appear on each individual riddle level, but some will not appear in other riddle levels.
Now we can move on to the meat of this puzzle, the riddle on the larger sign in the noose room. This will be different on each riddle level and will require its own deep examination for solving. Refer to below for the riddles and in-depth solutions.
Easy
He committed an evil crime.
He turned a happy home
into a pile of ash.
For that, he should die.They also committed crimes.
They tried to fraud
and trick others.
So their reward too is natural.Even he cannot be forgiven,
My friend without his left hand.
And so his death bothers me not.And what of him?
He also is not sinless.
There is only one here
who is innocent.The missing child was
nowhere to be found,
And so there was
no proof of his guilt.
His death was a tragedy.That is all I wish to say.
It was neither justice
nor retribution.
"He turned a happy home into a pile of ash" is very clear. The arsonist is guilty.
"They also committed crimes. They tried to fraud and trick others" describes three of the six accused men – the counterfeiter who tricks people with fake money or other items, the swindler who defrauds of money or property, and the thief who sneakily takes what is not his. They are all forms of fraud or trickery, and as described these men are all guilty.
"Even he cannot be forgiven, My friend without his hand. And so his death bothers me not" describes the bodily injurer, who causes harm or injury to another but not murder. So the bodily injurer is also guilty.
Then there's the final accused man: "There is only one here who is innocent. The missing child was nowhere to be found, And so there was no proof of his guilt." The kidnapper is the innocent man.
Normal
Dead men, dead men
swinging in a tree
How many dead men
do you see?
Tongue turned blue and
face gone grey
Watch them as they
twist and swayThe first one killed
the butcher man
Then cooked him in
the frying pan
Served him to his hungry guests
And gave them seconds on requestThe next one with his smile
and sweets
Stole poor children off the streets
To men who dressed unsavory
He sold them into slaveryBreaking into home at night
The thief he had a nasty fright
Filled his foolish head with ale
Woke in the morn
in the county jailThe artist with his daunting skill
Tried his hand at painting bills
But caught in rain he was undone
When the ink he'd use did
start to runWith promises of great return
Taking gold he did not earn
Bundled it up out of sight
Quietly slipped off into nightThree houses into ashes burned
The sheriff with no place to turn
Did spy a stranger to his town
Locked him up and beat him downDead men, dead men
swinging in a tree
How many dead men
do you see?
Six feet long and
six men wide
Round their necks
the noose be tied
After a fantastic introduction, our first clue is found in the second paragraph. "The first one killed the butcher man" refers to the murderer, who is certainly guilty. The rest is a nice little verse with more details but we already have the answer.
"The next one with his smile and sweets Stole poor children off the streets" obviously describes the kidnapper, so he's guilty too.
"Breaking into a home at night The thief he had a nasty fright" is also painfully obvious, making the thief guilty.
"The artist with his daunting skill Tried his hand at painting bills" explains that an artist made counterfeit money, making him the counterfeiter and therefore guilty.
"Taking gold he did not earn" is the crime of embezzlement. Perhaps he worked at a bank with access to the gold in the vault. Either way, the embezzler is guilty.
That leaves us with five guilty men but one more potential criminal, the arsonist. "Three houses into ashes burned; The sheriff with no place to turn Did spy a stranger to his town; Locked him up and beat him down". There is no proof that this poor man committed the crime and the sheriff only assumed he did. Therefore the arsonist is the innocent man.
Hard
I do not wish to die.
But tomorrow I will climb
the thirteen steps.Please someone - answer me,
Why must I die come the morning?The man imprisoned beside me
believed me. "Because they're
all insane, that's why," he said
Of course I know his opinion
will change nothing. "Now you
know why I struck out at them,"
he muttered.The man who was executed
yesterday, the one who had
said his job was to sell dreams,
said that was not true.But the man who is to be executed
the day after tomorrow for stealing
children shouted back that it was
true.The man who was hung today
did not answer. "They'll kill me
either way," he said. He was
caught embezzling public money,
so he hasn't any hope for mercy.The man who is always quietly
smiling to himself said "I am
happy for I will soon be with her."I do not wish to die.
I long only to return home.
But I know it is not to be.
Though I have done nothing, this
crime has been thrust upon me.Someone save me. This is not
judgement. They are bloodthirsty
and I am their sacrificial lamb!
Half of this riddle is very clear and half may take deeper examination. Let's go in order again, and note that the author appears to be one of the six accused men.
The third paragraph, which describes the first accused man, is quite difficult to understand. The man imprisoned beside the author of this riddle told him the reason he'll die come the morning is "Because they're all insane, that's why. Now you know why I struck out at them". The key here is the word "struck", which means to hit sharply, as with the hand, fist, or some form of weapon. This seems to describe the bodily injurer, who must've attacked and injured one or more of the prison guards while already in jail for another crime, or perhaps he even refers to everyone in the outside world after attacking someone. Either way, the bodily injurer is guilty.
"The man who was executed yesterday, the one who had said his job was to sell dreams, said that was not true." This next man sold "dreams" to people. Dreams that didn't come true. So he stole their money while giving promises of great return. This is the crime of swindling, so the swindler is guilty.
"But the man who is to be executed the day after tomorrow for stealing children shouted back that it was true." This clearly describes the kidnapper, who stole children, so he's guilty too.
In the next paragraph, the answer is given to you. In the third line we're told, "He was caught embezzling public money so he hasn't any hope for mercy." Crystal clear – the embezzler is guilty.
"The man who is always quietly smiling to himself said 'I am happy for I will soon be with her.'" This paragraph while not exactly direct should still make some sense. This matches the description of a crazy murderer, likely who killed his wife or a woman close to him whom he now misses and can't wait to see again in Heaven. But perhaps he's going somewhere else... Why did he kill her if he can't wait to see her now? Well, ask the crazy murderer, not me. Either way, the murderer is guilty.
The key to this riddle is in the last paragraphs, and we've already determined the five guilty men. "Though I have done nothing, this crime has been thrust upon me", says the author of the riddle, who is the sixth and final hanged man.
But how do we identify this innocent man? What was the crime he was accused of? Check the face plates in the corpse room to find the only unaccounted-for criminal is the counterfeiter. By process of elimination, the counterfeiter is the sacrificial lamb and innocent man.
Extra
We may visit death upon the head
of the sinner but to what avail?In the name of retribution,
we took part in a bitter
comedy this day.You, hanging as you do,
by your neck,
Unforgiven and cursed by all.Five of them committed crimes,
six went out for a drink and
were captured there.Only one of them was innocent,
but they knew not that.The bloodstains remaining
are proof of their guilt.
Trodden upon and thus created,
they are paths to
Hell or the Void.The white bandages stained
with crimson,
The remains upon the scorched
black earth,
The whispered cries of
the maiden.
They are but meaningless
contract.They are also signs of guilt.
But one of them was
done without reason.
It was done out of fear
and a ripe imagination.Sinning alone at the
end of a rope,
it is nothing less than
a disgrace to us all.
The first five paragraphs serve as a set up, however the sixth paragraph, "The bloodstains remaining are proof of their guilt", hints that the evidence of the crimes proves the guilt of the corresponding accused, or perhaps it just hints at the bodily injurer and murder crimes. So let's continue.
"The white bandages stained with crimson" brings two crimes to mind: bodily injury and murder. However bandages don't belong on a dead person as they will do nothing, so it has to be bodily injury.
"The remains upon the scorched black earth" is very clearly describing the remains of a fire, which burns and turns things black. Arson.
The next phrase, "The whispered cries of the maiden", describes an unmarried woman trying to scream, but all that comes out is a whimper or a whisper since she's terrified. You may be able to relate to this if you've ever had a dream where you tried to scream but couldn't for the life of you let it out. This definitely describes the crime of kidnapping.
"They are but a meaningless contract" is a bare sentence adding onto the three crimes already mentioned and its meaning is deep inside, so you really have to think about it. It may not even appear to be referring to one of the criminals at first glance and rather just back to the first three, but it is the only sentence that seems to tackle the following crime, so let's break it down.
A contract is an agreement, but it is meaningless if you're not going to follow it. So far the unspoken crimes are thievery, murder, and swindling. Swindling is cheating or defrauding of money or property, and this phrase could be interpreted as breaking a contract, potentially to illegally obtain money or property through deception. So the swindler fits here.
The next paragraph, "They are also signs of guilt", confirms our earlier suggestion that the evidence of the crimes indicates the guilt of the corresponding criminals. So the bodily injurer, arsonist, kidnapper and swindler are certainly guilty.
The second last paragraph isn't that clear either, but it's a bit easier to follow. "But one of them was done without reason. It was done out of fear and a ripe imagination." Without reason, eh? We only have thievery and murder left. Can you steal something out of fear and a ripe imagination? I mean, who knows, but it doesn't really make sense, does it? But could you kill someone out of fear? Absolutely. An example would be self-defense. Elaborating, the ripe imagination could be from this person thinking they were going to be killed by the other, perhaps jumping to extreme conclusions to arrive there, so they thought it was kill or be killed. Either way, the answer here is murder, making the murderer guilty.
Only five of the six men have been mentioned in this riddle, so what's this all about? What about the other guy? Well, we've determined which five men are guilty, so that leaves the final accused as the innocent man. The only unaccounted-for accused in the corpse room is the thief, who was never mentioned in the riddle, and thus he is the innocent man.
Once you determine the innocent man, locate him in the corpse room. Full solutions are above, but for quick reference these are the innocent men for each riddle level:
- Easy: Kidnapper
- Normal: Arsonist
- Hard: Counterfeiter
- Extra: Thief
Note the innocent man's position out of the six men by reading the face plates, then head over to the room with six empty nooses. Here, find the noose in the same position as the innocent man in the other room in respect to all the nooses. Then move up to it and examine it to pull it down. Do not pull any other ropes as this will undo your answer. If you do pull the wrong one first by accident, just pull the correct one after.

Now head back to the corpse room. If you pulled the correct noose in the other room, the innocent man will now be gone in this room and in his place will be the 45 Key of the Persecuted.
Each time you pull an incorrect noose and go check the other room to confirm it was wrong, there will then be 2-4 Lying Figures in the connecting corridor. This would be your reward "in a shape most wondrously strange", as described on the sign in the noose room. Make sure you're right the first time you pull to avoid this.
After picking up the key in place of the innocent man, exit the room and go through the door at the end of the corridor. Run to the lifting gate and use the Key of the Persecuted in front of the handcuffs to uncuff them, then James will lift the gate.
Beyond the Gate
Pass under the lifted gate, move down the ladder and follow the path to the white door straight ahead since the gate down here is locked. Through the white door, a cutscene will play before James leaves the room on his own.
Note on trying to re-enter this room:
If you try to re-enter this room and/or how much you try it may influence the outcome of the ending at the end of the game. I suggest you just play normally and move on, but feel free to check the Endings section for more information once you've completed the game at least once.
After James leaves the room, the nearby gate is now open... Proceed through it and up the latter at the end of the corridor.
Catacomb
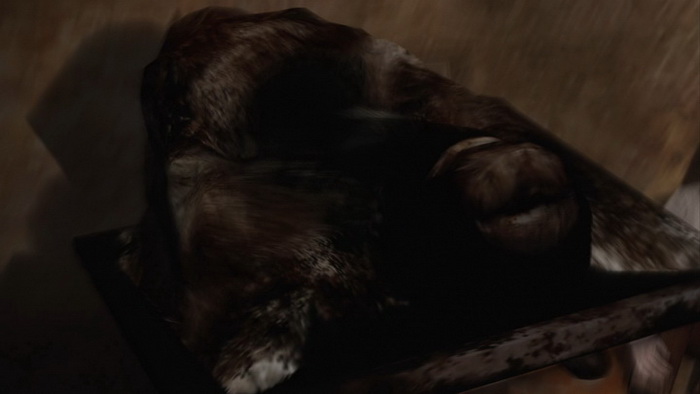
Take the First-Aid Kit on the floor atop the ladder, then follow the corridor to enter a small catacomb. In here you'll find three boxes of Shotgun Shells – one near the southwest corner, one in the southeast corner and one in the center to the north – and an Ampoule in the northwest corner. There's also a Save Point on the grave to the east, which I recommend using since a tough boss fight is just ahead.

If you examine the graves in this area, you'll notice a few familiar names. Remembering the Wood Side garbage chute article, Water Sullivan's name is etched in one of the graves. There's also a "Miriam K.", which is a different last name than Miriam (and Billy) Locane from the same article.
Freakiest of all, there are also gravestones for Eddie Dombrowski, Angela Orosco, and James Sunderland himself. Further, you'll notice the dug grave in front of James' gravestone is quite deep, and you must jump into your own grave to advance through the game.
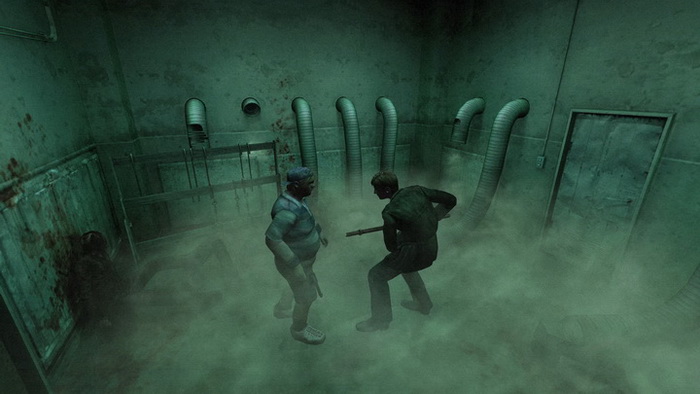
Once in your own tomb, continue down the stairs and follow the long pathway. Move through the door at the end to meet up with Eddie in a meat freezer. His psychotic nature has escalated even more from the last time you met him, so it's time for another boss fight. Interesting that Eddie chose to jump down into James' grave rather than his own, by the way.
Boss 4: Eddie (Meat Freezer)

Unfortunately, Eddie has gone mad and you'll have to deal with him rather than running away. It's kill or be killed, so get started. This battle consists of fights in two rooms, first this small entryway and then it will progress into the larger main freezer.
First Room
There are a number of good weapons you can use in this first room, including the Shotgun and Hunting Rifle with their power, however on Normal and Hard the best method is clearly the Steel Pipe, which allows you to avoid being hit at all by Eddie if done right.
With the Steel Pipe, use R2 and hold X tightly (to perform the overhead downward swing) right from the beginning to continuously bash Eddie over the head as he begins to rush you. He may look like he's about to hit you, but if done right he'll never get a chance as you'll be smacking him before he does so. This strategy is perfect for a no-hit performance on Normal and Hard, although Eddie moves slowly enough on Easy and Beginner that it throws off the timing a bit and you'll have to adjust your attack patterns.
The other recommend strategy is the Great Knife because of its ultra power, requiring only one to three hits depending on your difficulty level. You can also perform just a single overhead executioner swing to send him to the next room in one hit (it may require an additional swipe on Hard).
If on Beginner or Easy, go for a quick swipe finish him in this room, but try the overhead swing on Normal. I don't recommend this method on Hard since it's easy to get shot due to the weapon's slowness – go with the pipe.
Although melee weapons are honestly the way to go in this room, firearms can still be effective as well. The thing is though, Eddie will likely shoot you a few times due to his behaviour and the slow nature of the more powerful guns, along with the lower power of the Handgun. So do be ready to get in your heals in this case.
With the Hunting Rifle, just start blasting him right away and you may be able to send him to the next room with a full clip or so. Always try to keep a distance away from him since the Rifle is very slow to use. With the Shotgun, getting a bit closer to Eddie to narrow the blast and maximize its power can be helpful. Eddie will also be more likely to punch you at this range rather than shoot you, but that's a good thing since it inflicts much less damage and sets you up for another good shot.
Eddie's attacks:
Eddie is a simple man and will either shoot you with his revolver, inflicting a lot of damage, or he will punch you at close range, doing minimal damage. The shots take around a quarter of your health away and are very powerful, while the punches really aren't that bad and only take a tenth or eighth of your health. So if you can position yourself near him so he attacks you that way rather than lethal shots, it's not a bad strategy.
Again, I recommend the melee weapon strategies for Normal and above, but go ahead and try firearms for Beginner and Easy.
Once Eddie takes enough damage, he will end the draw and run into the next room. Once he leaves, be sure to get the Rifle Shells and Shotgun Shells on the ground in this room. Reload all of your weapons if you need to and make sure your health status is strong. Then proceed to the second room.
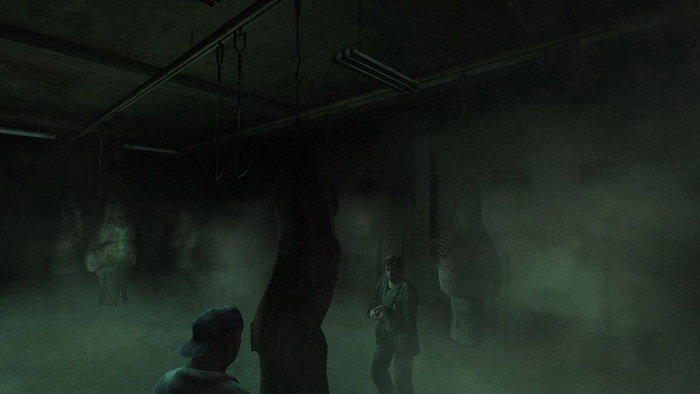
Second Room
Now in the main section of the meat freezer, this room will start with another cutscene, delving deeper into Eddie's mindset. Then he will approach you and start the fight again. Note that there are large racks of meat hanging from the roof in this larger room, so be sure to utilize them strategically to block potential shots from Eddie. Eddie will also behave the same way and use the same attacks in this room, but perhaps the more open space and cover allow for differing strategies.
In this room, the Shotgun seems to work best. The Hunting Rifle can be effective with its longer range, but it's also very slow and Eddie will be more likely to shoot you while so far away. Instead, try to get all close and personal with Eddie and blast him with the Shotgun to deliver the most power. This way he will also try to punch you rather than use his revolver. You may need to find a balance where you shoot him from a bit farther so that you can still escape, but still close enough so that he tries to go for a punch rather than a more lethal shot.
After getting in a blast up close, try to quickly strafe away after so that he can't punch you, and if done right he'll swing and miss a lot of the time. Take the opportunity to blast him again, and whenever Eddie runs after you, keep using the strafing buttons to your advantage for an easier escape. Be sure to hide behind the meat racks and blast him when he comes near, or hide behind them to safely get away and then come back out and blast him if he's hanging around. Continue using this strategy.
Another strategy that works fairly well is sneaking. Use some stealth and try to come up on Eddie from behind. Simply hide behind the meat racks so that Eddie loses track of you, then locate him through the racks and fire away.
Alternately, if you do have the Great Knife it works quite well in this room too. You may take some hits due to its slow nature, but it's so powerful that it'll only take three swings to end the battle on Normal, or up to six on Hard. Using the first meat rack as cover, slice him through it on his initial approach. Track him as he keeps moving around after and get ready to swing early once he comes back. Feel free to reset on the other side of the meat rack or another one if it makes more sense due to his positioning. But either way, stand close enough to it so that he may punch the piece of meat instead of you from the other side.
When Eddie starts hiding behind the meat racks, the fight is almost over and he knows it. At this point, one or two more good Shotgun blasts should kill him. The Shotgun is a little slow so this may make it difficult to hit him in this stage, so consider switching to the Handgun to finish him off with its faster firing speed and nimble handling. Find where he's hiding behind a rack of meat, let him run out and start firing away as you follow him from behind. Repeat this process until he dies.
After taking enough damage, Eddie will fall to the ground and the fight will be over. But hey, he had it comin'!
After the fight, head through one of the large doors on the opposite side from where you entered.
| 09. Toluca Prison | 11. Toluca Lake |