Walkthrough
Letter from Silent Heaven
01. East South Vale
02. Wood Side Apartments
03. Blue Creek Apartments
04. West South Vale
05. Brookhaven Hospital
06. Nightmare Hospital
07. Dark South Vale
08. Silent Hill Historical Society
09. Toluca Prison
10. The Labyrinth
11. Toluca Lake
12. Lake View
Hotel
13. Nightmare
Hotel
Born from a Wish
01. West South
Vale
02. Baldwin
Mansion
03. Blue
Creek Apartments
Lake View Hotel
"Waiting for you..."
Contents
- North Shore
- First Floor Hallway
- "Lake Shore" Restaurant
- Storeroom
- Basement
- Lobby
- Second Floor Midwest Corridor
- Second Floor West Wing
- Second Floor Mideast Corridor
- Figuring Out the Employee Elevator
- First Floor Employee-Only Wing
- Employee Basement
- Retrieving Your Items on the Second Floor
- Getting the Music Box Player Working
- Third Floor: Room 312
Video Walkthrough |
Complete Maps |


|
North Shore
Finally, there she is: the great Lake View Hotel. From the dock, follow the path and head up the stairs to the courtyard of the hotel. Searching the area, you'll find the 46 "Little Mermaid" Music Box on the left fountain. Deeper into the courtyard, you'll find stairs and the back entrance of the Lake View Hotel. Take a deep breath and enter through the double doors.

First Floor Hallway
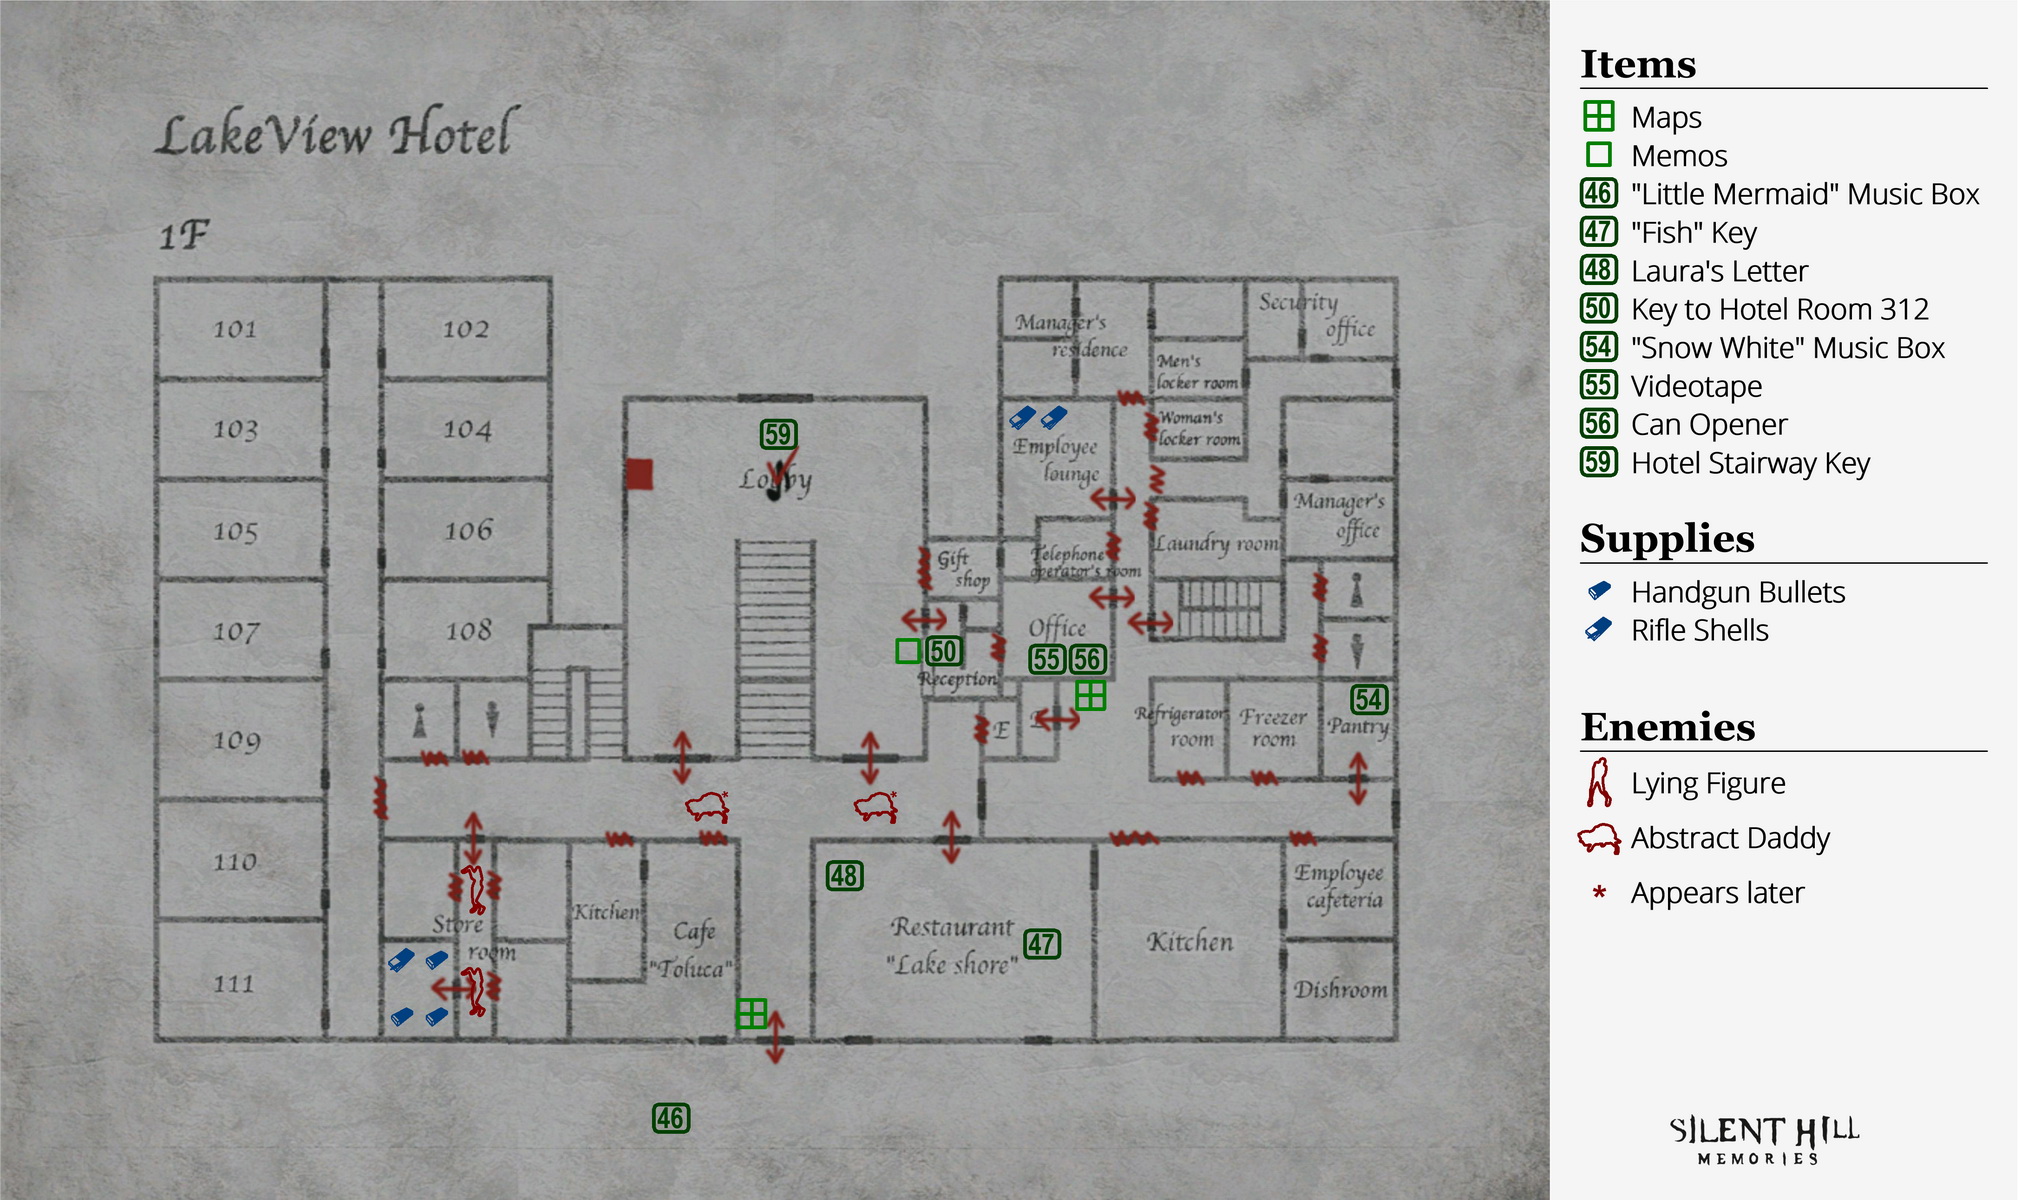
It's been a long ride but we've finally arrived at our special place. Just inside you'll find the Hotel Map (For Guests) on the bulletin board to James' left. He notices a message – "Waiting for you..." – written in the box of room 312 on the map, the room he and Mary stayed in three years ago... Could Mary really be here?
As a side note, go ahead and examine the Letter From Mary in your inventory for a bit of a surprise. Additionally, now is a good time to switch over to the Shotgun for the remainder of the game if you haven't been using it lots already anyway. Although feel free to use the Handgun on weaker enemies if low on ammo.
"Lake Shore" Restaurant
Enter the "Lake Shore" Restaurant from the hall and check over by the tables to grab the 47 "Fish" Key that someone was ready to eat. Head for the exit for a surprise cutscene. Turns out Laura is here and she's a lot more friendly this time.

Laura hands James 48 Laura's Letter, adding more context to the story along with some questions. Laura hints at another letter but appears to have lost it, leaving in a panic to find it. With Laura gone, examine the piano for a funny little anecdote about Mary, then exit the room.
Back in the hall, you'll hear something menacing moving towards you. There are two Abstract Daddy creatures out here and they're coming from James' left. Grab a hold of something, bite your lip, and blast away at the first one before it gets too close. Quickly kick it to finish it off and murder the other one as well. Thankfully they're not as tough as the earlier boss and only require two well-placed Shotgun blasts on Normal and Hard.
Storeroom
Before entering the lobby, you'll find another unlocked room in the corridor, which is the Storeroom (unmarked grey area on your guest map). Inside, take out the Mannequins and enter the smaller room through the doorway at the end of the hall. Get the Rifle Shells on the boxes and the three boxes of Handgun bullets on the shelf. You'll also notice toilet paper strewn on the floor. Hey, it's always good to know where the toilet paper is. Exit to the hall.
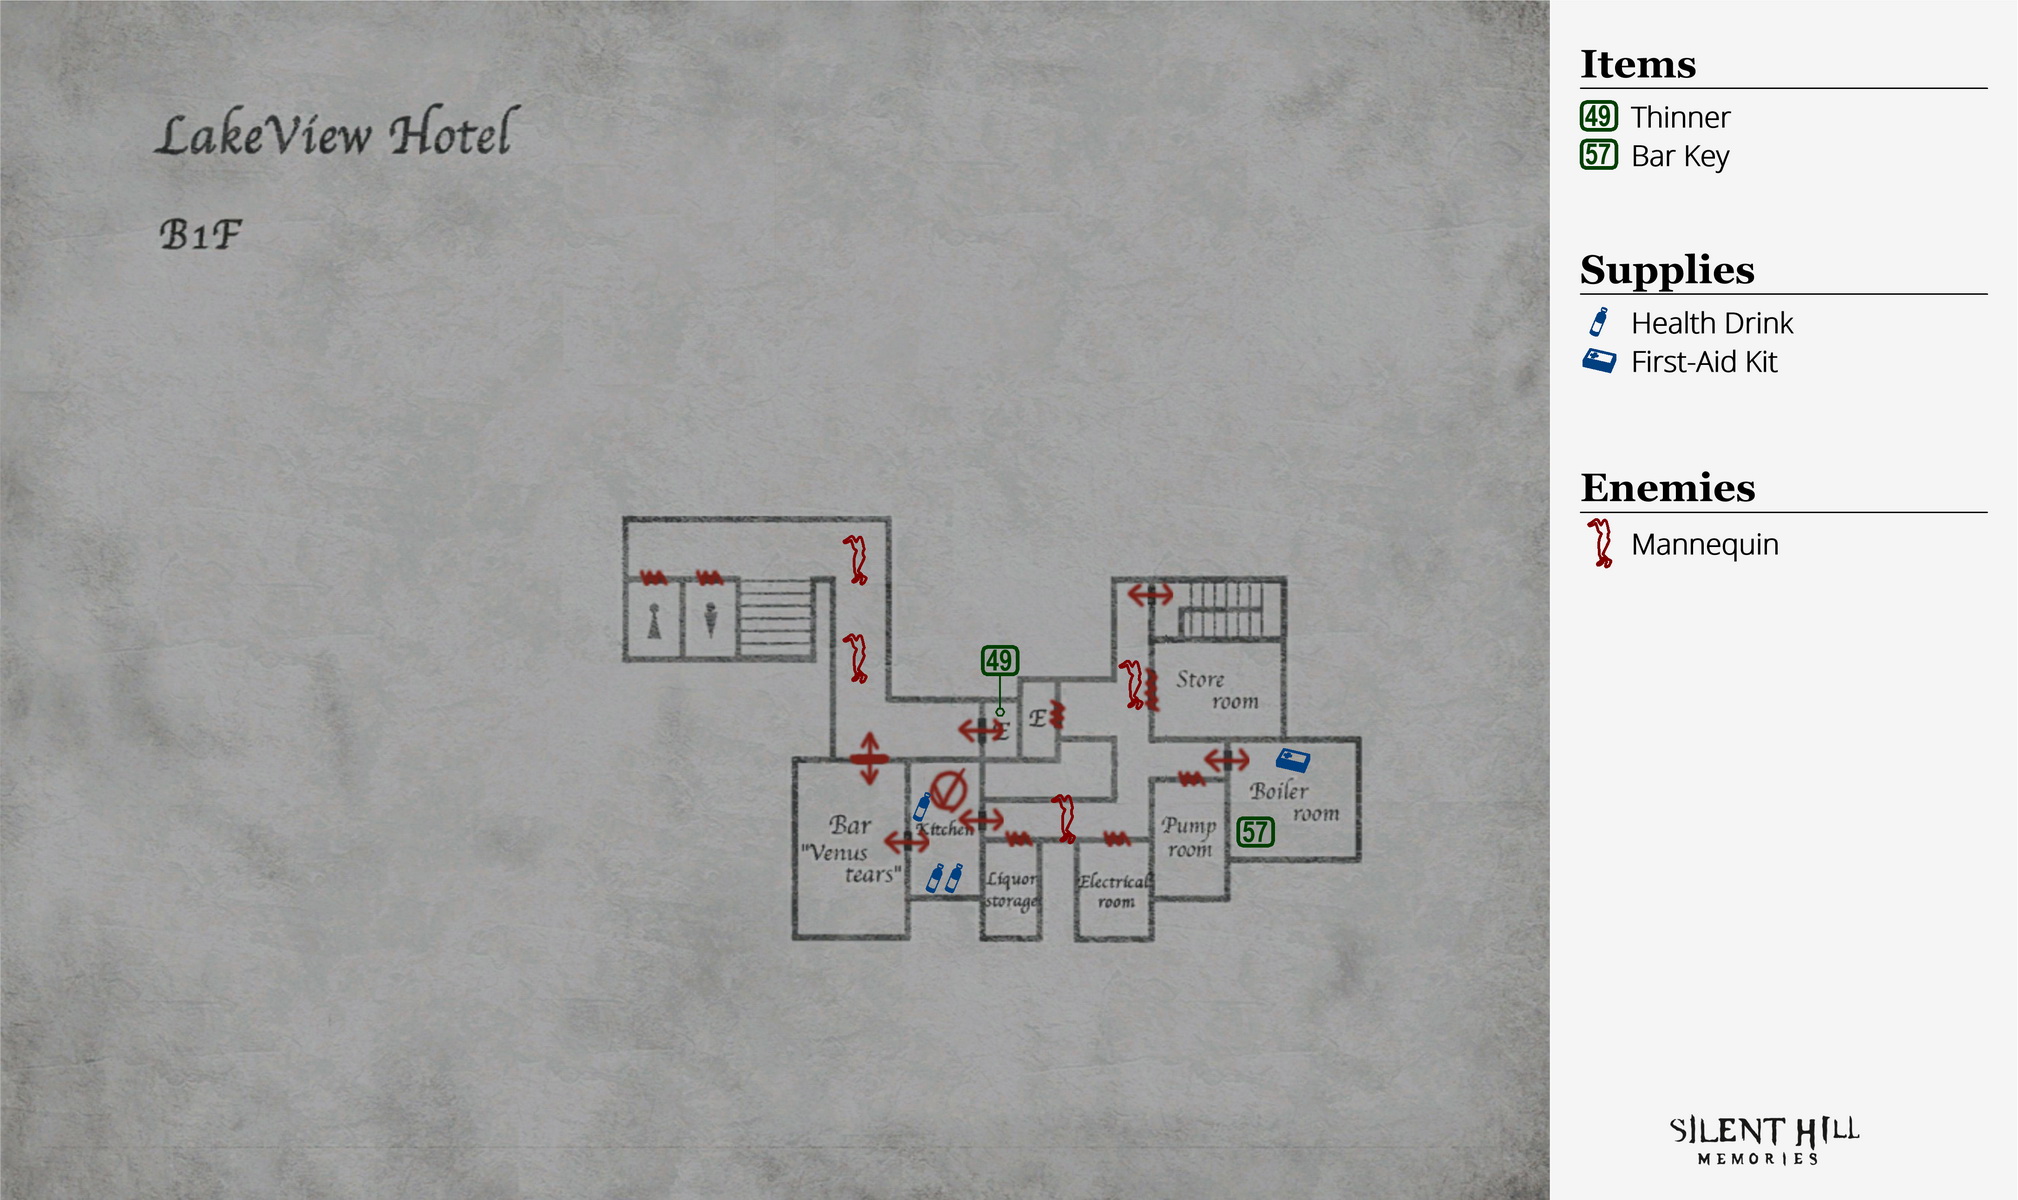
Basement
Spotting the stairway leading down in the center of the hall, head down to the basement. Make your way right past the two Mannequins (which won't be here if you check the basement before the restaurant) and grab the can of 49 Thinner in the open elevator. You may notice the Venus Tears Bar is locked, so you can bet you'll be back here later. Now head back upstairs and enter the Lobby through one of the two large doors by the stairs.

Lobby
Here you can find a Save Point on a chair in the northwest corner. You may also notice a large music box player standing by the stairs, but we only have one of three music boxes for it now. Remember it for later.
Head to the Reception desk to find a note on the counter about James' videotape that he left here years ago. It says the tape is in the first floor Office. You won't find an Office on your guest map, but there is a large empty space on the east side – it must be somewhere over there.
Enter the small Reception through the single door by the counter and you'll notice something glinting in one of the key boxes. Examine it to get the 50 Key to Hotel Room 312. Well, that was easy... Are we ready to go there already?

Second Floor Midwest Corridor
Now finished on 1F, head up to the second floor via the large staircase in the Lobby and move through the west doors to the small midwest corridor (or just take the slim staircase up from the previous hall). Out of curiosity, if you head up the slim staircase to 3F, you'll find a locked gate blocking your entry to the hallway. Looks like you won't be reaching room 312 anytime soon after all. Do listen intently for something subtle as you walk away from the gate if you do go up there.
In the midwest 2F corridor, enter the Cloakroom to find a First-Aid Kit on the counter. Grab the two packs of Shotgun Shells and two packs of Handgun Bullets on the shelves. You'll also find a locked briefcase on the counter by the wall, which is unlocked with the "Fish" Key. Take the 51 Key to Hotel Room 204 inside and leave the room.

Grab the two boxes of Handgun Bullets on the small semi-circle table by the window at the end of the hall, then enter the Reading Room. Inside you'll find Shotgun Shells on the left shelf ahead, more Shotgun Shells on the shelf in the corner past the bookshelf, and a Health Drink on the table in the other corner. Exit the room.
Second Floor West Wing
Now head through the doors into the west corridor and take care of the two Abstract Daddies that come at you. Then enter room 204 with the Key to Hotel Room 204. Inside on the desk, take the 52 Employee Elevator Key. Keep looking around the room to find a hole in the wall that leads to the next room, 202. In 202 you will find a funny-looking briefcase that's locked, plus a ton of photographs on the bed as if straight out of a serial killer movie. Looks like it's time for another puzzle.
Puzzle: Locked Briefcase (Room 202)

As you can see, the locked briefcase requires a four-letter combination, and no, it's not Mary. The combination is random each time but it always makes up an actual word. You may notice there's only a certain selection of eight letters on each dial (from left to right):
| m | e | s | p |
| l | a | r | n |
| k | x | m | l |
| h | v | l | k |
| d | u | e | e |
| t | p | c | a |
| o | o | w | t |
| n | i | v | r |

What you'll need to do here is spell the matching four-letter word that unlocks the briefcase. Examine the suspicious photos all over the bed and James will find one specifically of the briefcase's dial, but the combination is crossed out with black ink.

If you check your inventory, you'll find a useful item. Use the Thinner to remove the ink on the photograph and reveal the combination. If you don't have it yet, it's in the open elevator in the basement.
From playing this game several times, you'll generally notice a pattern in these random four-letter codes. It will usually be a dark, depressing or negative word with a couple outliers. Below are all potential solutions:
| damn | dull | kill | mist |
| dark | dust | lock | null |
| dose | hell | lose | over |
| down | help | love | town |
From the pattern, you might be able to sometimes determine the code without even using the Thinner, especially if you're good at rearranging jumbled letters into words, or if you just try all these listed here.
Once the combination is revealed, examine the case again and input the combination from the photo to open it.
Once the case is open, grab the 53 "Cinderella" Music Box inside. Now you have two music boxes, so you only need one more. Unlock and leave through 202's door and cross over to the mideast corridor from the lobby balcony.
Second Floor Mideast Corridor
Grab the Health Drink on the semi-circle table to the left and the Rifle Shells on the corner stand by the elevator. This isn't the employee elevator and it doesn't work anyway, but there is a greyed-out room on your guest map right here. Move to its door and enter with the Employee Elevator Key..
If you compare the first and second floor on your guest map, you are now above the greyed-out employee-only area on the first floor where the Office likely is, so taking the elevator in this room should lead right to it. First, use the Save Point near the door if you need to, then get the two Health Drinks on the janitor cart.
Figuring Out the Employee Elevator
If you move inside the open employee elevator, an alarm will sound and you won't be able to use it. Check the panel in the elevator and James will find a note on weight allowance – it explains that this elevator is only for one person. Even though James should classify as a single person, he is carrying a ton of heavy weapons and items, so perhaps that's what is causing the alarm.

Back inside the room you will find a large shelf. After reading the weight allowance note, examine the shelf and James will comment that he could store his stuff inside it. Consider healing up before dumping your items, and when prompted select "Yes" to put your items in the shelf. Now you must empty your entire inventory one by one – keeping even a single weapon or item will set the alarm off. Two exceptions to this are the Letter from Mary and Photo of Mary, which are seemingly light enough. On a related note, you might want to examine the Letter from Mary if you haven't since entering the hotel.
Note on the elevator and shelf:
You must enter the elevator, check the panel and read the note on weight allowance before you can use the shelf. Otherwise James won't understand what's the issue or realize why he needs to use the shelf.

Once you've emptied your full inventory onto the shelf, head back in the small elevator. Only the 1 button works here, so use it to head down to our destination.
First Floor Employee-Only Wing
Feeling a little vulnerable without any weapons, grab the Hotel Map (For Employees) on the noticeboard just outside the elevator, which is a map of the entire hotel unlike your guest map. You can see the Office is directly connected to this hallway, so that's a good start. Before heading there, enter the Pantry in the southern part of the corridor.
Inside, find and take the hard-to-see 54 "Snow White" Music Box on the shelf to James' right. You may get a chuckle out of the apple beside the music box if you're familiar with the Snow White fairy tale, and we'll actually get into that fairly soon since you now have all three music boxes. Exit the room.

Now enter the Office near the elevator. Find the open safe and take the 55 Videotape and 56 Can Opener inside. Exit the room, and for more ammo enter the Employee Lounge just north and get the two packs of Rifle Shells on the fridge. If you check the whiteboard in the room, James will comment that it was last updated one year ago... Interesting. Exit the room.

The employee elevator won't budge anymore, so use the stairwell right by the Office to reach the basement and find another route.
Employee Basement
Inside the corridor you'll notice your first threat since ditching your weapons, and you won't hear any static cause you don't have your Radio. It's a narrow corridor so you will need to push your way past the Mannequin – run at the tiny gap between it and the wall to push it most efficiently and you should easily avoid being attacked. Past the first Mannequin, enter the Boiler Room to James' left.
Here, take the First-Aid Kit on the ground and the 57 Bar Key hanging on the other side of the running boiler. Exit the room and prepare for your second session of Mannequin pushing. Once past, enter the Kitchen.
In the Kitchen you'll find two Health Drinks on the back shelf and another Health Drink on the right kitchen counter. You can also find a large tin can at the corner of the counter. What's inside? Well, use the Can Opener you found in the Office to find out. Ah, it's light bulbs, of course! James will take a 58 Light Bulb because why not?

Continue through the other door here to enter the Venus Tears Bar. Since you have the key, head around the bar to the exit. James will comment that it's too dark to find the keyhole. You just don't realize how useful the Flashlight is until you don't have it anymore... But fear not, there is a lamp on the edge of the bar pointing right at the door. Approach it and insert the Light Bulb from your inventory, and voila, let there be light! Now exit the bar with the Bar Key.

Retrieving Your Items on the Second Floor
Back in the guest portion of the hotel, you'll find yourself in the basement hall where you got the Thinner earlier. There will also be two Mannequins here unless you saw and killed them earlier, so tread carefully.
Your next task is to recollect your inventory so you can use the three music boxes in the Lobby. So head up the stairs to the first floor. The quickest way to the Employee Elevator Room is through the Lobby, up the large staircase and through the left double doors.
Once in the 2F mideast corridor, you'll be greeted by two menacing Mannequins looking for trouble. They heard you were pushing their buddies around back in the basement. Before things get too rowdy, enter the Employee Elevator Room and reclaim all your items by examining the large shelf. Ah... it feels nice to have weapons again. Exit the room, and sadly the Mannequins will be gone so you won't be able to get your revenge.
Getting the Music Box Player Working
Now that we collected all our stuff, we have the two original music boxes we found earlier plus the one from the Pantry on the first floor. Pass back through to the Lobby and descend the stairs to the large music box player. It's time to solve another puzzle.
Puzzle: Music Box Player (Lobby)

The idea of this puzzle is to make the large music box play music in the correct tune so that the turntable spins, revealing an item on the other side. If you make it play music as is, it will sound terribly out of tune because it requires six music boxes placed in the correct spots on the turntable, and three of them are missing. The other three are on the other side of the turntable, out of sight for the moment.
If you examine the three open slots, you'll find an inscription written in each, differing per riddle level. What you need to do is read the inscriptions and solve the short riddles to correctly place the three music boxes in the correct slots. Refer to the riddles and their solutions for each difficulty below.
Easy
All three slots contain the same inscription:
When the Lost One is returned
the sour note shall turn sweet
There's no real puzzle here. These inscriptions just tell us that when the three music boxes are placed in the player, the music will play in tune. Therefore it doesn't matter which boxes go where.
Place the "Little Mermaid" Music Box, "Cinderella" Music Box and the "Snow White" Music Box in the three slots in any order.
Normal
This time, each of the slots has a different inscription which describes the corresponding character on each music box. They read as follows:
Seat of the Princess
who fled at midnight.Seat of the Princess
who awoke from death.Seat of the Princess
who spoke no words.
This is a rather easy puzzle and only requires basic knowledge of the Cinderella, Snow White, and Little Mermaid fairy tales.
Cinderella was the princess who fled at midnight, and she also left a shoe. It was her fairy godmother who turned her into a princess, allowing her to visit the ball where she met and danced with the prince. But she was warned that the spell would wear off at midnight. When the clock struck 12, she remembered this and rushed to her carriage as quickly as she could. Thus the "Cinderella" Music Box goes in the left slot.
Which princess awoke from death? That would be Snow White. After she ate the poisoned apple from the Queen, she was put into a deep sleep thought to be death. However the Seven Dwarfs couldn't bear to hide her beauty and bury her. A prince then found her, and depending on the version of the story, a piece of the poison apple became dislodged during transit of her body, or it was the kiss of the prince that brought her back to life. So the "Snow White" Music Box goes in the middle slot.
Lastly, the princess who spoke no words was certainly the Little Mermaid. A mermaid princess named Ariel, half woman and half fish, saved a prince from drowning and began to fall for him. A sea witch named Ursula offered her human legs in exchange for her voice, which she accepted in the name of love, and thus never spoke. Therefore the "Little Mermaid" Music Box belongs in the right slot.
This leaves you with the following solution:
| Cinderella | Snow White | Little Mermaid |
Hard/Extra
This time the inscriptions delve a little deeper into each fairy tale. They read as follows:
Twas shameful greed did stain
her shoe with blood.Even so, I still want to believe
that she was happy.Beauty - Both a blessing
and a curse thou be.
Let's look at the first one. The word "shoe" sort of gives it away here, but the part about blood may understandably raise an eyebrow. There are apparently over 3,000 versions of Cinderella and some are certainly more PG than others, but this one draws from earlier versions of the fairy tale which are much darker than the pop culture versions.
In all versions, Cinderella ultimately goes to the ball, dances with the prince, runs off when midnight strikes and loses her shoe. The prince then sets out to find out whose shoe it was, or rather who was the beautiful young lady he danced with, by getting all the young women he could find to try it on. This brings him to the house of Cinderella and her two step sisters.
In the children's story, the first step sister's foot is much too long and the other's much too wide, leading to Cinderella trying it on with a perfect fit. Earlier versions of the fairy tale however, take a darker turn through this part of the story. The stepmother, desperate for one of her daughters to marry the prince, hacks off the first step sister's big toe for the slipper to fit. It does and she leaves with the prince, but some birds cry out that there's blood in the shoe, which is also too small, and that the right bride is still at home.
Next, the stepmother hacks off the heel of the second step sister and the slipper fits her, but the birds warn the prince again. Upon returning to the home, Cinderella finally tries on the shoe and it fits perfectly without any gruesome modifications, since it's hers after all. As for how this applies to this riddle, it was indeed shameful the stepmother's greed for the prince's riches did stain Cinderella's shoe with blood. With that, the "Cinderella" Music Box belongs in the left slot.
The second inscription is very vague, but upon deeper examination it describes the Little Mermaid. Ariel had the finest, most beautiful voice of all mermaids and humans. She saved a prince from drowning and began to fall for him. A sea witch offered her human legs in exchange for her voice so that she could be a human and have the prince return her love. Ariel accepted her offer and thus became a mute. She did end up living happily ever after with the prince but at the cost of losing her beautiful voice. Even though she's now a mute, I still want to believe that Ariel was happy. Therefore the "Little Mermaid" Music Box sits in the middle slot.
The last sentence refers to Snow White and how beautiful she was. The Queen, Snow White's stepmother, was so obsessed with her beauty and would always ask her mirror who was "the fairest of them all", to which the mirror would always reply that it was her. But as Snow White grew older and more beautiful, the mirror eventually told the Queen that it was in fact Snow White who was the fairest. And the mirror could not lie.
Upon this, the Queen ordered a huntsman to kill Snow White, but he could not bear to kill such a beauty and agreed to let her run off into the forest, where she'd find her new home with the Seven Dwarfs. Still hearing her mirror reveal Snow White as the fairest and thus still alive, the Queen tracked her down and managed to feed her a poisoned apple. Snow White eats the apple and falls into a deep sleep. Assuming she is dead but unable to bury her and her beauty, the Seven Dwarfs place her in a glass casket.
Soon a prince stumbles upon her and agrees to take the princess to her proper resting place. On the way while transporting her body, a prince's servant trips and this dislodges a piece of the poisoned apple inside Snow White, and thus she returns to life. In other versions this is more romanticized and it is the prince's kiss that brings her back to life, but either way the result is the same. The story goes on but that is the essential resolution and gives us the full context for this riddle. Beauty was both a blessing, as Snow White was so beautiful to everyone around her, and a curse in that the Queen attempted to kill her. This puts the "Snow White" Music Box in the right slot.
This leaves you with the following solution:
| Cinderella | Little Mermaid | Snow White |
With the three music boxes in the correct locations, make the large music box play and it will do so in the correct tune, offering up a catchy little composition. The music box turntable will begin turning and then stop to reveal the other three music boxes that were inside it, along with a key on the middle box. If the music is still out of tune, you have the boxes in the wrong slots, so take them out and try again.

Take the 59 Hotel Stairway Key from the middle music box, and if you saw the gate blocking the third floor you'll know what this is for. It's time to head to the core of your special place.
Head up the large stairway in the Lobby and through the west double doors. Then go up the slim staircase in the midwest hall and use the Hotel Stairway Key to open the gate blocking the way to the third floor hallway.
Third Floor: Room 312
Now it's time. Approach room 312 and enter with the Key to Hotel Room 312. If you missed the key, it's very easily found in a mailbox inside the Lobby's Reception.
It's very quiet inside with nobody in sight. There's nothing really of note either, although there is a TV with a VCR beside it by the back window. While facing the VCR, open your inventory and insert the Videotape you found in the Office. Pay very close attention while watching this videotape as it reveals a very important event at the end.

After the shocking revelation and a brief visit from Laura, a familiar voice begins emitting from James' radio. Just when I thought I was out, they pull me back in... Exit the room.
| 11. Toluca Lake | 13. Nightmare Hotel |