Born from a Wish Walkthrough
Letter from Silent Heaven
01. East South Vale
02. Wood Side Apartments
03. Blue Creek Apartments
04. West South Vale
05. Brookhaven Hospital
06. Nightmare Hospital
07. Dark South Vale
08. Silent Hill Historical Society
09. Toluca Prison
10. The Labyrinth
11. Toluca Lake
12. Lake View
Hotel
13. Nightmare
Hotel
Born from a Wish
01. West South
Vale
02. Baldwin
Mansion
03. Blue
Creek Apartments
Baldwin Mansion
"But how can you say that it is this town that is insane? Perhaps it is we who are insane. Both of us... hopelessly insane."
Contents
- Entrance Hall and Living Room
- Second Floor
- Investigating the Fireplace
- Kid's Room and Attic
- Beyond the Lounge
- Southern First Floor
- Heading to the Apartments
- Back Alley
Video Walkthrough |
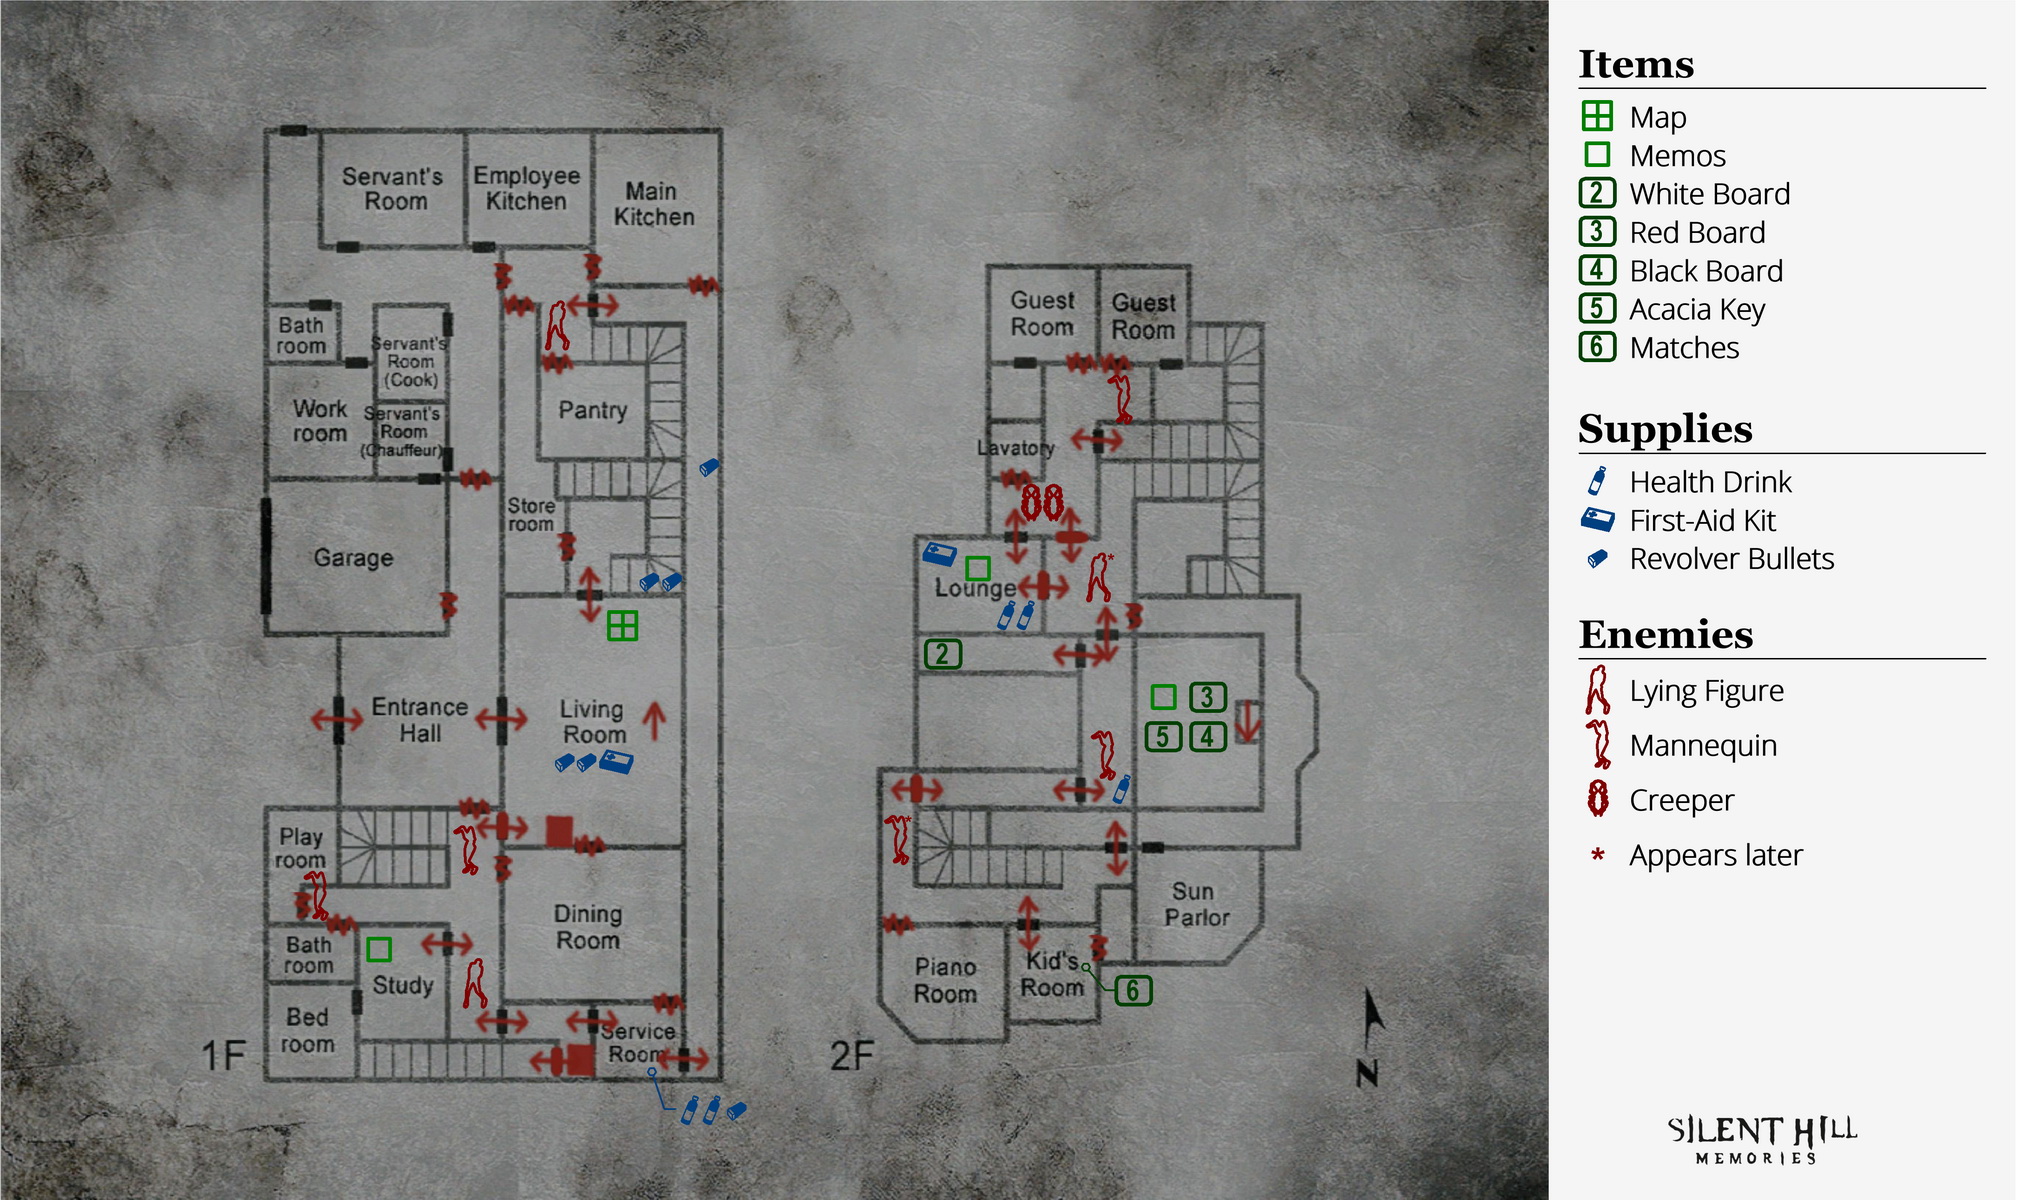
Complete Map |
|
Entrance Hall and Living Room
Pass through the double doors around the table since nothing else here is open. In the Living Room you'll find the Baldwin House Map on the short bookshelf to Maria's left. There's also two packs of Revolver Bullets and a First-Aid Kit on the coffee table by the blocked off fireplace and a Save Point on the far right wall beside the door. Check your newfound map and enter the staircase to the north.
Second Floor
Get the two boxes of Revolver Bullets on the stand in the corner on your way up the stairs. At the top, try the door to the Lounge on the right. It'll be slammed as you try and it appears there is someone else here... After pestering him enough, he reveals his name is Ernest Baldwin, but he won't open the door and wants to be left alone.

Move on through the south door, ignore the Mannequin and pass through the near right door to the balcony. Grab the 2 White Board on the floor and re-enter the hall. Past the Mannequin is a Health Drink on the corner stand, and through the other door on the next balcony is a locked door, so head back to the stairway hall.

Ernie still won't open up so head back down the stairs. You'll hear a thump and light footsteps on the way.
Investigating the Fireplace
After the ruckus you will notice the "Do not use" board blocking the fireplace has fallen. Check inside it and climb up the ladder.

Up here, grab the 3 Red Board and 4 Black Board near the gravestone. Examine the gravestone and get ready to solve a puzzle.
Puzzle: Gravestone Memorial (Above Fireplace)

Upon examining the gravestone, an epitaph reads:
Along with you died joy.
All that remains is despair and a
future of meaningless tomorrows.But I will never give up.
One, to see your
beautiful smile again.
One, to beg the
blessings of the Gods.
I wait for that day.When the boards cover all
All sadness too will be covered
But until my dreams
return to reality
I will have to swallow
all the pain.
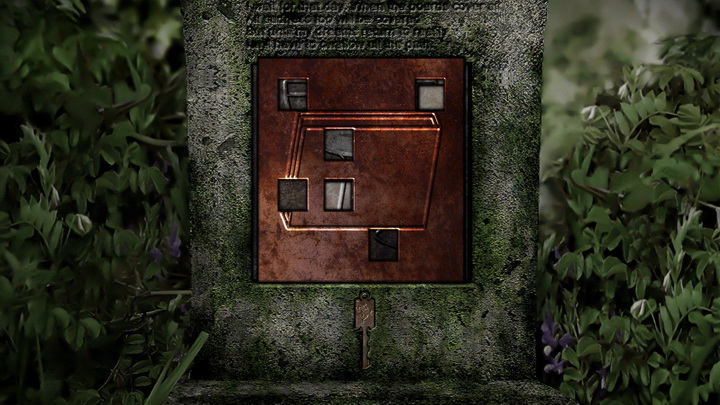
Under the inscription is a large square depression around the size of the three boards you now have, and a key that won't budge under that. "When the boards cover all; All sadness too will be covered" implies that you must insert the boards into the depression to release the key, however there's a catch.

Checking the boards in your inventory, you'll notice they each have square holes punched through them at different locations on each one, and there's a blue background on the square depression of the gravestone, which you will notice through the board holes if you place them in the depression. So what you have to do is find a way to insert all three boards so that the blue background is entirely covered.
You will find that each board has four rows and four columns where a hole can potentially be, and when standing upright they look like so:
 |
 |
 |
Note: If you'd like to get crafty and try a fun way to solve this puzzle on your own, use three equal-sized pieces of square paper (sticky notes work well as they are already squares) and cut the matching holes into them as per the three boards you have. Be sure to mark each paper by its board colour and also identify where the top of the board is. Once that is done, simply lay the "boards" on top of each other and figure out a combination that covers all the holes. If you'd rather just do it in your mind, which is very much doable as well, continue reading below.
The first board you insert into the depression must go in straight up, but the next two boards you insert can go in either straight up (as is), 90 degrees to the left, 90 degrees to the right, or 180 degrees (upside down). Feel free to reference the boards above and find a solution that works by manipulating the boards in your mind.
Do yourself a favour and keep one board upright, but even if you find a solution with no boards upright, all you have to do is shift each board accordingly so that at least one of them faces upright and that one you will insert first. If you get what I mean, your solution actually won't change at all, but rather just the way you're looking at it.
One way to wrap your mind around it is to look at the holes as numbers, or even coordinates. With this perspective, the White Board has holes at (1,1) (1,2) (2,2) (2,4) (4,1) and (4,4) while standing upright. If we put the Black Board on top of it as is, it will cover up the holes at (1,1) (2,2) (2,4) and (4,4), thus leaving only (1,2) and (4,1) exposed. No new holes will be made either as the White Board covers the other holes in the Black Board.
Now if we put the Red Board in as is, it will cover (4,1) but not (1,2). However if we rotate it 90 degrees left first, it will cover both (1,2) and (4,1), and thus it is a potential solution that will work every time. You can visualize it here:
|
|
 |
As you can see, every hole in each of the boards will be covered by at least one of the other boards. This is the only arrangement of the boards that works as a solution, however the entire arrangement can be shifted and work in another form. That is, if you put the Red Board in first as is, then the White and Black Boards just have to be shifted 90 degrees to the right. The boards will sit on top of each other and block the same holes, just all shifted 90 degrees to the right.
So the order you insert them really doesn't matter, just as long as the White and Black Boards go in the same way. Either way, you have the solution to the puzzle in its most simplified form:
- Insert the White Board as is
- Insert the Black Board as is
- Insert the Red Board 90 degrees to the left
After inserting the three boards correctly, the 5 Acacia Key will come loose. Descend back down the ladder and return to the second floor via the stairs. Ernest still won't open up so enter the southern balcony from the next hall and head through the other door with the Acacia Key.
Kid's Room and Attic
Now in the southern 2F hallway, enter the Kid's Room through the second door. Take the 6 Matches on the nightstand beside the bed, and examine the stuffed animals along the dresser and also the calendar by the door for interesting comments from Maria. Exit the room and continue down the hall to and through another unlocked door at the end.

Inside the attic, start up the stairs to hear some voices, but you'll find no one up here. It's also too dark for Maria to see clearly if you try to examine anything, but luckily there's a candle by the stairs. Approach the candle from the stairs side and use the Matches from your inventory.
Now with a light source, investigate the far left to find a 7 Birthday Card under the chair. Head back down the stairs towards the door, and on the way you'll hear a young girl's voice, giving you some instructions. Do as she wishes and head back to Ernest in the Lounge, passing a new Mannequin and Lying Figure on the way.

Beyond the Lounge
Upon checking the Lounge door, Maria will enter and find that Ernest has vanished. In here you can find two Health Drinks in the open cabinet by the door, a First-Aid Kit on the stand in the opposite corner, and a book on Acacia on the coffee table that Ernest may have been reading.
Move through the other door in the room to a new hallway where you'll find a few annoying Creepers scrambling about, plus a Mannequin around the far corner. Feel free to unlock the door leading to the previous hall by the door you came through, but pass through the only other open door here into another stairway. Make your way to the bottom past a Lying Figure and go through the door beside the stairway.
Southern First Floor
Start your way down this absurdly long hallway and pick up the Revolver Bullets on the left side a way's down. Continue to the end and enter the Service Room. Inside, grab the Revolver Bullets on the garbage container and two Health Drinks on the counter, then exit through the other door.
Now in another connecting room, there's a Save Point on the wall next to a locked stairway. Move through the other unlocked door here to encounter another Lying Figure face-to-face. There's also a Mannequin around the corner to the Study, but we can leave it in peace. Note that the northeast door in this hallway that leads back to the Living Room can be unlocked, but it's not necessary to return there.
Enter the Study and read the "Lost Memories" book on the table, which you may also recognize from the main scenario if you've attempted a secondary playthrough (although this is a different excerpt of the same book). Check the door at the back of the room to find Ernest's new hiding place.

After a somber conversation, Maria slips the Birthday Card under the door. Ernest then asks Maria for a favour. There's a bottle of white liquid somewhere in the apartment next door that he must have, but he cannot get it himself. He'll unlock the stairway in the nearby hall for you to get there.
Heading to the Apartments
Leave the Study and re-enter the small connecting room before the Service Room. The stairway door is now mysteriously unlocked, so Ernest found a way to do it sneakily. Move through the door, down the stairs and pass through the door at the end of the small hallway.
Now in a Creeper-infested hallway judging by the sounds, examine the plate on the floor in the corner for an interesting message about Amy. Head down the hallway and consider shooting the Creepers to avoid them bothering you any further. Move up the staircase at the end of the hall and follow the path to a doorway. Exit the mansion to outside.

Back Alley
Watch out for the Mannequin straight ahead and shrug off the spray-painted advice on the wall, which came a bit too late. Head through the large open doorway and enter the apartments in the next yard, avoiding the patrolling Lying Figure.
| 01. West South Vale | 03. Blue Creek Apartments |