Devil's Pitstop
Contents
- Get back to the highway
- Find a way out of the area
- Obtain a ticket to get to Devil's Pit / Find the missing ticket machine
- Change into new clothes
Walkthrough
Get back to the highway
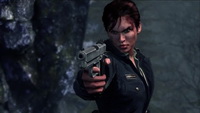 When you regain control again, you'll find yourself at the crash site in the forest. Now you have access to the Journal which contains tips, objectives, mysteries and maps. Before going deeper into the forest, move around the bus and cross the water to grab a Walkie-talkie by the tree at the shore of the lake. Return to the bus and proceed under a fallen tree. Go down the path until you see some crows fly out of a gap to your left. Squeeze through the gap in the rocks to obtain a Flashlight by the dead prisoner's body. Return to the main path and continue your way. When the path splits, you can choose either direction, although the right route is a more direct one. In any way you'll end up at the ravine. Cross over the fallen tree and approach the rocks ahead to trigger a cutscene. During the cutscene make your choice (the choice is going to affect your ending. More about this in the Endings section). Once the cutscene is finished return to the rocks to climb up to the highway.
Find a way out of the area
Head to the Gas Station down the road. Take the Map of the Outskirts from the bench. Pick up a Wrench from the toolbox, approach a locked gate in the fence and smash its padlock with the weapon (Note: The toolbox provides an unlimited number of wrenches if you want to replace your damaged weapon or lost one). Pass the gate and climb up the ladder. Cross the roof of the building and drop yourself down from the other side. Proceed between the two trees ahead and move around the building. Go up the stairs and enter the Aerial Tram Station. Approach the "Free Tram Ticket" poster in the back and observe the turnstile to get new objectives.
Obtain a ticket to get to Devil's Pit / Find the missing ticket machine
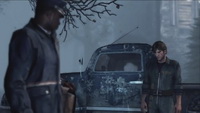 Pass through the doorway on the left and pull the switch to power up the tram and get it into a proper position. Before you exit the station, collect some Game Tokens from the counter and go outside. Follow the white marks on the ground until you reach a locked gate next to the Diner. Go to the right and approach the pickup in front of the Diner to trigger a cutscene where you meet a postman, Howard Blackwood. After the cutscene you'll get a new objective.
Change into new clothes
Proceed around the Diner and slip through the opening in the metal fence. Smash the diner's padlock and step inside (if you don't have a proper weapon, you can use a Stone near the door or a Wrench from the backyard of the Diner to break the lock). In the Dining Area take the Devil's Pitstop Map from the table by the window. Take the Devil’s Pit Flyer (1/54) from the table in the back of the room. Also you can collect Money from the cash register. You can use the Money on the jukebox right here in the Diner to hear some old good tune. Move to the toilet area and collect a First Aid Kit from the cabinet in the hallway. Enter the Kitchen. Pick up a First Aid Kit from the cabinet to your right. Murphy smells gas - try to turn the valve by the grills. When the fire starts, activate the alarm on your right and watch as the environment is transforming.
Otherworld: Diner
When you safely land in the next room, climb up the stairs in the centre and turn the valve at the end of the walkway to raise a room. Enter the room and turn a painting to further transform the area. Descend and enter a small room at the ground level. Rotate the painting there, which will move the exit into a proper position. Proceed into the next area through the bedroom. After the Void appears again, run to the left. The gate ahead is going to close as you're approaching, so circle around, turn the valve on your way to open the gate and go around one more time to run through the gate. Go up the stairs a bit until the Void is not chasing you anymore and then climb down. Go through the door and you'll find yourself in the Diner's kitchen once again. |
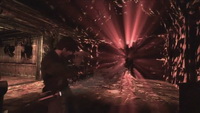 Quickly turn the valve on the wall to stop the water rising and proceed through the new opening. Climb up the stairs and continue down the hallway. In the room rotate the painting on the wall and run through the opened gate. Here you'll meet the Void. You can't harm the Void in any way, but it can hurt you. The only option you have is to run. Turn to the left hallway, run forward (the hallway will stretch several times) and turn around the corner whenever you can. Knock over some boxes to slow down the enemy. In the next room there are three openings, but the two will shut on you randomly so proceed through the only one remained open. Eventually you'll reach a small opening in the wall in the next hallway. Duck under it and then slide down. As you slide down, steer away from the obstacles on your way to avoid an instant death.
Go through the door to your right - you'll get to the Diner's Motel. You'll find a First Aid Kit in the WC. Head down the hallway and enter a room here. Before you go down to the basement you can explore the 2nd floor of the Motel, but the door there is locked. Pick up the Key from the table in the kitchen and go upstairs to unlock the door. Enter the first room to your right and take a Power Cord from the bedroom's drawers. In the next room you can find a First Aid Kit in the drawers. There's also a coffee pot on the window sill. Attach the Power Cord to it and the steam from the pot will reveal some numbers on the window's glass - 26381. Now go into the only unexplored room on this floor and move into a small room next to the bedroom to find a safe.
Puzzle: Motel's Safe
Easy
Normal
Hard
After you open the door, the safe will reveal a Colt. |
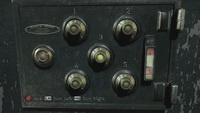 The safe's door has five dials. Not all dials turn as they should - some skip numbers and some affect other dials as they are turned. The code to this safe comes from the number on the window -
 Head back to the kitchen on the 1st floor and go down into the basement. There's going to be a First Aid Kit on the barrel right in front of you of the stairs. Take the path to the left and then around the corner. Break the lock and proceed through the gate. Enter the room in the back of the area. Pick up the Voyeur’s Notes (2/54) from the table. Go into the next room and take a Piece of Wire from the barrel. Return to the stairs. After the cutscene you'll have to deal with the new enemy - a Screamer. After the fight head to the lift in the basement past the stairs and use the Piece of Wire to fix the panel and get to the surface.
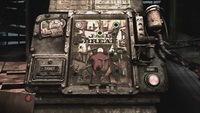
Step into the shack C (the first one to the right) to find some clothes on the bed for Murphy to change into. You'll also get a Police Badge and a Rusty Key. A room in the shack A has a First Aid Kit in the wall cabinet. Go behind the shack B through an open gate to find a generator and start it up. A Screamer will attack you here, so get rid of it first. After you start up the generator head into the shack B to find the lost ticket machine - use the Game Tokens to activate it and play a mini-game.
Puzzle: Ticket Machine
|
 You need to place three balls into the corresponding slots in the upper area as the water rises. The configuration of the game field depends on your chosen puzzle difficulty the configuration, but the goal is the same. It shouldn't be too difficult.
After you win the game you'll get a Free Ticket. Exit the shack, follow the marks on the ground and squeeze through the gap in the barricade. Use the Rusty Key to unlock the gate. At this point a group of Screamers is going to attack you, so it's better just to run back to the Aerial Tram Station (keep following the ground marks). Enter the Tram Station, use the Free Ticket in the machine next to the turnstile and step onto the tram to travel to Devil's Pit.
| 01. Ryall State Prison | 03. Devil's Pit |