Devil's Pit
Contents
Walkthrough
Step out of the tram and you'll have your next objective.
Find a way into town
 Go through the double doors to your right. Climb down the stairs into the yard. Go through the door in the corner of the yard, then into the next room through a bathroom (there's a First Aid Kit in the wall cabinet here). Take a Lighter from the workbench. There's a radio in the back of the room - you can turn it on to listen to a radio program. Pick up a Hatchet and chop through the boards blocking the door. Go through another boarded up door in the yard and collect a Key from the rack. Go up the stairs, unlock the door with the Key and enter the tourist centre. Continue your way and take the Devil's Pit Map from the information billboard. Go to the observation deck to start a cutscene and meet JP Sater.
Follow the path down to the train
After the cutscene, before you move further, you can use binoculars on the deck to see some cool and scary things. After that go into the lift and ride to the lower level. Continue along the deck and you'll see a pair of legs pulled behind the cabin. As you pass the spot, two Screamers are going to attack you. Deal with them and continue to a bridge. Cross it and the bridge will collapse halfway - hit and hold the buttons shown on screen to climb up. By the way, you've just lost your weapons and the flashlight. You need to make it to the next part of the deck ahead, but the stairs are destroyed so you'll have to find another way around.
Find an alternate route down
Take the path to the left, rotate the crank to open the door and enter the cave. Pick up a Pickaxe and clear the doorway ahead, continue forward deeper into the mine. Approach a lift in the centre of a cavern. To the right you'll see a set of water wheels. To the left is a flooded cave. Go up the stairs and approach the valves to solve the puzzle.
Puzzle: Water Wheels
Easy
Normal
Hard
|
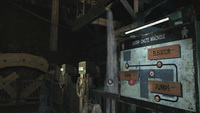 To power up the lift you need to move water chutes in proper positions to direct water. The board near the valves shows the statuses of three mechanisms: power, elevator, pumps. Before you power the lift, you can direct the power to the pumps to drain the flooded cave. In the cave you'll find a
 When you're ready to leave, step into the lift to ride down to the deep mines. After the cutscene head forward, defend yourself from Screamer's attacks and then push the mine cart along the tracks to cross the chasm. Continue your way down the stairs to find the Newspaper Article (Train Accident) (3/54) attached to the door. Go through the door into the storage room, grab a First Aid Kit from the boxes and exit through the next door. Here you'll encounter a new type of enemies - a Weeping Bat. Deal with it and continue down the stairs. Clear the boards off the ladder and climb up to the upper platform. Continue your way to a lift.
 The lift takes you outside to the observation deck and a cutscene will start. During the cutscene make your choice (the choice is going to affect your ending. More about this in the Endings section). After that use the valve by the gate to the right to open it and enter the Cave of Tears.
Move on until you're in a big cavern with some walkways. There's gonna be a couple of Weeping Bats in this area. Enter the control room. Inside you'll find a First Aid Kit in one of the glass display cases, a radio and, most importantly, a detonator in a small barricaded room. Smash through the boards and use the detonator to clear the way up ahead. Run from the area through the passage in the north and take the lift down.
Take care of a Screamer as you exit from the lift and examine a hanging body to collect the Poem (4/54). Continue down the stairs to the train platform. Approach the train controls to solve a puzzle.
Puzzle: Train Controls
Easy
Normal
Hard
|
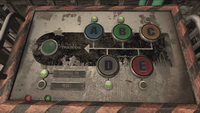 To activate the train you need to press the appropriate colored buttons in the right sequence. The help comes from the Poem you've found on the body. The contents of the poem are different for different puzzle difficulties and so is the right sequence.
After solving the puzzle, board the train to leave the area. Be ready for a QTE episode during the ride.
After all the cutscenes continue your way out of Devil's Pit. Move through the corridors, avoid the exposed wires in the next area and hit the switch in a fuse box to open a gate nearby. Move through the gate. Head forward to find another playing radio. Search the room to find a Flashlight in the corner, then hop over through the opening in the partition. Take the Town Map from the table ahead of you and exit the structure through a nearby door to find yourself in Silent Hill.
| 02. Devil's Pitstop | 04. Hillside |