St. Maria's Monastery
Contents
Walkthrough
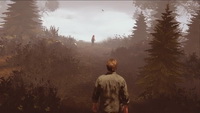
 Go straight through the door and grab the Monastery Map from the wall to the left. If you have a suitable weapon to hack through the boards, you can use it here to go through. If not, you need to explore the rooms around first. Go to the room to the south, take a First Aid Kit from the wall cabinet and squeeze through the crack. Check the drawers to get Pistol Bullets and then pull the bookshelf from the wall to reveal a hidden passage. Run to the end of the passage and grab a Fire Axe from the body on the ground. Now several Dolls attack you with their Shadows, so you
better avoid the combat and run to the Main Room. Use the axe to smash through the boards and proceed through the door. Move forward for a cutscene and you'll get a new objective.
Go straight through the door and grab the Monastery Map from the wall to the left. If you have a suitable weapon to hack through the boards, you can use it here to go through. If not, you need to explore the rooms around first. Go to the room to the south, take a First Aid Kit from the wall cabinet and squeeze through the crack. Check the drawers to get Pistol Bullets and then pull the bookshelf from the wall to reveal a hidden passage. Run to the end of the passage and grab a Fire Axe from the body on the ground. Now several Dolls attack you with their Shadows, so you
better avoid the combat and run to the Main Room. Use the axe to smash through the boards and proceed through the door. Move forward for a cutscene and you'll get a new objective.
Learn the Bogeyman Rhyme
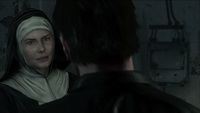
 Turn right and head through the door. Take a First Aid Kit to the left of the next door and go outside. Go around the corner and enter the Chapel. Move through the corridor and go up the stairs. You'll run into a little girl here. Following her will lead you to the top floor where you can ring a bell. Ringing the bell causes two Dolls to appear on the level below, so it's a bad thing to do. Go to the 2nd floor and proceed through the door. Cross the gap in the floor while the building begins to tremble. Head down the stairs, collect a First Aid Kit by the door and go through to the main hall of the Chapel. Approach the altar's gate for a short cutscene. Find a rope on the pillar to the left of the gate, examine it and use your Lighter to drop down the chandelier. Pull and push the chandelier a couple of times to get the gate open and collect the Poem Fragment 1 (27/54) from the book on the altar.
Locate missing Rhyme Pages
Exit the Chapel and move along the edge. Before you go up the stairs collect Pistol Bullets to the left. Continue forward and enter the Orphanage through the door ahead. Crawl through the barricade. In the hallway turn right and enter the room to the northwest to find Pistol Bullets. The Kitchen to the south has nothing of interest, but a single Screamer, so no need to go there. The Toilet to the west of the staircase has a First Aid Kit in the cabinet. Also you'll see a brief cool scene here. Move through the gate to the eastern portion of the hallway and deal with a Screamer here. Enter the Classroom to the right. Check the teacher's desk to obtain the Letter Home (28/54), then take a Hook by the office door to the north (you're gonna need it soon). Enter the office to collect a Colt behind the desk. Return to the hallway and enter the Theater to the north. Pull down the retractable ladder in the back of the auditorium using your Hook and climb upstairs.
Take the Technician’s Notes (29/54) from the small desk by the wall and enter the adjacent room on the opposite side to pick up a Lever on the desk (the Lever is on the shelf in the room on Normal puzzle difficulty and down in the auditorium on Hard puzzle difficulty) and a Vinyl Record in the drawer of another desk.
Puzzle: Theater Play
If you perform the wrong action, you'll have to start the whole sequence again. After you complete the proper sequence, the theater will transform into the play’s setting. |
 You need to start the play. In order to do that, you need to do things in a certain order. The order is revealed in the Technician’s Notes as well as some help comes from the labeled cue lights, however most of the tags are illegible (the number of illegible tags depends on your chosen puzzle difficulty). Here is the right sequence of actions:
 Climb down the ladder and make your way through the forest to the cottage on the stage (stick to the right after you made it through the crack). Enter the cottage and arrange correctly the tiles on the chest to open it.
Puzzle: Cottage Chest
|
You can rotate each puzzle block left or right. It takes some trial and error, but in the end you should get a portrait of a girl sitting on the beach. |
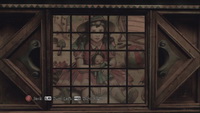 You need to assemble a picture of Gretel. Depending on your chosen puzzle difficulty the number of blocks will be different:
You'll get a Blackboard Eraser and the Poem Fragment 2 (30/54) from the chest. Beware, after you open the chest and collect the items, there will be two Dolls behind you. Run out of the cabin to escape from the enemies. You'll be back to the real world.
 Exit the Theater, return to the stairwell and climb up to the 2nd floor of the Orphanage. Approach the gate east of the stairwell. Open the gate - the girl will run from you. You can check the Dormitory past the gate to find a First Aid Kit on the shelf by the door and the Father’s Day Card (31/54) in the southeastern corner room. Be careful as there are three Doll enemies in other three corners of this room. Consider dealing with them one by one if you wish to. After you're done searching the Dormitory, go back to the hall and enter the Classroom. There's another Silent Hill artifact across the room - Canvas Sack - lying on the desk. After
collecting the item examine the blackboard with a drawn chain. Use the Blackboard Eraser on it to remove the drawing and trigger a flashback scene. Chase Charlie in this scene. When you're back in the Classroom, the door behind you will swing open. Head through it and grab the Preliminary Psychological Evaluation (32/54) from the back of the table in the next room.
Proceed to the hall through the Playroom. Check the office to the north for a First Aid Kit in the cabinet, the Psychological Evaluation 1 (33/54) in the drawers by the wall and a nice tune on the radio.
Exit the Theater, return to the stairwell and climb up to the 2nd floor of the Orphanage. Approach the gate east of the stairwell. Open the gate - the girl will run from you. You can check the Dormitory past the gate to find a First Aid Kit on the shelf by the door and the Father’s Day Card (31/54) in the southeastern corner room. Be careful as there are three Doll enemies in other three corners of this room. Consider dealing with them one by one if you wish to. After you're done searching the Dormitory, go back to the hall and enter the Classroom. There's another Silent Hill artifact across the room - Canvas Sack - lying on the desk. After
collecting the item examine the blackboard with a drawn chain. Use the Blackboard Eraser on it to remove the drawing and trigger a flashback scene. Chase Charlie in this scene. When you're back in the Classroom, the door behind you will swing open. Head through it and grab the Preliminary Psychological Evaluation (32/54) from the back of the table in the next room.
Proceed to the hall through the Playroom. Check the office to the north for a First Aid Kit in the cabinet, the Psychological Evaluation 1 (33/54) in the drawers by the wall and a nice tune on the radio.
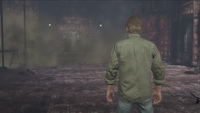
When you're done, head to the Main Room. There's a Fire Axe on the pillar to the right if you don't have one. Go south and around the room to get to the Hospice entrance. A Screamer will block you the way - deal with it and smash through the boards blocking the door to get inside. Enter the Restroom to the south. Take the Condolence Letter (34/54) from the table. Also check the area near the TV to find a Silent Hill Artifact - Toy Van. Exit the room through the Kitchen to trigger a cutscene in the hall. After you deal with a Screamer, squeeze through the gap in the wall. Follow the path through the Surgery and enter the X-ray Room. Check a small table near the door to take the Internal Memo (35/54). Now check the three lying Screamers on the gurneys here. To proceed you need a key swallowed by one of the Screamers.
Puzzle: X-Ray Machine
Note: If you try examining the wrong Screamer it will trigger a fight with it and you'll have to defeat the enemy before resuming the search. |
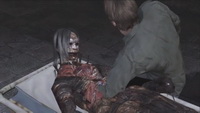 To find which Screamer has the key you need to scan them in the X-ray machine. Roll a gurney into the machine and activate the control panel to the left to scan the body. Once you determine the appropriate Screamer, pull the gurney out and begin searching the body. Follow the on-screen instructions to search the belly of the Screamer. When you find the right spot, push the button to get a
 Return to the boy
Exit the X-ray Room. Before continuing
down the stairs, check the small office to the north. There, in the drawers you'll find a First Aid Kit and the Psychological Evaluation 2 (37/54). Head downstairs, proceed through the door and then go through the door to the right. Hop through the wall opening and unlock the door leading outside. A Weeping Bat is going to attack you just past the door. Kill it or simply run to the next door to get inside the building. Return to the boy, watch the scene and after that the environment around you will transform again.
Otherworld: MonasteryRun forward following the little girl through passages and rooms. When you reach the gate, squeeze through the crack to the left. Cross the halls of the chapel, after you hop over a barrier search for a crack in the wall to the left and squeeze through. Make your way through the flooded basement and continue through the next area. Try to cross the bridge and it will collapse. Down in the trench turn to the left and the Void will appear here. Run right through the corridor with Wall Corpses and keep an eye for an opening in the left side. Turn there, run upstairs and through the yard behind the door. When the path splits, try to go left and then through another gate as the first one slams shut. Make it to the end of the corridor and approach a narrow passage. You have to move past this trap with emerging spikes. Learn the pattern and make your way through carefully (first and second sets emerge twice in a row, third doesn't move, fourth moves out only slightly, fifth - five times). Run through the corridor, take a First Aid Kit from the wall cabinet and enter the next room.
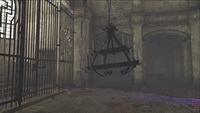
Continue through this gap, take a First Aid Kit at the end of the hallway and exit through the door. Notice a painting above the door - a silhouette of a girl in a well-lit hallway. Make your way through another corridor and into the staircase. Climb downstairs until you see the same picture of a girl. Go through the door next to it. Continue to another staircase, go up looking for the same painting and continue through the door next to it. Finally, you'll find yourself in a theater hall. After you drop down, turn to the left, enter the theater's dressing room and touch the painting to reveal a secret room. Take Blue Candles from the inside of the room. When you collect the Candles two Dolls will come alive behind you. Move across the theater and enter the door in the back. Climb upstairs to the control booth. Take a First Aid Kit from the wall cabinet there and approach stage controls. Pull both levers to open the stage curtains and lower the chandelier. Head back down the stairs to the theater hall. Defeat a Prisoner Minion and put the Blue Candles into the chandelier, then light them up. Return to the control booth and raise the chandelier. Now you can see a sequence of five symbols revealed on the wall in the UV light from the candles. Memorize the symbols and leave the booth. Leap onto the stage and move through the set. Behind the scene you'll see a set of three large bells. Each bell has a symbol inscribed on its side. You must ring the bells in a proper sequence remembering the symbols from the theater. The right sequence is:
After you complete the sequence, the room begins to flood. Go through the opened door, climb up the ladder and move through the attic.
|
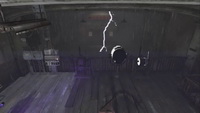
 Here you must deal with the Boogeyman as well as defeat two Screamers. Dodge the incoming shock waves sent by the Boogeyman as you deal with the Screamers. After some time the Bogeyman will make an opening in the wall and then walk away.
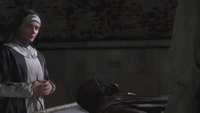 After a cutscene in the morgue descend to the lake and get ready to fight against the Boogeyman. The fight is pretty simple. If you have a firearm, keep distance and damage the opponent from a safe distance. If you have only a melee weapon rely on a hit-and-run tactic. The Boogeyman can deliver powerful hammer blows at close range as well as send shock waves from a distance. After you deal enough damage to the Bogeyman, he'll drop to his knees and perform a pulse wave attack. After he does so, run up to him and take his weapon from him to strike the final blow and finish the boss.
After the cutscene you will return to the morgue and obtain a Boat Key. Move through the crack in the wall and then through the sewers to leave the Monastery and return to the town streets.
| 07. Chastain Heights | 09. Pleasant River & Port District |