10-Star Ranking Guide

In this section we'll tackle every aspect related to your ranking, including tips for the ultimate challenge of a 10-star ranking, which is more achievable than ever this time.

Contents

01. Ranking Overview
02. Requirements
03. Difficulty
04. Play Time
05. Saves
06. Continues
07. Defeating Enemies
08. Memo Items Found
09. Ending
10. Walkthrough
11. Strategies
12. Puzzle Solutions
13. Special Weapon Modes

01. Ranking Overview

Silent Hill 2 game result screen

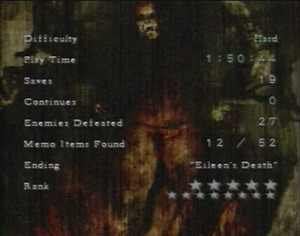
Once you complete the game, a ranking screen with all your stats will be displayed, including the following:

Difficulty The difficulty chosen at the start of the game
Play Time The total game clock time
Saves The number of saves used
Continues The number of continues used
Enemies Defeated The number of enemies defeated
Memo Items Found The number of memos collected out of 52
Ending The current ending received
Rank Your assessed ranking out of 10 (or 100) with large and small stars

Note that for your final ranking, each large star is worth 1 full point and each small star is with 0.1. So if your ranking is 7 large stars and 5 small stars, your ranking is 7.5/10, or 75/100. Our aim here will be to pump that all the way up to 10/10, or 100/100.

What is your reward for doing so? First you will unlock One Weapon Mode. A 10-star ranking in that mode will unlock All Weapons Mode, which features several bonuses inside your apartment. Eileen's Submachine Gun will also be unlocked with a ranking of 9/10 or higher. Read more about all these in the Special Weapon Modes section of this 10-star guide.

Below is a breakdown of how many stars are awarded for max points in each category. Note that 10 small stars equate to one large star.

Category Max Small Stars Awarded
Difficulty 20 stars
Play Time 20 stars
Saves 10 stars
Continues 10 stars
Enemies Defeated 20 stars
Memo Items Found 20 stars
Ending 0 stars
Rank 100 stars
Freebies 2 stars
Total Potential Stars 102 stars (capped at 100)

Confused about the freebies? Those are two free points that are always awarded, except the max score is capped at 100 or 10/10. This is probably since otherwise a perfect ranking requires 0 saves for the first time in a Silent Hill game.

But now with those two freebies, you can save twice and get 8/10 stars for saves but bank on getting 2 stars back from the freebies, or you can do the same for another category as we'll discuss in the next next section. This makes getting a 10-star ranking in Silent Hill 4 easier than 1-3.

And so the highest possible ranking is actually 10.2 stars out of 10, although you'll never see more than 10 stars appear. A 10.2-star ranking is its own thing and certainly a good challenge to push for as well. To do so, simply don't save and get max points for every other category. When all stats show up as green, except for your Ending, you've got a 10.2-star ranking.

02. Requirements

Difficulty Hard
Play Time Under 2 hours
Saves 0
Continues 0
Enemies Defeated 120 or more
Memo Items Found 52/52
Ending Doesn't matter
Rank 10 LARGE GREEN STARS
Freebies (2)

Netting a rank with this result, without cashing in your freebies, is actually a 10.2-star ranking. It is the maximum result, although no more than 10 large stars will ever show up. It's easy enough to deduce if your ranking is truly 10.2, 10.1 or just 10 stars based on how many of these stats show up in highlighted green.

Ending will always show up white and doesn't matter, but all other stats green means 10.2. One white stat could mean 10.1 or 10, while two white stats can only mean 10.

So how do the freebies work? They're only truly awarded if you need them to attain your 10-star ranking. Therefore you're able to miss out on two potential stars for one category or two between two different categories. Because you will get up to two back via freebies. That means there's several modifications you can make to the above requirements and still net a 10-star ranking. Assuming all other stats meet the thresholds, these modifications include:

  • 2 SAVES (8/10 stars)
    • OR
  • 2h30-3h00 PLAY TIME (18/20 stars)
    • OR
  • 47/52 MEMO ITEMS FOUND (18/20 stars)
    • OR
  • 108 KILLS (18/20 stars)
    • OR
  • 1 SAVE AND 50/52 MEMO ITEMS FOUND (9/10 and 19/20 stars)
    • OR
  • 1 SAVE AND 2h00-2h30 PLAY TIME (9/10 and 19/20 stars)
    • ETC.

Go with whatever combination works for you, but it probably makes the most sense to use them as your saves. That way you can have 2 saves just like you did for Silent Hill 1-3. Although play time is pretty tight so you could use 1 and 1 for play time and saves. Either or, plan it out and stick to it.

If you want a challenge as close to the same in Silent Hill 1-3, aim for the sky and go for the 10.2-star ranking, which is frankly still probably a bit easier than 10 stars in the other games, although the limited inventory and health items makes dying quite possible at times.

Either way, you will unlock One Weapon Mode by achieving 10 stars in a standard run, while another 10-star ranking in One Weapon Mode (which is frankly easier) will unlock All Weapons Mode. No more modes or rewards are unlocked beyond that.

MY STATS:

Difficulty Hard
Play Time 1:48:57
Saves 0
Continues 0
Enemies Defeated 179
Memo Items Found 52/52
Ending "21 Sacraments"
Rank 10 LARGE GREEN STARS

These are my stats for my first 10-star ranking, which is actually a 10.2-star ranking with all categories maxed. I achieved this on my first complete attempt, although I did get killed by Cynthia at the very end of the Subway 2nd trip on my first actual attempt. I got trapped after using the Train Handle, then escaped just in time but Eileen kept shooting Cynthia and I tried to unequip her gun, had to move closer to do so and then died from being within Cynthia's Ghost presence range. Tough one but I made sure to stab her next time instead, which I'd recommend to all.

I decided to go with 21 Sacraments since I figured I'd save a lot of time by not babysitting Eileen, especially since in a speed run just before I realized how tight the time requirement was at 2 hours.

But honestly... I'm not sure I'd even recommend this. Eileen became 100% possessed after leaving her once in the Subway and slowed me down on so many occasions, including several where she knelt down in rooms with enemies and nearly got me killed while trying to retrieve her. She also briefly flashed into Ghost status on a number of occasions, wasting more time.

Most of the time gained, if not all, from ditching Eileen just anywhere is lost while waiting for her to pull herself together in these moments, and she can pose a big risk to your life as well.

View my stats for One Weapon Mode below where I instead took care of Eileen and achieved the best ending of Escape without issue. I'd honestly recommend doing this instead, or at least getting the Mother ending if you don't want to waste time with hauntings and grabbing Holy Candles.

Note that I did not perform the Eileen glitch in Building World 2nd time since it felt like cheating, while I was fairly sure I could make it anyway.

MY STATS FOR ONE WEAPON MODE:

Difficulty Hard
Play Time 1:49:31
Saves 0
Continues 0
Enemies Defeated 151
Memo Items Found 52/52
Ending "Escape"
Rank 10 LARGE GREEN STARS

This is also 10.2 stars and I achieved it on my first attempt of One Weapon Mode with no deaths. It's quite frankly easier having the Rusty Axe from the start, especially for the escalator section in the Subway but also a few other spots.

I did make at least two mistakes that cost me 3-4 minutes, including some extra trips to Room 302. But otherwise it was a very efficient run a little better than my standard 10-star run. I did not perform the Eileen glitch in Building World 2nd time on this run either.

As I said above, I highly recommend taking care of Eileen since having her in good health will prevent you from losing extra time waiting for her to stand back up whenever she needs a resting break from being so damaged, plus you won't have to risk your life while retrieving her around enemies in these cases.

Babysitting her in each hallway or room does take a few extra seconds every time, but as I said, I think it pretty much makes up for the time she wastes if she gets too possessed anyway. Plus you will have to escort her through a good chunk of the game anyway, so a little more can't hurt too much. And frankly, perhaps having the best ending should've been required anyway for 10 stars, like it was in SH1. But it's certainly an achievable goal.

Lastly, I normally recommend going for practice runs before attempting a 10-star run in these games, but I'd say it's optional in Silent Hill 4. There's no damage requirement and you even get some freebies so it's not too difficult. At least if you're familiar enough with the game and have already done speed runs or beaten it on Hard without issue.

Maybe if going for a true 10.2-star ranking you might want to make sure you're ready first, since 2 hours without any saves is a long time and somewhat risky without being confident, both for time and ensuring you don't die. Plus you'll want to know exactly where all the memos are. But otherwise go ahead and see how you do that first time.

03. Difficulty

You must play on Hard difficulty for the max stars in this category. That means enemies will move at full speed, inflict heavy damage, health items will recharge less of your health than normal, and the Pistol only holds 8 bullets per clip.

While perhaps not as outright hard as past games, the limited inventory can put you in difficult situations at times, so make sure you know the game and Hard difficulty very well before attempting.

04. Play Time

For the max score here, you'll need to beat the game in under 2 hours, which is very tight considering this may be the longest Silent Hill game yet. You no longer have that buffer of a full extra hour like in 2 and 3, while the 2 hour limit is very comparable to the 1h30m limit in 1, which is a shorter game.

You'll really need to optimize your run through the game to get below 2 hours, since there's 11 major areas and all the Room 302 trips in between that you'll have to cover basically with an average of not much more than 10 minutes per area. Especially while escorting Eileen in the second half, that's no simple feat... At least until you really know what you're doing, but you need to be quick moving from one objective to the next without wasting time.

What about time spent killing enemies? Well, thankfully there's enough weak and passive enemies in the game to cruise through while disregarding regular enemies. Save yourself the hassle and only kill Toadstools, Whitestools, Tremers and Hummers when you find them on your path. There's plenty of them to take care of 120 kills and then some. Only kill regular enemies if they pose a significant threat to you or Eileen.

Be aware that watching cutscenes counts towards your play time, unlike Silent Hill 2 and 3. So be sure to skip them and every portal transition to save any potential lost time. Pausing your game via Start does stop the timer, which wasn't the case in Silent Hill 1.

Note that you also have two freebies, and if there's any categories where they may actually be useful it's play time and saves. While getting a sub two hour time is totally achievable, you may be stressing to reach it. By getting a time between 2h00-2h30m, you can relieve all that stress and go for something quite a bit easier, even adding a save in there as well.

Otherwise you can finish with a time of 2h30m-3h00m and sacrifice two stars to get 18/20 for play time and get them both back via freebies, as long as you've maxed every other category, including no saves.

Or you can keep your goal pure in going for the full 10.2-star ranking with a time under 2 hours and no saves, which is a fair challenge but a rewarding one.

05. Saves

The get max stars for the saves category you cannot save even once, not counting your ranking results. Thing is, you can still save up to twice and still net a 10-star ranking via the two freebies, as long as you've met all other requirements.

But if going for zero saves you'll have to know the game inside and out since you won't be getting any second chances in any area. There are actually a few spots over the game that can be quite dangerous and potentially cost you your life if you're not careful.

To combat this, I recommend walking around with a health item or two, at least in the second part of the game when your apartment stops healing you. And even then, at a few select moments it may be wise to carry even more than that to prepare for the absolute worst.

IF YOU WANT TO USE 1 OR 2 FREEBIES AS SAVES:

  1. Somewhere in the Subway World 2nd time, specifically in case killed by Cynthia's Ghost in the subway train at the end (if you don't take her out) or perhaps on the Wall Men escalator. A good exact point would be while returning to clean the Filthy Coin.
  2. Somewhere in the Building World 2nd time, since there's a dicey segment near the end after the clock door, featuring Richard's Ghost (if active) and a lot of enemies you must escort Eileen past, then followed by the One Truth boss which can go well or poorly. The best spot to save would be via the portal in the sporting goods store right before placing the Stuffed Cat in the pet shop and making your way to the clock door.

These two spots are where I'd recommend if you do want to save. If you only plan to save once, consider the first option here. Cynthia is capable of trapping you in the train while using the handle, and she even managed to kill me during my first attempt. I didn't make the mistake next time and pumped her with a Silver Bullet and Sword of Obedience, which I'd recommend as well.

Two trips on the Wall Men escalator could contribute to the challenge as well, although frankly the Rusty Axe should make it a formality this time. But either way it's a good midway point through the game after more or less cruising through the first half during the easier first trips.

For the other, Richard can really hassle you in a late staircase in the Building World and there's a lot of enemies to escort Eileen past before and after. And the One Truth boss can go sour if you have a hard time finding the master Wall Man and take a lot of damage, which can totally happen.

Otherwise, make sure you've mastered the game and know exactly what each area entails, especially if you plan on doing a zero save run.

06. Continues

Just like saves, you're allotted zero continues to get the max score in this category. But again, with two freebies you can potentially use one or two as continues if it comes to it, assuming you've met all other requirements.

So ultimately if you do die halfway through or late, you can just use a continue and keep going from the major area you died in but obviously you should be aiming for a clean slate.

07. Defeating Enemies

The odd thing about Silent Hill 4's 10-star ranking is that despite the game featuring more than double the enemies as the other games and probably being the longest one too, it requires the fewest total kills with 120.

Also gone are the categories of fighting and shooting, meaning you need 120 kills of any method. This is because of the game's shift away from firearms to focus on melee fighting. But either way, once an enemy is knocked down from a melee weapon or firearm, just kick it for the most efficient way to tally it as a kill.

Another stranger thing about Silent Hill 4 is that it has a ton of passive enemies that won't attack you and are easily killed with a single whack or stomp. That includes Toadstools, Whitestools and Tremers, plus Hummers which are knocked down with a whack and killed with a stomp.

Yes, all these enemies count just like any other enemy. What that means is you can entirely forget about regular enemies and just prey on the weak. Every time you see a group of Toadstools, Tremers, etc., beat them down for 10+ quick kills and move on. In fact you don't even need to really go out of your way to do this as there's so many of these enemies on your path that you'll either have to kill to get past or can take a few extra seconds to get a whole bunch of kills.

To be frank, because of the time constraints it'd be hard to do it any other way. Even relying on only these kills will still likely keep you tight for time.

Beyond these enemies, I'd generally suggest ignoring almost all regular enemies, except where your path is clearly blocked or you need to get Eileen past, such as Patients in the Hospital World and the six Twin Victims at the end of the Water Prison 2nd time. You'll likely want to kill in cases like this not necessarily to add to your tally but to allow Eileen to travel quickly and safely without any holdups.

With one star handed out per 6 kills up to a maximum of 20, you'll need 120 kills to max the category. With one or two freebies you can drop down to 114 or 108, but frankly this is not a category that's any issue to meet the max threshold.

Keeping Track of Kills

Normally for these 10-star runs I suggest using a notepad and pen to create a chart to tally your kills like so:

Count off enemies in your head as you kill them and then tally them up when you're done, pausing the game to update your tally. Using tally marks (|) will prevent you from having to cross things out all the time.

That said, if there's any 10-star run in the series where you can probably forego counting, it's Silent Hill 4. In my first 10-star run I reached 120 kills by the beginning of the Subway World 2nd time and then added another 60 on top which was only out of necessity when enemies were in my way.

In general, you'll probably come short if you only kill what you absolutely have to, but if you kill Whitestools and Toadstools whenever you see them, or at least most of the time, you should easily make the tally. Hummers are usually annoying enough to warrant being killed already and there's a few cases where you'll have to kill a whole family of Tremers to advance.

So as long as you're making even the slightest bit of effort to kill, you're probably fine. But it can't hurt to tally your kills anyway, and honestly it may be most convenient to just keep a notepad application handy on a computer at your side to make things quick. Especially since you'll often be killing in large groups around 10 or more.

Exactly Which Enemies to Kill

We've already covered the importance of focusing on the weak, passive enemies. But if you're wondering if there's enough of them on your path to hit 120 or which ones you should kill, let this give you some peace of mind. Below is a list of all the key locations where you should rely on getting your kills, but you certainly do not need to kill all of them.

Water Prison World

  • 9 Toadstools: 3F 4 o'clock Prison Diary cell.
  • 15 Whitestools: B1 inner hall around ladder after surveillance room.
  • 8 Whitestools: B1 kitchen.

Building World

  • 8 Whitestools: B12 shower room under elevator.

Apartment World

  • 10 Tremers: Room 102 in front of fridge.

Hospital World

  • 8 Hummers: 1F lobby.
  • 10 Toadstools: 2F hospital room with corpse (if encountered).
  • 10 Toadstools: 2F wet and rainy hospital room (if encountered).

Subway World 2nd Time

  • 10 Tremers: Women's washroom B1.

Water Prison World 2nd Time

  • 8 Whitestools: B1 kitchen.
  • 5 Whitestools: B1 torture room.
  • 5 Whitestools: B1 dining hall.
  • 15 Whitestools: B1 inner hall near ladder.
  • 20 Whitestools: 1F to B2 circular interior staircase.

Building World 2nd Time

  • 8 Whitestools: B12 shower room under elevator.
  • 4 Hummers: B8 clock room.
  • 11 Hummers: On the way down the large staircase to the One Truth boss.

That amounts to 164 enemies so you can totally pick and choose a few instances where you can skip past some. But note that most of these are enemies you'll really want to kill since they're either directly on your path or will bother you if you don't kill them.

You can also find more of them in certain side rooms just off your path but it's really not necessary when these will clearly be sufficient.

Obviously this doesn't account for any normal enemies like Sniffers, Gum Heads, Patients, etc. I'd suggest to only ever kill these regular enemies when they pose a real threat to you or Eileen. Therefore you'll be killing them for safety reasons, not necessarily to add to your tally but of course they count like any other enemy.

Two notable cases where you'll want to kill regular enemies are the 7 Patients found with Eileen in the Hospital World (2 on 2F, 2 on 1F, 3 in long staircase past elevator) and the 6 Twin Victims in the generator room of the Water Prison World 2nd time.

In many other cases you'll meet enemies either solo or in 2-3 groupings where you may want to kill them as well. Twin Victims are probably the most common for these cases.

The more regular enemies you kill, of course the fewer passive enemies you'll need to kill, but either way they're so easy to kill that it won't hamper you much and so many of them are in your way or more ideal to kill anyway. As a result, it's really not uncommon to finish with 150-200 kills in a 10-star run while really not even trying to go that high. It happens.

And frankly, this is why it's not even fully necessary to count. If you kill most of these enemies you can rest assured you'll easily reach the 120 count if not well overshoot it.

Killing Each Enemy Type

As I said before, I only recommend to kill Toadstools, Whitestools, Tremers and Hummers as the meat of your kills, only fighting others to help you or Eileen get by safely. But you still may have run ins with all or most enemy types so we'll cover how to deal with each here.

Sniffer Dog
For pure speed, avoid Sniffers by running in a zigzag fashion to dodge their crazy lunges. Note that they will often disregard you if you walk quietly on by, even relatively close to them. This can help a ton in the Forest and other areas like the pet shop in the Building World. If you must fight them in a few cases, they go down with a good 2-3 swings from the Rusty Axe (or one charge up swing), or a few more with the Steel Pipe. Just understand that they always try to hop back after taking a hit, so either swing quickly or prepare to run to their new position for your next hit. Alternatively, a few Handgun shots can knock them down in a hurry. Always finish with a quick kick.

Wall Man
I recommend just doing enough to let you pass whenever these guys are encountered on escalators. You can maybe run by a few, but others will be tough. The Rusty Axe's charge up swing makes it really easy to deal with them from a distance, but early on you'll likely want to turn to the Pistol. Shoot one bullet as you draw near, then run past. If you must kill them, keep unleashing charge up attacks until they dangle and then recede back into the wall.

Hummer
One swing and a kick, simple as that. You'll likely take your share of damage since they're overwhelming in a swarm, but just take them on one by one and get your stomps first and foremost so they don't get back up. Steel Pipe, Rusty Axe, whatever, it doesn't matter. Bug Spray can handle them well but it's honestly a waste of inventory space. Killing Hummers whenever they show up is a good way to build up your kill counts since they're quick and easy. That said, if there's other enemies nearby and it's not so simple, you likely don't need the kills and can just move on.

Twin Victim
Give these guys a few regular whacks as you build up your charge up swing, particularly with the Rusty Axe, and then unleash it to drop them and finish with a kick. Don't waste your time hunting them down, but feel free to defend yourself if they come after you. Watch out for their turn around arm swing, and run clear of them when you can. The Pistol handles them well if you have the ammo and can prevent a gang up from turning sour.

Toadstool/Whitestool
Easiest enemies to kill. Just approach and swing with whatever you're holding. Often you can kill a bunch of them with one swing but either way, kill them one by one until they're all gone. These guys will make up the majority of your kills. You may not need to kill all of them that you see, but killing at least most of them should be enough.

Tremer
Super easy to kill as well. Just approach and stomp on them. You'll find a whole family of them on a few occasions, which is a perfect way to quickly notch up some kills. In general I'd only suggest taking the time when they're already on the ground in their family groupings. Don't bother knocking them off walls, and it's up to you if you want to squish solo ones in stairwells and other areas. It only takes a second so it can't hurt either way, but killing all of them will likely be unnecessary.

Gum Head
Gum Heads aren't too aggressive but there may be 2-3 you'll want to kill over the game that'll be right in your face. Rusty Axe is always best if you have it, while the Steel Pipe or Aluminum Bat can handle them one on one fairly well. Pistol is always the quickest way to deal with them if you have ammo, taking about 5 shots and a kick. A few times they'll be found blocking doors but you can easily just push past them without a fight. Otherwise, even with Eileen you should probably just run past them in more open areas.

Patient
Patients can be lethal if you don't handle them quickly, and if there's any enemy I'd suggest enlisting Eileen's help with it's them. Her Submachine Gun dices them up easily, saving you from a lot of trouble if you have it (particularly in the Hospital). If not and you don't have another Eileen weapon yet like the Chain, turn to your Rusty Axe's charge up swing and always rush for the stomp, even if you have to follow them down a series of stairs. The charge up swing will save you from being attacked, but don't hesitate to perform a regular swing as it builds up if it means it'll break their swing combo.

Bottom
Same strategy as the Twin Victim. Run up and beat them down quickly with the Rusty Axe, building up your charge attack as you perform regular swings. Go for kicks before they can get up. Otherwise, Pistol handles them efficiently and Richard's Revolver can down them in one hit if you have it in the late game. That said, beyond the first double apartment encounter and the later solo one by the hallway stairs, just run past them since you shouldn't need the kills and they'll want to gang up on you.

Handling Unkillable Enemies

Killing enemies is only one part of your journey to 10 stars, while unkillable enemies will make things tougher the whole way. Refer to these strategies to stay alive and best handle these enemies:

Old Type Ghosts
Simply run past them when you can, that's it. That means every single encounter. I can't remember any normal Ghost being a factor in any location, even if I may have taken damage on a few occasions due to the finicky movement controls. Grab Saint Medallions when you find them and put them to use. 2 or 3 may be enough to get you through the game with your limited interaction with Ghosts, including the tougher types below.

Victim 16 - Cynthia
A really good candidate for your first Silver Bullet (found in the hall just after her) and Sword of Obedience (found in Building World Ghost). For the most part Cynthia can be avoided but she'll pose a big threat while using the Train Handle at the end of the Subway, capable of trapping you in the tight car and also with her hair. She can also be a minor hassle later on in the Building World, but she's most dangerous in the Subway.

When encountered the first time, run past her to get the first Silver Bullet, then return to pump it in her and stab her with a Sword. Just make sure you get the other Silver Bullet in the Forest to deal with DeSalvo if you use the first on her. Or you could place a Holy Candle at her feet to down her if you want to save the bullet. If you don't handle her in the Subway though, be as quick as you can in the final train -- use the Train Handle and try to escape the front car asap -- and prepare to beat her down if she traps you on your exit. You can enlist Eileen's help with the SMG or Chain, but just make sure she doesn't hold you up by continuing to attack after you're free.

Victim 17 - Jasper
Jasper is pretty forgettable overall, even despite being on fire. He is potentially very lethal and takes huge chunks of health away if near you for long enough, but otherwise it's simple enough to avoid him and he's totally not worth one of the two Silver Bullets you'll find. Grab the Saint Medallion in the rock area where he appears to suppress him. He'll show up again later to hound you in a late Building World stairwell, but he's not much of a threat. The best tool for handling him is always a Saint Medallion to prevent his lethal fire damage while in close.

Victim 18 - Andrew
The only Ghost you must use a Sword of Obedience on and also the best candidate for a Silver Bullet. This guy is an absolute nightmare to fight normally without a Silver Bullet, so trust me that you don't even want to consider that. Blast him with the silver, stab him with the Sword and grab his key. From then on, he will only appear in one optional apartment later, so you can take the Sword back but frankly on a 10-star speed run there's no one left that's important to take down anyway (unless you want to pin Richard).

If you're out of silver or your shot somehow catches him during an animation and doesn't drop him (which happened to me in a normal run), two Holy Candles placed underneath him can down him if you keep him in the same place. Otherwise, prepare for a long and gruelling battle that'll take a few minutes. Stay in the first tight hallway since it can be a disaster in the open basement room and he'll waste so much time. Keep going for charge up attacks, although he'll move away constantly. Just run up and go for the charge up attack again, dropping him over and over until you can finally stick a Sword in. A Saint Medallion and some health will help you get through it. Just hang in there.

Victim 19 - Richard
Richard is only really a factor at two spots during the Building World 2nd time, which is the opening elevator area and a late area staircase with Eileen after the clock door. In the first encounter, approach the elevator to make him spawn but lure him away from it to create an open path. Then take that path with Eileen and enter the elevator.

In the next encounter in the tight stairwell, just keep running until he becomes a factor. If he blocks your way, beat him down with regular and charge up swings whenever you can. If he goes after Eileen, do the same and he'll likely teleport out of the way, allowing you both to move on. Also use a Saint Medallion to slow him down a bit and help you. If you feel he's more of a threat than Cynthia you can use that Silver Bullet on him (and I was planning on doing this until Cynthia killed me first...), and by all means go ahead because the 2nd encounter can be dangerous and precedes many more dangerous enemies before the next portal.

Wheelchair
Avoid them at all costs. You can unleash charge up attacks to put them offline but it's really not worth the time. Pay attention to their paths in the Hospital World when jumping from room to room, then later in the Building World stairwell, time your run when a gap appears. Don't be afraid to run straight into the open area since the extra space can make it easier than running in the tight area under the stairs. With Eileen, just watch out for yourself and get to the door; she will manage on her own.

Man with the Coat
For the most part I'd say just ignore him and keep on running, unless he's causing you to be held up in some way. Other than maybe having to run around a bit more and maybe pass through doors a few times as you wait for Eileen to catch up, he shouldn't be a real factor anywhere except in room 206 during Outside Room 302.

There if you just run to the room with the hole he may run between you and Eileen and come to shoot you and can cause a real hassle as Eileen may not be able to get by. Therefore you may want to equip Eileen (SMG is fantastic if you have it, or the Chain) and also beat him down yourself with the Rusty Axe's charge up swing until he drops, which doesn't take too long. Do so in the open living room rather than the hall. Then you can move on without the hassle. Otherwise he shouldn't cause too much trouble, but if he is say along the Water Prison path by preventing Eileen from getting by, just give him a quick beatdown with her help.

08. Memo Items Found

For full points in this category you will need all 52 memos in the game, which isn't as exhausting as it sounds since most are very much on your path. That said, there are maybe a few that can easily be missed if not careful.

Note that 20 total stars are handed out for this category and each memo is worth the same at about 0.38 stars, except there's no rounding up. 52 memos nets you 20 stars, while 50 or 51 net you 19. 47, 48 and 49 all net you 18 out of 20 stars. That means 47 is the fewest amount you must collect if cashing in both your freebies here.

But frankly, memos are not an ideal category to use freebies on, which are better spent on saves or play time. Memos instead should be more of a formality to collect all of them, but just ensure you take note of the few that are a bit more likely than others to be missed (which we'll cover towards the end of this section).

Below are the locations of every memo in the game in the general order you'll find them. A few can swap around if you delay returning to your apartment or head back early, but otherwise this order can be followed for pretty good time-efficiency. Consider keeping this open as a reference or direct guide during your run.

ROOM 302
[01/52]  FIRST LETTER
Sits under your front door.
[02/52] BOOK SCRAP
Against the back wall behind the shelf.
SUBWAY WORLD
[03/52] RED DIARY - APRIL 8
At your front door after completing Subway World.
FOREST WORLD
[04/52] JASPER'S MEMO PAD
On the driver seat of the car in the fifth pathway.
[05/52] HOLY SCRIPTURE SCRAP
On the left floor inside Wish House.
WATER PRISON WORLD
[06/52] EXPLORATION MEMO
On the floor in the opening 1F cellblock.
[07/52] GUARD'S DIARY
Hangs on the wall right of the portal in the small south 1F room.
[08/52] WATERWHEEL ROOM PLATE MESSAGE
Examine the B2 waterwheel room sign after grabbing the key.
[09/52] PRISON DIARY
On the stand in the initial 4 o'clock 3F cell (with Toadstools).
[10/52] 1F SURVEILLANCE ROOM REPORT
On the desk in the 1F inner surveillance room.
[11/52] 2F SURVEILLANCE ROOM REPORT
On the desk in the 2F inner surveillance room.
[12/52] SECRET NUMBER MEMO
On the wall in the 3F inner surveillance room.
[13/52] RED DIARY - APRIL 4
Slipped under your front door after starting Water Prison World.
[14/52] RED DIARY - JULY 23
Slipped under your front door after Water Prison World.
[15/52] SUPERINTENDENT'S MEMO
After Water Prison World, enter Room 302's washroom for Henry to turn off the bathtub tap. Now examine the front door peephole for a cutscene with Sunderland and Eileen, where this memo is slipped under your door. One-time only and totally missable if you forget to check the peephole here.
BUILDING WORLD
[16/52] BARTENDER'S MEMO
On the counter of Bar Southfield on B15.
APARTMENT WORLD
[17/52] MIKE'S DIARY
On the living room table in room 301.
[18/52] JOSEPH'S ARTICLE
On a table in the back room of 301 near the super's key.
[19/52] SUPERINTENDENT'S DIARY (UMBILICAL CORD)
Nightstand in room 105's bedroom.
[20/52] RED DIARY - MAY 2
Slipped under your front door after starting Apartment World.
[21/52] RED DIARY - MAY 14
Red Paper is found on the living room table in room 301. Must be slipped under 302's exterior door and collected from inside.
[22/52] RED DIARY - MAY 20
Red Paper is found in the box near the key rack in room 105. Must be slipped under 302's exterior door and collected from inside.
[23/52] RED DIARY SCRAP
Torn Red Paper is found in the box near the key rack in room 105. Must be slipped under 302's exterior door and collected from inside.
[24/52] RED DIARY SCRAP (CONT.)
Torn Red Paper is found inside room 102's fridge. Must be slipped under 302's exterior door and collected from inside.
[25/52] MIKE'S LOVE LETTER
Torn Red Paper is found inside the bloody shirt in the back room of room 203, Apartment World. Must be slipped under 302's exterior door and collected from inside Room 302.
[26/52] RED DIARY - JULY 13
Slipped under your front door after Apartment World.
HOSPITAL WORLD
[27/52] NURSE'S MEMO
On the Reception table on 1F.
[28/52] RED DIARY - JULY 20
Slipped under your front door after guiding Eileen to the portal in the Hospital's 1F washroom.
[29/52] RED DIARY - ??/??
Appears by the living room bookshelf after reading the July 20 Red Diary.
[30/52] RED DIARY - JUNE 11
Appears by the living room bookshelf after reading the July 20 Red Diary.
[31/52] RED DIARY - JUNE 14
Appears by the living room bookshelf after reading the July 20 Red Diary.
SUBWAY WORLD 2ND TIME
[32/52] RED DIARY - JULY 25
Slipped under your front door after starting the Subway World 2nd time.
[33/52] KID'S LETTER
Slipped under your front door after starting the Subway World 2nd time (required for Toy Key).
[34/52] RED DIARY - JULY 17
Slipped under your front door after finding the Filthy Coin (ideal to grab while washing the coin).
FOREST WORLD 2ND TIME
[35/52] JASPER'S BURNED MEMO
On the ground in front of Wish House's remains.
[36/52] WHEELCHAIR DOLL TEXT
Examine the doll in the wheelchair among Wish House's remains.
[37/52] RED DIARY - JULY 18
Slipped under your front door after starting the Forest World 2nd time (obtained while clearing inventory space during Doll Part quest).
[38/52] DESCENT OF THE HOLY MOTHER - THE 21 SACRAMENTS
On the altar below Wish House's remains.
WATER PRISON 2ND TIME
[39/52] NOTE FROM THE BLOODY PRISONER'S SHIRT
Shirt found in torture room on B1. Soak in Room 302's bathtub to get the memo.
[40/52] RED DIARY - JULY 28
Slipped under your front door after starting Water Prison World 2nd time.
BUILDING WORLD 2ND TIME
[41/52] REMINISCES
On the ground in the opening B10 lot.
[42/52] LATER BARTENDER'S MEMO
On the bar in Bar Southfield on B15.
ROOM 302 OF THE PAST
[43/52] SUPERINTENDENT'S DIARY (MAN WITH THE COAT)
In front of the door to Room 302 of the Past at the bottom of the spiral staircase after Building World 2nd time.
[44/52] OLD PICTURE BOOK
On the living room coffee table.
[45/52] CRIMSON TOME
On the living room coffee table.
[46/52] RED DIARY - AUGUST 2
On the bedroom dresser.
[47/52] RED DIARY - AUGUST 3
On the bedroom desk.
[48/52] RED DIARY - AUGUST 4
On the bedroom desk.
[49/52] RED DIARY - AUGUST 5
On the bedroom floor.
[50/52] RED DIARY - JULY 29
Under your front door after starting Building World 2nd time (no need to return until this point).
[51/52] RED DIARY - AUGUST 7
Slipped under your front door after Building World 2nd time.
[52/52] JOSEPH'S LETTER
On a low box in Henry's own laundry room after viewing the cutscene in Room 302 of the Past. Easy to miss because the hole is no longer needed after getting the Pickaxe of Hope. Best to acquire immediately before using Keys of Liberation.

Easily Missable Memos

While you have every memo location at your fingertips above, let me just point out a few that you're probably more likely to miss if not actively tracking them.

[09/52] PRISON DIARY
This is in a 3F cell that you don't need to visit otherwise. Make sure to get it before jumping down to the basement. If you do forget it on the 1st trip, it'll still be there the 2nd time.
[15/52] SUPERINTENDENT'S MEMO
This is a bit weird. Eileen and the super will buzz or knock on your door separately on trips before this but that's not important. After returning from the Water Prison World, you must first turn off your bathtub just by entering the washroom. After that, there will be no knocking or buzzing heard but if you look through your front door you'll see Eileen and the super, who will drop this memo under your door. If you forget it, you won't get another chance to claim it.
[27/52] NURSE'S MEMO
This one is in a side room in the hospital that you otherwise don't need to be in. Just make sure you don't skip it.
[36/52] WHEELCHAIR DOLL TEXT
This one's right in your face but that's exactly why you might forget it... it's very possible you might insert all the Doll parts and move it aside without ever examining it to get the memo. Just be conscious of it.
[52/52] JOSEPH'S LETTER
This is the sneakiest memo in the game. It's placed in the laundry room immediately after the hole in that room becomes useless since you get the Keys of Liberation. Just make sure to get it before doing the Outside Room 302 segment, or ensure you've got it before the final boss. Otherwise if you've gotten 51/52 memos it's probably this one you're missing.

And remember to check Jasper's car for that memo, even though the car itself is right in your face. Don't forget to check the B2 Water Prison sign after getting the key, don't forget Joseph's Article in the back room of room 301, and be sure to grab the super's Umbilical Cord diary in his back room. And just ensure you get all the Red Papers in the Apartment World.

09. Ending

Endings award zero points so you're free to get any of them for a perfect score. However you may want to consider which route you plan to go because it may impact your run in a certain way that you may not have thought about. Hauntings are fairly obvious, but at least give the Eileen bit a read below.

Should You Protect Eileen?

Time is really tight so you might have the idea to just disregard Eileen and leave her anywhere to prevent time wasted babysitting her, and that's what I did on my first 10.2-star run in standard mode. But keep in mind that time saved from this can be waste elsewhere instead...

I left Eileen alone on the Lynch Street platform (with Ghosts) in the Subway and she immediately turned to 100% possession once we hit the spiral staircase underneath the world.

Who cares, right? Well... when 100% possessed, Eileen will not only begin to turn into a Ghost at times, slowing you down as you wait for her to snap out of it, but even worse she'll drop to her knees on different occasions (usually in rooms with enemies) for 15 or more seconds and you'll have to wait for her.

This last one is a really big factor. In my run she nearly cost me my life in the Forest as she knelt down in a pathway full of Sniffers and Walter (before Wish House's compound where I wanted to leave her).

I ran around avoiding them as I waited for her and then tried to guide her once she finally got up, but I took a lot of damage in the process and might've been one hit away from death, including health items I already used there. In a zero save run... that's a scary situation to deal with and really not in your control. It's a real event that happened to me and who knows, something worse could happen to you.

I'm not necessarily saying protecting her is automatically better, but I I personally prefer it. I went for Escape in my One Weapon Mode run and it felt a lot better to not have my life under threat or waste so much time waiting for Eileen to pull herself together in these moments.

Because ultimately, instead of wasting time waiting for her, taking her with you only costs some extra seconds in each area, and you have to escort her most of the time anyway.

That said, maybe if you're just a little more careful with where you leave her you can avoid it getting so bad. She still takes damage in rooms without enemies, but much less.

Otherwise, in terms of saving Eileen in the final fight, all you need to do is be quick and you should be fine if you did even a decent job of protecting her or not leaving her alone too much.

If you treat her well and even allow her to be downed once, you should have around 5 minutes from the start of the fight (not counting cutscenes) before she dies, while killing Walter in around 4m30s is an achievable target. If you disregard her, she'll zoom away and be unsaveable, but ultimately it really doesn't matter for your ranking.

Should You Exorcise Hauntings?

This one is more straightforward. Do you have the extra time to spare? Do you have the inventory space to pick up a few Holy Candles? Over a speed run on console you'll probably encounter 6-8 hauntings and can therefore forget about one max, but in a quick PC run you may only encounter 4-5 (since certain hauntings are not featured). In that case, you may need to exorcise every single one to get one of the better endings.

Ultimately this will probably cost you an extra 2-4 minutes or less in your apartment. Holy Candles are a dime a dozen so you don't need to pick up a ton of them, but you'll also want to dump them in your chest (or use them) to clear up that space. So avoiding hauntings entirely saves you not only time but from picking up Holy Candles at all, unless using them on Ghosts.

It's totally achievable to get the best ending but it comes down to what you want to do and how much of a buffer you have.

10. Walkthrough

This section serves more as a general walkthrough to guide you through kill balancing and some of the tougher moments of the game. For specific item-finding and other related aspects, refer to the speed walkthrough, but you should already have a very good sense of what to do at each moment. Refer to the Memo Items Found section above for all locations in an efficient order.

You'll note that not much time at all is spent fighting enemies and this guide mostly relies upon killing the passive one-hit enemies, since it's the easiest and most efficient method of achieving 10 stars. Now let's get started.

Room 302

Zoom through the opening segment and grab the Chocolate Milk now since it's easy to forget later and you won't need the inventory space yet.

Subway World

Run past every enemy in this world, zigzagging to avoid Sniffers. An important thing to remember is to unlock the southeast maintenance door from the inside on the east Lynch Street platform. Once down in the ladder pathway after the train maze, head up the other ladder to unlock that door and save you a lot of time and hassle on the 2nd trip. Collect the Pistol Bullets while there.

Pick up the Nutrition Drink by the King escalator and hop on. I recommend a single Pistol shot for each Wall Man. Run past right after shooting. The only tricky thing is Henry will often target the previous one rather than the next one when they're close, which is really hard to avoid.

Ultimately you can take a good bit of damage here and you'll have the drink in case, but only use it if you must. Remember the Pistol is your best way to avoid damage, unless you're in One Weapon Mode and have the Rusty Axe (use the charge up attack for each), but it's very difficult to get through cleanly and quickly.

Dump the placard and make sure your health is at least fairly high before taking the washroom portal to the Forest World since Sniffers and Hummers will be aplenty.

Forest World

Zigzag past the Sniffers everywhere, or simply walk (not run) around the edges to avoid triggering them. I suggest skipping the Pistol Bullets in the factory area cause the Hummers will just destroy you. You can stop and fight them as your first kills but it's not quite necessary and there's a lot of them to beat up on you and your health may be hurting after them and all the Sniffers.

There's a Nutrition Drink by the shelves in the area with Jasper, which is best saved for later.

If you're really hurting and might not survive another path or two of Sniffers, return to 302 to heal a bit from Wish House, but there's two forced return trips coming up and the post-world return trip that will all recharge your health so don't over do it (recharge bit by bit).

Run straight for the cemetery to meet Walter, then back to Wish House to begin the puzzle quest with Jasper. Simply run past all enemies and complete the world.

By this point you may have zero kills and that's 100% fine.

Water Prison World

Head straight for the B2 waterwheel room, but take the ladders on the way down to get there most quickly while avoiding the Wall Men. Note you can find a Saint Medallion at the north end of B1 if you skip the second ladder and take the stairs the rest of the way. The Hummers on B2 won't bother you if you head straight for the key/sign and leave.

Remember the Prison Diary in the 4 o'clock 3F cell after opening the sluice gate, and kill all Toadstools in there as potentially your first kills.

After jumping down to B1 and arranging the cells, kill all the Whitestools that form around the ladder on the way down.

Now jump down to the kitchen and kill all the Whitestools in there before completing the level. The code is 0302.

Dump any unneeded items and recharge your health.

Building World

Run past all Gum Heads and grab the Sword of Obedience from the Ghost in the birthday room to use on Cynthia (or potentially Richard).

The Aluminum Bat is a good upgrade until the Rusty Axe if in standard mode. In the pet shop, I suggest quietly walking down the closest aisle and grabbing the key from the end middle shelf, then walking back to the exit. You'd be amazed at how well this works without triggering Sniffers.

Bash your way past the Gum Head on the downward stairs outside, killing it in the process. Kill all the Whitestools down in the shower room from the elevator.

Now skip past all enemies straight to Bar Southfield. Remember the memo on the bar. The code for the door is 3750. Having a Saint Medallion will help you avoid losing any health as you run up the huge stairwell, but as long as you're not hurting for health you should make it.

Dump any items in the chest and charge your health.

Apartment World

Slip the first Red Paper under 302's door to save space as you leave 3F. Note that there's a Portable Medical Kit in 106's bedroom that may prove helpful later.

Skip past all normal enemies in this world but kill all Tremers while getting the Torn Red Paper in 102's fridge. Grab Eileen's SMG if it's unlocked and on the counter there as well.

Finish up all the Red Papers and conclude the world.

Hospital World

Quickly squash as many Hummers as you can before they start flying. Then make sure you kill them all before leaving. Remember the memo in the Reception, plus the Ampoule and Portable Medical Kit in the two south rooms near the stairwell (also a Nutrition Drink in the southwest emergency room).

Track the 2F Wheelchairs so you don't get run over. Be sure to pick up any Nutrition Drinks or the Saint Medallion if found, or anything else you want like Holy Candles and ammo. Kill any Toadstools you find as well in any random rooms.

After finding Eileen, equip her SMG if you have it. Otherwise, take care of the incoming Patients with your Rusty Axe's charge up attack. Make sure the elevator's been called and try to return to 302 with Eileen on 1F. Kill the Patients down there before doing so.

After getting and using the Small Key, the SMG will help in the long stairway if you have it. Otherwise prepare the Rusty Axe's charge up swing and kill the first one asap. Try to follow and stomp it before the other two arrive, although sometimes it may keep on dropping down.

Again use the charge up swing to get the other two, potentially at the same time if close enough. Rush and finish them off.

By this midway point through the game you should ideally have at least around 50 kills, although you may just as well be pushing 80-100 or more if you've killed all or most passive enemies right on your path.

From this point on, be sure to actively clear hauntings in Room 302 if going for a better ending. That includes finding Holy Candles.

Subway World 2nd Time

You may want to kill the first Gum Head in the hall here. Then run straight to the women's washroom, kill all the Tremers and retrieve the Toy Key from the front door and Subway coin from your chest.

I also highly recommend grabbing a Sword of Obedience and the Pistol to eliminate Cynthia. Run right past Cynthia to get the Silver Bullet in the next hall up the stairs (avoid the Gum heads), plus the Nutrition Drink in the earlier alcove.

Shoot Cynthia with a Silver Bullet and stab her with a Sword. Alternatively you can use the Holy Candle from the start of the area and place it at her feet to down her if kept in its radius, then stab her. Either way, now you won't have to worry about her trapping you later in the train.

After the earlier point with the Tremers in my first 10-star run, my kill count had reached 120. So if you're not counting and have been killing passive enemies whenever found, you may have about the same. If so, you can start ignoring some but many more enemies will be in your way anyway.

Remember the southeast maintenance room will be open only if you unlocked it on the 1st trip. Leave Eileen safely in there as you open up the other route.

I recommend first getting the Filthy Coin and using the southeast maintenance room to reach the west one and its portal (to clean the coin). Leave Eileen and forget about getting the Murder Scene Key for now since you don't need it until after opening up the other route.

Instead head straight for the Wall Men escalator and use your Rusty Axe's charge up swing to get by easily. Note that there's only four of them on the up side and if you actually kill them, you can safely return down that up escalator with Eileen. They need to retract back into the wall to die.

Grab Cynthia's ticket and don't fear that you can't enter the booth yet. Use the ticket to reclaim Eileen in the maintenance room, then get the key from the vending machine as she catches up.

Now take Eileen through to the other turnstile, grab the handle in the booth and use it to leave the Subway after heading back down the escalator. Grab the Sword of Obedience by the exit door to use on Andrew.

Note that Cynthia will hound you while using the handle if she's still kicking. Just be ready to whack her if she tries to trap you.

Forest World 2nd Time

Remember the importance of the Torch and having it lit to reach reach all the parts. Run in zigzags to avoid Sniffers and Walter in all corridors, however quietly walking still works great here to avoid the Sniffers and remain on the move from Walter for the most part.

If you are going to leave Eileen anywhere, do so in the Wish House compound, but frankly just bringing her everywhere is the best method to keep her in a good state, even if she takes some bumps. And be sure to get Eileen's Chain on the jungle gym in the Wish House compound, unless you already have the SMG.

Kill all the Hummers at least in the first area of the southeast passage. Might be best to run past the next area with Walter, unless you can get a few kills.

Do not miss the second Silver Bullet in the small tree lot to use on Andrew. Consider dipping your Torch in 302's laundry room oil to make the flames last longer although it's not hugely important anyway.

Now do the northeast passage, running past most enemies. You'll probably want about 5 inventory slots for the doll parts and some other items. Grab the Saint Medallion in the same area as Jasper to defend against him and others. Kill the Hummers in the next area then skip through the factory area. Be sure to return with both parts on this passage. It's always fine to get the earlier one on the way back.

You'll want a few inventory slots for the northwest passage as well. Killing the two Twin Victims may help a bit but is not totally necessary. Again getting the doll part on the way back is fine since you'll need to head to the lakefront where a fixed torch is.

Make your way back with the medallion and all parts inserted to finish things off.

Water Prison World 2nd Time

Run right around Walter and through the door with Eileen. Unequip her weapon, head down the ladder and wait for her. Do this each time you need to take her down a floor to avoid dealing with Hummers. Head straight for the 1 o'clock 3F cell and ditch Eileen in there as you jump down all the holes to below.

Grab the shirt next door and kill the Whitestools you come across here. You may be well on pace already but killing them all can't hurt. Use the outer pathway ladders to return to 1F quickly.

While using the shirt in your bathtub, be sure to return with the Pistol, a Silver Bullet (or instead use two Holy Candles) and a Sword of Obedience to handle DeSalvo. You may also want a few clips of Pistol ammo for the Twin Victims in the basement later. Some health could help as well, but don't max your inventory.

Go retrieve Eileen from 3F and clear the Whitestools along the outer basement path on your way to find DeSalvo. Then pump him with silver and stab him with a Sword of Obedience to get the key and leave to the basement. You can take your Sword back but there's really no need unless you want to take out Richard.

If using Holy Candles instead, drop them both right near him and try to keep him on the same spot by slowly circling around him. He should drop after both candles burn for a while. Then stab him.

Grab the Portable Medical Kit by the B2 portal since you may need it in the next room.

For the basement generator room with the 6 Twin Victims, consider leaving Eileen outside if you want to prevent any damage. However, she can be really useful in there, especially with the SMG or even the Chain. Her taking a few hits is still okay.

For best results, the Pistol with 2-3 clips can help you a lot here to kill them most efficiently. You can even slowly walk to bring one or two of them over at a time as you head back to fight them near the close door, but they all might rush in at some point.

The Water Prison 2nd time is probably the location where you'll tally up the most kills, potentially up to 60-70+ kills alone although you really won't need all those most likely.

But either way, you'll want to exit this world with at least 100 total kills by this point, although you may very well have already hit your 120 goal or even be pushing 170+ by this point if you've been aggressive.

Building World 2nd Time

Head near the elevator to spawn Richard. If you still have a Silver Bullet (if you didn't use one on Cynthia), it can help to take out Richard right now. Either that or drop two Holy Candles right under him and watch him drop after some time. Pin him with a Sword of Obedience.

Otherwise once he spawns by the elevator, move away to lure him away from it. When the path is open, take Eileen and enter the elevator. Head down to the bottom floor.

If you wish to do the Eileen glitch, head out the bottom doors to the southeast corner by the Holy Candle, push her into the corner, then move behind her and bump her (then equip/unequip her weapon) as you run back to the elevator. Enter the closest elevator for best results. Read more in the Strategies section below and skip the next paragraphs.

Otherwise, remember the order is the Billiard Ball, Volleyball, Cake Candles and Stuffed Cat (you'll get the Volleyball on the way to using the Billiard Ball).

Kill the Whitestools in the shower room on the way to the bar. Dodge all enemies including the Wheelchairs in the big stairwell, then return to Eileen in the elevator.

Consider killing the Sniffers on B10 and get the Nutrition Drink before ascending the stairs. Then sprint through the next sections to place the remaining reminisces without slowing down to fight anything. Remember to do the Stuffed Cat last cause the clock door is right there.

The section from placing the Stuffed Cat until arriving at Bar Southfield is arguably the toughest and most dangerous part of the game with many threats (and potentially Richard) along the way as you babysit Eileen. Consider first hopping through the sports store's portal to claim some extra health items in case because it can get really marginal.

Take Eileen to and through the clock door, killing the Hummers in there. Run through the lot with Gum Heads to meet Richard again in the stairwell, if he's still kicking.

Run until he becomes a problem, then give him a few whacks and he'll teleport away (repeat as necessary). This stairwell and the following areas can whittle your health away so an extra couple health items may be wise to carry just in case.

Ignore all enemies as you guide Eileen all the way to the bar. Quickly murder the Gum Head in there to complete the most dangerous section of the world and maybe the game.

Use the portal to return to 302 to grab some health items for the upcoming One Truth boss. If you have enough, fully heal and carry a few more with you. Also a fully-loaded Pistol can help, while an extra magazine is nice if you can spare it.

Bat down all the Hummers on the way (if you can hit them off the ledge they'll fall to their deaths in one hit) and grab the Portable Medical Kit at the bottom.

The One Truth boss can either be quick and lucky or it can be drawn out and cost you a lot of health. Always prepare for the worst and take it very seriously. Use the Pistol for best efficiency to discover the master Wall Man, shooting from the side corners to sometimes hit two at once. Use mostly quick regular attacks once the master is found. Full strategy can be found under Strategies below.

By the end of this world you should have reached your goal of 120 kills. From this point on there's no more easy passive enemies to kill but frankly there's so many of them before this point that you could be pushing nearly 200 kills or more if you've gone after them.

You'll have a few more chances to kill some regular enemies but really this should mark the end of needing any kills for your tally. Only kill to preserve the life of you and Eileen.

Room 302 of the Past

Collect all the memos, break the wall inside your own 302 and do not forget Joseph's Letter in the laundry room before leaving (although you can get it later too).

Outside Room 302

Note that if you don't care about Eileen's status, you can leave her behind and she'll still end up in the lobby after finding the Walter statues. Otherwise, continuing dragging her along.

Head straight to 301, kill the Twin Victim asap. Another Twin Victim and Bottom are downstairs. Try to have your charge up swing ready to attack them. There's a Nutrition Drink in a cage down in 201.

The apartment stairwell is full of Patients but it's probably best to avoid fighting, unless Eileen has the SMG. Just run straight for the other door, wait for her to arrive, and just pass through the door if you're about to get hit, then return for Eileen.

Do note that when Eileen stays in the lobby later, these Patients still being active technically in the same room can lightly impact her status, even if you're quick. So it's something to consider at least.

You'll find Walter inside 206 where it may be necessary to beat him down to avoid costing you time and heath. Perform some charge up attacks and let Eileen use her weapon. Then pass through to 207, beat the Bottom on the stairs and proceed through the final segment.

Just run through all the rooms and hall to examine the six hanging Walter bodies, which are listed in the Puzzle Solutions section below. By this point you really shouldn't need any more kills.

If you may need the health, there's an Ampoule and Portable Medical Kit in the washroom and bedroom of 106. There's also a Portable Medical Kit by the Wall Men in 104, but approach and grab it cautiously or you may get swatted. Plus there's Nutrition Drinks in 103 and 102.

In the super's 105 would be the time to drop a Holy Candle by Eileen's feet if you plan to (there's one in 106), but in all my testing I've found it not to make any difference whatsoever despite people swearing by it. Grab the Umbilical Cord, rush back to 302 and beat the final boss.

If you're planning on also getting the Nurse's Uniform in this run, now is the time to do it (access 303 from the main stairwell on the way back). Perhaps it's not worth the risk of extra time unless you're certain you're in the clear. There's also a Patient in there which can surprise you, by the way.

For the final boss, take the Umbilical Cord, Rusty Axe (or Spade) and up to five of your best health items. You'll want at least three empty slots (which will turn to four after using the Umbilical Cord) for the spears on each side. Find the full boss strategy below.

11. Strategies

Bosses

The One Truth (Giant Wall Men)

How tough this fight is always comes down to how quickly you can find the One Truth. Do so by moving in a clockwise or anti-clockwise fashion, moving on as soon as you get in your swing/shot with no response from all.

With the worst possible luck, it could be one of the last Wall Men you try. It can be hard to avoid taking at least some damage here while moving to the next Wall Man, so I suggest bringing a good bit of health. There's a Portable Medical Kit just out the door, but consider bringing 2-3 more health items if not more.

Having the Pistol can also help save some time and potential damage by shooting from the side. One clip inside the gun is enough and you can just use the Rusty Axe or whatever else you have for the remaining ones, or take an extra clip if you really want to.

You can also sometimes hit two Wall Men at once with the Pistol if you shoot from one of the corners towards both of them. Use this to your advantage, and if all the Wall Men flinch, double check each one to confirm who's the master.

If you really want to avoid damage, try to stay away from the Wall Men while they're already down. Instead, wait for them to go up and then wait with your charge up attack ready. Thing is, this wastes a lot of time so it may be more practical to be more aggressive by just running to the next one and hoping you can swing before you get hit. Even if you do get hit, quickly swing at the next one or two Wall Men and move on.

Once you've found the right one, regular attacks seem to be the best method while the Wall Men are down, since so much potential hit time is wasted while charging up and even performing those attacks as they'll slide up out of the way every now and then. If they do slide up, prepare a charge up attack to start things off when they return, then continue with regular attacks. Rusty Axe works best here as always.

Also be sure to give Eileen a weapon. Her SMG can help a ton here if you've got it, otherwise the Chain is pretty good. She can also save you from damage here and there by swinging at the right time and causing a Wall Man to flinch. And remember, having enough health here is important, so don't hesitate to fill your inventory with a trip to 302 from the bar just before. Just leave one spot for the Portable Medical Kit at the bottom.

The Final Sacraments (Walter)

Go into this fight with at least three inventory slots so that you have four for the spears on each side after using the Umbilical Cord. Go with your preferred weapon, Umbilical Cord, and then take up to five of your best healing items, which you really shouldn't need but just in case.

By the time you attempt a 10-star ranking this battle should be more of a formality than anything. Use the Umbilical Cord asap, then collect all the spears on the left side, stab them all in and do the same with the right side. You'll almost always see Walter slide over and swing at you even while grabbing the spears but Henry has so many frames of invulnerability even for a moment after grabbing them so it's really not something I've ever found to be an issue.

Once he's in regular form, Walter's spin attack is the only attack that can really mess with you and frankly you should never be close enough to him that it becomes a factor. If using the Rusty Axe, always step back after unleashing a charge up swing so you don't get caught by it. Otherwise, taking a few bullets or pipe swings here and there isn't too bad and only cost you a second or two.

As for the weapon, I've almost always found the Rusty Axe to be the best. There was a brief time where I thought the Spade may be better because of its faster charge up swing and that Henry remains in place as he performs it, but that's only helpful if Walter is backed into a corner and you can regularly bait him into pipe swings. Otherwise, the Rusty Axe appears to be the better weapon overall with a slightly longer range and more power per swing.

With the Axe, perform only charge up swings and on constant repeat. Always step back a bit after each hit to escape the bodyslam range, but prepare to move up and attack when Walter steps back and raises his pistol. He may sometimes land a shot just before your meter fills but it shouldn't be a big concern (keep charging), and most of the time you'll lock into the charge up attack just in time. If you can back him into a corner you can stay semi-close to bait him into a pipe swing as you back out of its range, then unleash your attack without fear of being shot.

With the Spade, its tad shorter range makes it even more important to move up in time whenever he steps back. Be prepared to move in after attacking and most of the time you'll get to deliver your special attack just before he shoots. If you can back him into a corner, you can find a sweet spot where you won't even have to move anymore. Stand close enough to bait him into a pipe swing but one that you're just clear of. That way you can avoid the pistol from being used. Repeat until he drops.

If somewhat close after your attack, he may try to swing at you. No huge deal if you get hit but generally you should be in a position that you can avoid it. Just continue to step back as you charge up.

Note that if you're ever too slow between attacks or sometimes after taking a shot, Walter may try to hop backwards, catching you flat footed and totally out of your range. He'll also go for some free shots in this case. If that happens, immediately bail out (forget the charge up attack) and run up to him to reset. Don't get too close or you'll get body slammed.

As for saving Eileen, it really depends on not only your fight efficiency but how well you took care of her. If you did a decent job of escorting her you you should have about 5 minutes or more before she dies.

With the Axe or Spade you can finish the fight in around 4m10-4m30s (entire ordeal, while skipping cutscene), which is plenty of time if she's in a decent or better state. Even if she steps in the bloodbath around the 4 minute mark you should have about another minute or so to go if she's not too bad. But remember it doesn't make a difference if she lives or survives in terms of your ranking.

Other Strategies

Escorting Eileen

If you want Eileen to survive at the end (although it doesn't matter for ranking purposes), always bring her with you whenever it's possible and only ditch her in rooms without enemies. Specifically, only ditch her in the following moments and locations (outside of any 302 runs):

  1. Subway World: In the southeast maintenance room as you open up the new route with Cynthia's Commuter Ticket.
  2. Water Prison World: 3F 1 o'clock cell as you jump down to the basement.
  3. Building World: B12 elevator as you acquire and use the Billiard Ball and get the Volleyball on the way.

This may be in your best interest even if you don't care what happens to Eileen, at least not leaving her alone in rooms with enemies. This is because Eileen will waste even more of your time if she's in a bad state, starting to turn into a Ghost at different moments and also kneeling over especially around enemies due to having taken too much damage. This can cost you time and also potentially your life if there's too many enemies around that make it difficult to retrieve her.

Eileen Building World Glitch

If you wish to save about 10 minutes or so in the 2nd time trip through the Building World, immediately take Eileen to the bottom elevator button floor of B12. Exit through the south doors and take Eileen to the southeast corner where the Holy Candle is.

Try to back her into the corner and then move behind her so you can then run through her (pushing her aside) as you dart to the elevator. Enter the closest elevator for best results as going for the far one will give her a bit more time to recover from the push and make it in the elevator. To make this process even easier, equip or unequip (or both) her weapon right after bumping her to buy you even more time. This will ensure she freezes on the spot for another second or so after recovering.

If done right, and it may take multiple attempts, Eileen won't be in the elevator and you've completed the first step. I can't stress how much easier the weapon trick makes this, at least to pull it off consistently, even with the far elevator instead.

Now head down the ladder and up the other in the shower room (ignore the Billiard Ball). Now follow the pathway and you may see Eileen on the other side of the fence. She cannot pass through it like so. Instead, continue to the next area to the right and just wait. You should hear Eileen's footsteps and she'll shortly join you. Now just keep going all the way to the bar and finish the area without bothering with the reminisces.

Eileen Weapon Trick

If you wish to clear Eileen's equipped weapon out of your inventory and keep it in her hands (if playing on console; doesn't work on PC), head to your item box. Move the cursor on the item left of the Eileen weapon, then press right and X (PS2). The cursor will quickly switch and dump the Eileen weapon if done right. Frankly though, losing control to unequip Eileen's weapon at any time may be more of a hindrance since she can have a mind of her own when you really just want her to join you sometimes. So I'd probably advise against doing this.

Eileen Holy Candle Trick

In all my time spent extensively testing this trick, I've found it to be a complete red herring. I found no instances of it working both on PS2 or PC while trying in different locations, multiple candles, different possession states, on multiple difficulties, etc.

Yes, the blood flow on Eileen's back disappears when you place a Holy Candle at her feet, but I've never seen this carry over to the final fight and instead she keeps the same possession state she had before. Either too much time passes or the fight is coded to work off Eileen's damage taken regardless of any candles.

Some people swear by this trick and I thought it worked before as well, but I really think its just the placebo effect. Seeing the candle work on her back is powerful and can convince some there alone. Plus there's so many enemies on the way through the apartments and even a hit or two can make a difference. When I first neutralized all enemies and saved in 302 to set a consistent playground, I never experienced any difference with any number of Holy Candles placed anywhere. So ultimately for those who believe it works, I think it comes down to that and also performing better/worse against Walter.

I really wish it worked, but in my experience... it just doesn't. I still used them in my 10-star runs right before getting the Umbilical Cord, but it was before I did extensive testing to confirm it didn't work. It didn't slow her down one bit in my standard run (where I went for 21 Sacraments anyway) and I did a great job at escorting her in my One Weapon run that she looked great beforehand anyway, so no candle made a bit of difference for me.

If you want the peace of mind, go ahead and drop a candle before getting the Umbilical Cord, but just don't count on it to actually make a difference. Instead, if you want her to survive, the most important single thing is to never leave her alone in rooms with enemies, and just limit her time spent alone. That's more crucial than her taking hits from enemies.

12. Puzzle Solutions

Posted here are the quick reference solutions to all the puzzles in the game. There's not too many traditional puzzles or key codes so I've included the major puzzle item quests as well.

Forest Spade and Key: Do the following in the Forest World:

  1. Ensure you have the Chocolate Milk to start off.
  2. Find little Walter in the southwest cemetery.
  3. Give the Chocolate Milk to Jasper at Wish House to get the Blood-Inscribed Spade.
  4. Use the spade by the tree root in the second last southeast path to get the Rusted Bloody Key.
  5. Use the portal in the next end path to dump the key in your chest and return.
  6. Head back to Wish House and use the portal to get the key from your chest, then return and enter.

Surveillance Room:

  1. Open the sluice gate on the roof.
  2. Turn the 2F handle right 4 times.
  3. Turn the 3F handle right 2 times.

Don't forget you still need one more turn after the cutscene of DeSalvo being freed.

Torture Room Keypad: The code is 0302.

Bar Southfield Keypad 1st Time: The code is 3750.

Doll Parts: Find all five Doll Parts from the wells in this order:

  1. Doll's Head in second southwest passage.
  2. Doll's Left Leg at end of southeast passage.
  3. Doll's Right Arm at end of northeast passage.
  4. Doll's Left Arm in second northeast passage.
  5. Doll's Right Leg in first northwest passage.

The Crested Medallion is in the northwest end path. Note you can flip the order of 3 and 4 if your Torch is lit, but it's always fine to get 4 on the way back.

Reminisces: Find and place the four items in this order:

  1. Find Billiard Ball at end of shower room hall on B12.
  2. Find Volleyball by boxes at south of B12.
  3. Place Billiard Ball on the billiard table in Bar Southfield on B15.
  4. Place the Volleyball inside the basket in Albert's Sporting Goods on B5.
  5. Find the Cake Candles on the counter in Albert's Sporting Goods on B5.
  6. Place the Cake Candles on the cake in the birthday room on B3.
  7. Find the Stuffed Cat in the birthday room on B3.
  8. Place the Stuffed Cat in the cage in the pet shop on B7.

Then proceed through the clock door underneath the pet shop.

Bar Southfield Keypad 2nd Time: The code is 4890.

Hanging Walter: Find and examine Walter's hanging body in each location:

  1. In the circle cage in 104's hallway.
  2. In the corner of the east wing hall by 104.
  3. In the living room of 103.
  4. In the living room of 102.
  5. In the circle cage in 101's hallway.
  6. At the north end of the east wing hall by 101.

13. Special Weapon Modes

So what's the point of getting a 10-star ranking at all? Well, beyond the satisfaction and personal reward there are two special modes to unlock. For full details about how to start each mode and which weapons are available to choose, refer to the Unlockables and Secrets section, while we'll briefly cover those modes below.

One Weapon Mode
This mode is unlocked upon receiving a 10-star ranking in a standard run. It could be a first-time run or A Brand-new Fear, doesn't matter. This special mode takes all 10 major weapons in the game and places them on the ground in the opening Subway World hall for you to choose one to take you through the entire game. Upon making your selection, the rest will disappear so make your choice wisely.

Note that the Pistol, Golf Clubs, Torch and Eileen's weapons (except for the Submachine Gun) will still appear. Completing this mode with a 10-star ranking will unlock All Weapons Mode. And quite frankly, One Weapon Mode is a fair bit easier than standard mode since you get the Rusty Axe (or your preferred weapon) right away and still get to use side weapons like the Pistol and (most of) Eileen's weapons. The only more difficult thing is you'll have to do without Eileen's SMG, which is very useful.

All Weapons Mode
Unlocked by achieving a 10-star ranking with One Weapon Mode. Again, all weapons will be laid out in the Subway World but this time you can take all of them, inventory space permitting. Anything left can still be found in its normal location or on the 2nd trip through the Subway. Again, the Pistol, Golf Clubs, Torch and Eileen's weapons (including Submachine Gun this time) will be found normally, plus the Steel Pipe in Room 302.

As a bonus, 10 Nutrition Drinks will spawn in your fridge and 6 packs of Pistol Bullets on your laundry room shelves every time you return to Room 302. Note that this mode is the ultimate reward in the game and another 10-star ranking on All Weapons Mode won't unlock anything else.

Eileen's Submachine Gun
This is the only other ranking award but it's instead unlocked by achieving a ranking of 9/10 or higher rather than a perfect score. It's a very helpful weapon for Eileen that can get you out of a lot of trouble and quite frankly gives you an easier time. So consider unlocking it before your first attempt, although you'll have to do without it on One Weapon Mode.

An important thing to note about the SMG is that Eileen becomes a bit aggressive with it in ways that aren't helpful, often going after enemies out of the way that you're already well clear of. Therefore it's wise to unequip it in certain areas if not most of the time by default. When you think she'll help, let her play with her toy. Otherwise you can sometimes get her to stop shooting if you just run far ahead.

Note that Eileen's status may slightly deteriorate when using it over a long period, but it's very negligible to the point that using it often in a 10-star run won't impact her much at all. I was always able to save her without any issue even when extensively using it and she never looked bad at all.