Unlockables and Secrets
A Brand-New Fear
This special mode is unlocked after completing the game once and is the basis for all unlockables and receiving each ending in one file. Just like Next Fear and Extra New Game in previous games, A Brand-new Fear carries over any unlocked weapon, costume, or ending achieved. Instead of starting a New Game after the first time, load your "A Brand-new Fear" save, select your difficulty and begin. |
One Weapon Mode

This extra mode is unlocked upon achieving a 10-star ranking for the first time. In the first hall of the Subway, each of the main weapons will be laid out in front of you and you'll be tasked with choosing one to take you through the full game. After your selection, the rest will instantly disappear and will not appear elsewhere, outside of the Pistol, Torch, Golf Clubs and Eileen's weapons (but not the Submachine Gun), which will be found in their normal locations. Upon receiving a 10-star ranking in A Brand-new Fear or fresh New Game, find your A Brand-new Fear save. Your cursor will be blue and you'll see a blue > arrow to the right of your difficulty selection. Press right and the cursor will turn red and show a red < arrow on the left side. This means you're in the One Weapon Mode selection. Choose a difficulty with your red cursor to begin the mode. The weapons laid out for you in the Subway will be:
You can never go wrong with the Rusty Axe, while the Spade, Aluminum Bat and Stun Gun are great choices too. The Pickaxe is also a powerful weapon but is a bit slow for normal enemies. If you want a real challenge, try the Paper-Cutting Knife or the Wine Bottle. Taking the Revolver is not ideal since there's not much ammo available for it, but perhaps it could make for an interesting challenge run along with the golf clubs. |
All Weapons Mode
Another special mode, unlocked by completing One Weapon Mode with a 10-star ranking. Again all 10 main weapons will be laid out at the beginning of the Subway but you can pick up them all, assuming you have the inventory space. Note any left behind will remain there on the 2nd time trip through the Subway, while those same weapons can also be found in their regular locations as well (if obtained in one spot, it will disappear in the other). The Steel Pipe, Pistol, Torch, all Golf Clubs and Eileen's weapons (including the SMG if unlocked) will be found in their normal locations. In addition to all major weapons right at the beginning, supplies will spawn in your apartment during every trip there. That includes 10 Nutrition Drinks in your fridge and 6 packs of Pistol Bullets on your laundry room shelves. This mode is the ultimate reward of Silent Hill 4, with no further bonus for completing with a 10-star ranking this time. Upon receiving your 10-star ranking in One Weapon Mode, find your relevant A Brand-new Fear save and select it. With the standard blue cursor for your difficulty selection, you will now see blue arrows < > on both sides. Hitting right switches to One Weapon Mode, while left will change to All Weapons Mode where the cursor will turn green and show a green > arrow on the right. Select your difficulty with the green cursor and begin. Just as One Weapon Mode, the following weapons will be laid out in the opening Subway hall:
I suggest just picking up the more appealing ones assuming you've already tried them all out a bit, but now is also a great time to play more with the weapons you haven't as much before. If you always went with the Rusty Axe, try the Spade out a bit more, and play around with the Bug Spray on Hummers. Have some fun by doing things a bit differently this time. Any weapon you leave can still be found in its normal location or again in the Subway on the 2nd trip. |
Extra Weapons
In Silent Hill 4 there's only one extra weapon available for the player, plus one for Eileen that's quite a great one. Once an extra weapon is unlocked, it can always be found in A Brand-new Fear, although One Weapon Mode can affect this. Read more below. |
Chainsaw |
Unlocked after completing the game once, the Chainsaw works a lot like it did in Silent Hill 2 with Henry having to start it up each time, but at least he's a bit quicker with it than James. It's a fairly fun weapon to use but sadly it's super weak for some reason, which ultimately takes some of the fun away. Hold R2 to ready it and use X to perform standard downward arcs, or hold X long enough to unleash a charge up sideways arc. Once the Chainsaw is unlocked, it'll appear stabbed into the ground near a tree stump in the northeast path with Jasper's running car in the Forest World. It is one of the 10 choices in One Weapon and All Weapons Mode, meaning it won't appear in its normal location, unless left alone at the start of All Weapons Mode. |
Submachine Gun [Eileen-only weapon] |
This weapon comes with the minor side effect of gradually damaging Eileen as it's used, although quite frankly it's on the negligible side and not something to be too concerned about. In fact it can be fairly helpful in achieving your first 10-star ranking. At the same time though, you likely won't want it to always be in Eileen's hands since she'll slow you down by shooting everything rather than being a good girl and following you. So don't hesitate to unequip it when unneeded. Once unlocked, the Submachine Gun is found on the kitchen island counter in room 102 of the Apartment World. It will not appear in One Weapon Mode but will be there in All Weapons Mode. |
 This special weapon for Eileen is unlocked after receiving a ranking of 9 large stars (9.0/10) or higher. The Submachine Gun has infinite ammo and can only be used by Eileen. While generally not too aggressive with it, she can really help you out in the tougher situations, although she'll also be trigger-happy if equipped when you wish to just run by other enemies.
Extra Costumes
While there are no extra costumes for Henry, there are two that can be unlocked for the game's two lovely ladies, Eileen and Cynthia. Note that they actually require a bit of work to unlock, adding up to at least four completions to see both. But you will certainly be rewarded for your work as both not only include the costume change but an interesting new "feature" that's sure to get your attention. |
Nurse Eileen |
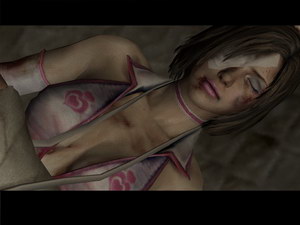
This is a special sexy nurse costume for Eileen that she'll wear in the second half of the game in place of her backless purple dress. With it comes the additional bonus jiggle effect, which can be fairly extreme when in motion... I think you know what I mean. It's actually quite impressive and I won't blame you for getting Eileen to go up and down those stairs, or bumping into her accidentally on purpose. Just don't make it obvious. The sad thing is that it takes a quite a bit of effort and time to actually see, and no earlier than halfway through your third run. There are two conditions to unlock it. First you must receive an ending where Eileen survives (Escape, Mother). That will unlock the Nurse's Uniform which will appear in Eileen's room 303 during Outside Room 302. You must find that item and keep it in your inventory as you complete the game with another ending where Eileen survives. After that, start A Brand-new Fear and you'll be able to select if you want Eileen's Normal or Nurse costume. Eileen will retain her at home outfit for the first half but she'll change into this sexy nurse costume and remain wearing it for the rest of the game. Just try to focus on keeping her alive rather than gawking at her bouncing boobies too much. |
Sexy Cynthia |

This is a special costume to be worn by Cynthia, the woman in the Subway who offers Henry a "special favour". Sadly it only appears on her living character and not her Ghost form, but perhaps that would be too distracting anyway. Once you've unlocked this costume, you'll find Cynthia not only wearing it but performing a special "dance" while waiting for you in the Subway. It's quite a revealing costume as you'll see, and like Eileen's Nurse Uniform it comes with the added bonus of the jiggle effect. While Cynthia doesn't run as much as Eileen, she certainly has more baggage and is capable of heavy distractions up and down those stairways -- be warned. You may also notice the tattoo on her butt cheek is Robbie the Rabbit himself. These two ladies can't get enough of him. Just like Eileen's costume though, this one takes time to unlock. You must receive all four endings in the same file, and you must unlock Eileen's Nurse costume as well -- that includes unlocking and finding the Nurse's Uniform in room 303 during Outside Room 302, and completing the game with it in your inventory as Eileen survives. From there, you won't see any prompt about Cynthia's costume but instead it's tied to whether Eileen is wearing hers. If you select "Nurse" for Eileen's costume in your next A Brand-new Fear, Cynthia will wear her sexy lingerie. Select Normal for her to revert back to her already fairly revealing clothing, but without the jiggle. |
Secret Weapon - Stun Gun
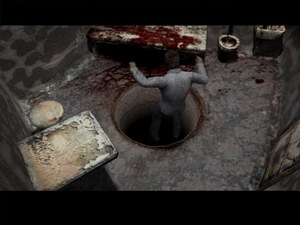
The Stun Gun is not an unlockable weapon and can always be found in any run, but it's placed in a somewhat hidden location that requires some specific work to obtain. That means you're unlikely to find it on your first attempt and you may not think to look more carefully after that, without otherwise knowing about it since there are no clues. The Stun Gun is similar to the same weapon from Silent Hill 3 except this time it requires no batteries or ammunition, allowing for infinite usage. It's quite powerful too and Henry will even thrust it forward a bit to make the most of its range, but it can be a tad slow to use. The Stun Gun is located in the initial 4 o'clock cell in the 2F cellblock in the Water Prison World, before anything is moved. Thing is, this room is locked and can only be reached from a hole in a 3F cell which must be placed above. Therefore all you need to do is turn the 3F cells once to the right and it'll place a cell with a hole in the 4 o'clock position on 3F. Go up there, jump down to the 2F cell and grab the Stun Gun on the nightstand. From there, jump down the hole and the next one to land in the kitchen and return to solve the puzzle in the surveillance room. If it is missed on your first trip to the Water Prison, there is no way to reach it the next time since the cells can no longer be rotated and it'll be stuck in the 10 o'clock 2F cell which does not have a hole above it. |
3rd Silver Bullet
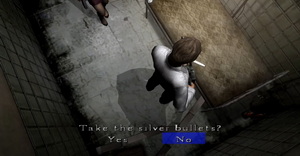
Normally only two Silver Bullets can be found in the game on the 2nd time trips to the Subway and Forest Worlds. However, a secret third bullet can be found... After collecting the Keys of Liberation after Room 302 of the Past, a Silver Bullet will appear on the bed in Eileen's hospital room in the Hospital World. Yes... all the way back there. Be warned that this is so far away and requires so much backtracking that it is in no way worth the trek, but it is available if you wish to have it. To claim it, you must backtrack with Eileen since Henry won't proceed through certain doors without her. That means back through the laundry room portal to Room 302 of the Past, back up the spiral staircase and through each of the previous worlds. You can only do this before using the Keys of Liberation, which when used will forever transport Eileen to Outside Room 302 where she can no longer reach the spiral staircase. So how long does this take? Took me about 23 minutes just to get there, but double that if you plan on going back. As said previously, this is so impractical that it's really not worth it unless interested in the novelty of it, because you can likely beat the game in less time than it'd take to find the Silver Bullet. It's really not needed either if you've made it to this point. Honestly, just take my word for it that it's there. |
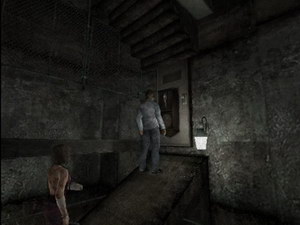
Eileen Building World Glitch
Escorting Eileen in the second half of the game can be a hassle with how much she falls behind. Normally in each area you must perform a task that opens up another route for Eileen to travel, but in the Building World 2nd time there is a glitch you can perform to completely bypass most of that area. Normally you must find and place all four reminisces as described in a memo, ditching Eileen for part and guiding her for the rest. This method skips this entire puzzle and does not require you to use the clock door that unlocks by completing it. After entering the elevator on B10 at the beginning, take the elevator down to B12 via the bottom button. Exit through the south elevator doors where you'll see a fence blocking the pathway. The entire goal is to bring Eileen to the other side of that fence, which is a two step process. This is most achievable by gently pushing her into the southeast corner, moving behind her and then brushing her aside as you run past her and into the closest elevator, before she can fully gather herself. Equip or unequip her weapon (or do both) right after you bump her to buy yourself even more of a buffer to pull it off. You've succeeded if she isn't standing in the elevator afterward. This may take multiple tries to get right but with practice it should come fairly naturally. It is achievable without the weapon trick but it does make it so much easier to pull off consistently. You can also pull it off with both elevator doors, but generally the closer one seems to work better because she has less time to react, however she'll need to be far enough away from it for it to work. So if you haven't backed Eileen fully into the far corner, maybe the farther elevator will work better. Now, simply descend the ladder in the elevator, proceed through the shower room and up the other ladder. Follow the path around the next corners and you'll reach the fence which she still cannot bypass. However, what you need to do is take a right and continue to the next area and just wait. You should shortly hear her footsteps and Eileen will run up to you, at which point the glitch has been accomplished and you can continue down to Bar Southfield to escape without bothering with the reminisces. This is possible because Eileen is coded so that she'll still run to join you from much farther distances when there's no door between areas. And in this case, the collision detection of the fence is removed since you've left that area which is no longer rendered. A simple and unexpected oversight from the development team. This can be helpful for saving a bit of time and hassle while going for a 10-star ranking, but you should still be able to accomplish one without pulling this off. But I'll leave that decision up to you. |
Eileen Weapon Glitch
Normally Eileen's weapon takes up a slot in your inventory. Further, it is normally impossible to dump an Eileen weapon in your chest if it is equipped. However in the PS2 version there is an exploit to get around both of these. Place your cursor on the (left) item beside the equipped Eileen weapon, then press right and X at the same time. This will fool the item chest into thinking you're trying to dump the left item but it'll instead switch over to the Eileen weapon and dump it. But here's the kicker... Not only will you gain an inventory slot, but Eileen will still carry and use the weapon upon returning to her. I've confirmed this works on PS2 but does not on PC. Either way it's nothing huge but instead just a neat little trick to help you in two different ways. |
Holy Candle Trick
Best used for exorcising hauntings in your apartment, neutralizing or taking down Ghosts in the outside world, there is a secret effect of the Holy Candle. When placed near Eileen, it will slowly reduce and can entirely remove all blood flow that appears over her body. This will take longer or shorter depending on how bad she is but one candle is always enough to entirely rid her blood flow. That said, you can place more to speed up the process. Be warned that this only improves her condition temporarily as she will return to her former status over the next few minutes. And despite the common claim that it can help slow her down in the final battle (which I used to believe as well), in all my extensive testing on both PS2 and PC I've found it to have no lasting effect whatsoever. If Eileen is possessed before placing a candle right before grabbing the Umbilical Cord or even in or before the lobby, she'll appear the same way in the final fight and rush to her death. I've tested this on different difficulties, multiple game versions, multiple states of possession, multiple candles and in multiple locations. It never made a difference. That includes an attempt with a candle to start Outside Room 302, another in the lobby before ridding the Walter statues, and a final one immediately before the Umbilical Cord (all in the same go). Both the lobby and super's room scenes had Eileen clear of any possession and yet she still walked to her death within the same second as when I didn't use any. Every time. And trust me, I tested it extensively. I've also tested candles along her platform/stairway during the fight, and I've waited for 5 minutes after grabbing the Umbilical Cord to see if not rushing back had any impact. Everything I could think of, I tried. Nothing made any difference whatsoever. I know some people swear by the Holy Candle trick and I thought I remembered it working too, but I just couldn't get documented proof of the Holy Candle having any lasting effect on the final battle. I'm therefore convinced it does not work and people are being fooled by the placebo effect after seeing her body cleared by the candle. I also believe people are either performing better against Walter and/or getting Eileen to the final destination with her taking less damage. There's so many enemies on the way to room 105 that can affect her status, but in my testing I made sure to clear them all (except Walter who you can't clear but I always downed him asap without harming Eileen) before saving in Room 302 as a starting point. This gave me a consistent and level playing field to extensively test this out (multiple different occasions too) by placing none, one, two or three candles. It was always the same result. I really wish it worked because so many people are convinced it does and it would be a great trick if it did. But it just doesn't in my experience. When timed with a stopwatch she always dies within the same few seconds, covering for any margin of error within my timing or skipping cutscenes and screen prompts during the fight. Instead you have to take care of Eileen the old-fashioned way if you want to save her. So if you want some peace of mind, go ahead and try it but it's really not something that can be relied upon. Instead, it can be useful to briefly improve Eileen's status mid-game so that she doesn't drop to her knees or turn into a Ghost and hold you up in a trouble area up if she is in a poor state. But as always, she'll return to her former status in a few minutes. |
Easter Eggs in Room 302
|
Silent Hill 2 Reference |
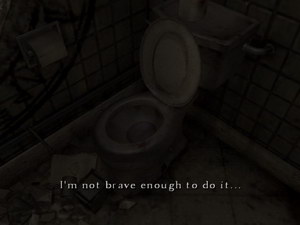
Henry will notice something in the washroom toilet if you check it right after Building World. You'll be prompted if you'd like to check it out, but even if you select yes, Henry wimps out just like Heather did in Silent Hill 3. So James remains the man in the world of Silent Hill. |
The People and Events of South Ashfield Heights
| There's a whole ton of backstory that can be observed about the tenants of Henry's apartment building, mostly occurring during Apartment World. Find a summary of several tenants and events below.
|
Walter's Diary
What's interesting to note is that Eileen effectively translates Walter's poor spelling and grammar as she reads the entries under normal status, but she struggles to understand a few parts. When Eileen is in a very poor state with blood flow all over her body however, she'll read each entry exactly as it appears to her without any issue, complete with poor spelling and grammar while sounding like a child. Below is the full diary including all of Walter's entries. Although the content is the same, I've gone with Eileen's translations everywhere possible. In the few parts she can only read while possessed, I've followed her method of translating them from kid-speak to normal English. If you wish to read each entry exactly as she reads them under both states, refer to the tail end of the Memos section.
|
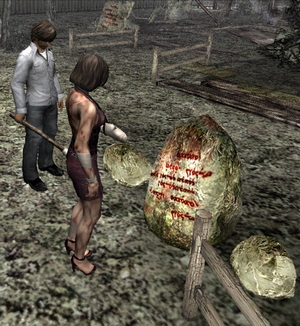 Posted around the Forest World are bits of strange writing that can only be read by Eileen during the 2nd time trip. This is perhaps because she studied archeology in college as she may explain after reading one of them. These are all revealed to be diary entries of little Walter during his time spent at Wish House.
 | by Andrew Haffenden aka Conquerer (Silent Hill 4: The Room FAQ/Walkthrough) |