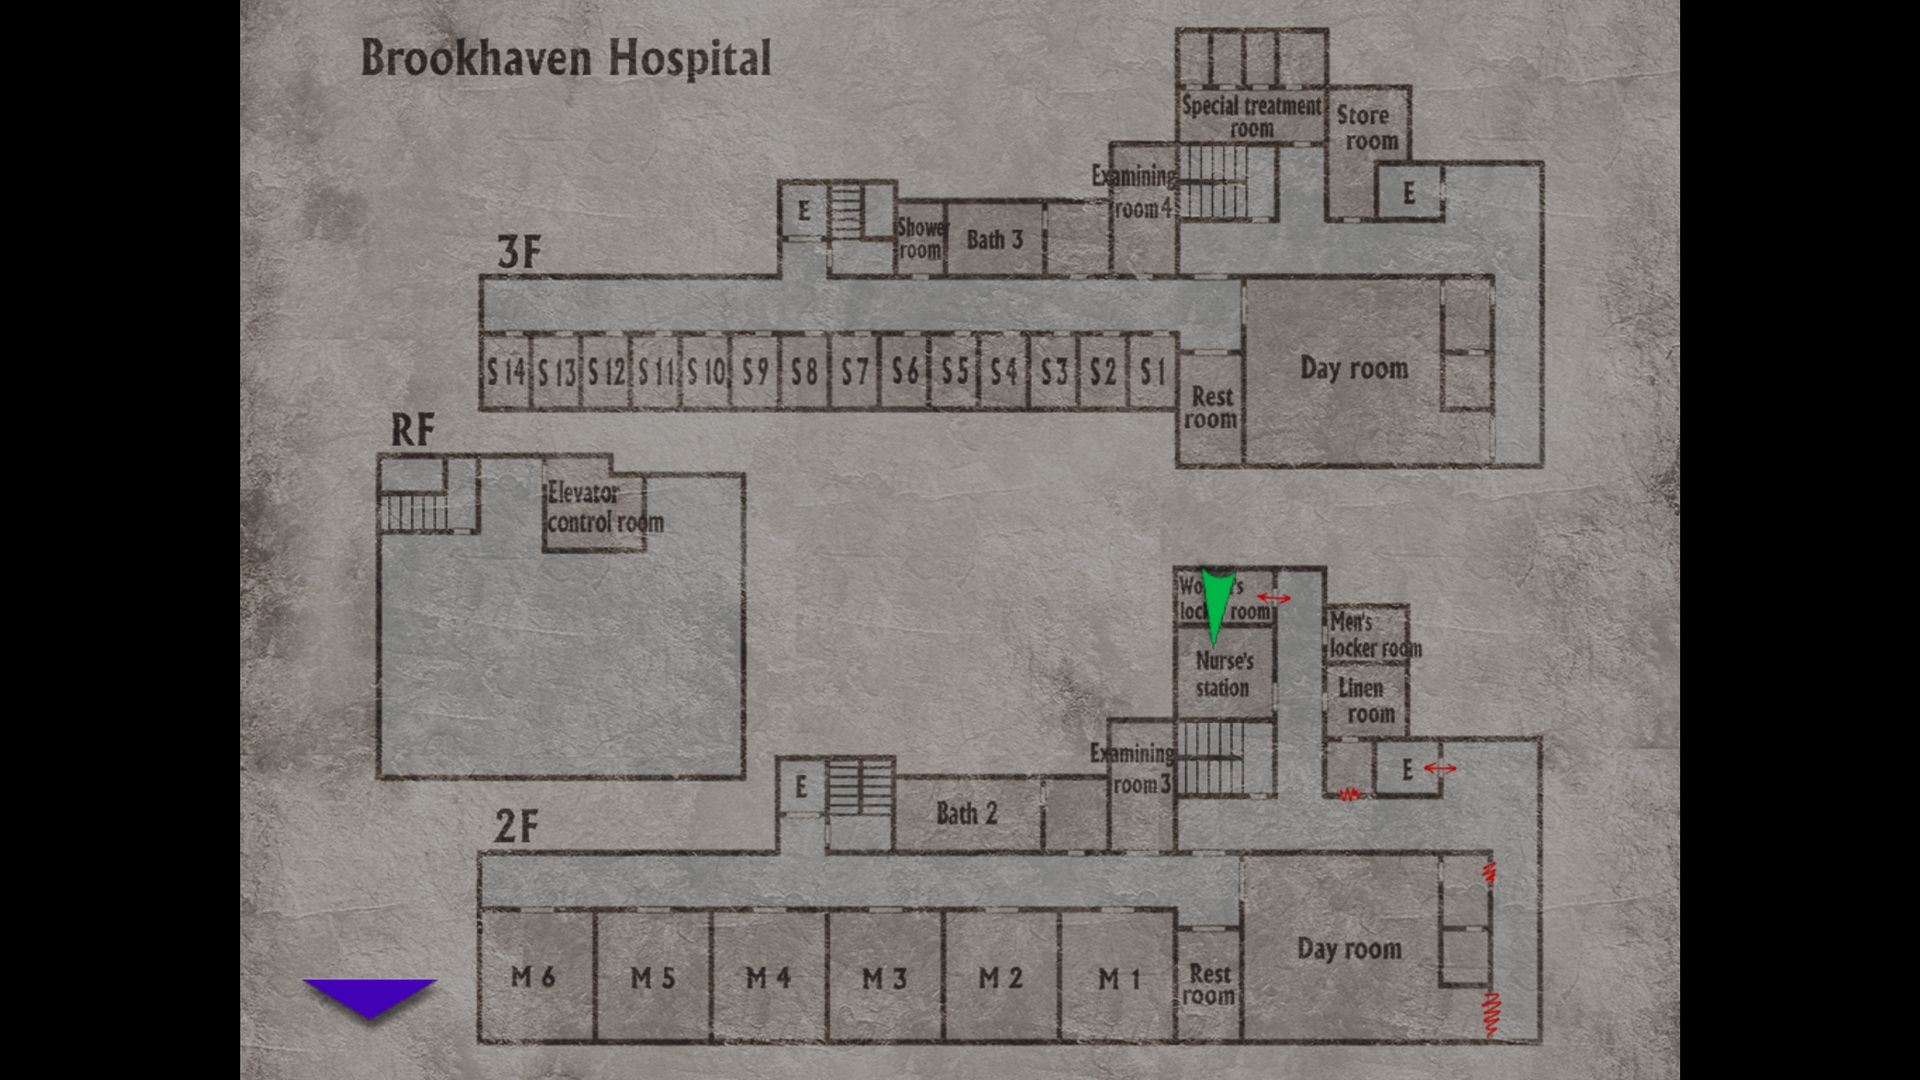
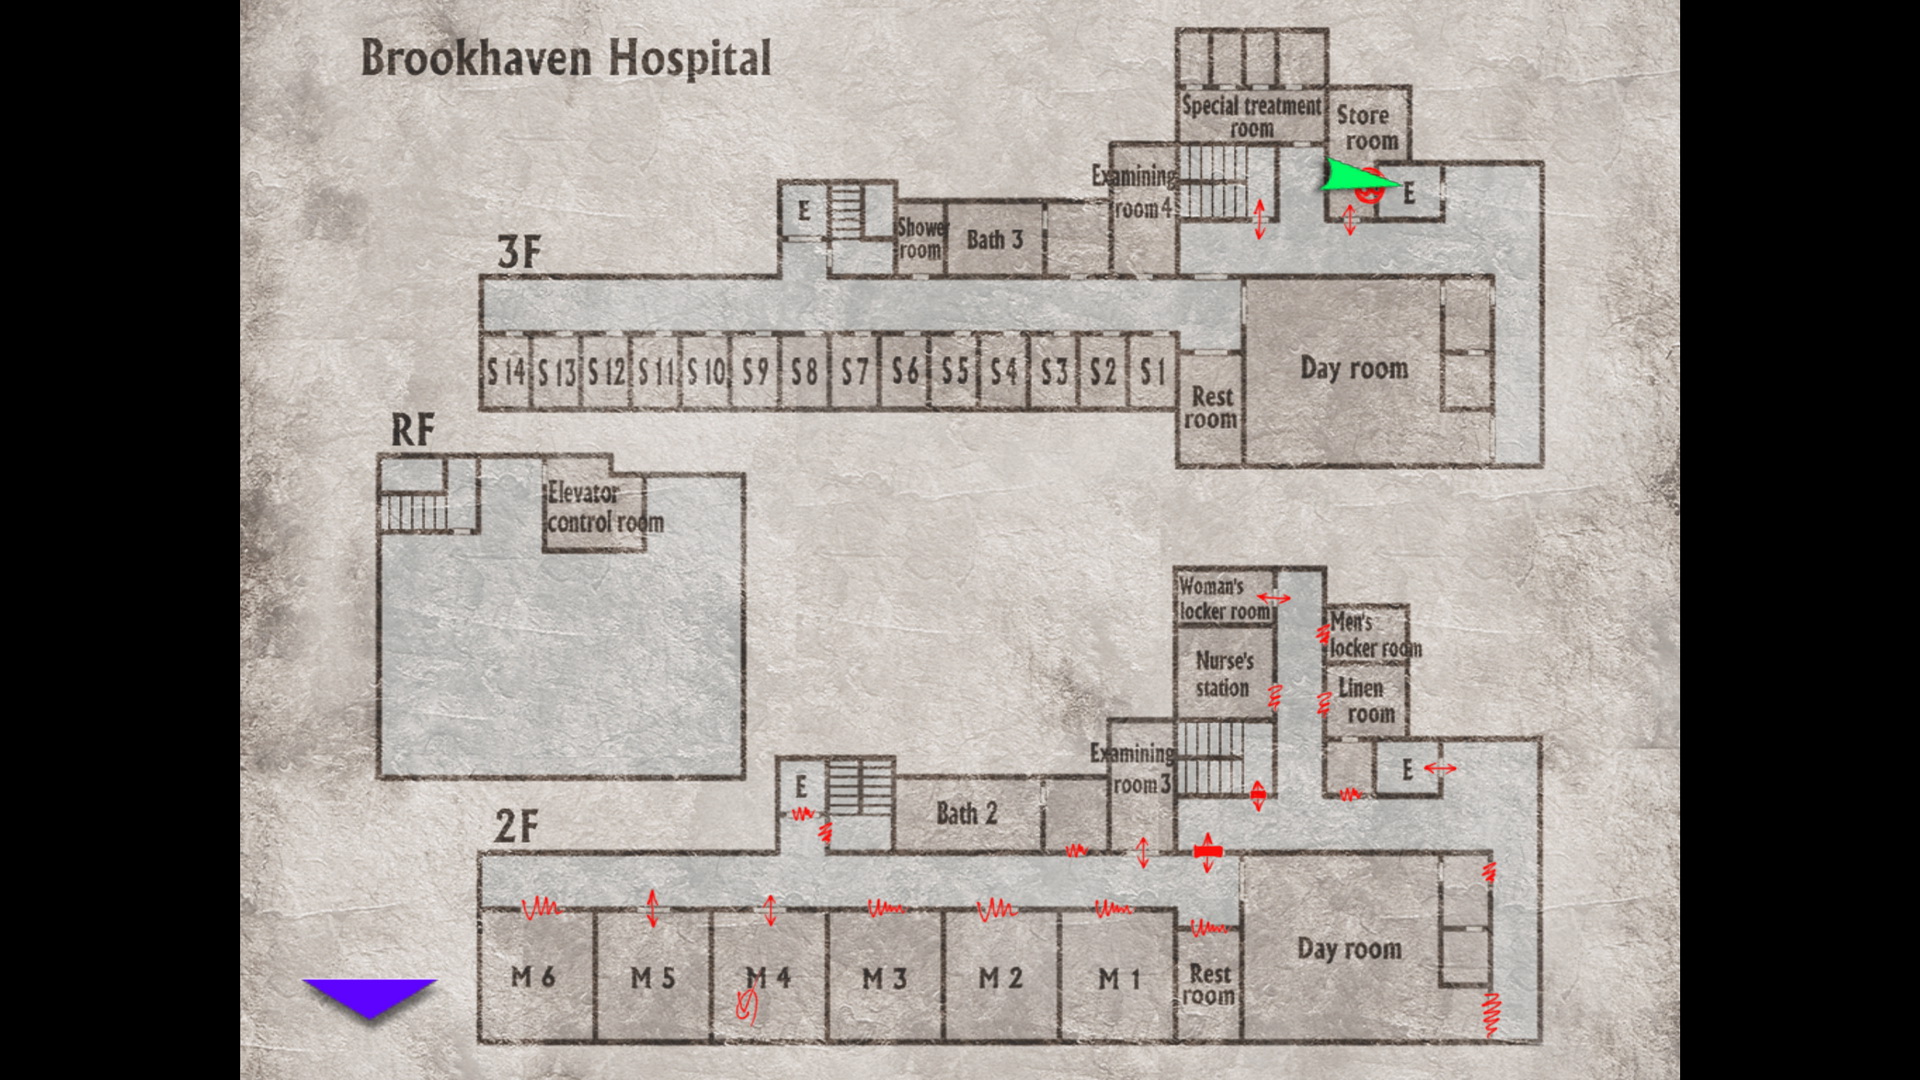
Brookhaven Hospital
Welcome to the eleventh chapter of the complete walkthrough guide for Silent Hill 3 (2003, PS2, PC), covering Brookhaven Hospital. This guide provides a comprehensive walkthrough with all item locations, detailed puzzle solutions, and boss strategies.
Color legend
Tongs - items
Handgun - weapons
Health Drink - supplies
Shopping Mall Map - maps
Save Point - save points
Contents
Walkthrough
"This day has finally come. That's right – the day when you and I will meet."
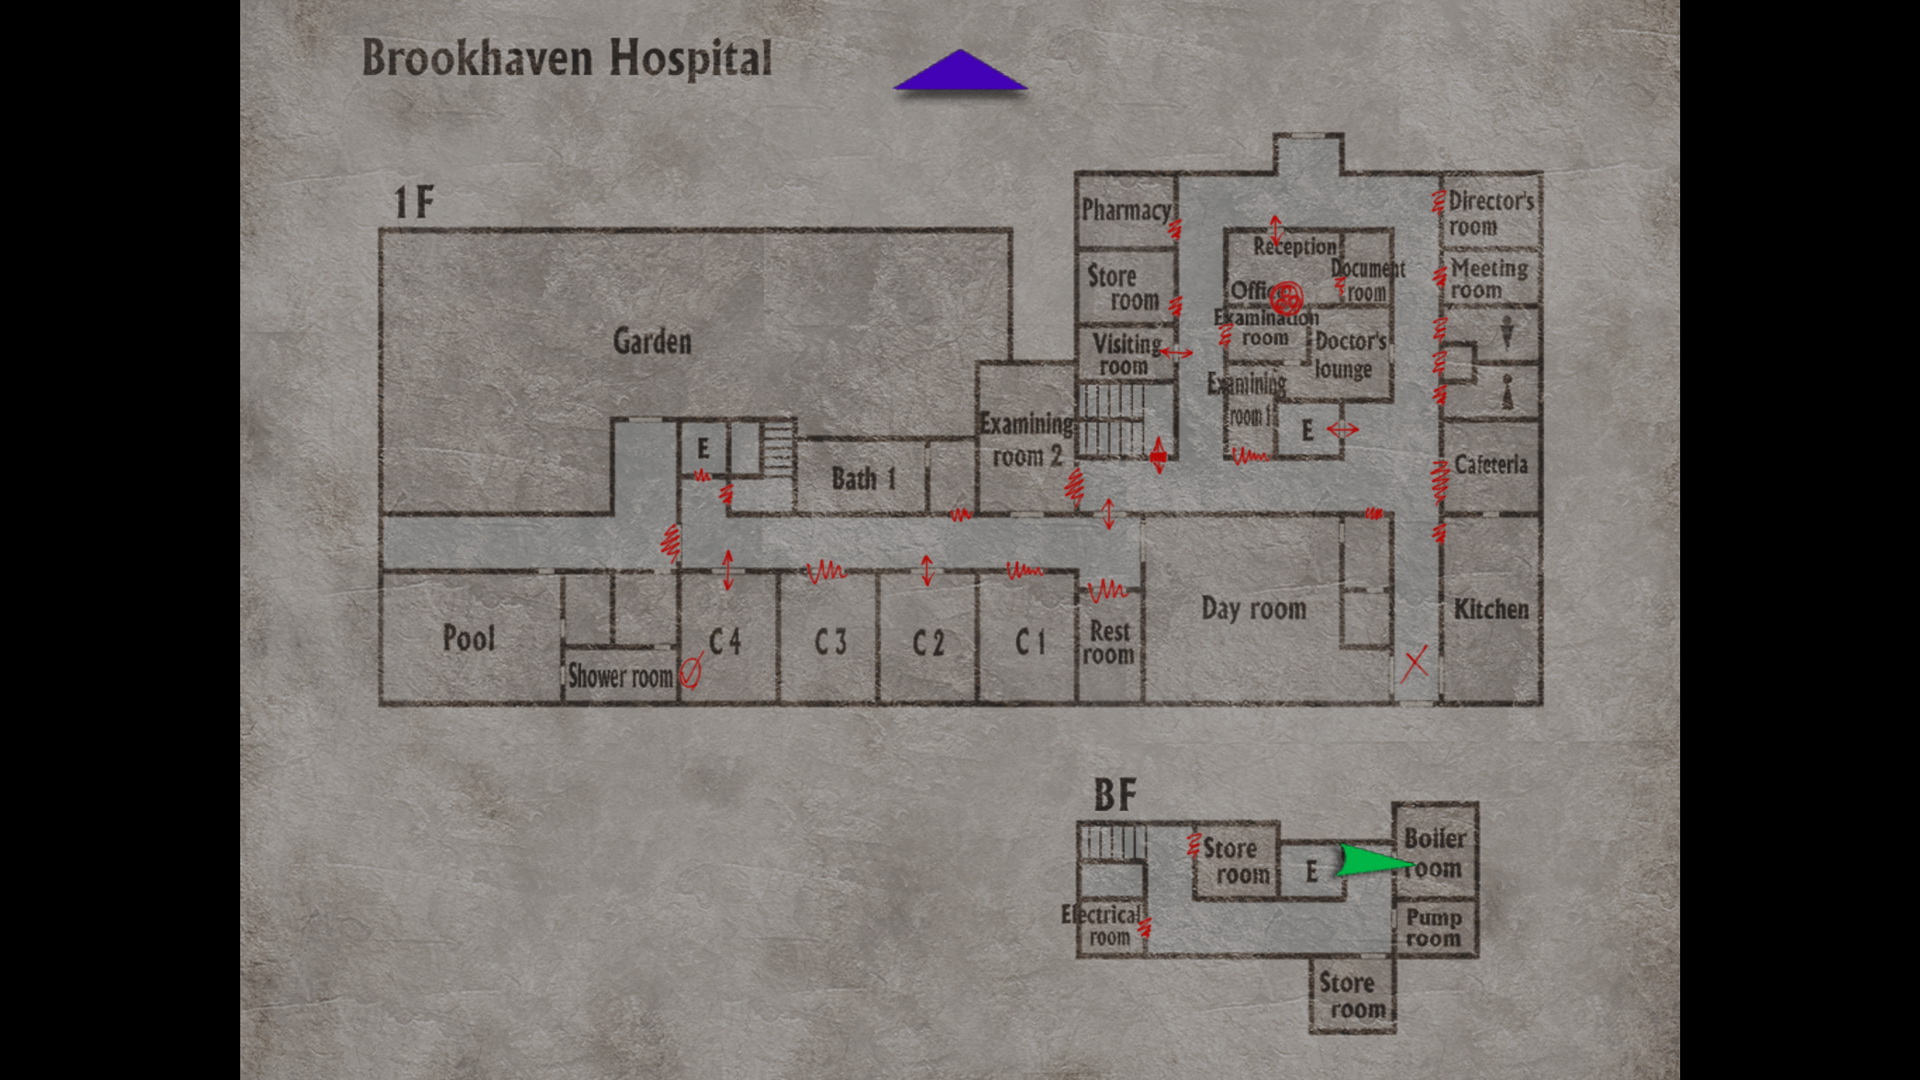
First Floor Lobby
Oh, the memories! Just inside the familiar hospital you'll hear some heavy breathing and footsteps from two Nurses in the corridor. Just like in Silent Hill 2 they carry steel pipes, however they are stronger and can run, so be mindful of your distance. Use the Handgun if you have the time and space, otherwise the Shotgun will handle them well.
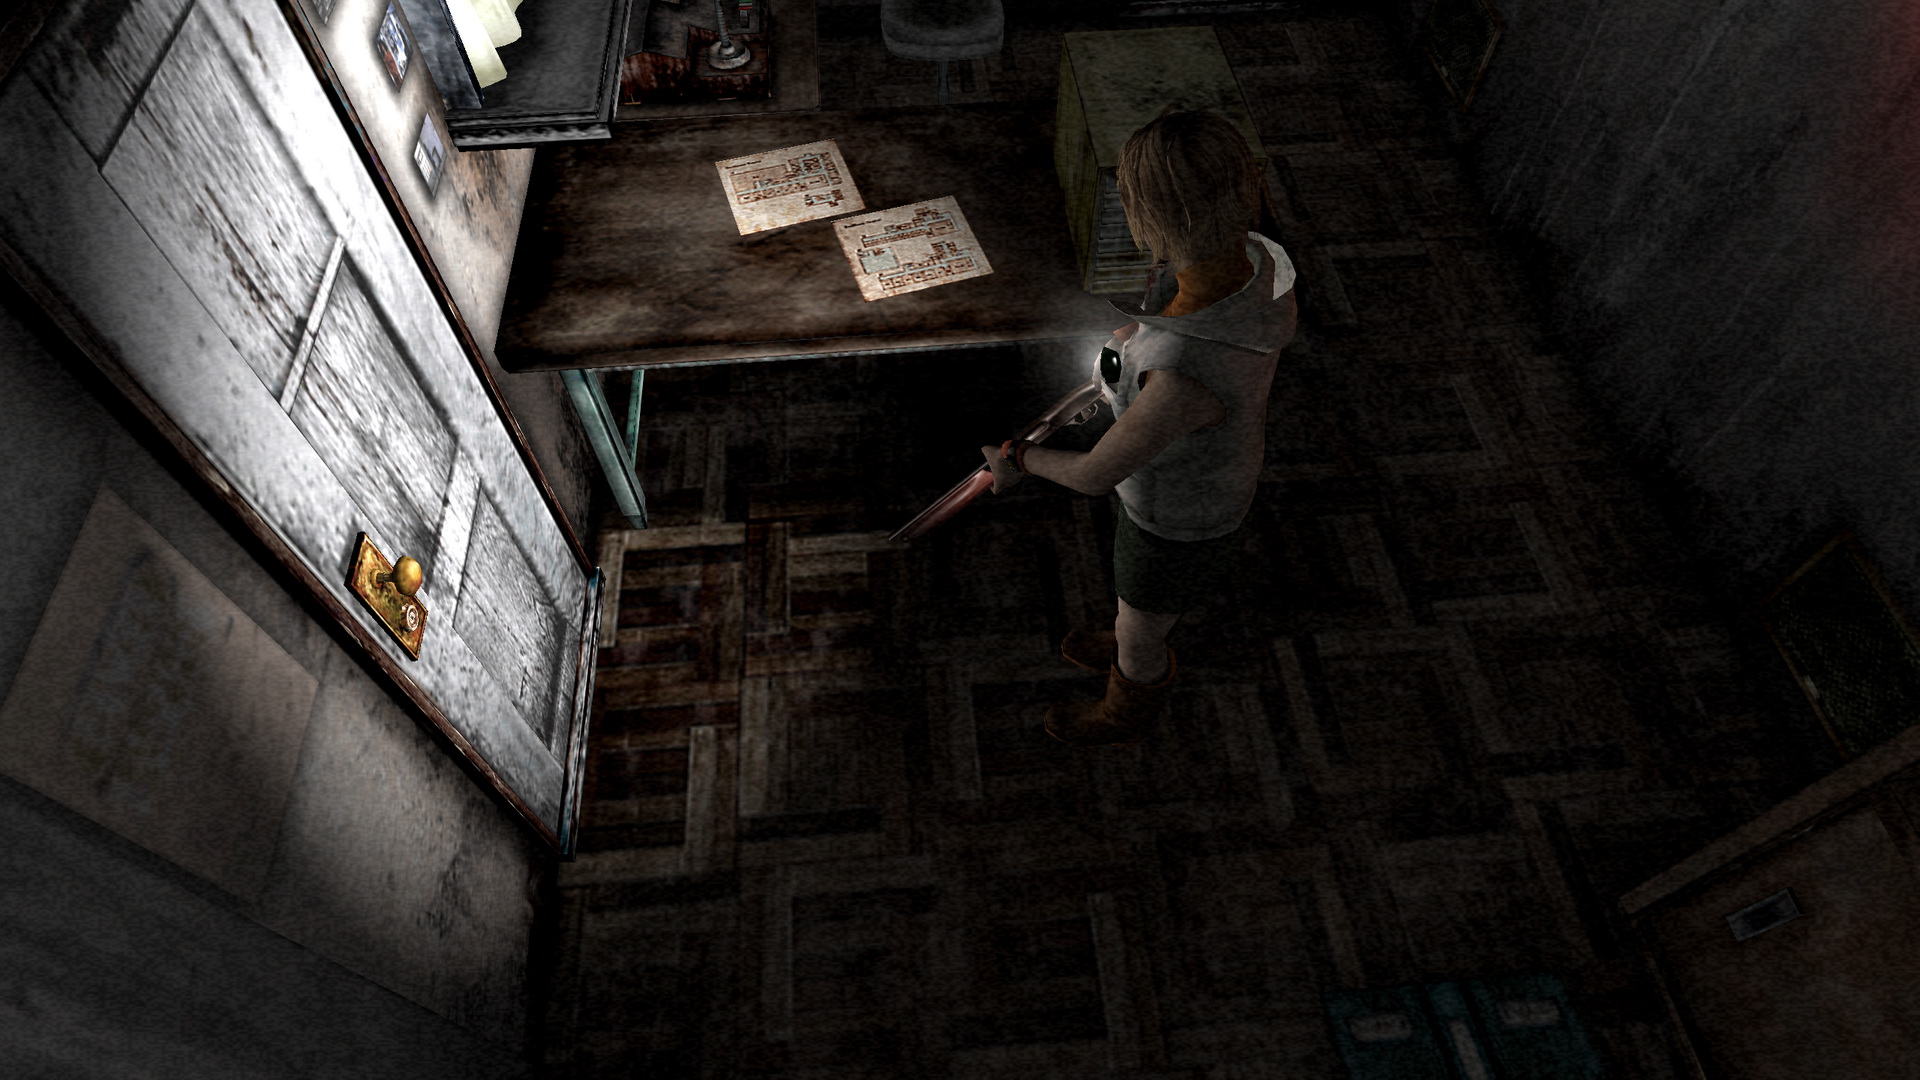
Inside the Reception right by the entrance you'll find the Hospital Map on the desk, a Health Drink in the closet by the entry door and a Save Point on the wall.
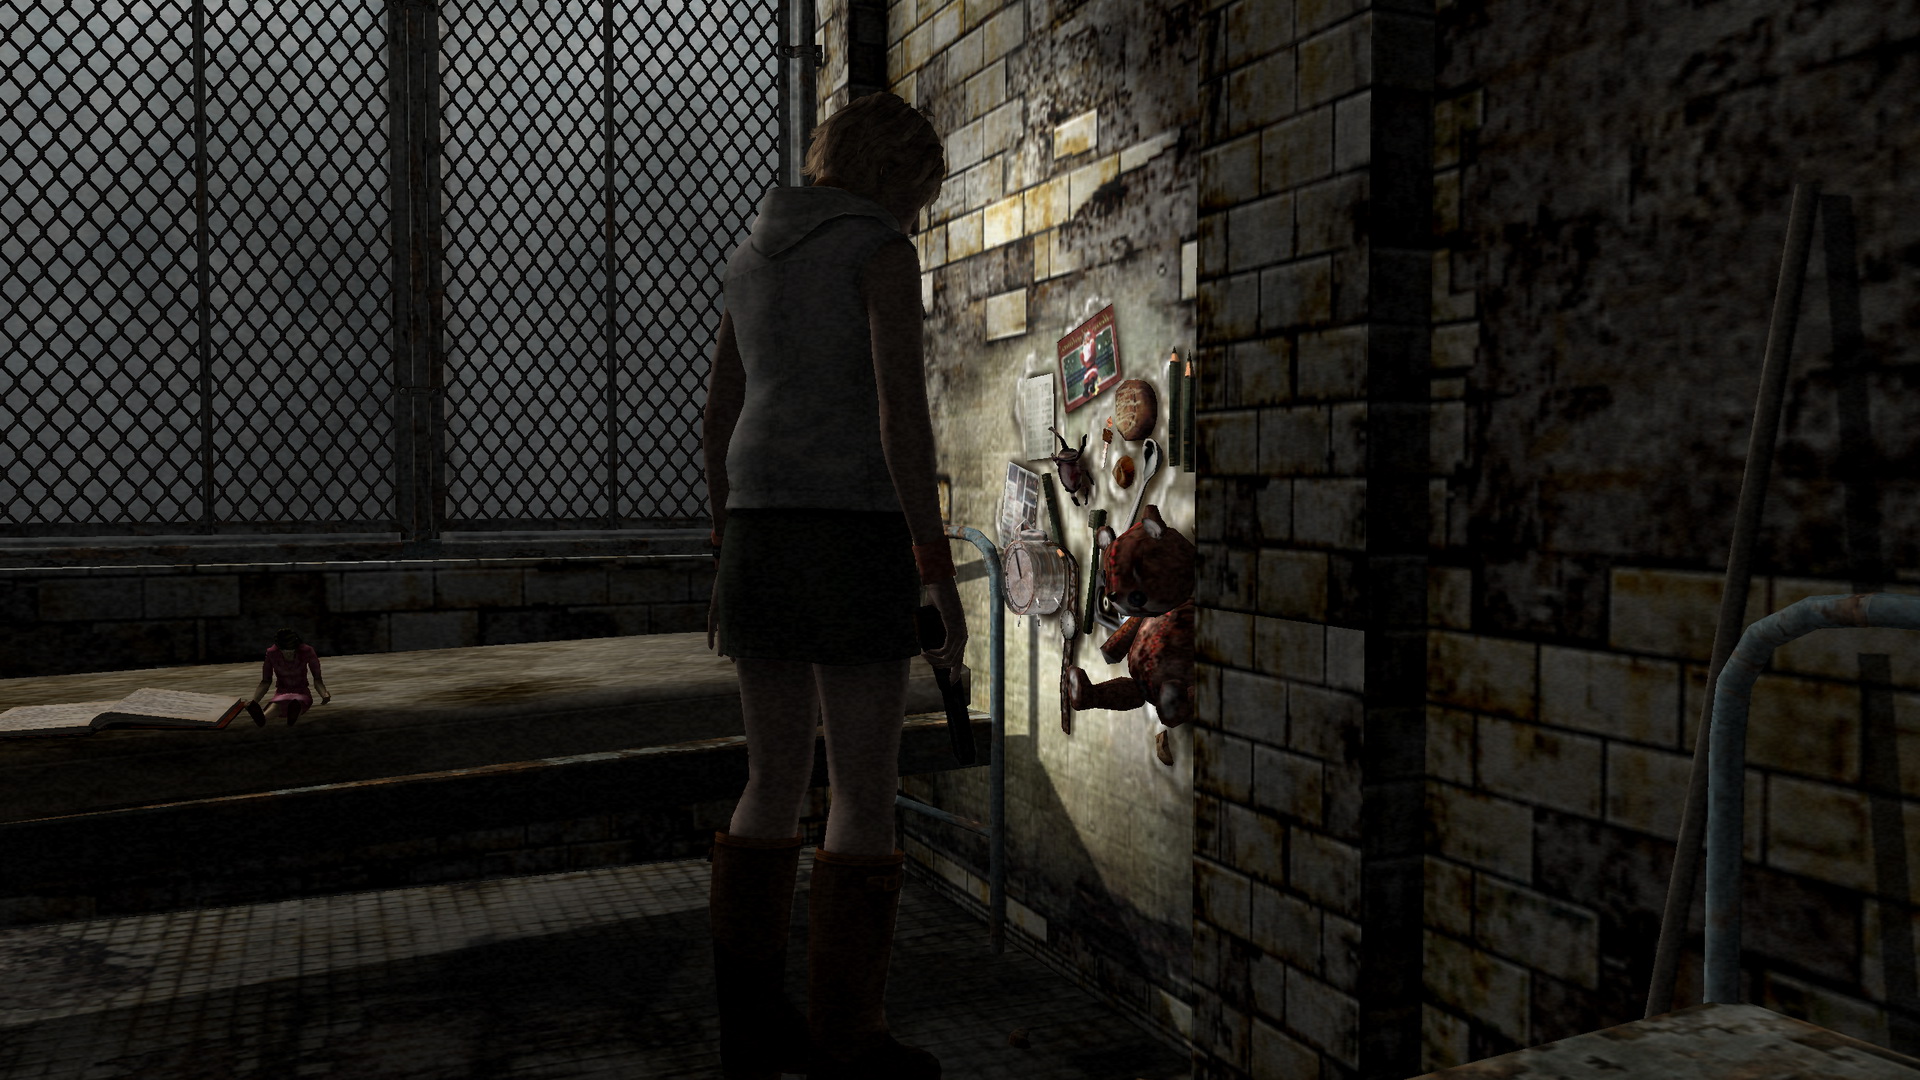
Find the Visiting Room on your map for a very creepy memo from a "Stanley Coleman" next to a doll. Be sure to examine the doll before and after the memo for a dramatic change in tone from Heather.
Note on Stanley's Diaries: You'll find many more of these creepy diaries throughout the hospital, and while they're generally placed for you to find all of them, it is possible to miss one or two, which may or may not cause others to not be found later on. If you skip ahead to a later one it may remove earlier entries, while skipping early ones may remove later entries entirely. They're all optional reading either way (though some do provide helpful hints), but in this walkthrough we'll follow an order that allows you to read them all.
Inside the Doctor's Lounge back in the hall you can find a Health Drink in the fridge and medical notes for Leonard and Stanley Coleman on the low table.
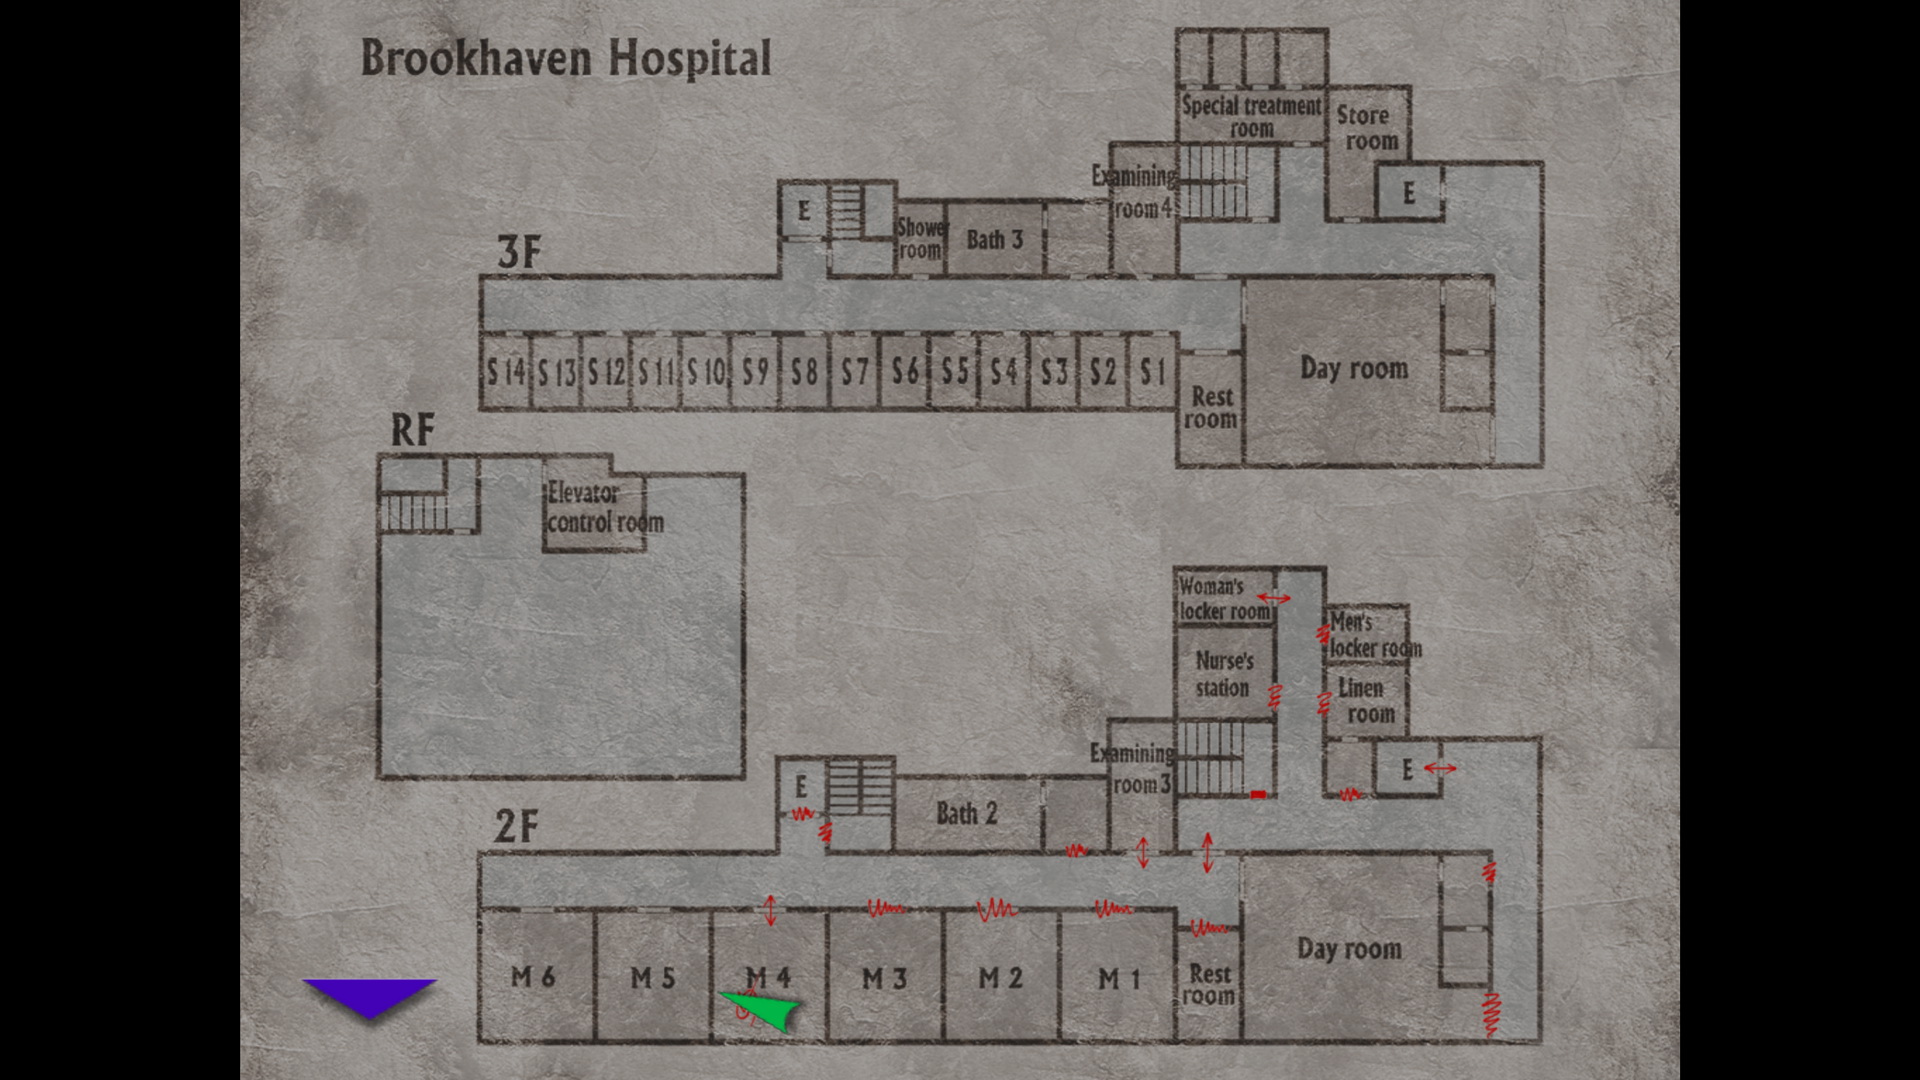
The stairwell is locked and the patient wing is accessible, but all we'll find there is a key stuck to the wall in C4 so we'll save that wing for later. Instead, find the lobby elevator which is in operation and take it up to the second floor.
Second Floor Employee Wing
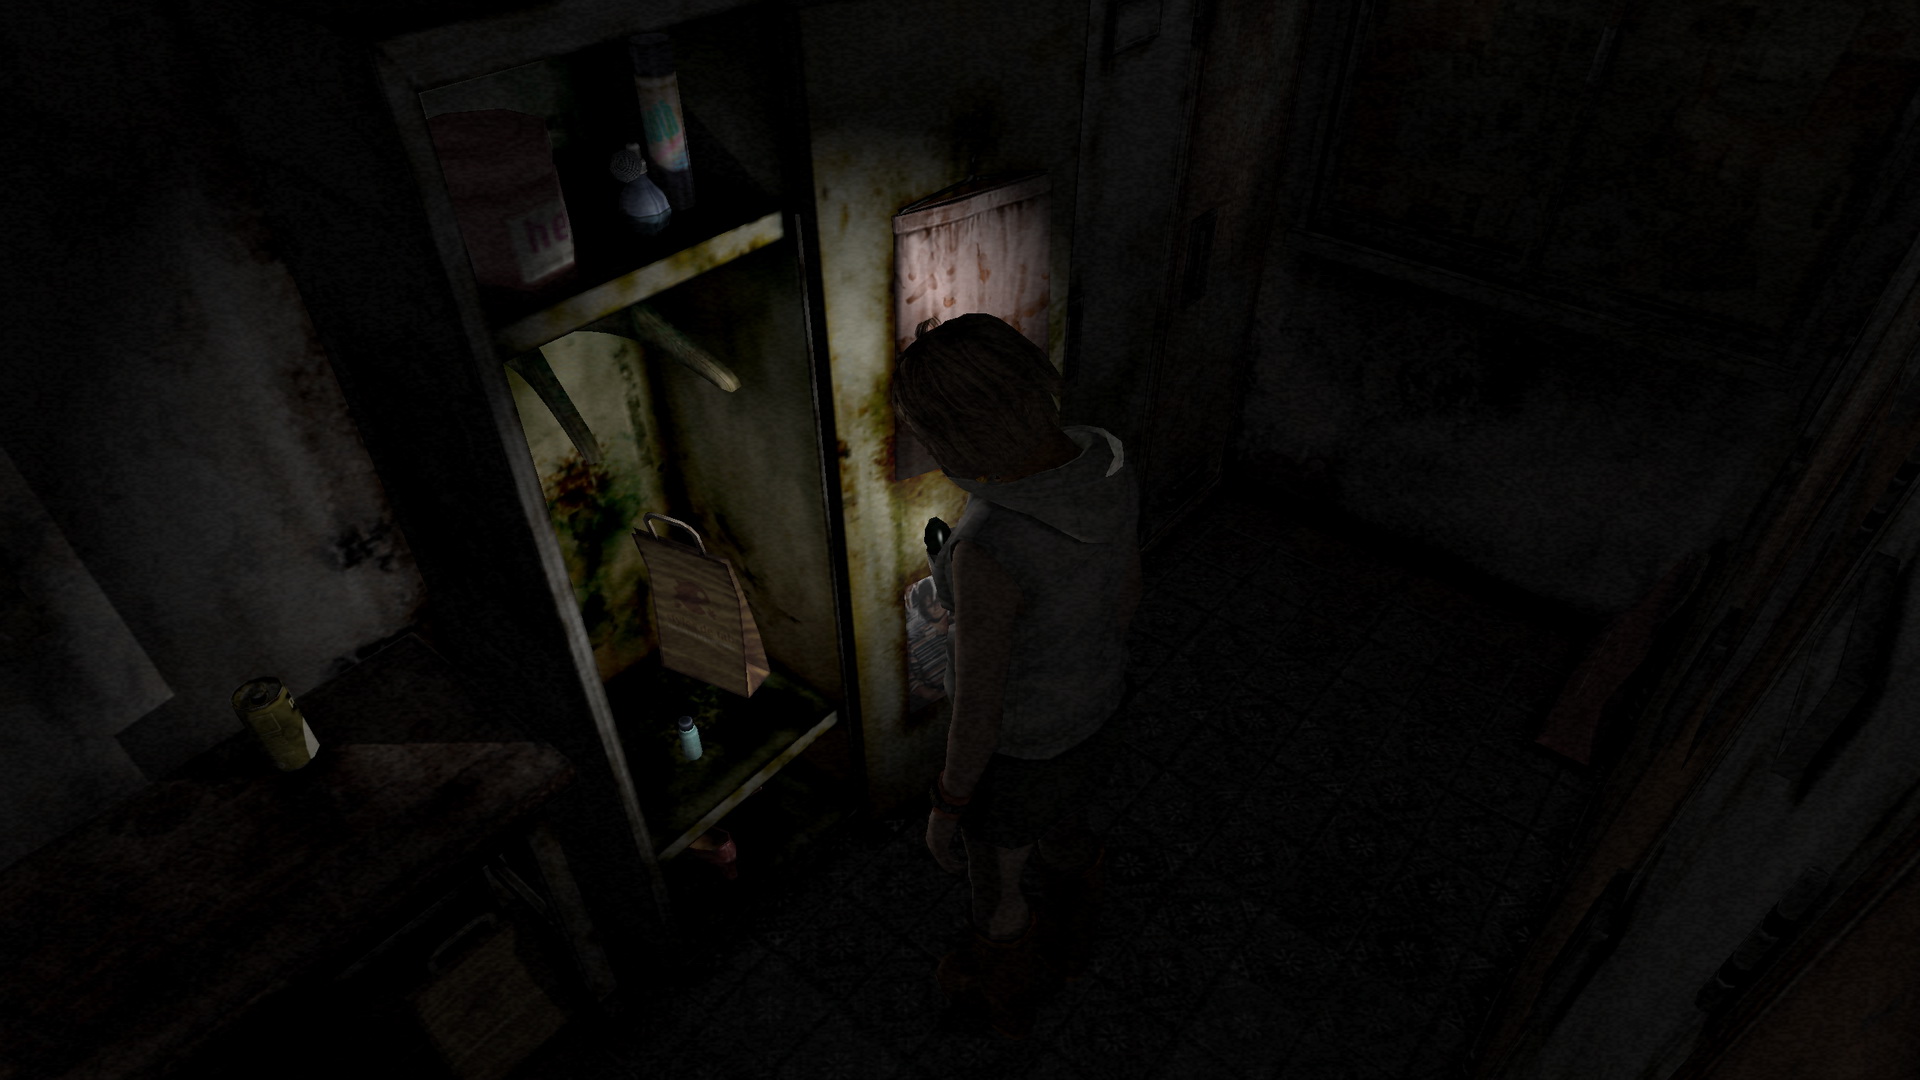
Enter the Women's Locker Room and take the 31 Nail Polish Remover and 32 Perfume from the open locker. You can now retrieve the key on the wall in C4 but we'll keep exploring up here for now.
 |
 |
Note on Perfume: Perfume is an odd item that when equipped spawns and attracts more monsters to your location. So normally I'd suggest not using it at all, however it can be helpful on subsequent runs where you want to attract and kill a lot of enemies.
Find the patient wing double doors to find another doll and message from Stanley as well as a memo on the chalkboard. The double doors are locked and you'll have to solve a puzzle.
Puzzle: Second Floor Patient Wing Keypad
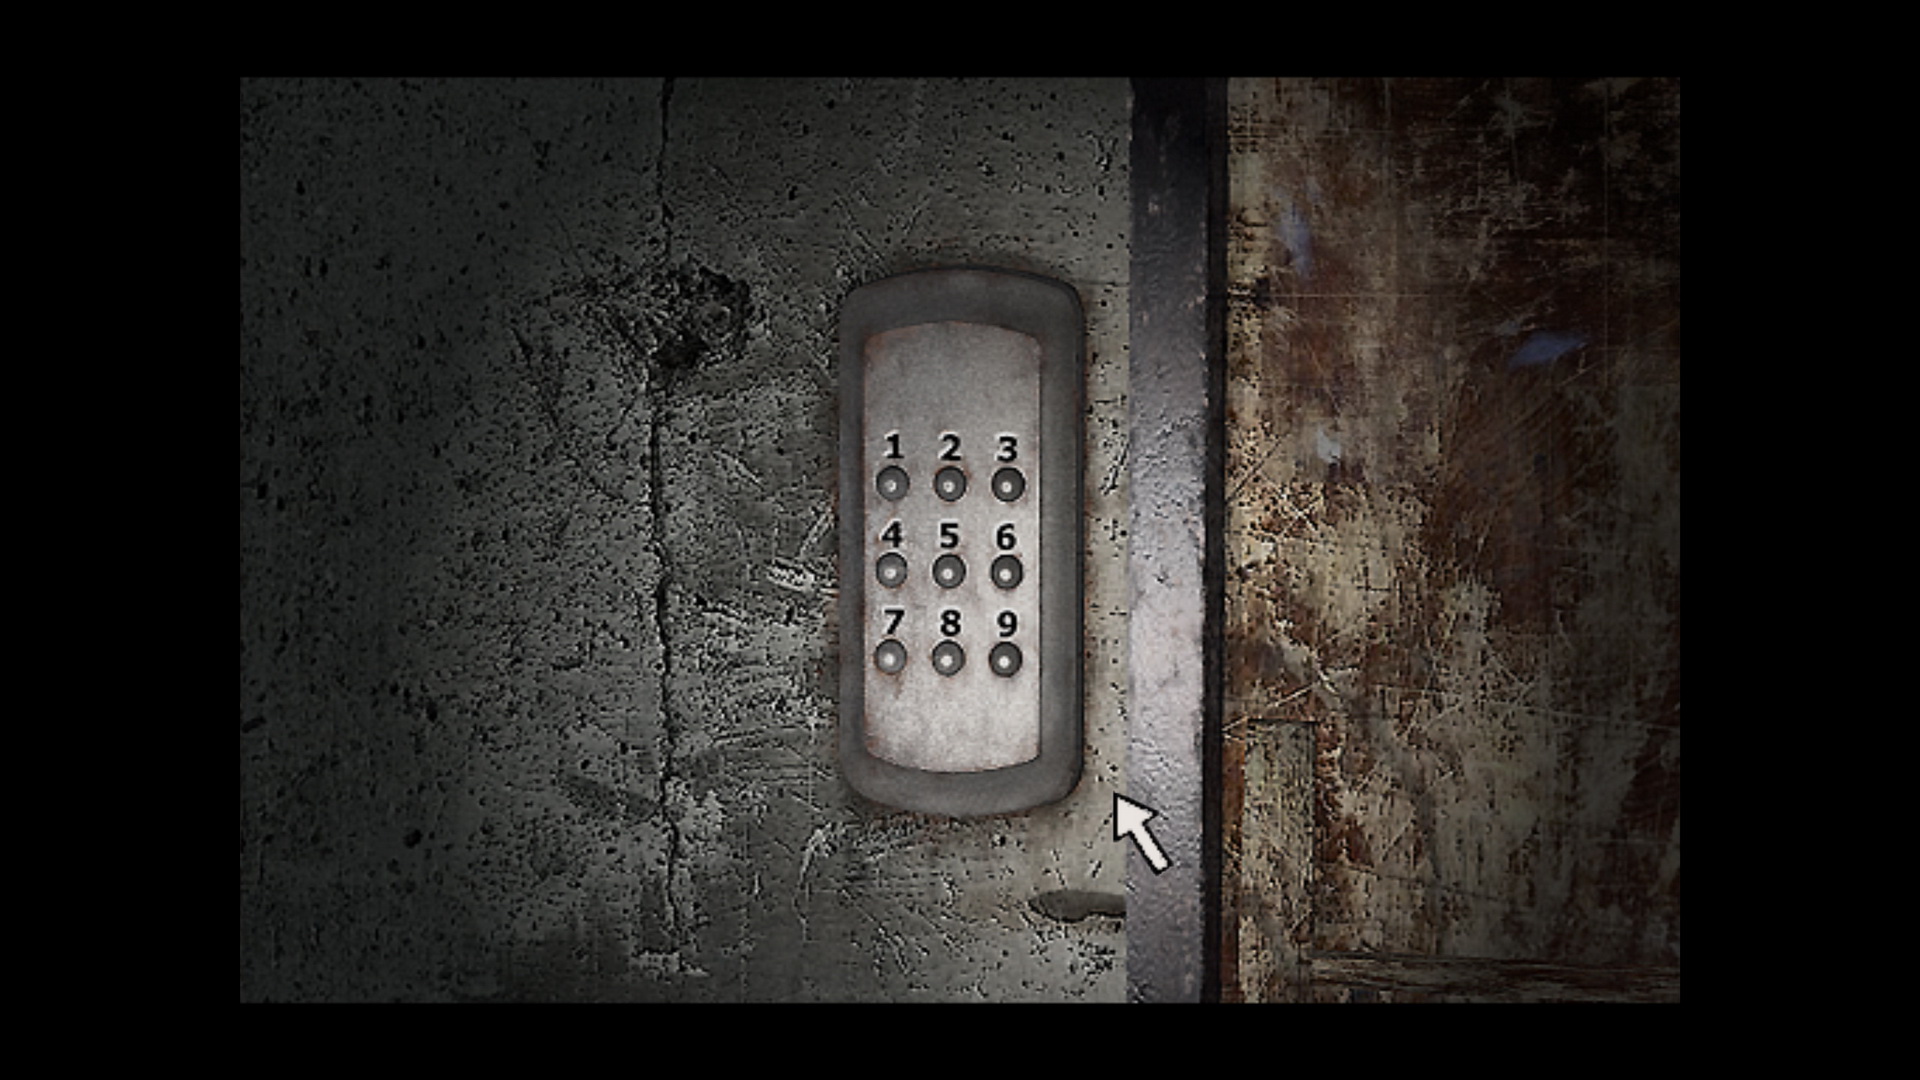
|
The paper memo on the chalkboard explains the solution to unlock the door, differing per riddle level. Once the correct code has been inputted into the keypad, the doors will unlock. Refer to the riddles and solutions below.
Easy
Press, move 2 right;
press, move up 1;
press, move 2 down;
press, the door shall open.
Looks fairly simple but where's the starting point? Well, let's visualize the keypad as we go through it.
| 1 | 2 | 3 |
| 4 | 5 | 6 |
| 7 | 8 | 9 |
The riddle says to move 2 right after pressing the first number, so it has to be 1, 4 or 7 in the left column. You must be able to move up 1 row after the second number so that eliminates starting in the top row with 1.
You must also be able to move 2 down after the third number (which is 1 up from the second) so that eliminates 7 in the bottom row (you can't go down 2 from the middle row). Therefore the starting point is 4.
Now just follow the directions: Press 4, move 2 right; press 6, move 1 up; press 3, move 2 down; press 9, the door shall open. The resulting code is 4639 and it's the same every time on this difficulty.
Normal
The first is larger than the second;
the second twice the third;
the third smaller than the fourth;
the fourth is half the first.Four of the numbers are not repeated
Three are not in the top row
Two are not in the right row
One of the numbers is the final key
So here we will have to do a little algebra to uncover the code. The memo should leave you with the following relative information about each number:
- #1 > #2
- #2 = 2x#3
- #3 < #4
- #4 = 0.5x#1
The easiest way to start here is the last number which must be half the first and thus both are even numbers. That means the first number must be 2, 4, 6 or 8, and fourth number must be 1, 2, 3 or 4 respectively. Now let's move backwards.
The third number is less than the fourth, which is no higher than 4, so the third is no higher than 3. Further, for the third to be less than the fourth, the fourth cannot be 1 (but instead 2-4) since there is no 0.
The second number is twice the third, so it must be 2, 4 or 6 (double 1, 2 or 3). It can't be 8 because the third can't be 4 (or higher). Still with me?
Lastly, the first number is larger than the second. We already determined the first must be 2, 4, 6 or 8, but since it must also be higher than the second which must be at least 2, that eliminates 2 as a possibility for the first. It also means the first must be the highest number.
So let's just jot down where we're at with our potential solutions so we can start to wrap our head around this madness:
- 1st Number: 4, 6 or 8
- 2nd Number: 2, 4 or 6
- 3rd Number: 1-3
- 4th Number: 2-4
Continuing the riddle, "Four of the numbers are not repeated" means the code uses four different numbers. This eliminates 4 entirely as the first digit since it requires the fourth to be 2 (half of 4) which means the third can only be 1 (less than 2) and the second only 2 (double 1), which repeats the number 2 and doesn't work. It also eliminates 2 as the fourth digit since it's directly tied to 4 as the first. If this all sounds like gibberish you'll have to trust me that it makes sense.
"Three are not in the top row" implies only one number from the top row (1, 2, 3) is used in the code (three are NOT in that row). This eliminates 6 entirely as the first digit since it requires the fourth to be 3 (half of first) and thus the third either 1 or 2 (less than fourth), which puts at least two digits in the top row. Thus 3 is also eliminated as the fourth digit as well as 1 as the third and 2 as the second since they all require more than one digit in the top row.
Therefore that locks in 8 as the first and 4 (half) as the fourth. The second can now only be 4 or 6 and the third 2 or 3. However the second cannot be 4 because the fourth is already 4 and no numbers repeat, which also eliminates 2 (half of 4) as the third. Therefore that leaves us with only one possible solution: 8634.
But we still have two lines to double check our work, or to give us more chances in case we're finding it hard to follow along. "Two are not in the right row" means only two numbers are 3, 6 or 9 while two are not. Our code has 3 and 6 so it fits the criteria.
Lastly, "One of the numbers is the final key" -- what could that mean? The final number must be 9? No, it means one of the numbers of the code is the final key or button. The final key is the "fourth" one. So the code must have the number 4, and ours does. Got it? Just a play on words.
Therefore 8634 is confirmed as the resulting code, which will be the same every time on Normal. Quite the ride, eh?
Hard
Pure eyes, blue like a glassy bead–-
You are always looking at me
and I am always looking at you.Ah, you're too meek–-
beautiful, unspoiled:
thus I'm so sad, I suffer–-
and so happy, it hurts.I want to hurt you
and destroy myself
What you would think
if you knew how I felt.Would you simply smile,
not saying a word?
Even curses from your mouth
would be as beautiful as pearls.I place my left hand on your
face as though we were to kiss.
Then I suddenly shove my thumb
deep into your eyesocket.
Abruptly, decisively,
like drilling a hole.And what would it feel like?
Like jelly?
Trembling with ecstasy, I obscenely
mix it around and around: I must
taste the warmth of your blood.How would you scream?
Would you shriek "It hurts!
It hurts!" as cinnabar-red tears
stream from your crushed eye?You can't know the maddening
hunger I've felt in the midst of
our kisses, so many of them
I've lost count.As though drinking in your cries,
I bring my hopes to fruition:
biting your tongue, shredding it,
biting at your lips as if tasting
your lipstick.Oh, what euphoric heights I would
reach, having my desires fulfilled
like a greedy, gluttonous cur.I longed, too, for your cherry-tinted
cheeks, tasty enough to bewitch my
tongue.
I would surely be healed,
and would cry like a child.And how is your tender ear?
It brushes against my cheek;
I want it to creep up to my lips so
I can sink my teeth into its flesh.Your left ear, always hearing words
whispered sweet as pie–-
I want it to hear my true feelings.
I never lied, no...
but I did have my secrets.Ah, but what must you think of me?
Do you hate me? Are you afraid?
As though inviting you to the agony
at the play's end, if you wish, you
could destroy me–-I wouldn't care.As you wish, you may destroy me
–-I wouldn't care.
This author is one sick bastard, that much is clear... While you won't find any number or button hints in this memo at all, you'll have to think with a creative mind. As crazy as it sounds, the author reveals the code through a series of movements and actions on a face, which represents the keypad like so:
| 1 eye |
2 | 3 eye |
| 4 ear |
5 nose |
6 ear |
| 7 cheek |
8 mouth |
9 cheek |
You may question the proportions in relation to each other, but it is the arrangement that most makes sense corresponding to a keypad, at least in the sense that is described by the author. Now let's get started.
Pure eyes, blue like a glassy bead–-
You are always looking at me
and I am always looking at you.
This sets the stage that the author is facing his female victim. Therefore the girl's left eye, ear and cheek are on his right, and so on. Keep that in mind while paying attention to the language, and let's try to establish just what he's doing here.
Ah, you're too meek–-
beautiful, unspoiled:
thus I'm so sad, I suffer–-
and so happy, it hurts.I want to hurt you
and destroy myself
What you would think
if you knew how I felt.
Essentially the girl is too pretty and innocent for him and thus he wants to destroy her, rearranging her face in a way he's about to describe.
I place my left hand on your
face as though we were to kiss.
Then I suddenly shove my thumb
deep into your eyesocket.
Abruptly, decisively,
like drilling a hole.
This marks the beginning of deciphering the code. His left hand being placed on her face would naturally be his left and her right as one of 1, 4 or 7. Shoving his thumb into her eyesocket is the first move, representing a press of the 1 button on the keypad which corresponds to where the face's eye is. Sick to your stomach yet?
And what would it feel like?
Like jelly?
Trembling with ecstasy, I obscenely
mix it around and around: I must
taste the warmth of your blood.
Now he wants a taste... But how would the sick bastard do this? We must follow the blood trail.
How would you scream?
Would you shriek "It hurts!
It hurts!" as cinnabar-red tears
stream from your crushed eye?
So her bloody tears are streaming down her face, allowing the author to taste them as he wished. Normally tears would flow down the cheek, but we need to remember our setup of the keypad. Therefore the tears flow down from her right eye (1) to her right ear (4). That is where the bastard is able to taste her and thus it is our second number.
As though drinking in your cries,
I bring my hopes to fruition:
biting your tongue, shredding it,
biting at your lips as if tasting
your lipstick.
Here the psycho moves from licking her bloody tears to biting her tongue and lips, representing the 8 on the keypad. But his desires are beginning to escalate as he moves around the rest of her face.
I longed, too, for your cherry-tinted
cheeks, tasty enough to bewitch my
tongue.
I would surely be healed,
and would cry like a child.
And just like that the freak switches to her cheeks. But which side? We'll have to continue to find out.
And how is your tender ear?
It brushes against my cheek;
I want it to creep up to my lips so
I can sink my teeth into its flesh.
This guy moves quickly... he's already onto the ear, but which one? And which cheek was it before? We must read on first.
Your left ear, always hearing words
whispered sweet as pie–-
I want it to hear my true feelings.
I never lied, no...
but I did have my secrets.
And there is our answer. Her left ear, which is the author's right, signifying the number 6 on the keypad. It only makes sense now that the cheek he snacked on earlier was her left and his right, between the mouth and ear, which is number 9 on the keypad. The riddle concludes itself but we've already uncovered all of its clues.
And thus we are left with a five-number code: 14896. But it's one number too many, which even Stanley points out in his memo beside the keypad:
I mean, 4 numbers would've been
good enough, but he kept on going.
So we still have more work to do to get the final code. Let's just analyze where we got each number from with each of the corresponding actions:
- 1: crushing, drilling her right eye
- 4: tasting the warmth of her blood (tears); drinking in her cries
- 8: biting, shredding her tongue; biting her lips, tasting her lipstick
- 9: tasting her left cheek with his tongue
- 6: sinking his teeth into her left ear
What stands out here as different? 4, 8, 9 and 6 all involve biting and tasting her and her blood, while 1 only set the stage by crushing her eye, didn't it? He never implied he tasted her eye, but rather the blood that streamed from it, and thus below it (at her ear).
Further, read the riddle again and look specifically for this theme of biting, tasting and hunger. It's everywhere.
"I must taste the warmth of your blood." "You can't know the maddening hunger I've felt in the midst of our kisses". "I bring my hopes to fruition: biting your tongue, shredding it, biting at your lips as if tasting your lipstick." "Oh, what euphoric heights I would reach, having my desires fulfilled like a greedy, gluttonous cur." "I want it to creep up to my lips so I can sink my teeth into its flesh."
He's made it very clear. He is hungry for her blood, and that is the key to the code. So we can eliminate the 1 which precedes the sick tasting of her blood and rather just begins the adventure.
With that we're left with the resulting code of 4896, which is the same each time on Hard. Hope you didn't enjoy that one too much, you sick bastard.
Now input the correct code into the keypad and pass through to the patient wing.
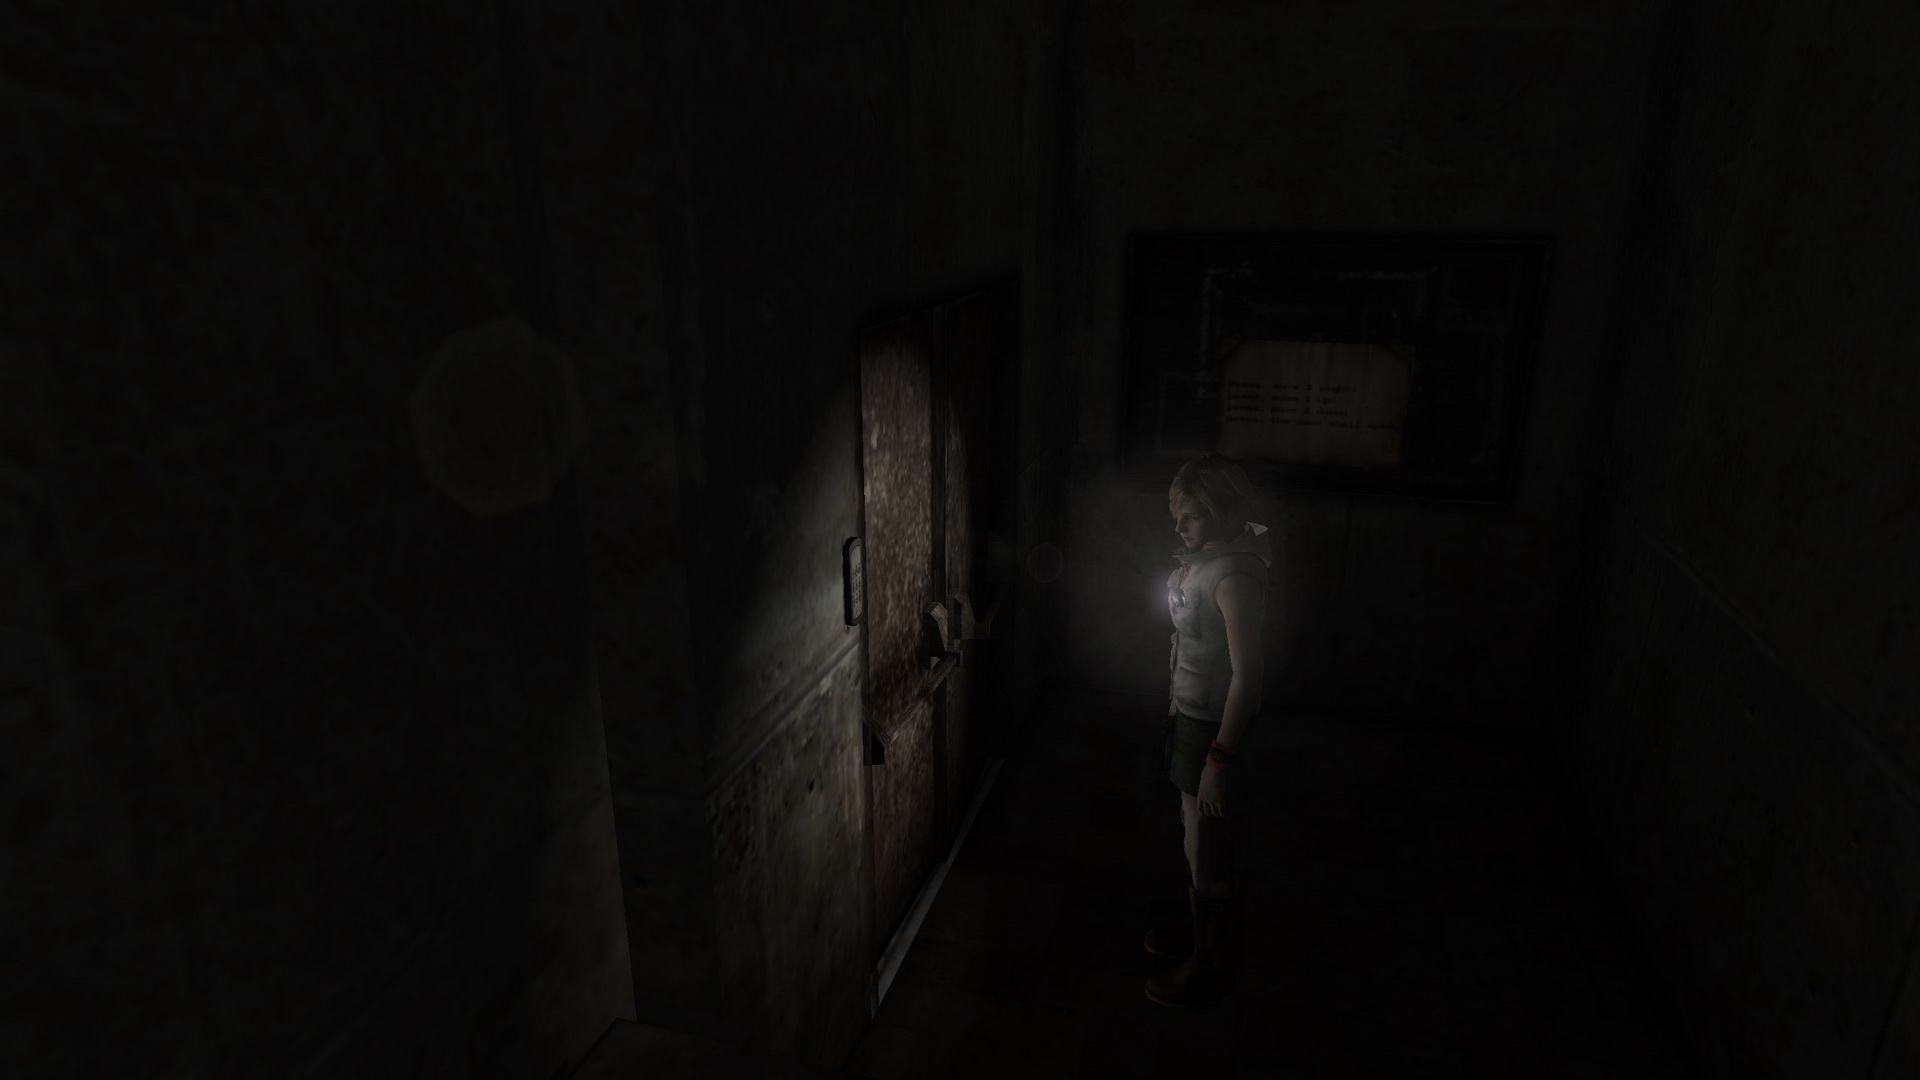
Second Floor Patient Wing
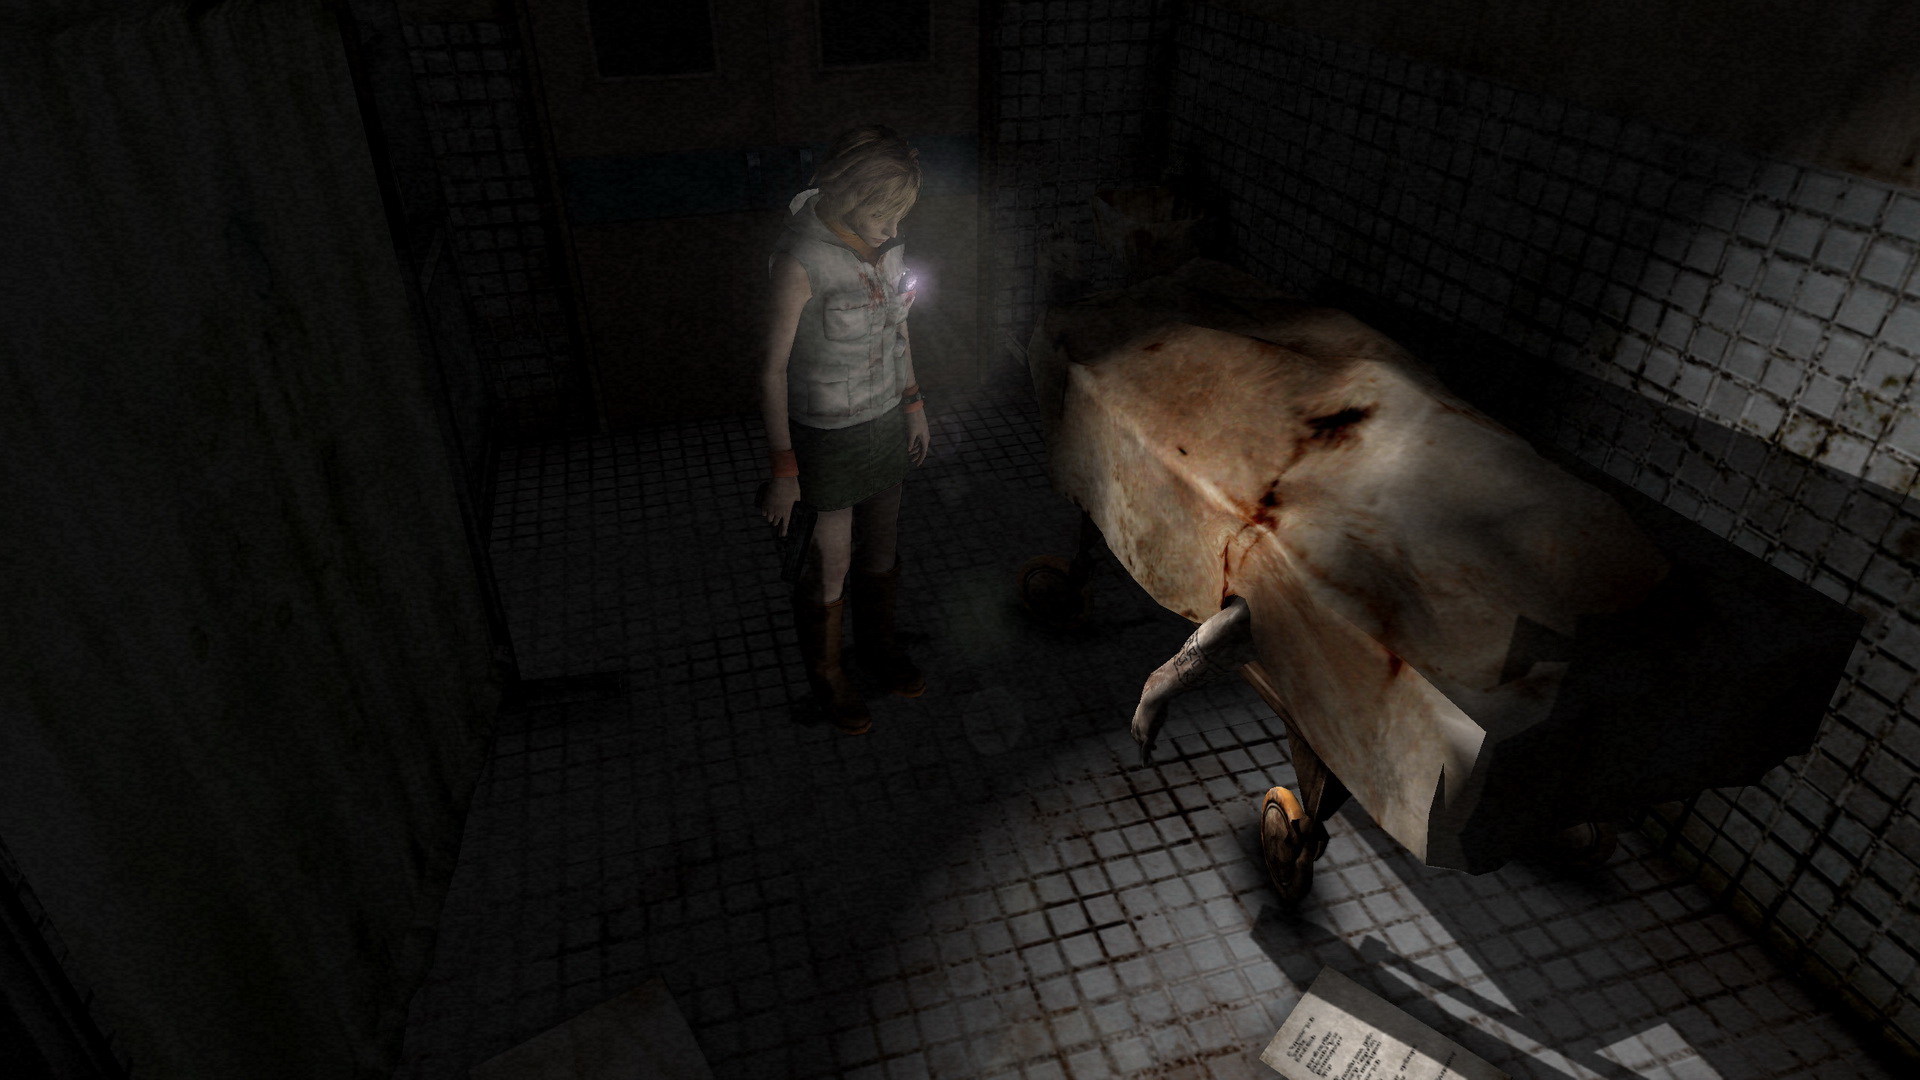
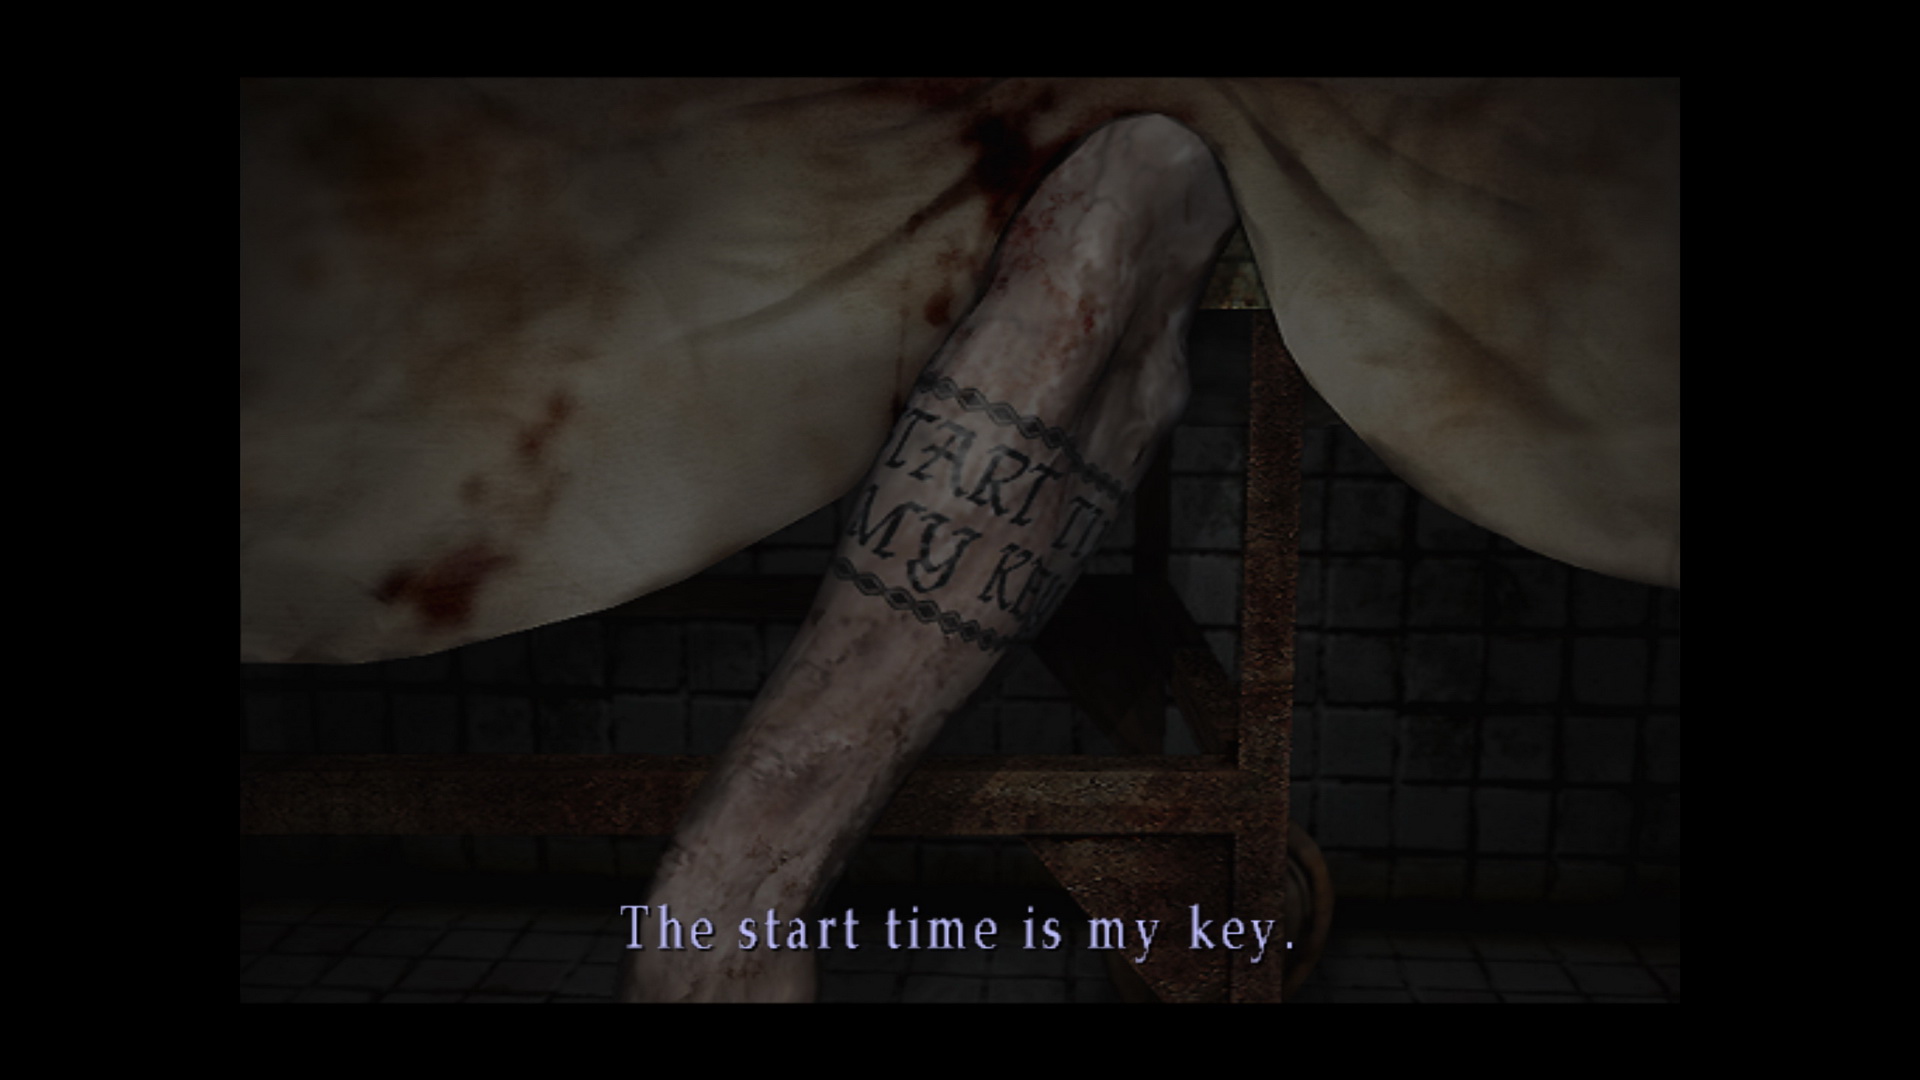
Enter Examining Room 3 on your right. Do some examining of the arm hanging down from the corpse on the stretcher to read its tattoo, "The start time is my key." Find the memo at the back of the room that explains that the patient may have been murdered and his effects still remain in room M4. Exit the room.
Out in the hall there will be two Nurses nearby and one of them has a revolver. Consider using the Shotgun to quickly take her out of commission before she can do any damage, which is always a good idea for any revolver Nurses in the future as well.
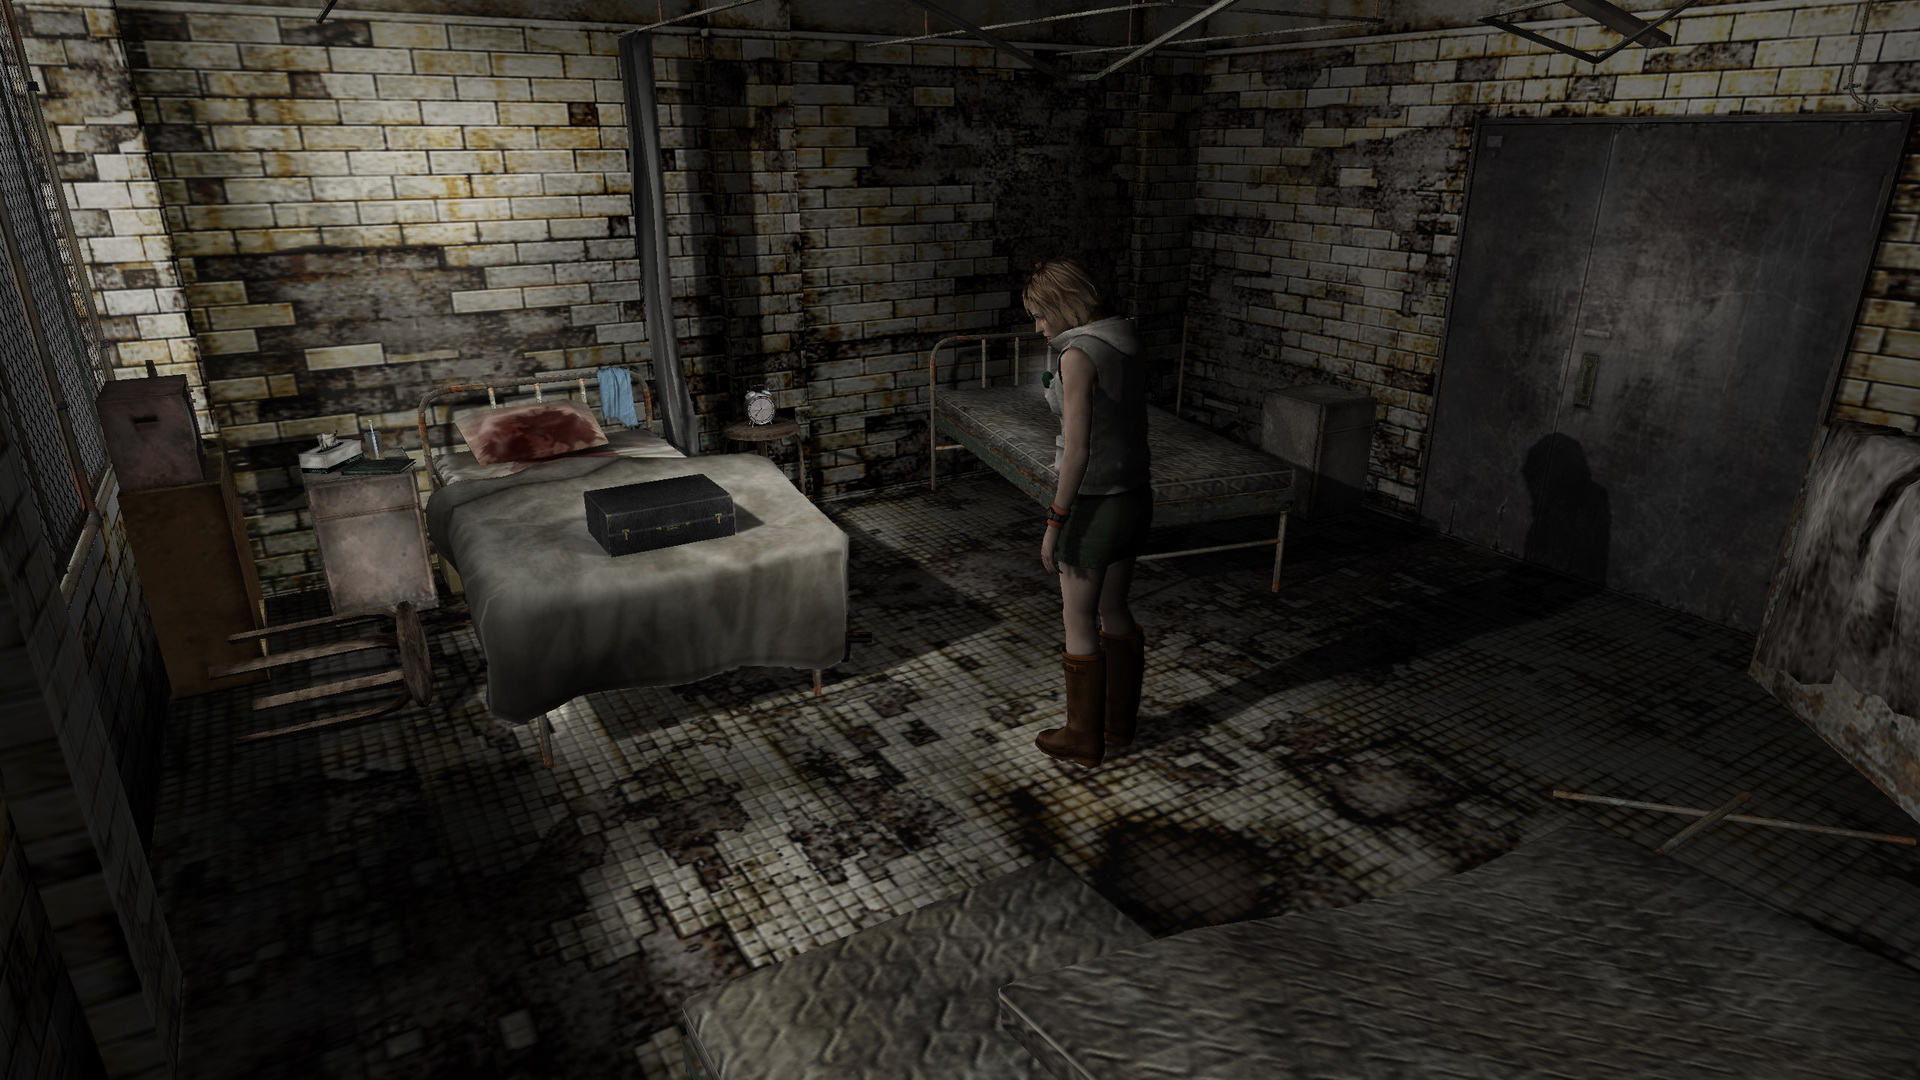
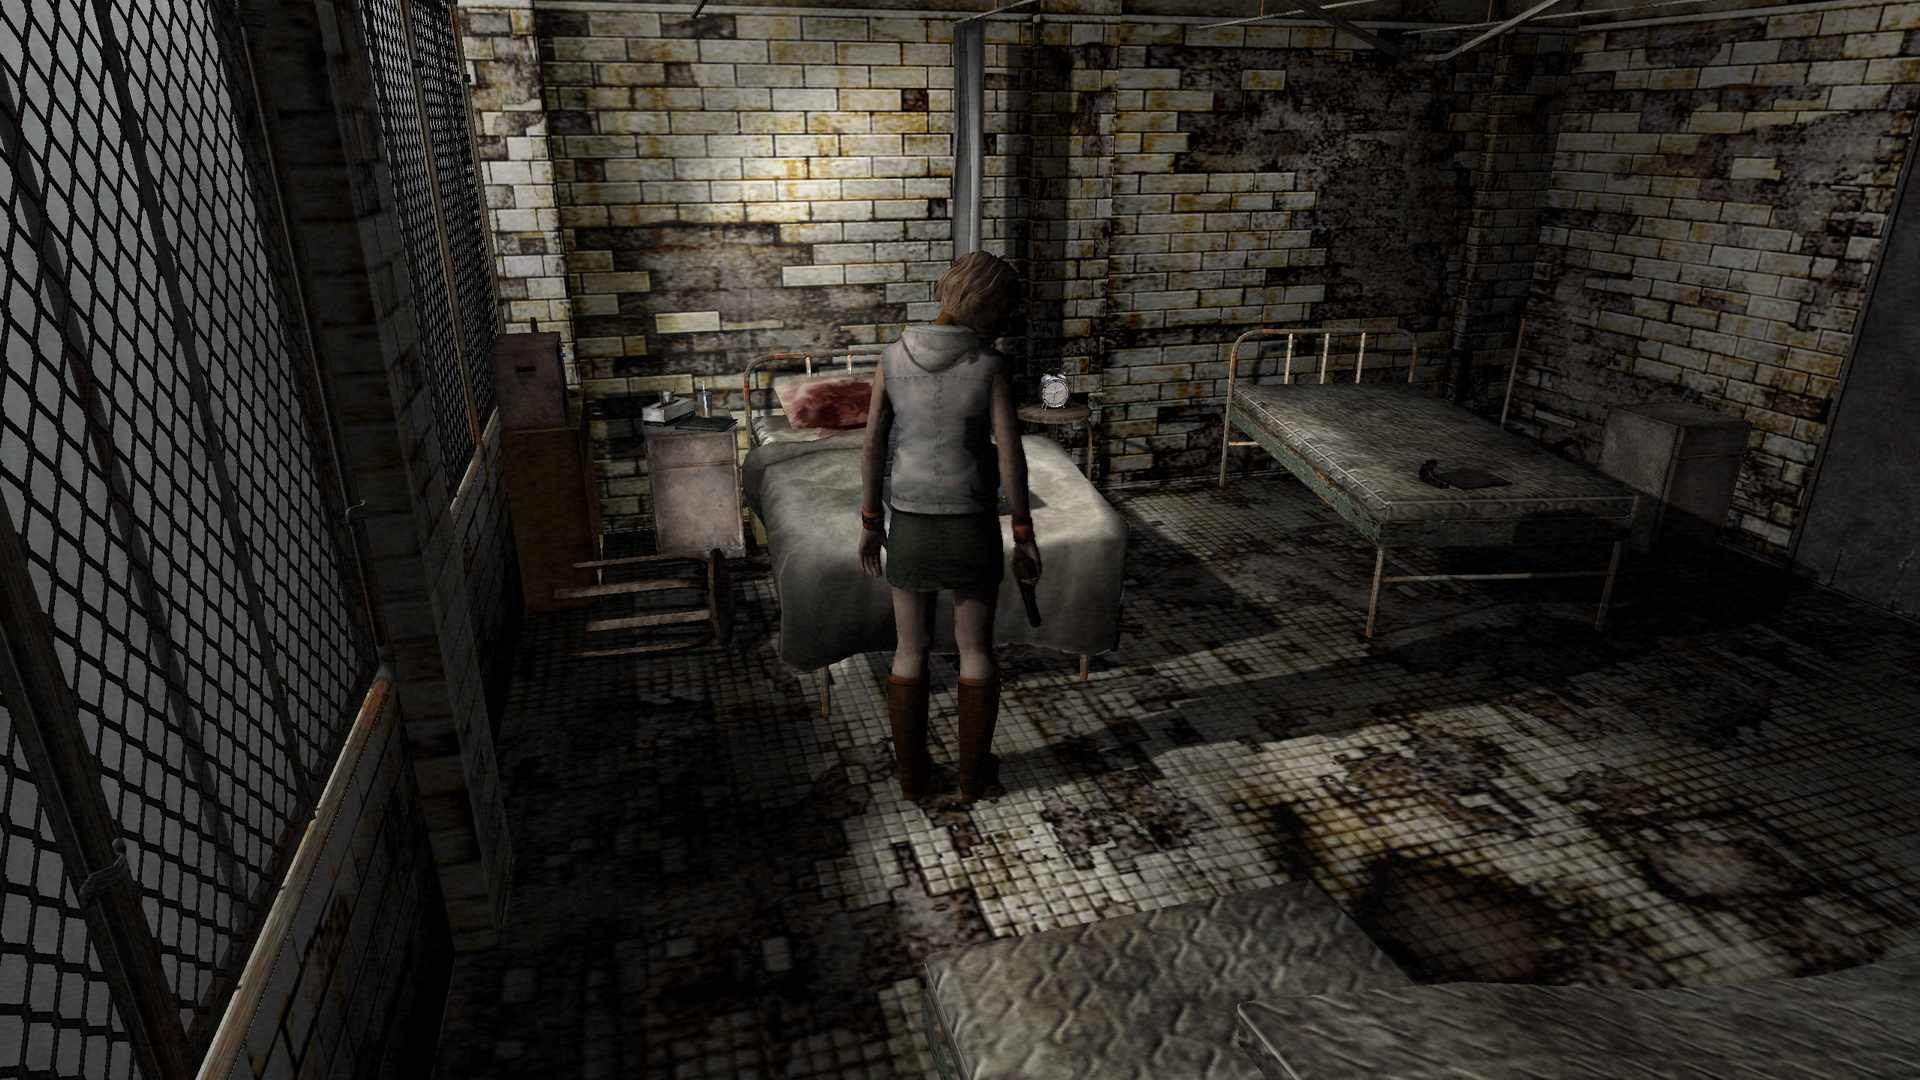
Enter room M4 and read the memo by the first bed. An alarm will sound off deeper into the room. Examine the clock on the nightstand to turn it off. It'll be set to a certain time and the briefcase is locked with a four-digit combination dial. Looks like it's now time to solve a puzzle.
Puzzle: Dead Man's Briefcase (Room M4)
|
To unlock the briefcase you'll need to uncover a code, but from where? Well, there was a corpse in Examining Room 3 with the following tattoo:
The start time is my key.
Further, the memo at the back of that room explained that the dead man's bed and effects are as he left them in room M4, this very room. Stanley's diary confirms the clock and briefcase as the dead man's as well, and Stanley even jokes about writing something on his own body for Heather. Therefore the key is the clock as the tattoo explains. How it is used differs per riddle level, with randomized solutions each time. Refer to the steps below.
Easy
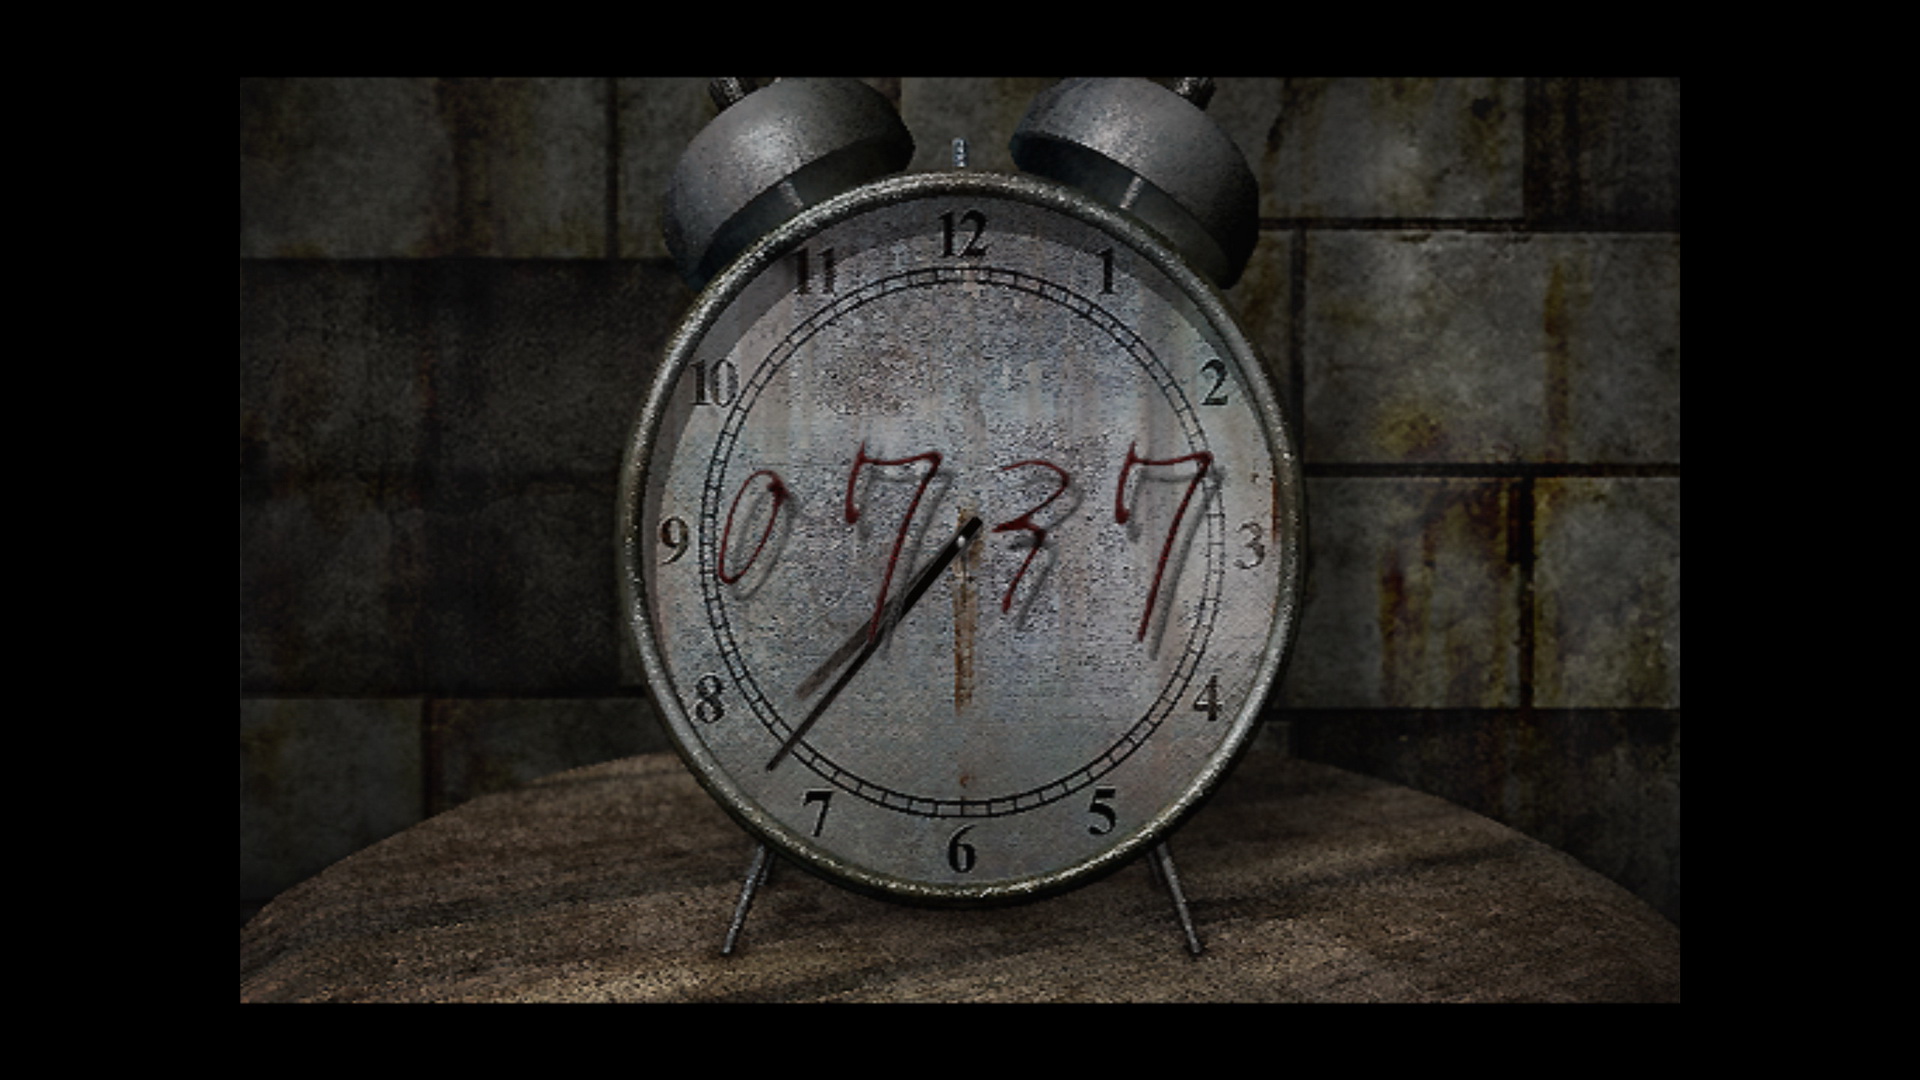
|
Here there will be a four-digit code written in red on the clock face. Enter it into the briefcase. Very simple.
Normal
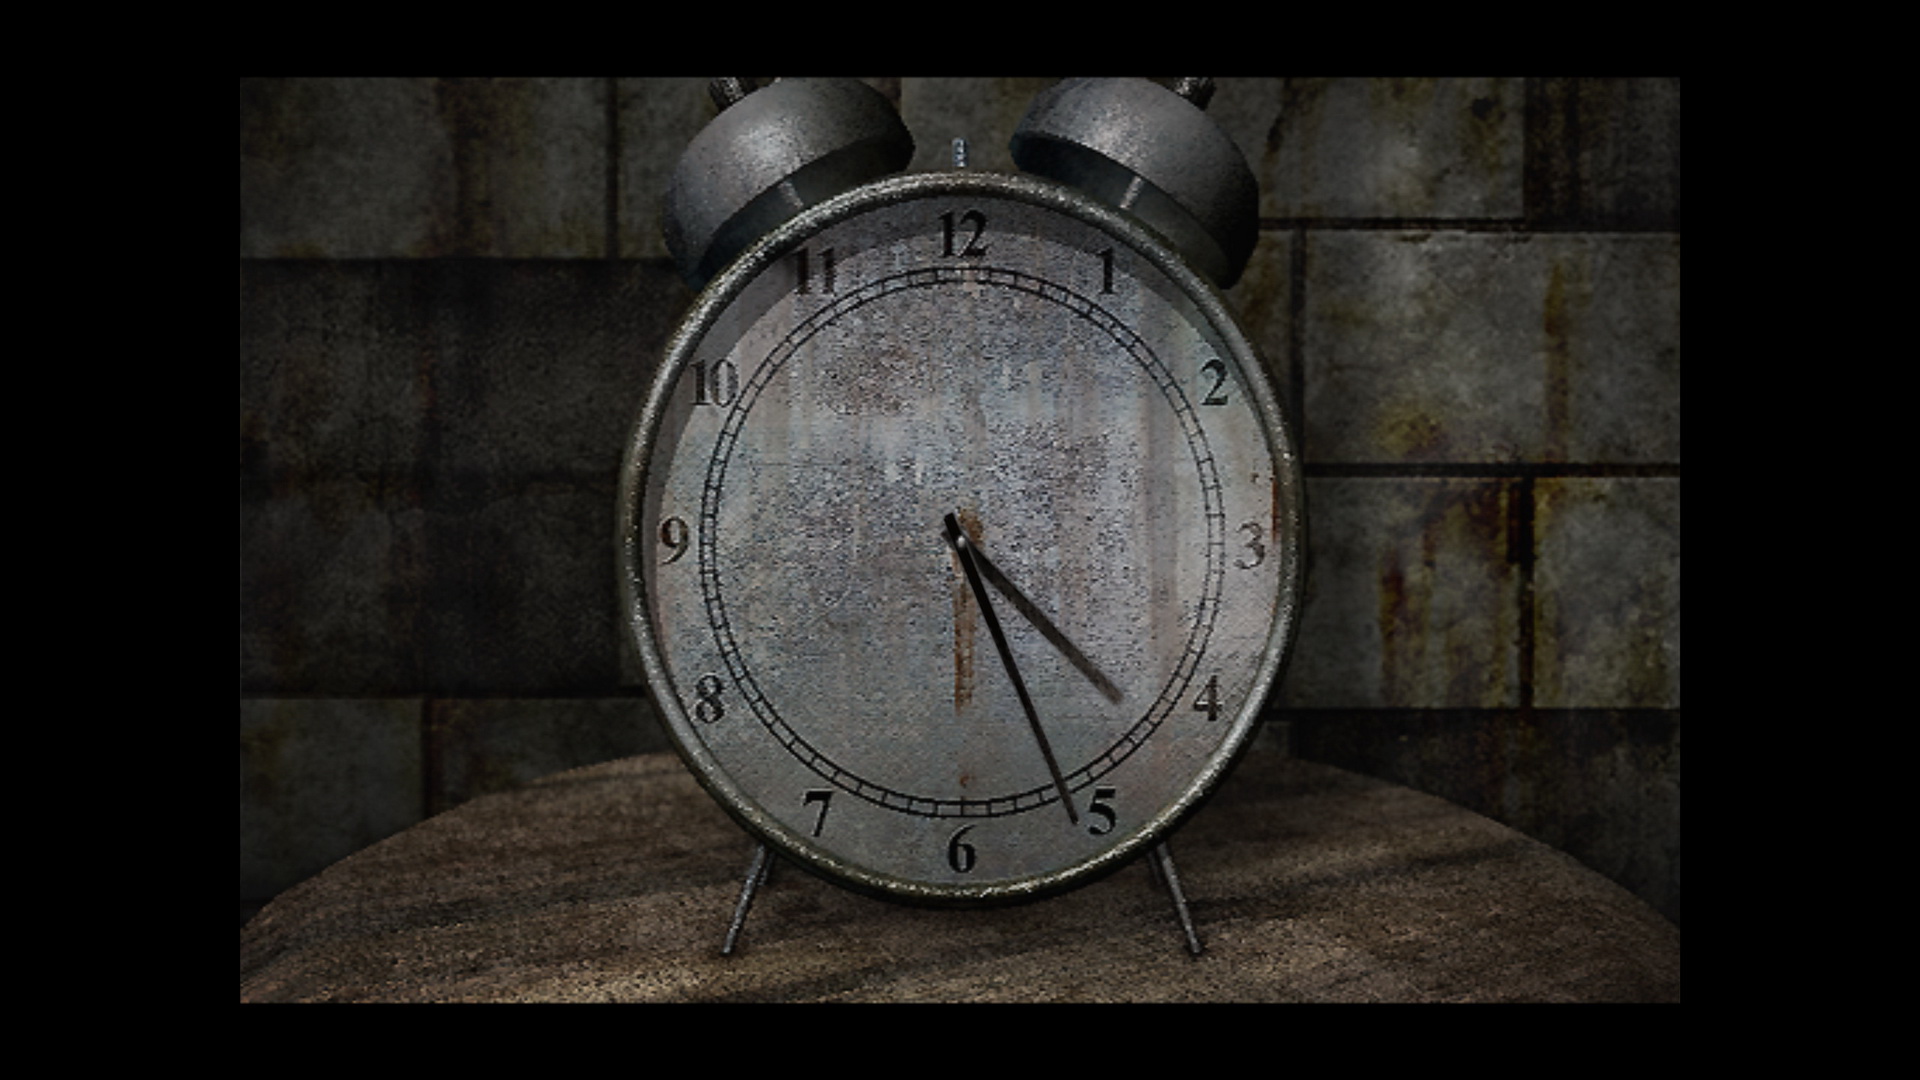
|
With no code on the clock face, it will be set to a certain time with no other clues. Therefore the time is the key. The small hour hand represents the first two digits and the longer minute hand represents the final two digits. If the hour hand is a single digit then the first number will be a zero.
So if the clock reads 5:21 then your code is 0521. If it's 11:37 then your code is 1137.
Hard
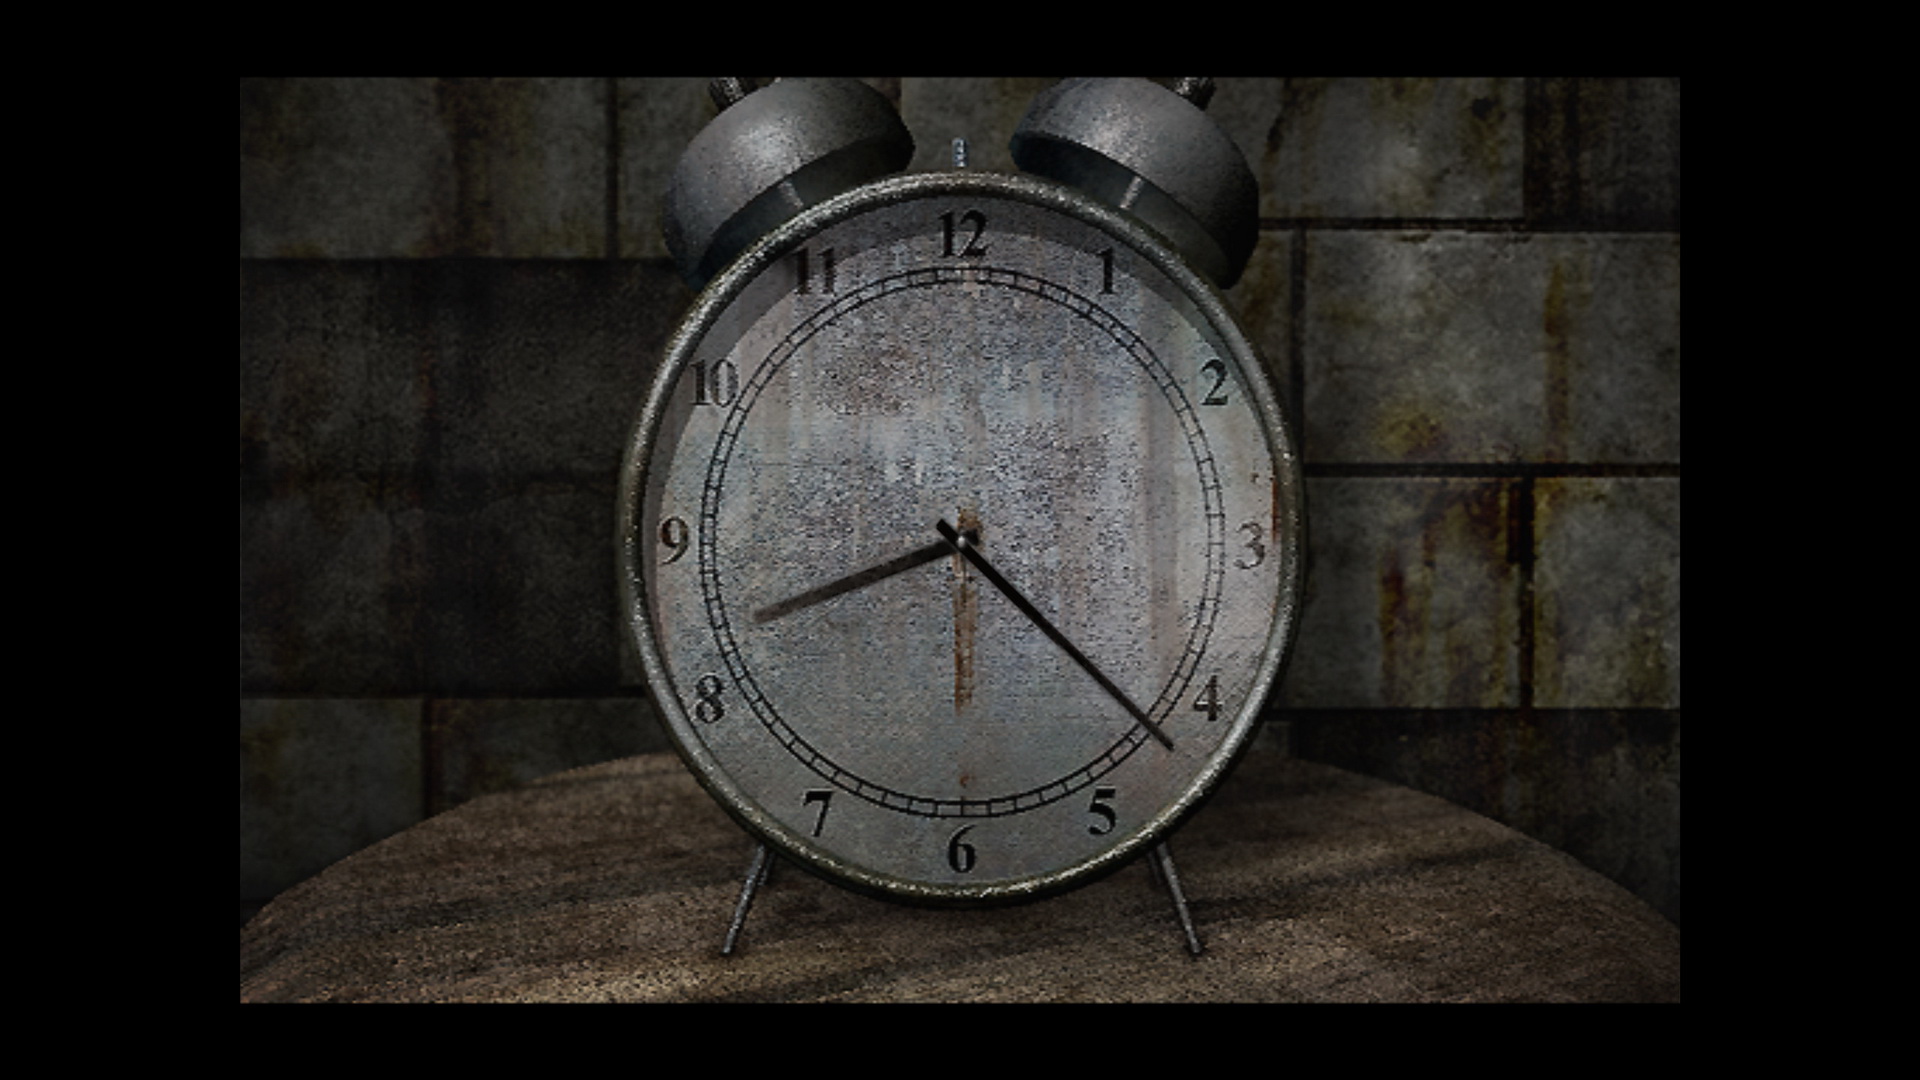
|
Just like Normal the clock will be set to a certain time, but instead of regular 12-hour time you must input the code in 24-hour time (military time). So if the clock reads 8:39 then your code is 2039. If you don't understand military time, just add 12 hours to what the clock says like so: 8:39 + 12:00 = 20:39
Note: For Normal and Hard, remember that if the minute hand is close to the end of the hour, the hour hand will be very close to the next hour but the corresponding part of the code will be the previous hour.
Input the code into the briefcase to get the 33 Instant Camera inside.
 |
 |
Exit the room, and if you're interested in fighting three Nurses for a First-Aid Kit or two you can do so in M5 next door. Head back down the hall and re-enter the employee wing, past two Nurses (one with a revolver).
Enter the elevator and head back down to 1F since 3F's button won't work, then enter the patient wing.
First Floor Patient Wing
In this hall you'll encounter two Nurses with pipes. Inside room C2 are three naughty Nurses and possibly an Ampoule if you're not swimming in health supplies, so consider if it's worth the fight.
In room C4 you'll find a memo with another doll and a bunch of items glued to the far wall. Heather notices a key amongst them. One part of the memo addresses it:
How about if I stick this
to the wall?
That would be worthless.
You can peel it off,
can't you, with that junk those
nasty wenches won't stop using?
Ah, of course. Use the Nail Polish Remover you got from the wenches' locker room on 2F to get the 34 Stairwell Key from the wall.
 |
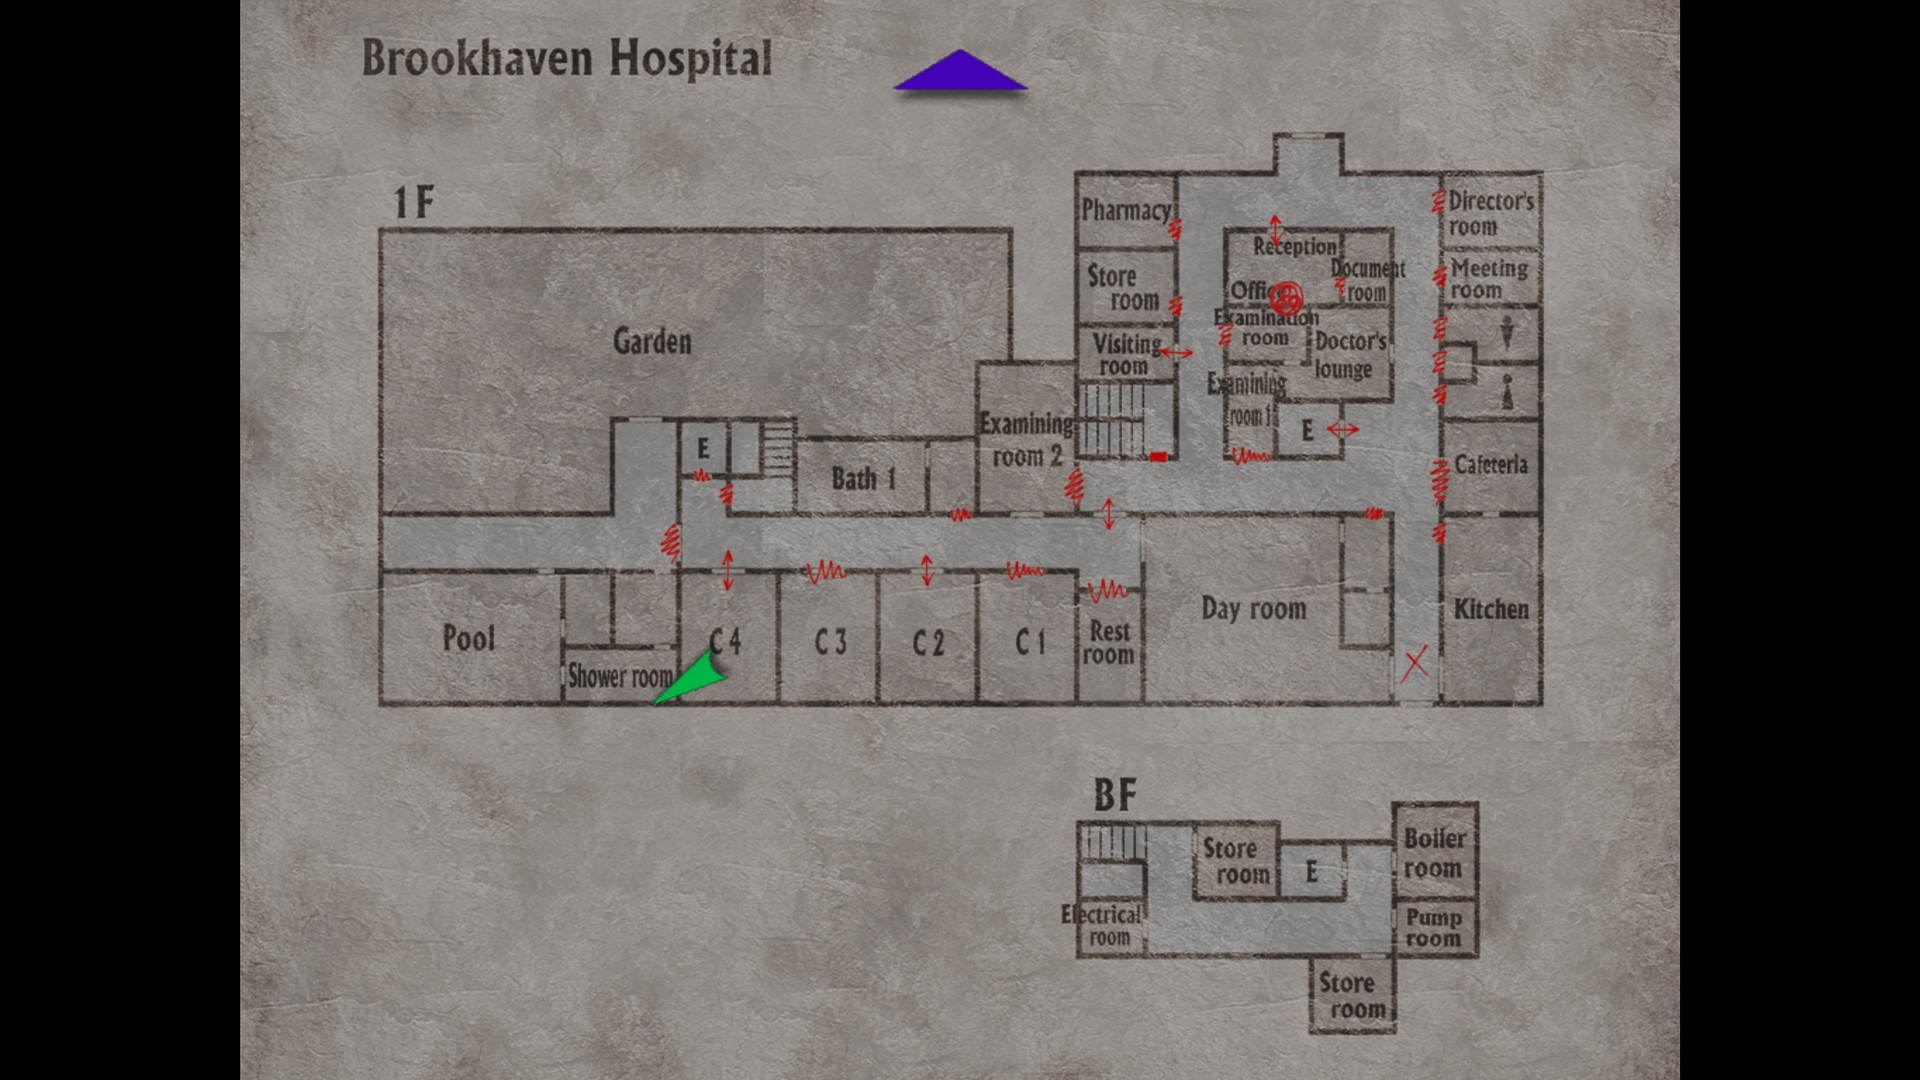 |
Return to the lobby and use the Stairwell Key to access the stairwell. Descend and enter the basement first.
Note on Stairwell Key: Using this key unlocks the stairwell door on each floor and also unlocks the 3rd floor button in the elevator, which previously didn't work.
Basement
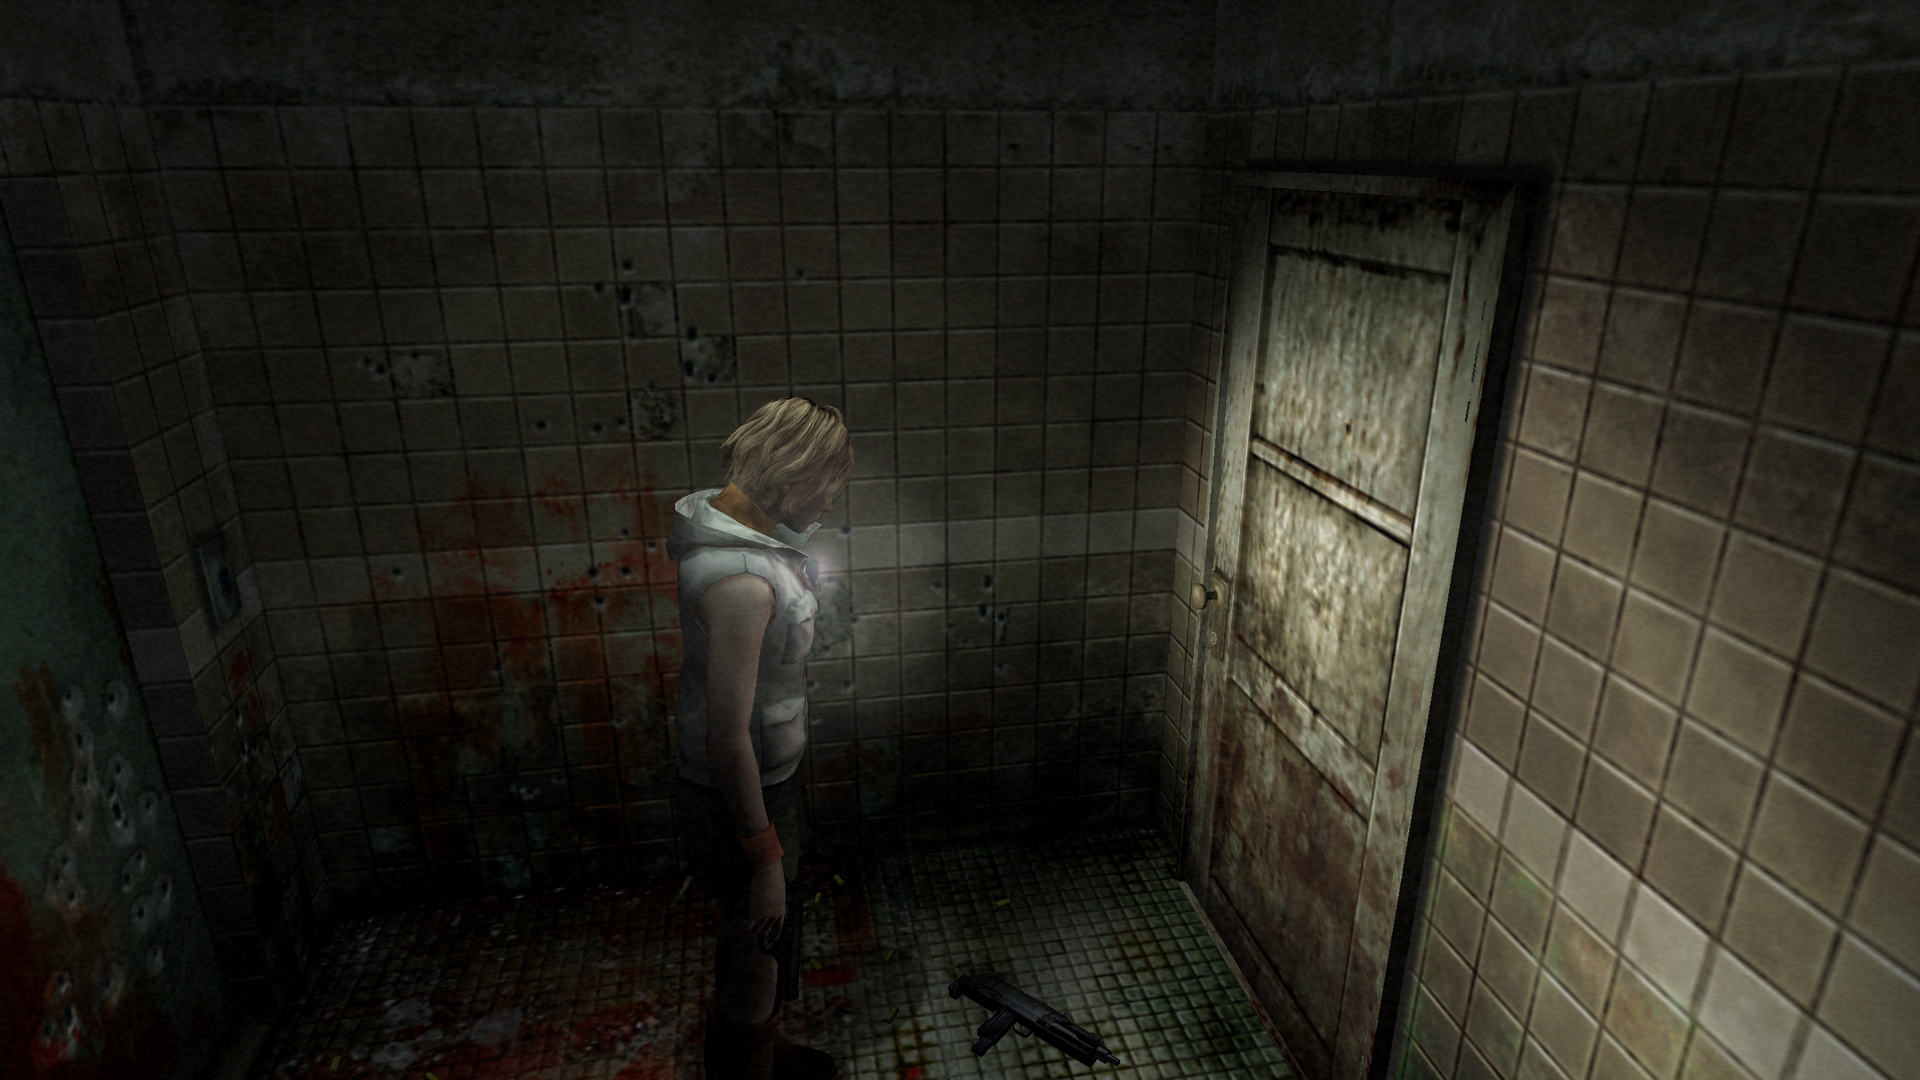
Grab the Submachine Gun Bullets on the floor and continue towards the wheelchair, a recurring theme in the game. Prepare yourself and follow the trail of blood to the end of the corridor. Grab the 35 Submachine Gun on the floor by the elevator and hope you have better luck than the previous owner.
 |
 |
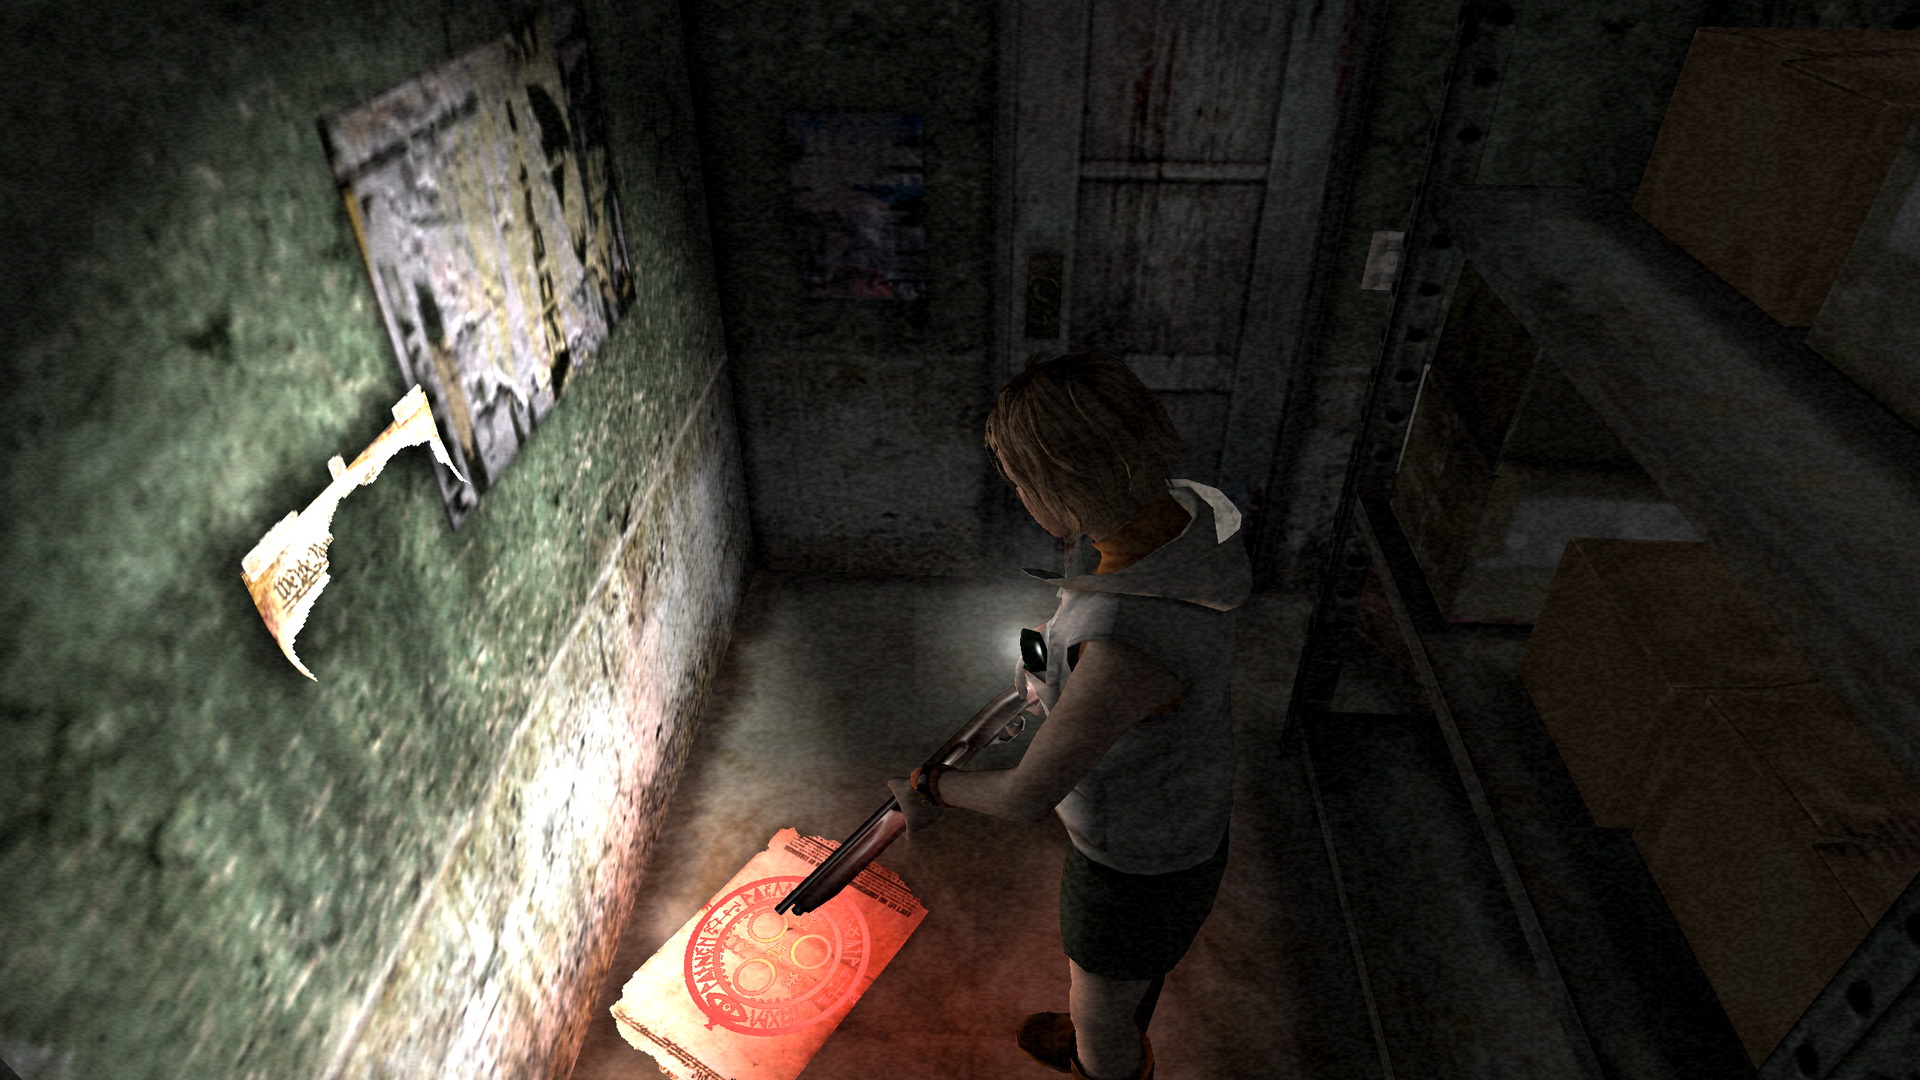
Enter the Storeroom through the nearby door. Find the blood smear by the shelf and Heather will think there could be something behind the shelf despite being unable to move it or get back there. Turning to your creative mind, use the Instant Camera to see what's back there.
 |
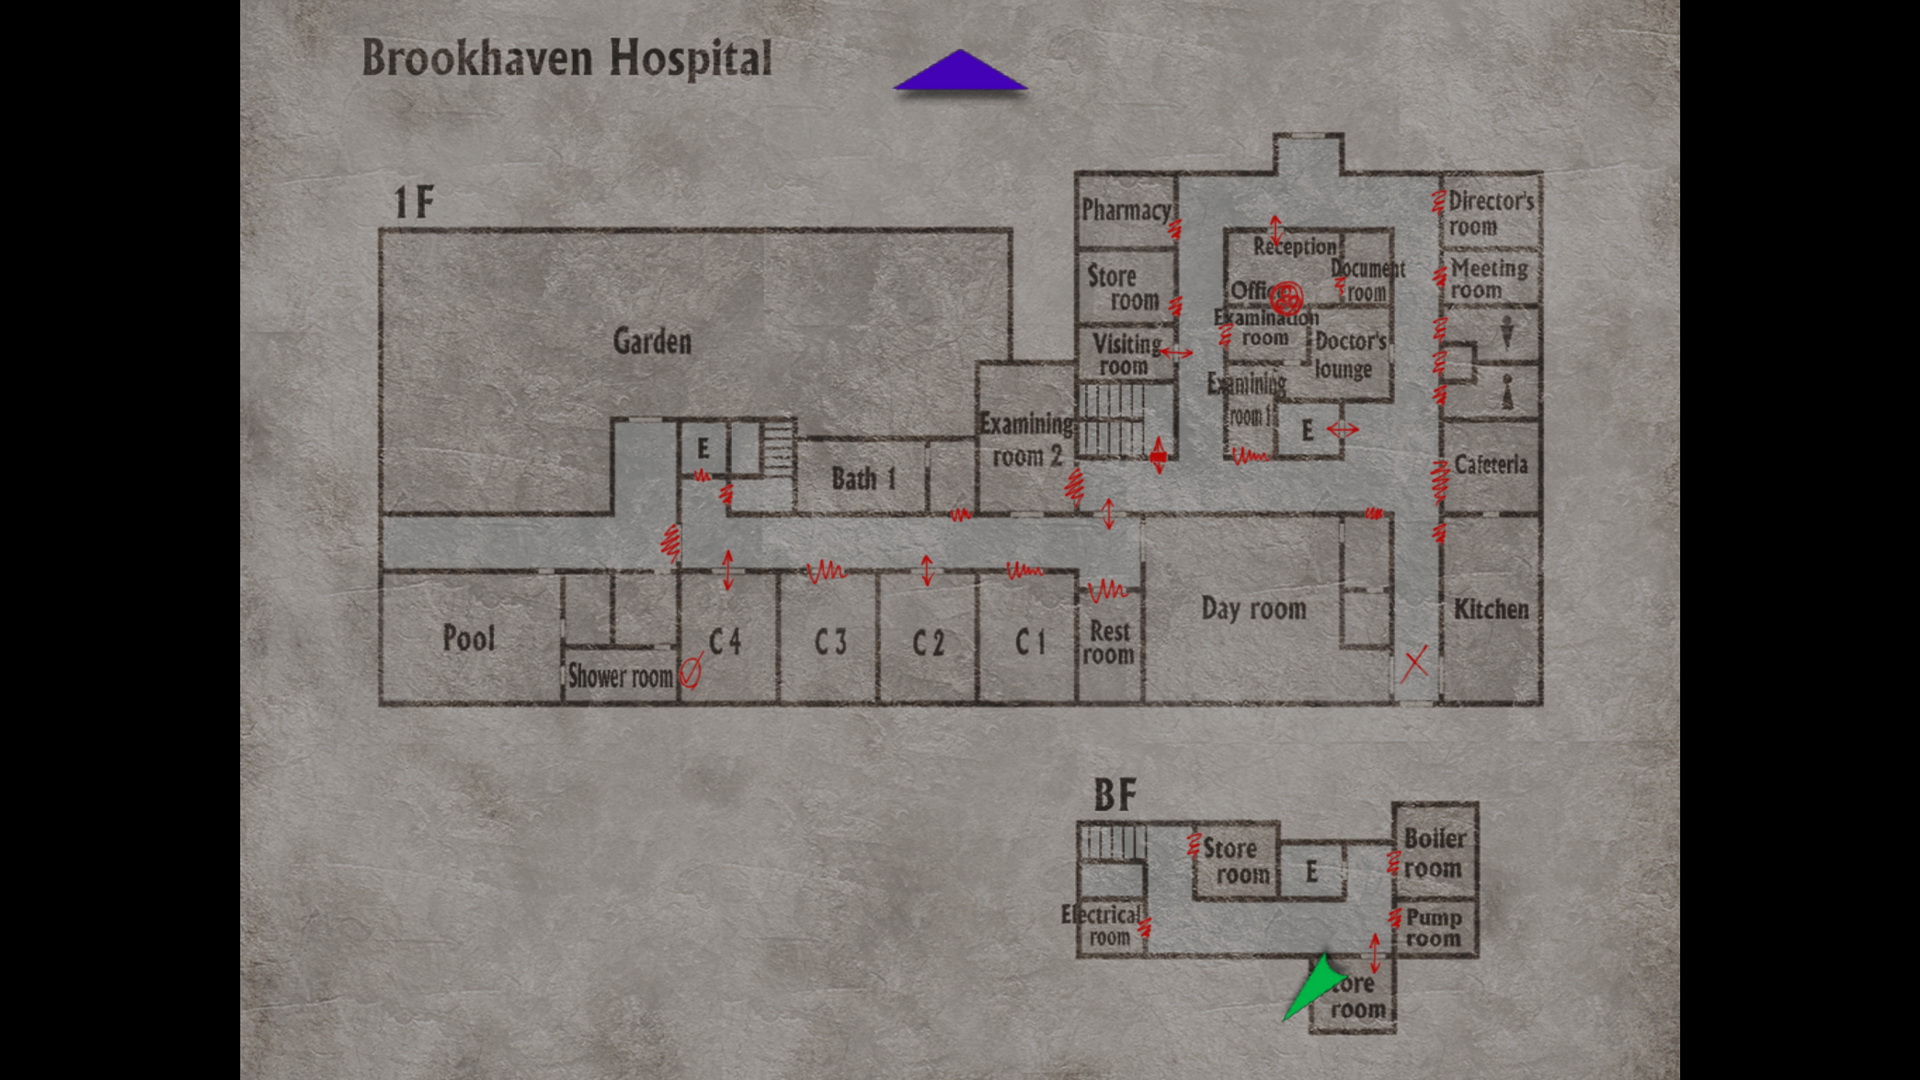 |
Heather will take an instant photo that reveals a four-digit code on the back of the shelf, which is randomized each time. Exit the room to the hall and use the stairwell to access the roof.
Rooftop
Read Stanley's message beside the door and step outside. There are two Closers out here but you can just avoid them. Find two mags of Submachine Gun Bullets on the barrel in the corner.
Silent Hill 2 Reference
 With a completed save of Silent Hill 2 on your memory card, you can experience extra scenes and references to it in this game, including one right here.
If you examine the fence by the Elevator Control Room that James got knocked through, Heather will comment that it doesn't look like it's about to break and fall. Just a minor but mildly interesting reference.
Use the stairwell to access the third floor when finished.
Third Floor Employee Wing
Enter the Special Treatment Room where you'll find a brief note on the wall about a nurse who got locked up in here. Feel free to unlock the second door and say hi to her inside. In the farthest padded cell is another Stanley memo.
Inside the Storeroom next door you'll find a Save Point on the floor, a Stun Gun Battery and two Health Drinks on the shelf, plus another Stanley memo on the shelf beside it (this entry may not appear if viewed out of order).
 |
 |
It tells you that the code you got from behind the shelf in the basement ("underground garage"; perhaps a translation error for the basement storeroom) unlocks the nearby patient wing doors.
Thank Stan for the tip and enter the polaroid code into the keypad to access the 3F patient wing (check the Memos section of your inventory to reference the photo again).
Third Floor Patient Wing
Inside room S1 are two Health Drinks on the nightstand along with a long memo about a Hope House, which will become more relevant in Silent Hill 4 under the name Wish House. Grab the Beef Jerky on the bench by the Bath 3 room in the hall and then enter S7 for a sad conclusion to Stanley's diaries. Well, not for Heather. You may remember from the patient memo on 1F that this is Stanley's room. Leonard's is S12 just down the hall.
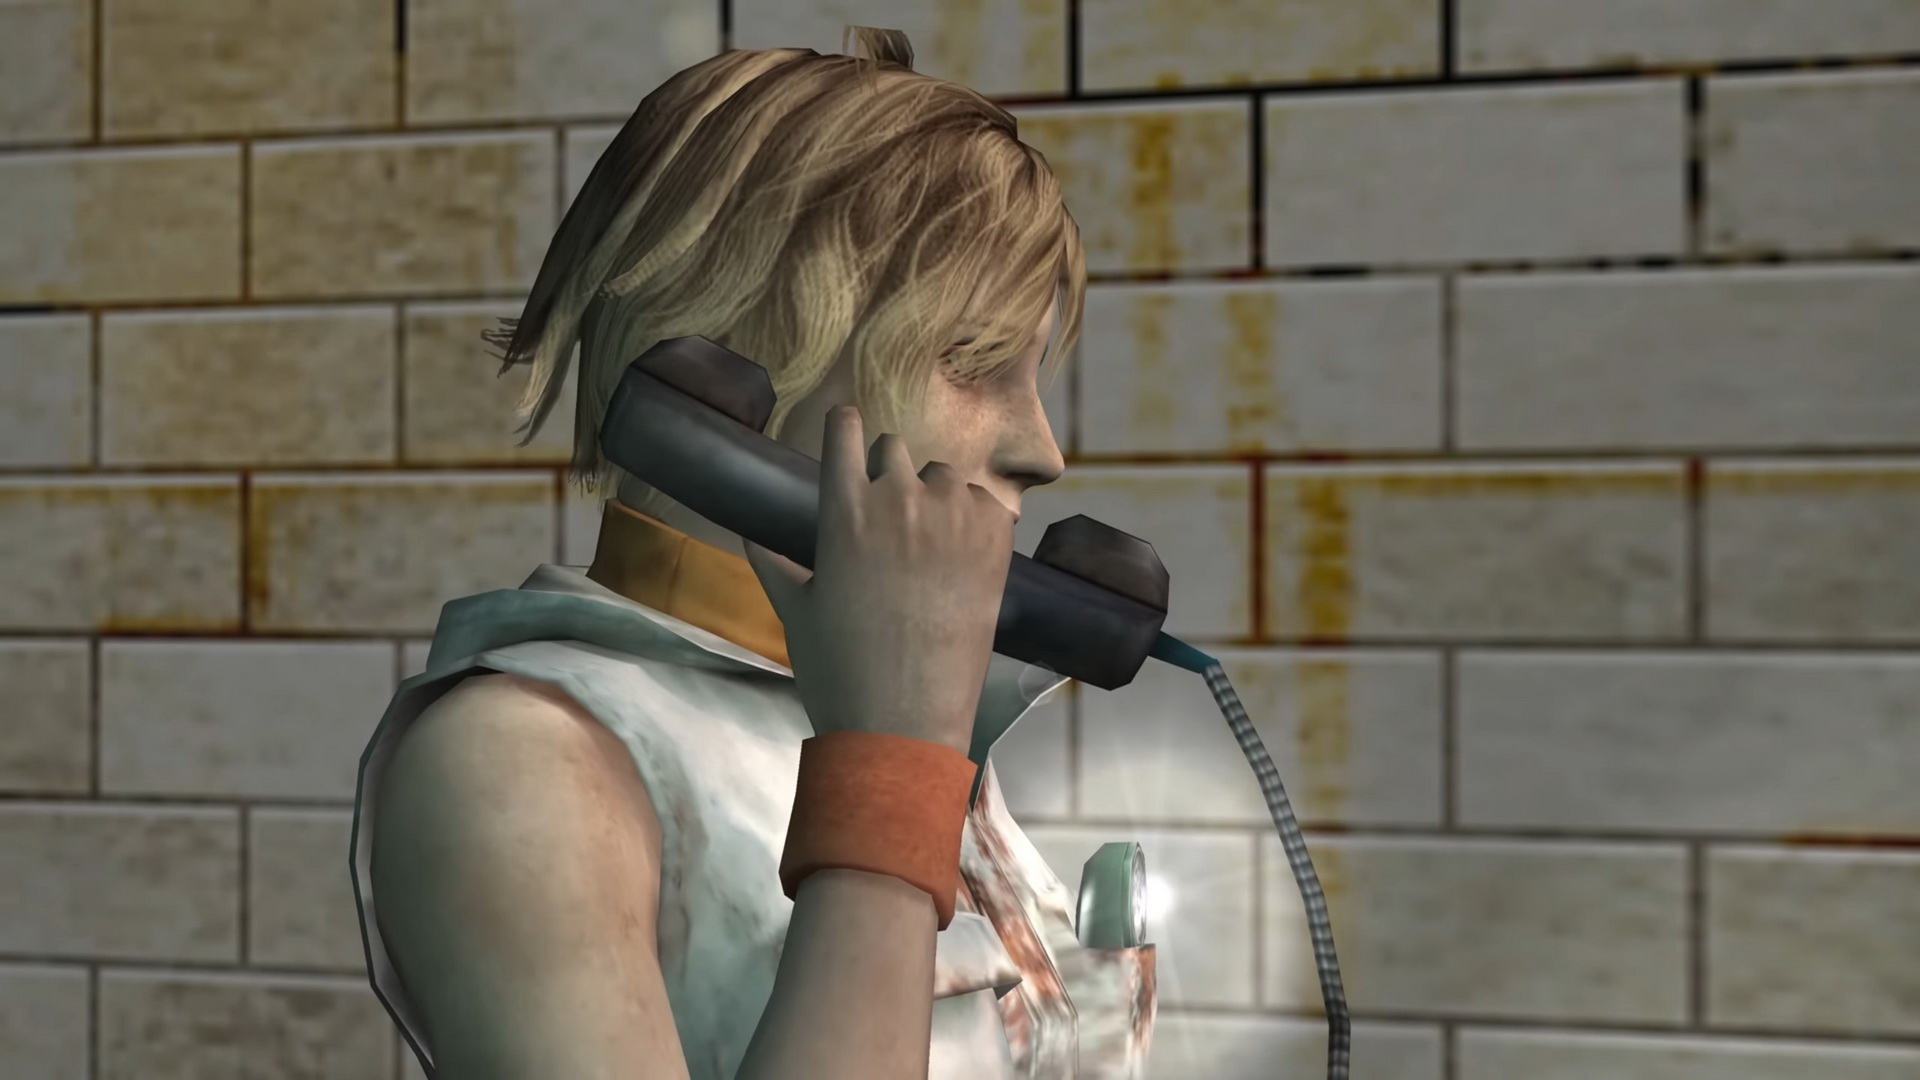
Three Nurses will appear upon leaving S7 or just running past it, including one with a revolver. Handle them or just run and enter S12. In here, answer the ringing phone for a conversation with Leonard who wants you to find him. He claims he's at the end of the second floor hallway, while we didn't find him earlier. Head down to the second floor and enter the patient wing to see what he's talking about.
Second Floor: Finding Leonard
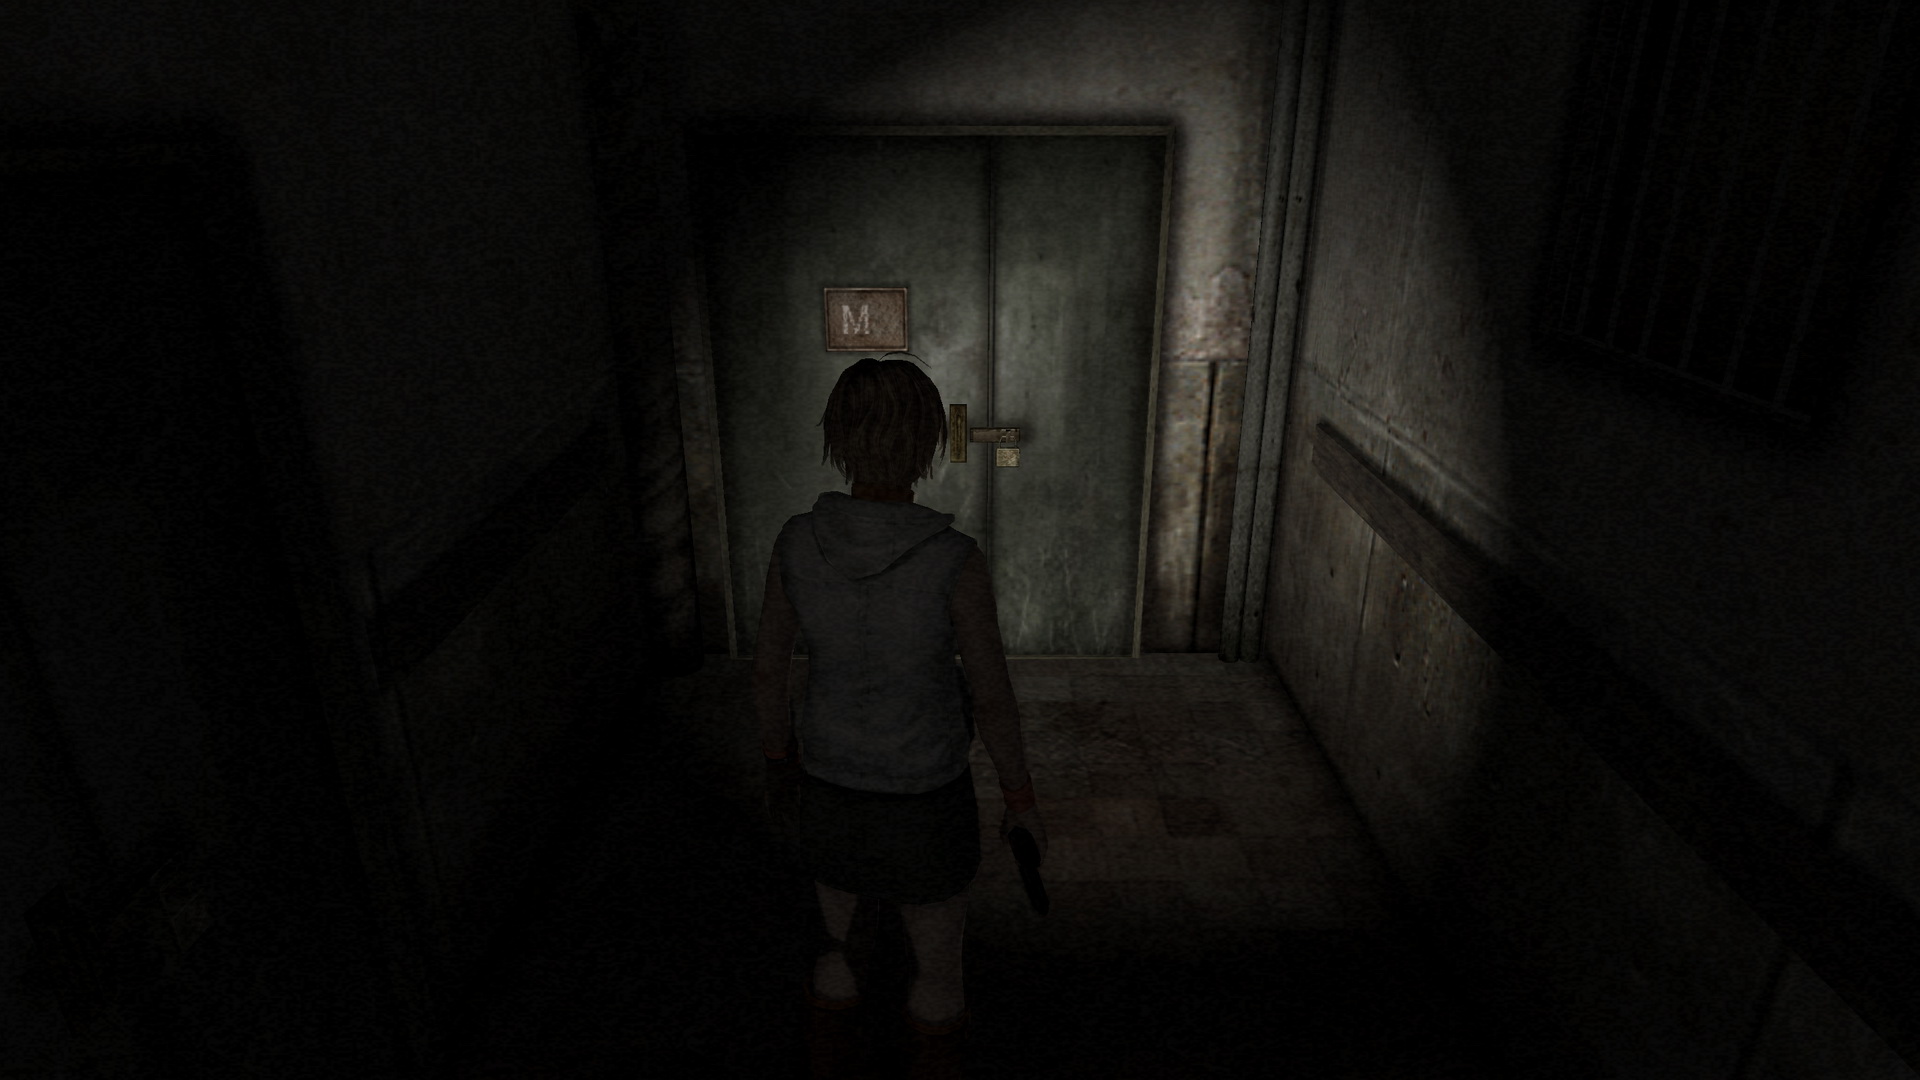
At the end of the patient wing you'll find a new, mysterious door labelled "M" with no number... Getting any flashbacks of Alchemilla Hospital's mysterious 4th floor?
Brace yourself and enter a secret path for which you have no map. Just follow the path as gates open and close around you. In some cases a gate won't open, leading you another way where a gate will close, which then opens up a previous gate. Make your way through the maze path and through the door at the end.
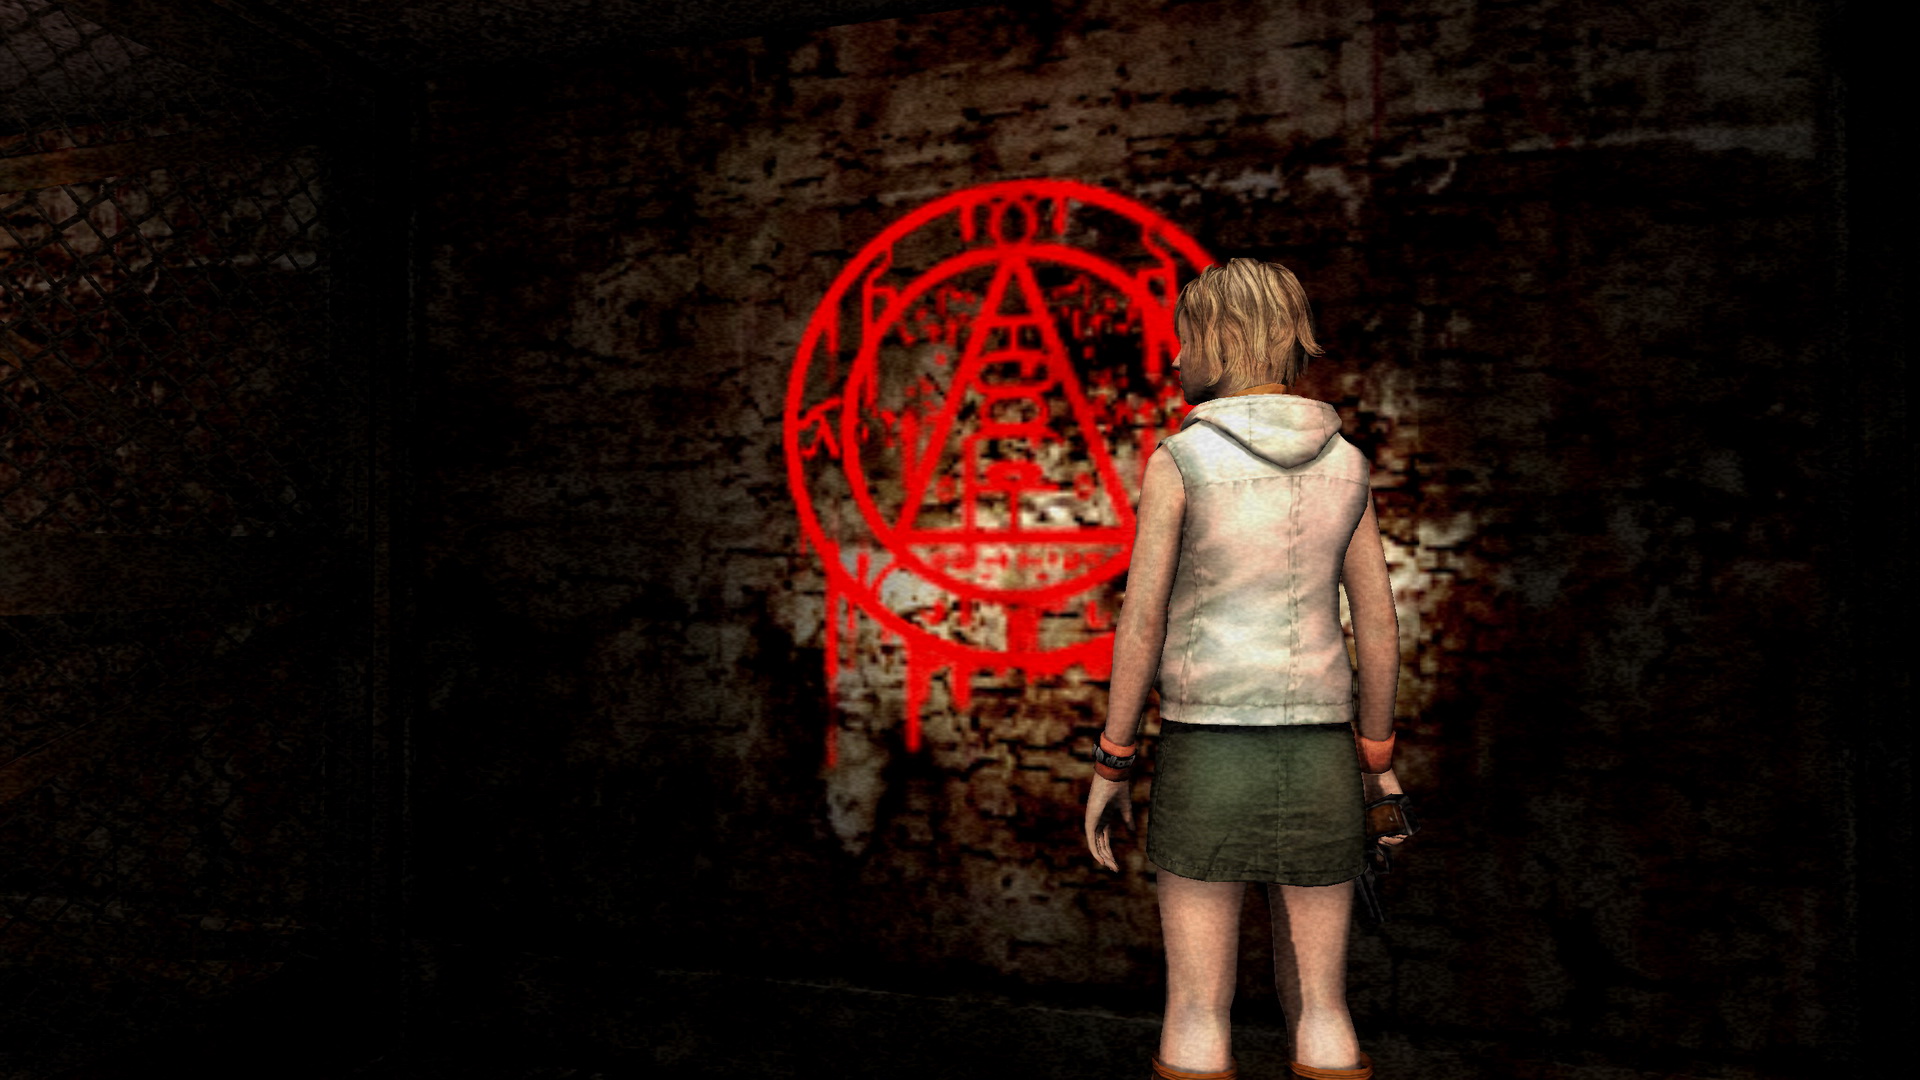
Proceed through the second corridor just the same and inside the third you'll eventually reach a path where six gate doors will close behind you as one blocks you from the front. Examine the red symbol on the wall which isn't a save point but what was referred to as the "Mark of Samael" in the first Silent Hill. Examine it for a brief flashback of Lisa from that game, then proceed through the door down the newly-appearing hallway.
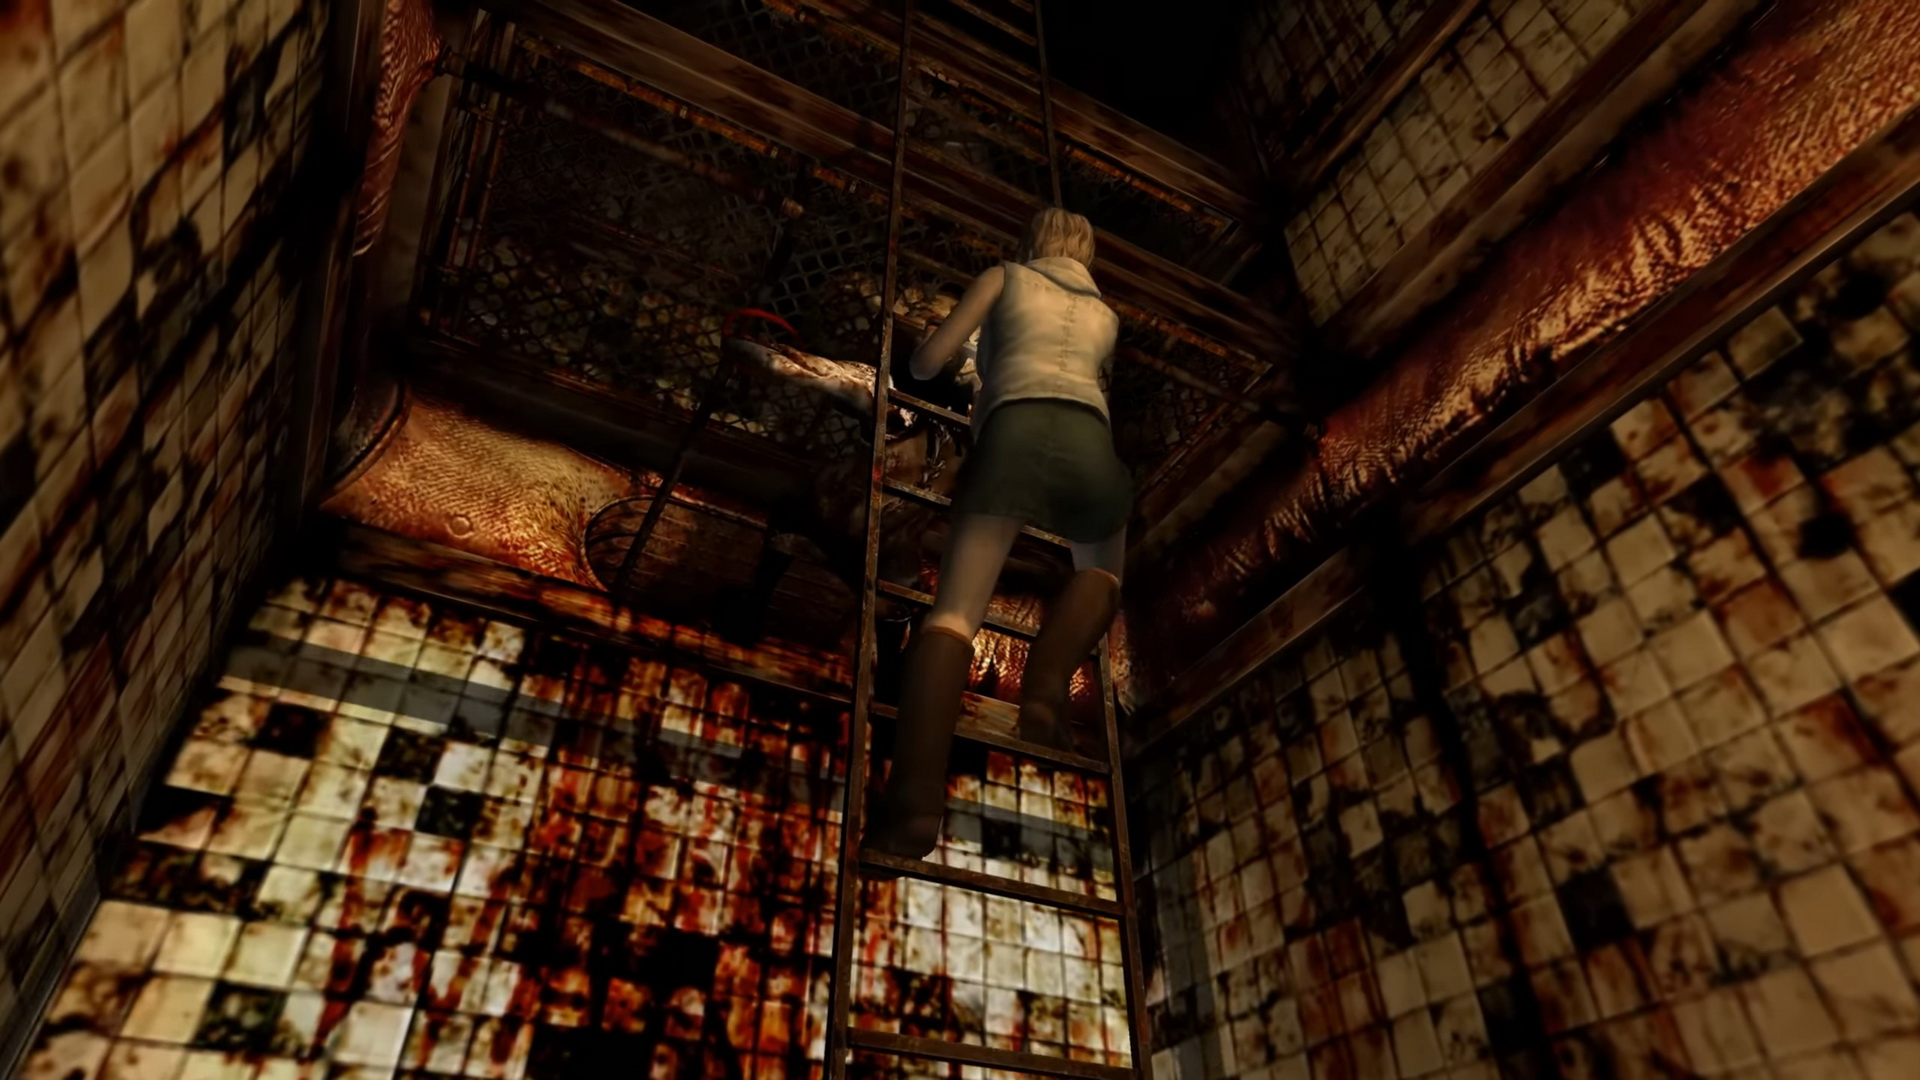
Transition to the Other Side
Climb up on the ladder and grip yourself as you ascend through the nightmare realm, passing a creature named Valtiel and a tied up nurse on the way. Head through the door at the top to start one hell of a visual and horrifying journey.
| 10. Silent Hill | 12. Nightmare Hospital |