10-Star Ranking Guide
This section uncovers the ranking system of Silent Hill, while dedicated to doing everything you can to achieve a perfect 10/10 score. |
01. Ranking OverviewBelow is an overview of every stat that will appear in your ranking screen at the end of the game.
What is your reward for doing so? Beyond the reward of the highest achievement in the game, you will unlock the most powerful weapon available. Read more in the Hyper Blaster Upgrades sub section below. See below for the breakdown of where you stars will come from, specifically the max you can achieve for each category. Note that 10 small stars equal one large star.
|
02. RequirementsBelow is an overview of every stat that will appear in your ranking screen at the end of the game.
To clarify, there is no firm requirement for fighting and shooting kills individually but instead it boils down to a convoluted formula that assesses them both together. I'll explain the full formula under the Defeating Enemies section below, but you require at least 200 total kills to achieve max stars for this category. Kills in whichever category you have more of count less and less the more you have them, and so a relatively even distribution is necessary, or you'll instead have to compensate with proportionally more of one to make up for the lack of another. Instead, 100 and 100 is the simplest and easiest way to achieve your 200 kills and should be your target. Note that since shooting and fighting kills are judged together, either both or neither will be highlighted. Perhaps an even more obtuse category is shooting style, which again comes down to a silly formula that I'll cover in that category below. But essentially short, middle and long shots are all increasingly valuable while no aiming (missed) shots are worth the most but have a negative value, capable of ruining your shooting style on its own. Ultimately it mostly comes down to limiting no aiming shots to about 0.12 or 0.13 or below as the most important variable. In a random run you may overshoot this, but if you're mindful of your shots it's pretty simple to stay in the safe range of 0.05-0.10. No points are awarded for your difficulty, although 5 are taken away for using Easy. But it's impossible to achieve 10 stars on Normal since you require 5 game clears and Next Fear accelerates your difficulty to Hard after one or two clears. Also note that Silent Hill's game timer does not ever stop, even when the game is paused. So make sure the game has your undivided attention the whole way through, cause there's really not much margin for error. There is also sometimes a glitch that displays your extra item number as +13 or +14 rather than the +5 or +6 you collected, but either way it will not affect your ranking in any way. Note that there is no requirement for damage like there is in the later games, so all you need to do on that front is to survive and not run out of supplies. To make up for it however, you'll have a very small buffer to beat the game in under 90 minutes while killing 200 enemies, landing about 90% of your shots and making sure you don't miss too many items to hit 150, which is no automatic if you just rush through. But ultimately the most difficult thing I'd say is doing everything in the allotted time. MY STATS:
These are my personal stats for my first 10-star ranking, achieved on my second attempt. My first attempt went smoothly and I felt I was quick but I ended up going over for time by 1m17s, giving me a 9.5 ranking while every other stat was maxed. In hindsight, I spent too much time killing more enemies and collecting 20 more items than needed, which I cleaned up a fair bit on the above attempt although still pushed a bit high in items due to not wanting to take the risk while not actually counting. I can't stress how important it is to not waste too much time fighting enemies in trickier areas since there's more than enough throughout the game and time is really marginal. Consider skipping through occasional rooms with multiple enemies that may be difficult or time consuming to handle. Both these runs were preceded by a practice run while getting the final ending (Bad) in that save file (it was well past my 7th clear overall). That ranking ultimately was an 8.4 while already ineligible for 10 stars with the Bad ending, but I also used 3 continues due to sloppy play, went over by 6+ minutes and collected just 142 items to my surprise, while entirely skipping the Kaufmann quest to be fair (to get the needed Bad ending in my file) and also fighting Cybil. But it certainly alerted me that it was a bit more difficult than I'd thought. I can't recommend enough doing at least one or even multiple practice runs like this before officially going for 10 stars since it is no simple feat and requires total optimization of your route and strategies through the game. Save before the most difficult spots, including boss fights to try to limit your time (and damage taken if it's an issue for you). And do try to aim for 100+ kills in each category, 150 items and focus on limiting your missed shots and total time to get you in the groove for when it comes time to do it for real. |
03. Difficulty ModeNo stars are awarded here (while 5 will be lost for using Easy), but due to the way Next Fear works, it's only possible to achieve a perfect ranking on Hard. This is because you need at least 5 game clears, which can only be done by using the Next Fear function, which ups your difficulty after each completion until the max of Hard. So even if your first run is Easy, your second will be Normal and third will be Hard, with every run after that Hard. Therefore you must play a Next Fear on Hard to have any shot of 10 stars. |
04. Game ClearThe requirement for game clears is 5, meaning you must have at least 4 before attempting a 10-star run. Every additional run after your first must be made with the Next Fear function in your save file to keep adding the clears together. |
05. EndingThe Good+ ending provides the full 10 small stars for this category, while other endings do not. Therefore it is the only ending you can achieve a 10-star ranking with. To achieve the Good+ ending, you must perform both optional side quests in full. That includes: Quest 1: Finding the Vial (Good ending)
Quest 2: Saving Cybil (+ ending)
Note that you can skip Indian Runner during the Kaufmann quest since there are no needed items inside, although there are three items there to add to your total, if you have a time buffer and would like them. Also be sure to pick up all items in the rooms you're forced to explore to add to your tally, including the two Health Drinks in Annie's Bar, Health Drink in motel room 3, plus the Health Drink and Shotgun Shells in the motel office garage. Same thing for the Health Drink in the hospital Kitchen when getting the Plastic Bottle. |
06. SavesYou are allowed a maximum of 2 saves during your entire run to get the full points from this category. The most ideal locations to save would be the following:
These are the only two specific locations that pose some level of concentrated difficulty, making them ideal more or less by default. Right before the Split Head is a perfect first location for a couple reasons. First, if your timing is off or the Split Head bumps you while trying to shoot its mouth, it can insta-kill you and ruin your entire run (although you can use one continue and reset from the start of Nightmare School). Additionally, the school is a tricky segment to get through with a lot of Grey Children that are easy to miss shots with or maybe even eat away lots of your health. So if you've done well in limiting no aim shots while also being quick for time, it's a great spot to lock your stats in. Alessa's bedroom is a good final spot because the final boss is capable of killing you rather easily if you're not on top of your health, or if you don't have enough to last several lightning strikes which are insanely difficult to avoid on Hard. That said, the final boss is fairly trivial if you do have enough health to just eat any potential attack and are responsible with your heals, even while just standing there trying to end it as quickly as possible. If that is your plan, which is totally a viable (and quicker) method, then by all means consider saving elsewhere. Just make sure you always heal asap during that battle to avoid death. No one spot particularly stands out instead, but feel free to choose an area where you're not too confident about your speed, amount of enemies killed or damage taken (if you're marginal), or even a location that allows you to redo a whole section or more. Perhaps just before the Floatstinger boss, the end of the first sewers, in the boat cabin or the beginning of Nowhere are decent candidates. But otherwise if no one other area stands out, I'd suggest just sticking with this one and playing it safe. You may be surprised how easy it is to be caught off guard and killed in the final boss fight simply by not healing at the right time. Saving right before avoids a stupid mistake like this costing you anything. |
07. ContinuesSurprisingly you are allowed one continue to still obtain the maximum stars for this category. Obviously you should aim for zero simply to not interrupt your run and it always looks better on the ranking screen, but if you do make a mistake, perhaps on the Split Head which is totally possible, you can just use a Continue and start from the beginning of the most recent area you started instead of resetting if you'd like. Note that your play time also resets to what it was when you started that area, so it won't be counted twice and push you over. But again, try your best to aim for zero to keep your run as clean as possible, and so you don't lose track of your kill count if on top of it. Always smartly manage your status and heal when your controller is vibrating. Heal whenever you're in your inventory to use certain items or change weapons to save time, but take action otherwise if you're hurting. It's very easy to get ambushed and die in locations like the school for example. If you ever sense you're just about to die and get grabbed or hit, immediately enter your inventory and heal, even during an attack grapple. It could very well save your life. |
08. Total TimeUnlike later games in the series, this one is pretty tight with a limit of 1h30m for the max points. 1h30m on its own isn't too bad, but while killing 200+ enemies, limiting missed shots and collecting 150 items, it's really marginal. Therefore it's super important to optimize your run by deciding in which spots are not worth killing time-consuming enemies or collecting items just a bit too far out of the way. To make things worse, the timer in this game does not ever stop, including when in your inventory, watching cutscenes, and even when the game is paused with the Start button. There's simply no way to stop it, although it doesn't include loading times and will ultimately be about 30 minutes shorter than a real time clock. That means a successful 1h20m-1h30m run will take you about 1h50m to 2 hours of real time. Always skip every skippable scene and avoid leaving the game idle for any length or it will add up. Yes, that includes getting a washroom break in before starting if we're to cover all bases. Beyond that you do not want any interruptions whatsoever. This game's 10-star run is a total marathon that requires your undivided attention from start to finish for about 2 hours, so do not leave any box unchecked. Note that the nonstop timer also makes regular tallying with a notepad impractical since all those mere seconds will add up very quickly. Instead consider using a laptop with a notepad application that you can edit very quickly, either during door transitions or while running straight down empty hallways. Use your free hand as you move Harry with the other, without losing any time. So how do you limit your time to under 90 minutes while performing the rest of the tasks? First you will need a very good understanding of the game and where to go at all times. Any time spent reading a walkthrough you likely cannot afford, while quick reference maps are probably the best solution if there's a few things you need a reminder for. Doing some practice runs is pretty well mandatory for maximizing your efficiency, as even if you know exactly where to go you can still go over due to too much time lost fighting and collecting items. Also I can't really stress enough how important it is to not kill too many enemies or collect too many items. On my first real run I went over by 1m17s, with 170 items and 110 and 116 kills. I wasn't counting items so I didn't know I was so high above, otherwise I could've skipped several items towards the end and reached the time, or killed less enemies even though my personal kill counts were off by about 5 each. If counting, I suggest to stop going for fighting kills once you reach 101 or 102 as a small margin for error (rather than 105-110+), keeping in mind you're more likely to forget to add a kill than to mistakenly count extra kills. Keep in mind bosses also count as shooting kills (assuming you're using the default strategies) and just as well to stop once you hit 101 or 102. There were a few cases where I didn't count enemies like Night Flutters I shot down but didn't see land and didn't know for sure if they died. You'll probably have a few cases like this to give you a bit of a buffer either way. And while you may already have both counts achieved before the end, it may be more practical to kill certain enemies to clear out halls and avoid more lost time and damage. This is also why it may help to slow down your kill count so you achieve it during Nowhere rather than before, but only if you know there's enough enemies left to achieve it there. Better to leave it to no more than 10-15 kills needed there to play it safe. Don't worry though, I achieved my counts before Nowhere and I did fine. I just decided to kill only the enemies in my way from then on, particularly the Stalkers and only some of them. Consider skipping items that are too far out of the way, or avoid entering a room just for one unneeded item unless it's just a matter of a few extra seconds. Do make sure you get all or most of the Rifle ammo you can find since it's absolute gold after acquiring the gun around halfway. x6 bullet adjust should allow you to use it the rest of the way. Refer to the Walkthrough section below for all Rifle shell locations. Also note that there is a glitch in the amusement park where you can use the Unknown Liquid on the first Larval Stalker that appears after climbing out of the sewers if you do it quickly. That way you can skip about a minute that it takes to reach Cybil. Otherwise, consider looking at some maps or my walkthrough and seeing which items are worth getting and which ones aren't in terms of time. Feel free to map out a general plan or at least visualize what's best. I personally didn't count my items in my document alongside my kills, but that's always an option too, even if it may complicate things further. |
09. ItemsRegular Items Therefore it takes some hard thinking and application to hit the 150 threshold without wasting too much time, in addition to fighting enemies. Rooms that contain both enemies and items are great since you're adding to both counters at the same time. If you have to go too far out of the way and there are no enemies to kill either, perhaps it may not be ideal to go collect these items. Also be sure to take advantage of locations where 3 or more items are located, even if it's inside a room or area you normally wouldn't access or think of. Some locations include:
The Convenience Store is somewhat out of the way and you can skip one extra item so it's not compulsory, but the four other items makes it a solid trip. And don't forget the vending machine by the elevator in Nightmare Hospital -- it gives no visual clue but contains 3 Health Drinks if you check it, while directly on your route anyway. Extra Items
Yes, the Hyper Blaster counts even though you do nothing to acquire it in-game. And if you really want to skip one for time, the Channeling Stone may seem ideal since it's a bit out of the way. However the store also contains four health items, upping your item count and giving you health which can go by quickly. So I recommend taking the trip, but it's your call either way. Also note that using any of these weapons will potentially detract from your score. You technically can use them a bit if you have enough game clears oddly enough, and there's another convoluted formula to calculate this, but I suggest just forgetting about them entirely. |
10. Defeating EnemiesIf you don't care to know about the exact formula for required kills, all you need to know is you need at least 200 kills -- the most efficient way to do this is to achieve 100 shooting and 100 fighting (melee) kills, but it's important you stick to those numbers or anything higher. If you're satisfied, you can aim for that and skip the next formula bit without worrying about it, but be sure to give it a read if you plan to make or allow for any modification to this distribution, or if you're just plain curious. Understanding the Kills Formula
Note that it puts both your kill types together to calculate your stars, so either both figures will be highlighted or neither will be. It took me a bit of time and sampling to actually understand this formula but it's fairly straightforward. Let's go through a couple samples and test it out to see what works and what doesn't.
Sample A is the simplest and most efficient way to achieve 10 stars. As you can see, it awards exactly 30 stars, which is the max attainable in this category. I used both formulas to illustrate it doesn't matter which one you use when your figures match, but only one is needed there. Sample B however has the player with the exact same amount of kills (200) but in different proportions. Note that the final score is 29/30 stars and thus a 10-star ranking is not attainable. This is because kills for the category you have more of are worth less. This is why it's inefficient to go for any other combo other than 100 and 100. But as shown below it can be done just as long as you know how to compensate.
Note that these are thresholds. So if 140 and 80 works, something higher like 160 and 85 will also work of course. If you do the math with those you'll end up with more than 30 stars, but it's capped so you can never achieve more than 30. Feel free to go for whatever you want just as long as you understand how this formula works. But I suggest just sticking with 100 and 100 to avoid any unnecessary complication, especially since killing more than 200 enemies can potentially put you over time, which is already marginal. Furthermore, 100 and 100 is the target we'll be using throughout this guide. Lastly, if you're really curious, there's a potential extra variable in the above formula that I kept out to keep it as simple as possible. You don't need to worry about it at all if not using extra weapons since it won't factor, but if so, understand that you're only allowed a number of uses depending on how many game clears you have. The Stars formula is still the exact same as above, but there's a new variable when calculating A and B, which is x as shown below.
Extra weapons means weapons only obtainable in a Next Fear run. Rather than fully getting into this one I'll just leave it at that. If you have enough game clears you can mess around a bit with extra weapons, but otherwise just forget about them and there's no more complication to your formulas. "Shooting" vs "Fighting" Kills How to Efficiently Count Your Kills Instead however, I recommend using a laptop with a notepad application in front of you that you can quickly edit during door transitions or simultaneously while running down empty hallways without losing time. Say you start off with 3 kills in the streets, while running a 10-20+ second stretch, turn to your document and type "3" with your free hand. Then you get 2 more fighting kills and 2 shooting kills, delete the "3" and write "5", then write "2" under it like so:
Keep updating this while running through the streets, empty hallways, or during door transitions. Mentally keep track of kills in your head until you're able to find time to type them. Adding anything else like "fighting" or "shooting" labels I just find unnecessary and can add more complication where it's not needed, since it's much easier to use the arrows to scroll and delete numbers rather than scroll through unnecessary words in these brief moments you'll have. But find whatever works for you. Do make sure you don't waste time updating this document by standing still or pausing the game. If you need to wait another minute or two to update your document, that's fine. Just keep a mental reminder in your head of how many kills you need to add to your current numbers until then. Do fighting on top since that one's the priority at first and will be the most of your kills in the early going. Work on getting it to 100 before officially turning to shooting kills, while a handful of shooting kills before then are fine and may inadvertently happen. But say if you have 95 fighting kills and only 5-10 shooting kills at some point, that's totally fine and really the way to go anyway. If you have the spare moments, consider also jotting down your kills once you hit certain key areas just for later reference (eg: "78-6"). Or say when you save your game in case you screw up and have to reload your save and otherwise would have no idea how many kills you'd need to subtract from each. Just try not to let this document consume you, remembering it's only there to quickly help you rather that distract you too much. Killing Each Enemy Type Below you'll find strategies for dealing with each enemy. Note that not one suggests using the Shotgun because its wide blast radius will raise your no aim shots too much, which is a shame cause it's a great weapon that would give you an easier time. But you cannot afford ruining your shooting style with it, outside of boss fights (most specifically the Split Head and Twinfeeler). Air Screamer/Night Flutter: Groaner/Wormhead: Grey Child: Creeper: Romper: Pupper Nurse: Puppet Doctor: Hanged Scratcher: Mumbler: Stalker: Bullet Adjust |
11. Shooting StyleUnderstanding the Shooting Style Formula
Note that all these stats are tied together, so they're either all highlighted or none are. As you can see, there's a huge penalty for missed shots, but how does that quantify? Let's go through some samples and see what works and what doesn't.
Sample A uses my actual stats from my 10-star ranking posted in the Requirements section. Sample B is a potential distribution that I just made up to illustrate cutting it close with no aiming shots. Let's take a look at these with the formulas.
Sample A isn't even close. Easily within the threshold since no aiming shots are kept to such a low amount, even despite having fairly low long range shots and a ton of short range shots, while pumped up middle range shots is great. But see how close Sample B cuts it? If no aiming shots were 0.13 it would've brought the score down just enough to make 10 stars unattainable. Note that since we're working with the star system, there is never any rounding up -- you either have a full star or you don't have it. Even a score of 9.9 with the formula gets rounded down to 9 stars rather than up to 10. Let's now take a look at two samples that don't make the cut:
Sample C does a great job getting a ton of middle range shots and a high amount of long range shots, but just look how no aiming shots destroys all that good work. On the other hand, Sample D does a pretty good job at limiting no aiming shots to 0.10 which is fairly respectable, but there's just way too many short range shots and not enough distribution. If more time were spent converting some of those short range shots to middle range, plus maybe another point or two in long range, it surely would've eclipsed 10 stars. While showing you Sample D might freak you out a bit, all it takes to avoid this is to make some general effort of extending your shots in at least in one major location like the hospital, which is perfect for this. Doing it in the school is the most difficult cause it's so easy to miss Grey Children, so don't panic as you build up short range shots there and just compensate later on. General Guidance The school is a tough spot to get too many kills past short range due to the darkness and the short Grey Children which can be easy to miss, but otherwise try your best to get in a good amount of mid-range shots. Do aim for a bit longer before shooting to give Harry increased accuracy, and always have your Flashlight on. In the hospital with Nurses is a great place to start driving up your middle range shots. Aim at them, make sure your first shot hits and then back up a bit to lock in these shots as middle range when possible. Once the Rifle is acquired you can start going for more long range shots, but I suggest not getting carried away with it. Where you're going to win in this category is getting a lot of middle range shots (in addition to lots of easy short range shots), while getting too many missed shots is where you're going to lose it. So focus on middle range the most when you can help it, while the occasional long range Rifle shot is very welcome, but don't get too consumed by it. As for putting a number on things, use this as a general guide:
Getting even above 0.10 long range shots is great because those shots are worth the most, but it doesn't come easy and isn't really necessary anyway, while it may waste a bunch of time or cost you missed shots while trying. The most important thing is limiting no aiming (missed) shots. A little trick you can do to pump up your long range shots is by shooting the final boss from one of the far corners of the room. Right at the start, turn around and run to the corner and fire off all your shots from there. I didn't do this in my actual run, but when I loaded my save just before and tried it I was able to improve my long range shots from 0.06 to 0.09 from that alone (almost a full star), so it makes a decent difference and can help you if needed. You can sometimes still succeed with around 0.12 or 0.13 no aiming shots if you did really well with middle and long range shots, but once you've had enough practice it should be simple enough to be in the 0.05-0.10 range. You may also have way more short range shots than middle range shots and still make it if you've limited your no aiming shots to around 0.05 or less. But to be honest, as long as you limit no aiming shots to under 0.10 you pretty much don't have to worry about the rest of your stats. That's what's most important. Avoid ever using the Shotgun outside of the Split Head and Twinfeeler fights since it will partially miss on the regular and drive up no aiming shots, making a perfect ranking out of reach. And try to restrict your use in those fights to super close range. Lastly, using the Hyper Blaster during your run will drive up your no aiming shots. Too much and your no aiming shots will read as 1.00 with all other categories as 0.00, but your scores will be ruined well before that happens. While you may be allowed some extra weapon uses with enough game clears, using the Hyper Blaster at all can immediately disqualify your run with a significant rank reduction, so I'd recommend just forgetting about it entirely. |
12. WalkthroughThis serves as a general walkthrough to push you in the right direction, pointing out some key ammo pickups, extra item reminders, and kill counts to aim for by certain areas. Since there is no damage requirement and you must simply survive the adventure, you will be less stressed when facing enemies than say later games in the series. But that said, since time is tight you should always focusing on killing enemies quickly and efficiently, while picking up all items in a reasonable range. Fighting kills are harder to come by since they require an additional kick and in many cases carefully avoiding another bullet or two before the enemy goes down, otherwise they may die by your bullets anyway. Therefore your first priority is to reach 100 fighting kills even before going for a single shooting kill, which will also help you a bit more as you build up your ammo anyway. That said, it's totally fine if you get a bunch of shooting kills inadvertently, but otherwise you should aim to kick every single enemy in the first half or so of the game. Streets Before School REMINDER: Although it tends to carry over, make sure you're using x6 bullet adjust before starting your run or picking up the first boxes of ammo. After the first Air Screamer, you'll find another at the entrance of the Convenience Store on the bins by the door. Kill it quickly before it flies, snuffing it out with another bullet or two if you can't reach it for a fighting kill. It may also respawn on your way out. Remember that the Handgun will be your primary weapon until getting the Hunting Rifle, so be sure to pick up all ammo within reason. From there get the first Eclipse key in the alley and then consider killing a few Groaners on the north side of Finney just above the alley as you make your way to the east bridge. From here, only bother with Air Screamers if they're on the ground or hovering right above and can be killed quickly. Otherwise they're too much of a hassle and not worth the time or the risk of missing. REMINDER: Grab the Katana in the side room of the Levin Street house before exiting to the backyard. This will put you at +3 extra items. Kill more Groaners by the Levin Street home and consider killing the Air Screamer quickly in the next alley so you can have an easier time and kill the Groaners there, but this can also be a hassle as well and there's plenty of other enemies in the game. Kill two more Groaners by the entrance to Midwich, although sometimes an Air Screamer will intrude. Be quick and move on. School Killing 2-3 Grey Children at a time is perfectly manageable and efficient, 4 tends to be ok as well for the most part while sometimes tricky. But you may encounter 5 in a Classroom or two. You can kill them but honestly it wastes a lot of time balancing between them all since they'll keep getting up as you deal with others. And it's not like there's a shortage of enemies elsewhere. So consider just skipping through these rooms because time is tight at the end of the day. REMINDER: Inside the Infirmary right before facing the Split Head boss is the recommended spot for your first save. Unlock the door by the 1F stairs while descending and pass through to the Reception hall to reach it. 25-30 minutes spent by this point is ideal. Any more and you may have a hard time staying under the rest of the way. Remember to record your kill counts at this exact moment in time in case you need to load from this save later on. REMINDER: Be sure to get the Shotgun from the Boy's Washroom on 1F for the Split Head and use it there from close range (and the Twinfeeler later), but do not use the Shotgun to fight any normal enemies, otherwise it will hurt your chances by inflating no aiming shots. By the time you're through the school it's ideal to have about 70-80 kills, while any more is totally fine as well. Just don't waste too much time where not needed. If all your kills are fighting that's fine and even preferable, but I usually wound up with 5-10 or so shooting skills by the end of the school, not really by specific choice. Streets Before Hospital REMINDER: Pick up the Chainsaw at Cut-Rite Chain Saws, the Gasoline Tank in the Gas Station garage, and the Rock Drill in the bottom room of the Bridge Control Room, all on Bloch Street. This will put you at +6 extra items, one more than required. It's up to you if you wish to avoid one but I suggest just getting them all anyway. The police station trip may not be worth the time, especially if you're a little behind on time, plus the Rompers and Air Screamers there can catch you off guard. Therefore making a beeline for the hospital is never a bad idea here. Hospital Continue using the Handgun on everything, but focus on getting middle range shots on Nurses in the hospital. Lock on your aim from a medium range and fire away, potentially moving backward as you fire. You can also often land first hits from farther away, but sometimes it's good to ensure the first bullet hits before extending your range. To make sure you get fighting kills with Nurses, slow down your shots as you near bullets 5-6-7, making sure you don't shoot any more bullets than necessary, otherwise they'll die by gunfire. You should hit around 100 fighting kills at some point near the end of the Nightmare Hospital, but if you're at least close then you're still fine cause there's plenty more enemies. Leaving the hospital with something like 100-10 (fighting-shooting) will do you just fine, while anything like 100-25 is doable as well. I'd suggest maybe getting a few insurance kills just to make sure, then officially switch over to shooting kills. Just blast away at Nurses and Doctors at full speed until they drop and they'll tend to die immediately upon dropping. Streets Before Sewers As soon as the shift happens to the nightmare world, run straight for the Town Center, get the items and ammo in the jewelry shop, fight the Twinfeeler (six close shots with the Shotgun) and grab the Hunting Rifle. Now is where you should make the official switch over to the Hunting Rifle, and by now you should definitely have 100 fighting kills and be only going for shooting kills. If not, find the balance but it helps a lot to be able to just blast away the rest of the game. Take note that Rifle shells come in a limited supply and therefore it's imperative to treat them like gold and make sure you pick up at least most of them if not all. All pickup locations for the rest of the game are listed below.
With these 9 pickups at x6 bullet adjust, that's 324 Rifle Shells, plenty enough to help you get a ton of shooting kills and remain fueled to the end of the game. You can frankly consider skipping the Indian Runner one which is maybe a bit out of the way and perhaps another, but they're all pretty close to your path. As you traverse the Nightmare streets, use the Rifle to quickly aim and blast at creatures from a distance while boosting your long range shots a bit. You can even handle flying Night Flutters, but don't get carried away with it cause you don't want to miss or waste time. Night Flutters, Wormheads and Rompers may require another shot or two when downed, so just be quick and move on. Sewers Before Resort Area Snipe Scratchers from the roof whenever possible, and note that two shots is always good enough to kill them, so shoot twice and move on, regardless of their super slow falling or dying animations. Streets Before Pier REMINDER: You will need to complete the side quest in this area to achieve the Good+ ending. Get the Kaufmann Key from Annie's Bar, the Magnet from the motel office (code: 0886), push the shelf inside motel room 3 to get the Motorcycle Key, then use it to open the motorcycle gas tank in the garage. As soon as you shift into the nightmare realm, focus on getting quick Rifle kills and advancing all the way to the boat. Get the jump on the Rompers before they do you before the pier. Pier to the Lighthouse On your way to the sewers manhole, you can kill the Night Flutter nearby and the Groaners there too, but it can also overwhelm you and you may not need the kills either way, so just running straight to the ladder is always an option. Sewers and Amusement Park In the Amusement Park you may only see one Grey Child in the first section. You can search a bit for some others by the ferris wheel but I suggest staying focused on time. Run directly to Cybil after the first kill. REMINDER: You must use the Unknown Liquid to save Cybil on the merry-go-round. Immediately when the fight starts, run right up to her and use it within range. You can also technically use it on the first Larval Stalker in the Amusement Park as a glitch if you desperately need to save some time. Either way, this will ensure you get the required Good+ ending, along with completing the earlier side quest. Nowhere If you're good to go already, consider running past Nurses but you'll probably want to kill the Stalkers that appear later on. They will essentially be your final chance for kills so make sure you've got 100+ in both categories before heading to the final boss. Lastly, if you run out of Rifle ammo by Nowhere, switch to the Handgun and just make sure you get the Rifle ammo in the jewelry shop on the second floor and save at least 24-26 shells for the final boss. Also be firm and avoid using the Shotgun as you hopefully have until now other than a couple boss fights. It's just too risky to use and drive up your no aiming shots. REMINDER: Make sure to use your second save in Alessa's bedroom before facing the final boss. I suggest placing the five rites into the door first for convenience, and use a new file instead of overwriting your first save. Remember if you want to drive up your long range shots by a few percent, just run to a far corner during the final boss and fire all your shots from there. Doing so can upgrade your long range shots by about 0.03, but it may depend on how many shots you've taken over the game. If you end up overshooting on time, consider just loading from your first save and trying the rest again, especially if that save is 30 minutes or less into the game. Something in the 25-27 minute range is especially a great base to play with, assuming you've also tallied a good amount of kills. Just remember to record your kill counts for up to then so you know where you're at after loading. Don't panic about the unskippable final cutscenes by the way since the timer stops as soon as the Incubus dies. Enjoy your ending as you'll have to be a bit patient to see your final score. |
13. StrategiesBosses Split Head Now stand right in front of its mouth and aim at it. Be ready and wait for it to open its mouth, then immediately start backing up while firing in its mouth. You should get off two shots before it freezes again. Simply repeat by standing right in front of it while aiming, then firing into its mouth as it opens while stepping back. After 5-6 mouth shots the fight will end. The timing is important here and if you're too slow to move back, or if it bumps Harry just before opening its mouth you might get eaten and die in its insta-kill attack. So if you do get bumped or you've been too slow, do whatever you can to strafe to the side and escape asap, then try again. Otherwise, you'll have to rely on your save in the Infirmary, which is the ideal first save location for a 10-star run. Twinfeeler Stand as close to it as you can to limit the Shotgun's blast radius for both max power and limiting no aim shots. Sometimes you may need him to erupt another time if you didn't get your shots in quickly enough, but just do the same trick on the grate of dodging as soon as it surfaces. Do not forget the Hunting Rifle on the wall in the extra time you have before the larva creates an exit for you, only after defeating it. Floatstinger Simply repeat the strategy of firing one Rifle shot and then strafing or running a few steps to another spot and firing again. Fire, run, fire, run, fire, run. Occasionally you may get hit by acid or kicked by its torso, but in general this strategy should help you avoid these attacks. Sometimes you may have time for 2-3 shots so by all means go for it, but be aware it can attack very quickly. If you prefer the tower method, head up there to get a better view of the creature and create more distance. Run around until you've created a gap, then turn and shoot it 1-2 times and get right on the move to avoid any acid spit. Sometimes you can get in 3-4 shots perhaps, but otherwise limiting standstill time and moving a lot is the best way to avoid damage. With each strategy the Floatstinger should die after around 20 Rifle shots. Parasitic Cybil Alternatively it is possible to bypass this fight and save a minute or so by using the Unknown Liquid on the first Larval Stalker in the amusement park if you're quick enough. Incubus The more you can perfect your circle the more likely you are to avoid it, but understand it's very difficult and probably the single hardest thing in the game to do. If it does hit you, don't worry and simply enter your inventory immediately and heal to full health. Once you've fully-healed, you cannot take any more damage even if the strikes continue to hit you for a few more seconds (but make sure you have enough to survive the next set of strikes). This is key to the fight, especially if you're low on health. After avoiding the lightning or once it stops if hit, fire 4-6 more Rifle shots at the Incubus and repeat this strategy. Now, if you have enough health to eat a few rounds of lightning strikes, you can forget about the running nonsense and just stand on the spot firing at the incubus to end the battle as quickly as possible. Do make sure to lower and re-raise your Rifle after the sixth shot each time to perform a magic reload. Whenever struck with lightning, immediately heal to full health and you will not take any more damage during the series of strikes. Whatever your strategy, the Incubus will die after 24 Rifle shots. If somehow you fight the Incubator girl in bright white instead of the flying demon, you did not find Kaufmann's vial and will not be able to get 10 stars as a result. It is only achievable with the Good+ ending. Other Strategies Working Around Harry's Stumbles But what's more likely to be a bigger issue is Harry's stumbles while stopping from full speed movement, upon which he does some transitioning footwork while you lose direct control of him for a moment. This gives enemies, particularly Groaners and Wormheads in the streets, a perfect opportunity to lunge at you before you can do anything about it. Therefore I suggest stopping just a bit earlier in these cases to allow you to get the drop on them rather than the other way around. Or perhaps even better, hold Square (with reverse Walk/Run control; release Square with normal) to transition directly into walking rather than full on stopping by releasing forward movement as you reach your target. That way you can immediately raise your weapon and start firing. |
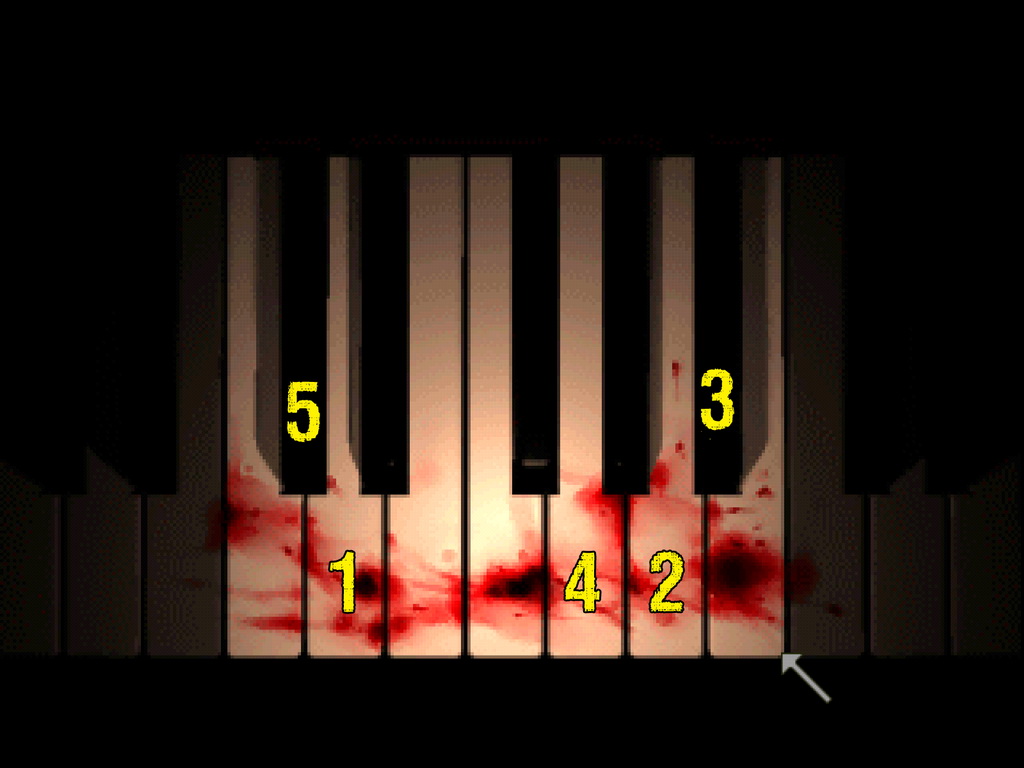
14. Puzzle SolutionsHere you will find quick reference solutions to all the puzzles in the game to help you on your run. Piano Puzzle Press the broken keys in the following order:
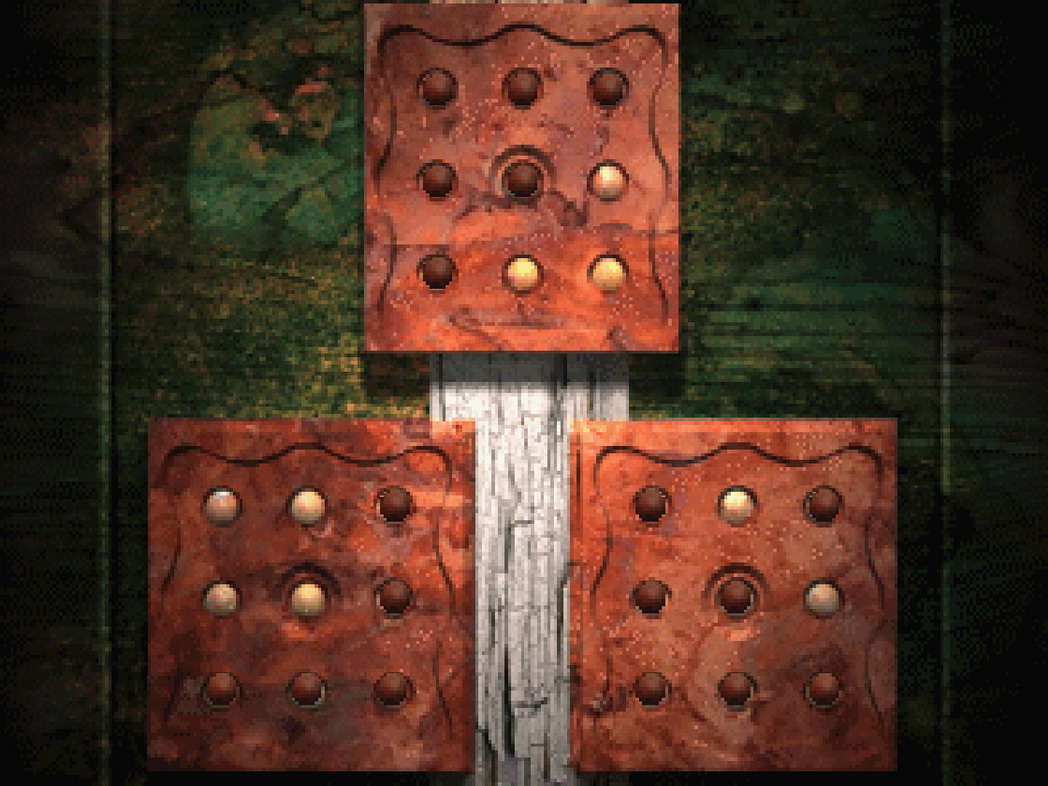
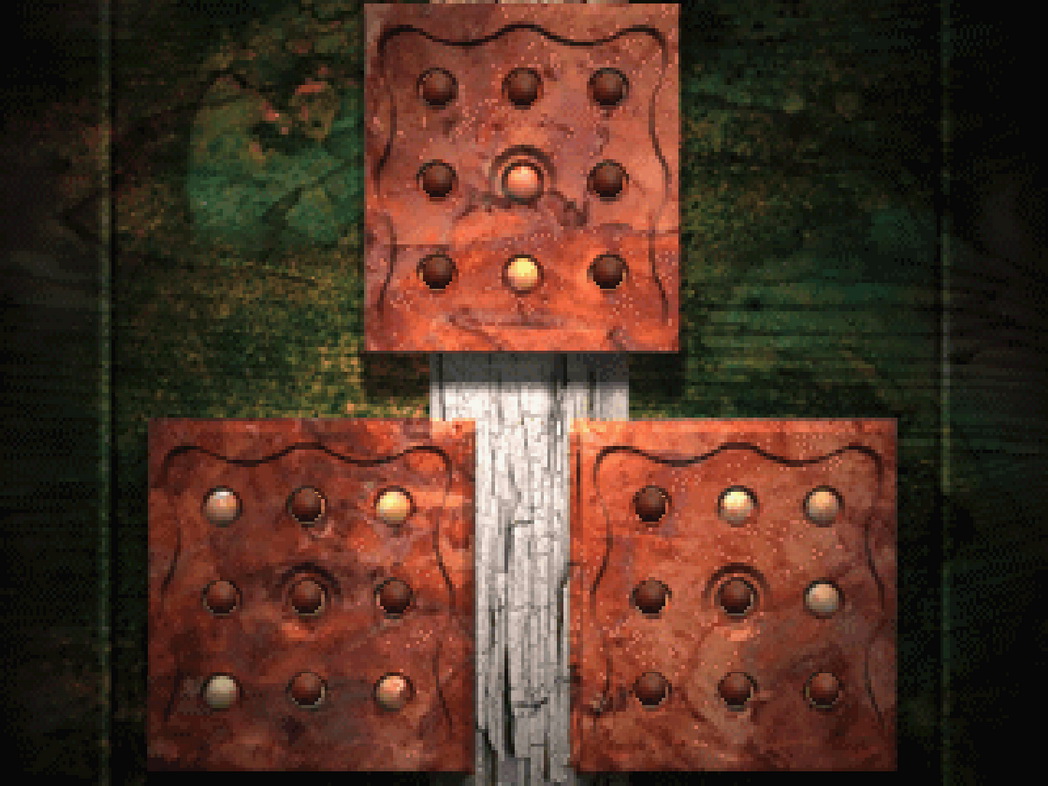
Valve Puzzle
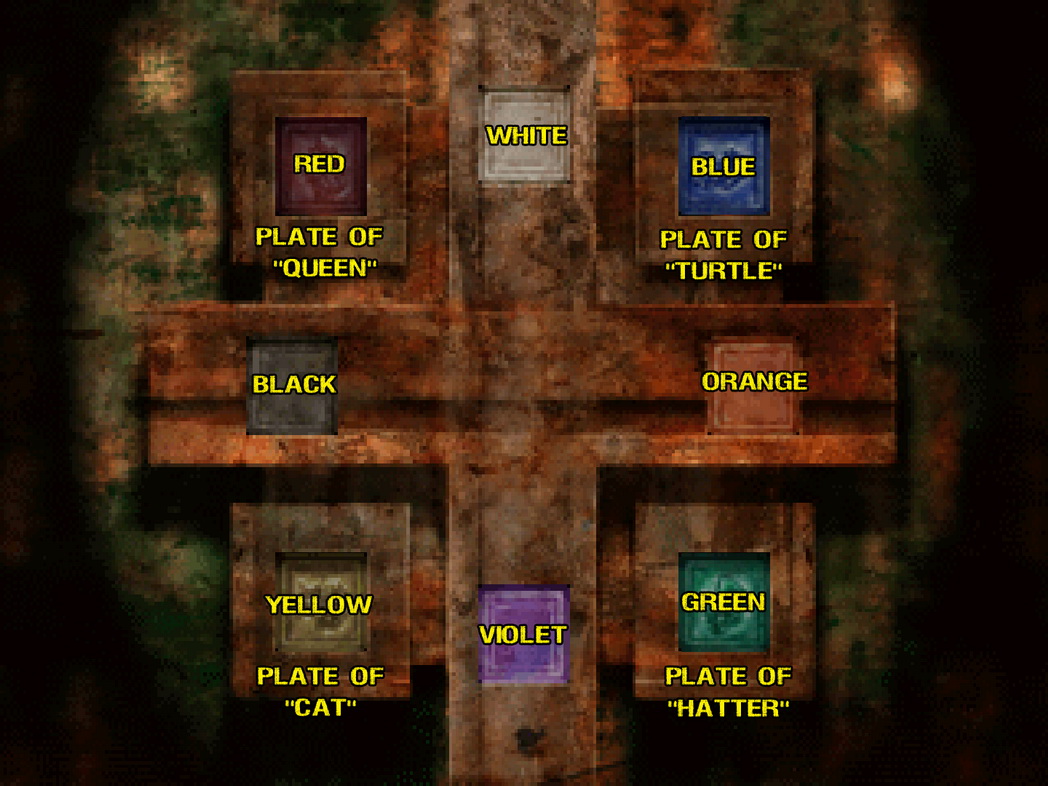
Plate Puzzle
Astrology Puzzle
The Grim Reaper's List Enter the code "ALERT" into the keypad. Light Puzzle Unlocking only the left door is necessary. Camera is not needed.
|
15. Hyper Blaster UpgradesAfter achieving the UFO ending you will unlock the secret Hyper Blaster, which is initially likely weaker than the Handgun. Increasing your ranking can change its laser colour and increase its power accordingly, with the most deadly version about the power of the Rifle serving as your ultimate reward for a 10-star ranking. This is how it all works:
After saving your ranking of 8/10 or higher, you'll see "HYPER BLASTER POWER UP" in the bottom right corner of the save menu, along with the colour you've unlocked, either yellow for 8.0-9.9 or green for 10 stars. Sadly, these rewards are not permanent, and thus you will lose the Green Blaster after your next run if you don't post another perfect ranking (or even the Yellow if you score below 8). This is why it's always a good idea to save your clear data in separate slots so that you can always start another run with whichever Blaster you choose. Make sure you don't overwrite your Green Hyper Blaster save slot once acquired. Note that using the Hyper Blaster during your 10-star run can immediately disqualify you with a huge rank reduction right off the top. But even beyond that, every Hyper Blaster shot counts as a no aim shot and so enough usage will keep worsening your stats. Over time, your no aim shots will become 1.00 with all other shooting stats 0.00, although your stats will be ruined well before then anyway. So simply avoid using it entirely on your run. You'll have all the time in the world to mess around with the best one when you're done. |
| by Andrew Haffenden aka Conquerer (Silent Hill FAQ/Walktrough) |