Bosses
Boss 1: Split Head Lizard
A giant lizard, eh? Do you remember reading the fairy tale about the hunter and lizard just a few minutes ago in the Library? Let's recall the story:
Hearing this, the hunter
armed with bow and arrow said,
"I will kill the lizard."But upon meeting his opponent,
he held back, taunting,
"Who's afraid of a reptile?"At this, the furious lizard
hissed, "I'll swallow you up
in a single bite!"Then the huge creature
attacked, jaws opened wide.This was what the man wanted.
Calmly drawing his bow, he shot
into the lizard's gaping mouth.Effortlessly, the arrow flew,
piercing the defenseless maw,
and the lizard fell down dead.
If you just attack the Split Head normally you'll find it's one resilient sucker, so you'll need to follow the lead of the hunter. Note that the lizard dropped dead once he shot arrows into its gaping mouth. Surely our Shotgun shells should be sufficient instead.
The creature won't open its mouth at the start of the fight, so first we'll have to anger it, similarly to how the hunter did. Harry lacks taunting skills so start blasting it with your Shotgun while backing away. Try to keep curving around the circle for optimum space management. Otherwise you can start the fight by running past to its left side as it lunges at and misses you, then leaving itself open for continuous fire from the side.
After around six shells, the lizard will spew green liquid out of its mouth as it deeply growls while frozen and the music picks up. Now you've infuriated the lizard, so prepare for the crucial part of the fight. Now let it approach you and start backing up once it's close enough. When it opens its mouth, continue backing up as you empty shells into its mug. You should be able to fire two shells each time on Normal and Hard before it closes.
If you don't back up or are too slow, the creature will swallow you whole and it'll be Game Over, so stay on your toes. On Hard it'll be even more aggressive with next to no margin for error, so consider bailing out and strafing if you get caught flat-footed. Repeat the strategy, always backing up while you fire in its open mouth and the fight should end after 5-6 shells on Normal/Hard or fewer on Easy. As a little trick, lower and re-raise your gun between attacks so that it automatically reloads, avoiding an untimely in-game reload or a visit to your inventory.
The best method for firing in its mouth is to stand immediately in front of its head after first angering it. Once it re-activates, it'll open up right away. Be quick to move back and fire at it. Now just repeat the same method until it dies.
Split Head's attacks: At the start of the fight the creature will resort to a headbutt attack when you're in range, inflicting a fair amount of damage. Once you've aggravated the Split Head, it will engage its gaping mouth attack, which is an insta-kill if you're caught. Always be backing up to avoid this.
After firing enough shots into its gaping mouth, the screen will blur and the fight will be over. Well done, hunter.
Boss 2: Twinfeeler
There's no escape once you land in the pit, so instead you'll have to exterminate the giant larva. But first, locate the Hunting Rifle leaning against the wall just ahead, which can work fairly well for this fight but the Shotgun's superior speed, power and handling makes it more preferable.
What the larva will do every now and then is rise up from the soil to spew acid at you as it crawls over the surface before shortly diving back into it, leaving you a brief window to shoot it. It may be hard to predict where it will rise and attack from, which makes running around fairly unpredictable, especially since it may rise right in your path.
The best strategy here is to instead stand on the fallen grate in the middle which helps in multiple ways. Firstly, it prevents it from erupting anywhere near you while giving enough time to dodge its acid, but it also lures the larva over the grate where it cannot drop back into the soil until it reaches the other side, providing you with a very lengthy attack window.
So stand on that grate and as soon as you hear it erupting, either run ahead or strafe to the side to dodge the acid, then immediately target the larva and start blasting away while closing the distance for peak power. Even on Hard you can end this fight in a matter of seconds and just one full clip.
Twinfeeler's attacks: The larval creature has two attacks. One is spitting acid at you every time it climbs above the surface and the other is physically ramming into you when slithering above or just as it hits the surface. Stand on the metal grate to avoid being bumped into and be sure to run or strafe away as the Twinfeeler rises to avoid its acid every time.
After just six well-placed Shotgun blasts from close range, or up to 10 or more Rifle shots, the Twinfeeler will curl up in a ball and the fight will be over. It doesn't die however and instead smashes through the closed doors on its escape, providing you with an exit as well.
Boss 3: Floatstinger Moth
Right at the start you'll be facing the giant menacing moth, so consider getting some breathing room before attacking. You can stay on this open part of the rooftop which lets you move around without much restriction, but you can also run up the nearby stairs to the higher roof and use the water tower as cover. It's quite hard to see the full moth and what it's doing from the lower spot so consider relocating up here for a better picture, but do keep in mind the open space makes quick shooting and running a very viable strategy.
Just as before, the Shotgun and Rifle are the best weapons here, with the Rifle preferable from the higher position and the Shotgun better from up close down below. From the open main roof, the best strategy is to keep moving, especially by strafing to keep the creature in front of you, and get in one or two shots at a time before the moth can respond with an acid spit or by smacking you with its abdomen. Just take your shot, run ahead or strafe to the side a couple meters and fire again. If you can get 2-3 shots safely, go for it, but sometimes the moth will be quick to smack you or spit acid.
If you'd like a better view and to create more distance, head up the stairs to the water tower and use the Rifle. Same thing here though, keep moving and take 1-2 shots at a time, with the occasional 3-4 shots if you really have the time. Take your shot and run a few feet as you likely dodge an acid spit, fire again and just keep dodging and repeating.
Alternatively you can try running for a bit longer to create more space so you can fire more shots, but always be prepared to dodge acid at a moment's notice, and never remain close to its body for long or it'll smack you. Note that the Shotgun still works fairly well from this location but loses its power when the moth is farther away.
Floatstinger's attacks: The creature attacks very similarly to how it did in its previous form with another acid-spewing attack and an abdomen-butting attack. Keep your distance to prevent the second attack from ever happening, while the acid is somewhat difficult to avoid but is telegraphed by a distinct sound each time. Once you hear it, strafe or run aside asap and get in your attacks, although it won't always be easy.
After landing about 15-20 Rifle or Shotgun shells the creature will fall to the ground and die this time, as sirens sound in the distance.
Boss 4: Cybil
Optional Quest: Saving CybilIf you acquired the Plastic Bottle and used it to pick up the Unknown Liquid back in the hospital's Director's Office, you can end this battle at any time by approaching Cybil and using it right in front of her. Doing this will save her and lock you into one of the two + endings. If you don't have the liquid or would rather a worse ending, you will instead have to fight and kill her. |
If you don't have the means to save Cybil or wish to fight her anyway, you'll first need to avoid her gunshots until she runs out of ammo. She has 10 bullets and won't hesitate to use them, even firing off a few in a row if you can avoid them. Otherwise, her shots are insanely damaging and will kill you if you have anything less than 80% or so health, or if you take two shots without healing.
To avoid her gunshots is actually a very simple task of strafing in a circle around her and not stopping until she runs out. To get set right from the start, hold R1 on its own to get moving, then quickly begin also holding left on the analog stick to start curving in a circle around Cybil. Once you've got the right arc, hold it and keep running circles around her as she fires her ammo, sometimes 2-3 bullets at a time before resetting. It'll look close but her bullets should just miss you each time.
Try to stay clear of all objects like horses, poles or walls, since Harry will bump into and stumble on these things, leaving him open to an attack. Otherwise, you can also hide behind horses whenever she's about to attack, or even run away since her accuracy falls off at far range.
You can also go on the offensive right away by firing back, preferably from a farther distance with the Rifle if you wish to have any chance of getting away. But honestly, the first strategy of circling around her is the most effective and will save you a lot of health.
Once Cybil fires her 10 shots, she'll drop her gun and take matters into her own hands, although losing her long-range attack makes the fight very trivial as long as you don't let her get close.
From this point just use the Rifle from afar to blast her and simply strafe away when she gets close. The Shotgun also works well, at least from a closer distance, and the Handgun can be effective as well but will take a bit longer. Be sure to back up while firing these weapons to keep your distance from Cybil.
As long as you have the ammo for it, utilize the Rifle and its long range to fire at Cybil from safety. If you've run out of all ammo, the Hammer is the best melee weapon while the Axe is next best if you don't have it. Just be sure to get on the move after landing an attack or you'll get choked. Remember this is your last chance to use the Unknown Liquid to save Cybil if you have it, otherwise keep firing or swinging away until she dies.
Cybil's attacks: Cybil's simplest attack in the first part of the fight is a handgun shot, knocking Harry down while pushing your status into deep red. Two shots without healing will kill you (or just one if not close to full health), so always stay on top of your condition. Just circle around her, or stay far away, to avoid all her shots. Cybil's other attack in this phase is a pistol whip from close range, which isn't as deadly but wise to avoid.
Once Cybil drops her handgun, she'll try to attack Harry by grabbing him by the neck and strangling him. Wiggle the shoulder and directional buttons to escape this attack more quickly while limiting damage, since it can be very harmful the longer it goes on. She may also try an arm chop although not nearly as frequently as the chokehold. Both are quite damaging so just be sure to heal up.
After 26 Rifle Shells or some other combination, Cybil will fall to the ground and your friend will sadly be no more, unless you used the Unknown Liquid to expel her parasite and save her life.
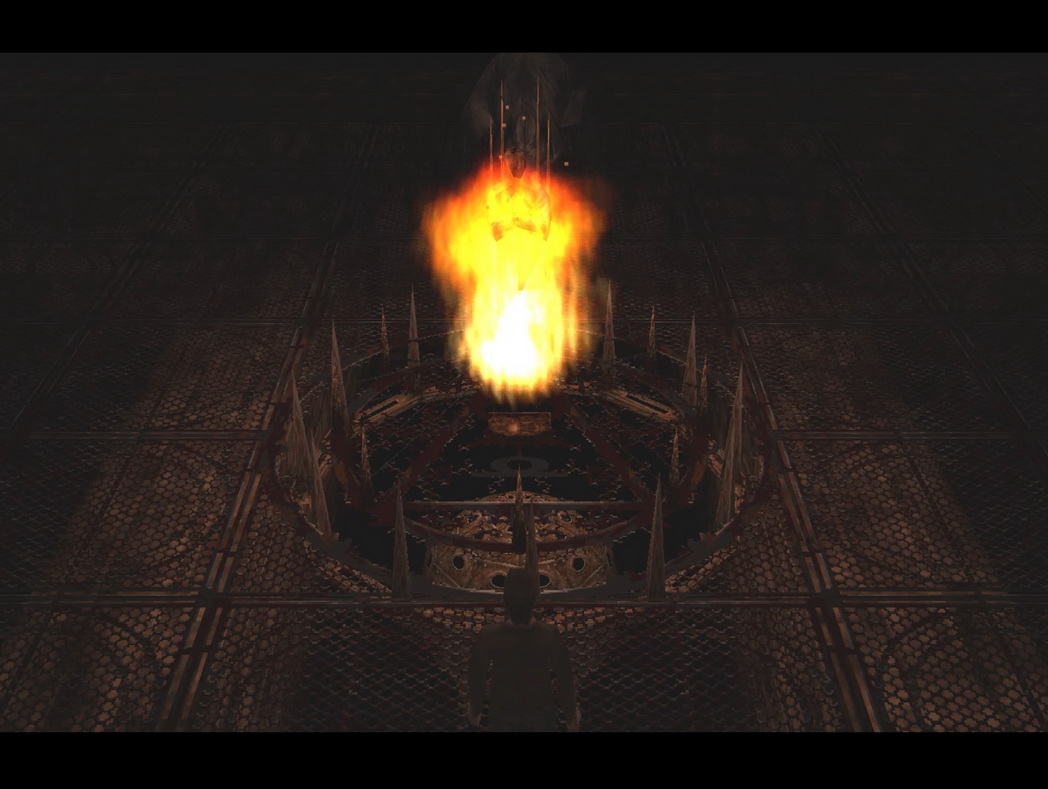
Boss 5: Incubus / Incubator
If you and Kaufmann found the vial in the resort area, he'll make an entrance to alter things here, making you fight the Incubus which is the more menacing demon creature with wings. If you did not complete that optional quest, you'll instead fight the Incubator, which appears as a strikingly bright and holy-looking young girl as the combination of Alessa and Cheryl, but no less evil than the Incubus. Refer to the strategies below for each form, noting you will only see one or the other, not both.
Incubus (Good & Good+ Endings)
Make sure you start this battle at full health because this creature deals an insane amount of damage per hit, capable of killing you from one initial hit that freezes you in place as more strikes hit you. But we'll deal with that more specifically in a second. Also use L2 at all times or when needed to focus the camera on the flying Incubus to make sure your bullets are landing and to see when it's about to fire lightning, telegraphed by red static electricity forming around it.
To start things off, equip the Hunting Rifle and unload 5-6 shots into the Incubus, then prepare to run around the arena to avoid its red lightning strikes. For best success, try running in an aggressive circle until the lightning stops striking and then start shooting again and repeat. If you're ever hit by a lightning strike, immediately enter your inventory and heal to full health, since you may die if you just stand there and let the lightning keep striking you, as it will do for another few seconds unless you luckily only caught the last strike.
Once you heal upon the initial strike, you will not take any more damage despite being continuously hit by the lightning. So don't mess around and always heal immediately to avoid any risk of death, as long as you have the health needed. When firing, never take more than six shots in a row since Harry will be forced to reload in-game. Instead, lower and re-raise your weapon to automatically reload, or just run around and reset after the incoming lightning strikes.
You may only be able to get 4-5 shots off safely before the lightning comes if you're a little late to start shooting during the window. On Hard especially, the lightning becomes insanely ridiculous to avoid. I'm serious, it seems to be 50/50 at best whether you can avoid it even through the best aggressive circle-running strategy, so it can be insanely frustrating to avoid damage here, or to beat it at all if your health is limited. But if you have enough health supplies you can more or less tank all the hits and just focus on shooting it enough to drop it.
If you ever run out of ammo, switch to the Shotgun or the Handgun to finish it off, knowing it may take a while longer but it's all you've got.
Incubus' attacks: The one and only attack during this fight is a series of lightning strikes which inflict insane amounts of damage and can kill you if hit for more than a second or two consecutively without healing. Always heal to full health immediately upon being stricken to make sure you don't die, and note that despite continuous strikes immediately upon healing you will not take any more damage. Also try not to get too frustrated from being hit since it can be rather difficult to avoid it. Just try to hang in there and fire back after taking any damage, while managing your health.
Note that the lightning attacks are telegraphed by red static electricity appearing near the creature before the strikes are about to come, so get moving if you want any chance of avoiding them. Always run in an aggressive circle for the best chance at doing so.
After firing 24-26 Rifle Shots at the Incubus on Normal and Hard, it'll drop dead and the fight will be over.
Incubator (Bad and Bad+ Endings)
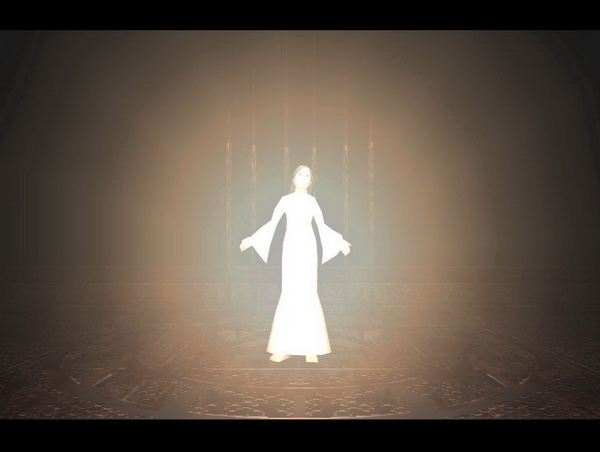
Unlike the flying Incubus, the Incubator stands at Harry's level in the center of the arena, but otherwise the fight is near identical due to it using the same lightning strikes, although this time blue-coloured.
To start things off, unload 5-6 Rifle shots to empty the Rifle and then prepare to run in a circle around it as it fires blue lightning at you. It can be very difficult to avoid, and nearly impossible sometimes on Hard, so if it does hit you, immediately enter your inventory and heal to full health. Once you return to the game after healing, the lightning will continue to strike you but will deal no more damage since you already healed during the attack. Use this trick to your advantage throughout.
Continue the same strategy of firing 5-6 shots each time, while using L2 to focus the camera on the Incubator. Always start running in an aggressive circle around her to avoid her incoming lightning attacks, and remember to immediately heal if hit to avoid dying, which can happen if you don't heal and continuously take damage for a second or two, or if you don't heal up enough and die on the first strike of the next series of strikes.
Just as well you can just stand there and eat all her lightning attacks while healing in the inventory when needed and otherwise firing back constantly. As long as you have enough health to last a few hits then you'll be fine and you can avoid running around the arena.
If you ever run out of Rifle ammo, pull out the Shotgun or the Handgun to finish things off and just hang in there.
Incubator's attacks: The Incubator uses the same lightning attacks as the Incubus except they are blue instead of red. They are just as lethal and capable of killing Harry when consecutively struck. However just as with the Incubus, as long as you heal to full health immediately upon being struck, you will not take any more damage as the current lightning attacks continue to strike you.
Additionally, the Incubator has a forcefield around her which will throw Harry down if he gets too close to her. Simply stay far enough away on her perimeter while running around to avoid this attack entirely.
The Incubator will drop dead after about 20 Rifle shots Normal and Hard.
| by Andrew Haffenden aka Conquerer (Silent Hill FAQ/Walktrough) |