Midwich Elementary School
00. Arrival
01. Old Silent Hill
02. Midwich Elementary School
03. Nightmare School
04. Old Silent Hill Part 2
05. Central Silent Hill
06. Alchemilla Hospital
07. Nightmare Hospital
08. Central Silent Hill Part 2
09. Nightmare Central Silent Hill
10. Sewers (Connecting to Resort Area)
11. Silent Hill Resort Area
12. Nightmare Silent Hill Resort Area
13. Sewers (Connecting to Amusement Park)
14. Lakeside Amusement Park
15. Nowhere
Welcome to the second chapter of the complete walkthrough guide for the original Silent Hill (1999), covering Midwich Elementary School. This guide provides a comprehensive walkthrough with all item locations, detailed puzzle solutions and boss strategies.
Color legend
Flashlight - items
Handgun - weapons
Health Drink - supplies
Residential Area Map - maps and notes
Save Point - save points
Contents
- Walkthrough
- First Floor Reception Hall
- Courtyard
- First Floor Top Hall
- First Floor Left Hall
- Second Floor Left Hall
- Second Floor Top Hall: "Alchemy Laboratory"
- Second Floor Right Hall
- First Floor Right Hall
- Courtyard: Placing the Golden Sun
- Second Floor Bottom Hall: "A Place with Songs and Sound"
- Courtyard: Placing the Silver Moon
- Basement: "Darkness that Brings the Choking Heat"
- Clock Tower
Walkthrough
"Flames render the silence, awakening the hungry beast. Open time's door to beckon prey."
First Floor Reception Hall
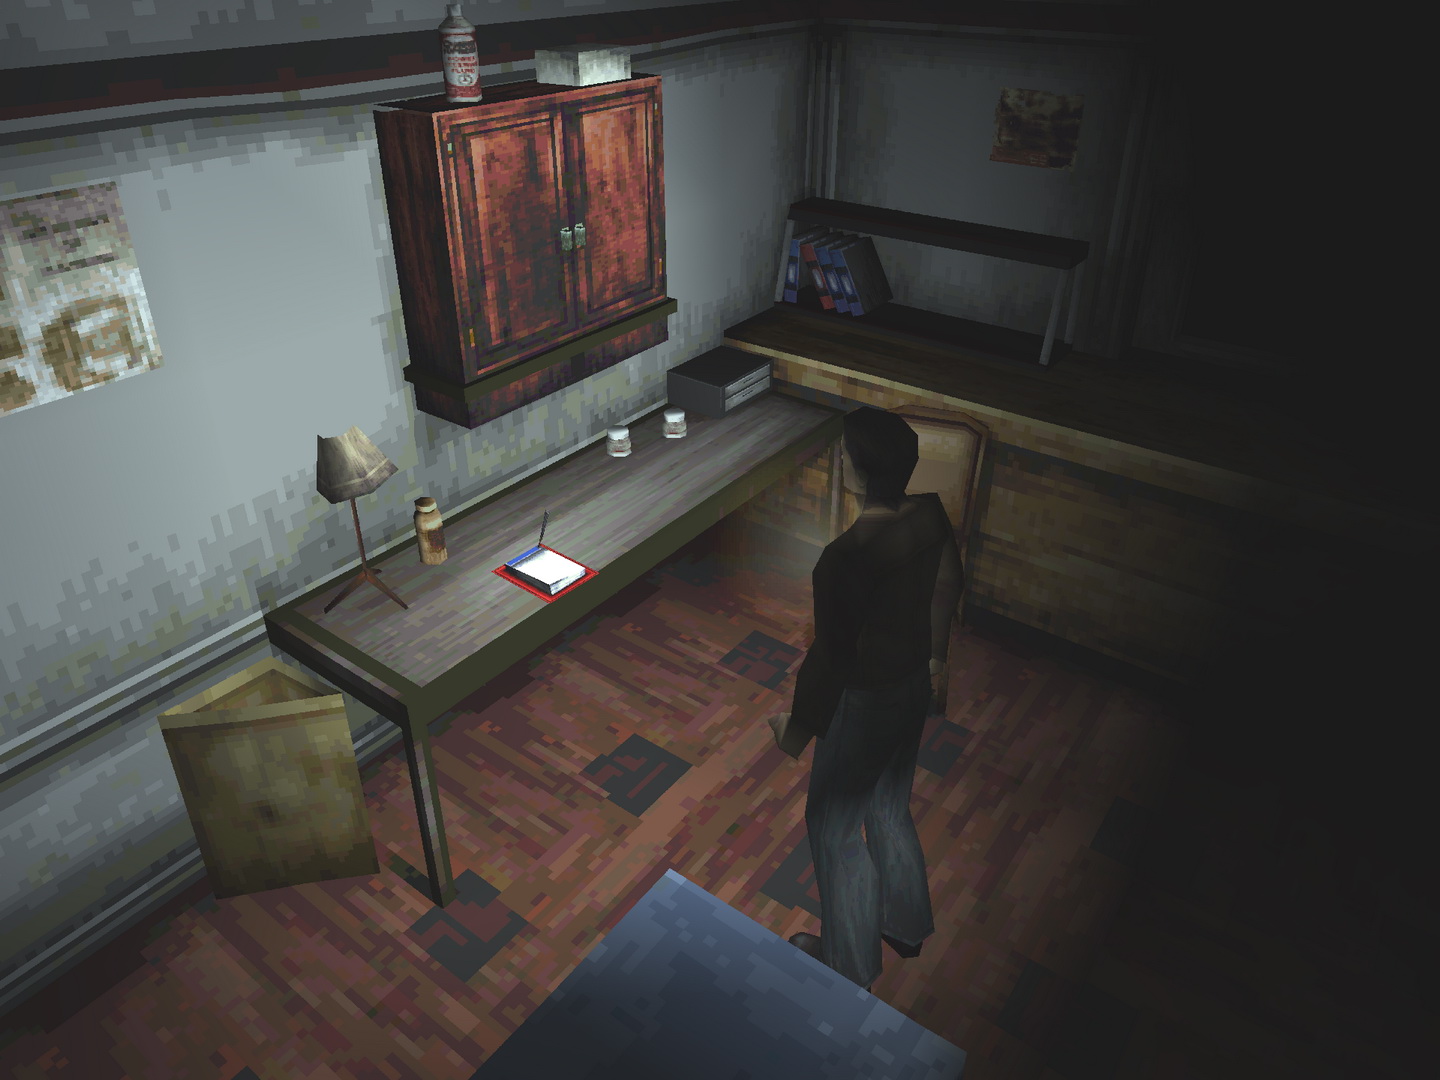
Find the School Map on the left side and proceed through the next doors. Take a right and enter the Infirmary where you'll find a Save Point and a First Aid Kit on different tables, plus a Health Drink in the cabinet beside them. This is the only save point in the school, so remember to come back here if you want to save. Exit the room.
 |
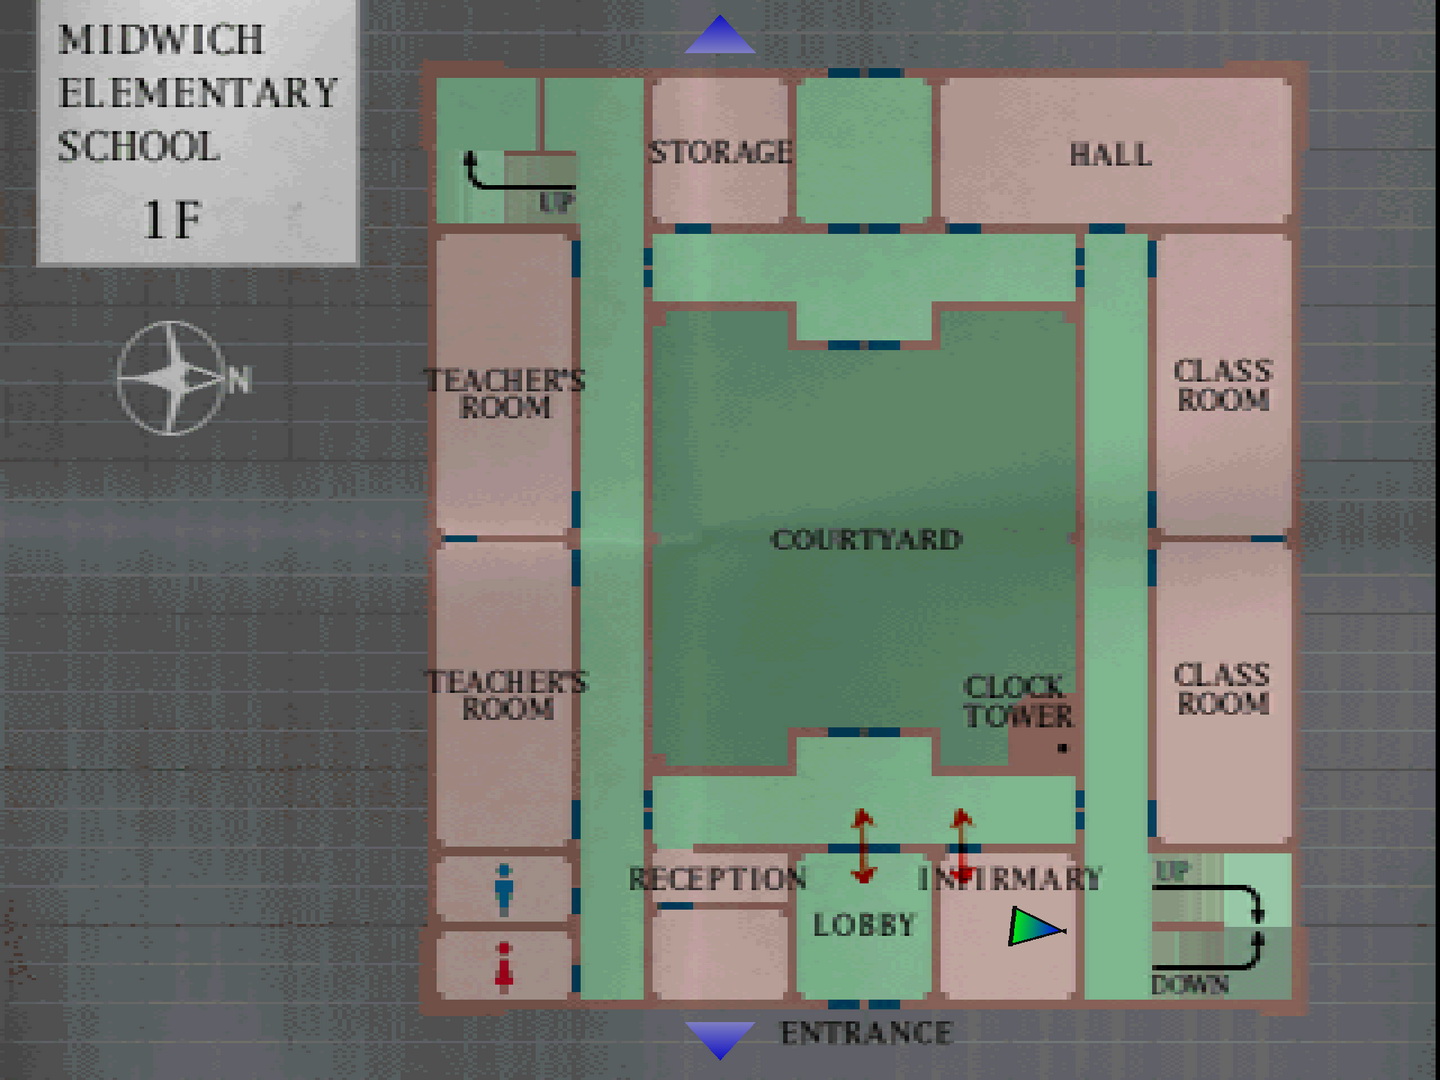 |
Note on school map: The map for this location has been rotated as such that its top is the west while north faces right. To avoid any directional confusion this may cause, I'll avoid compass directions and instead refer to more standard directions, such as which part of the map a room or hall is located.
Now head behind the Reception desk to find three books with messages written in blood that will guide us to our next tasks.
They read:
"10:00
'Alchemy laboratory'Gold in an old man's palm.
The future hidden in his fist.
Exchange for sage's water.""12:00
'A place with songs and sound'A silver guidepost is
untapped in lost tongues.
Awakening at the ordained order.""5:00
'Darkness that brings
the choking heat'Flames render the silence,
awakening the hungry beast.
Open time's door to beckon prey."
Looks like a puzzle of some sort, with instructions given corresponding to time. You may notice a "Clock Tower" in the courtyard on your map, so it may enlighten you. First you can enter the room behind the counter to admire a painting of a strange door and find Handgun Bullets on the coffee table. Then exit to the center courtyard since both side hall doors are locked.
Courtyard
Outside you'll be greeted by two terrifying Grey Children. The Handgun is best against them if you have the ammo. Approach the Clock Tower and you'll see circular depressions on either side for a "A Golden Sun" and "A Silver Moon".
Examine the doors up the steps for Harry to get a look at the clock itself, which displays 10:00, matching the time from the "Alchemy laboratory" message. Therefore the Chemistry Lab on the second floor seems like our first destination. Leave the courtyard through the doors at the top of your map.
First Floor Top Hall
Back inside, you'll be ambushed by two Grey Children so act quickly. Always try to escape any ambush and shoot them one by one if possible. Enter the open hall through the doors at the top of your map to meet an apparition called Larval Stalker for the first time. By no means will it attack you, and you may notice it's quite pathetic in movement either way. You'll meet many more of them in the school. Grab the Handgun Bullets on the bench and exit back to the previous hall since the top doors don't open.
Avoid any respawning Grey Children and pass through the doors to the left side hall on your map, since the other side is locked.
First Floor Left Hall
Immediately take care of the Grey Children here, by the stairs and to your left. Both Teacher's Rooms won't open, and despite both washrooms being unlocked there's only a Grey Child in the Boys' room. Head up the stairs at the top left of your map.
Second Floor Left Hall
If you keep heading up you'll find the roof door is locked, but inside the top Classroom you'll find two Grey Children patrolling and a Health Drink on a desk. Another Grey Child is in the hallway. The next Classroom is empty, while you can find Handgun Bullets in the Girls' washroom after killing two Grey Children inside. You can explore the Boys' washroom for a startling surprise.
The bottom Music Room hall can be unlocked, but we'll be heading there shortly so let's instead enter the top hallway where the Chemistry Lab is located.
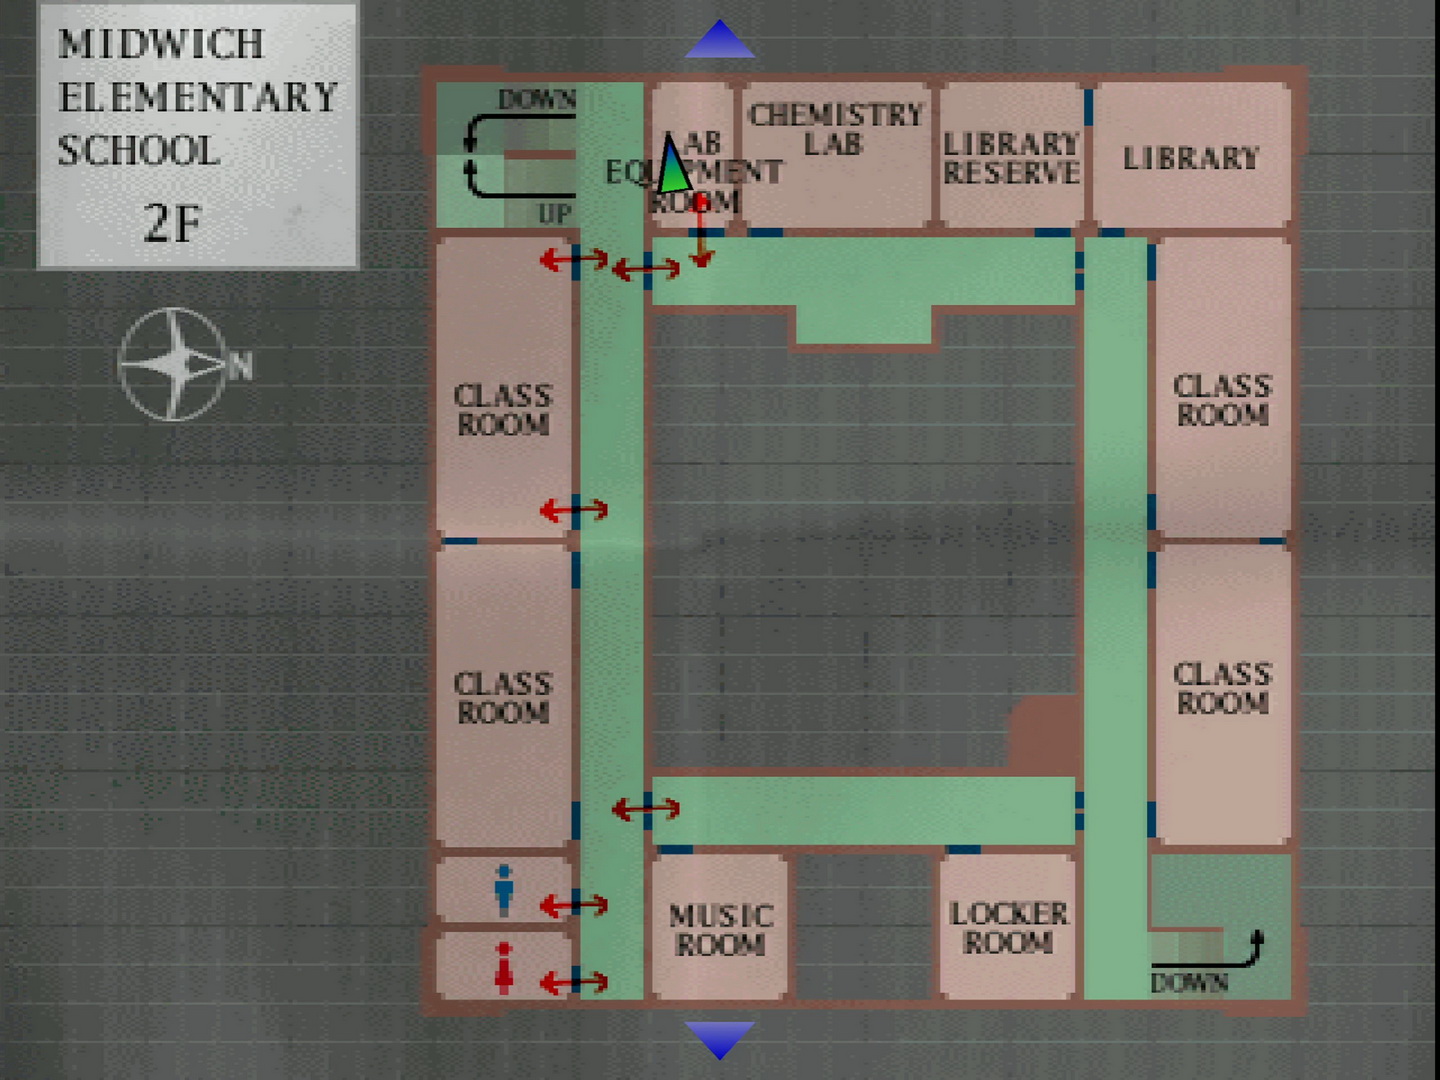
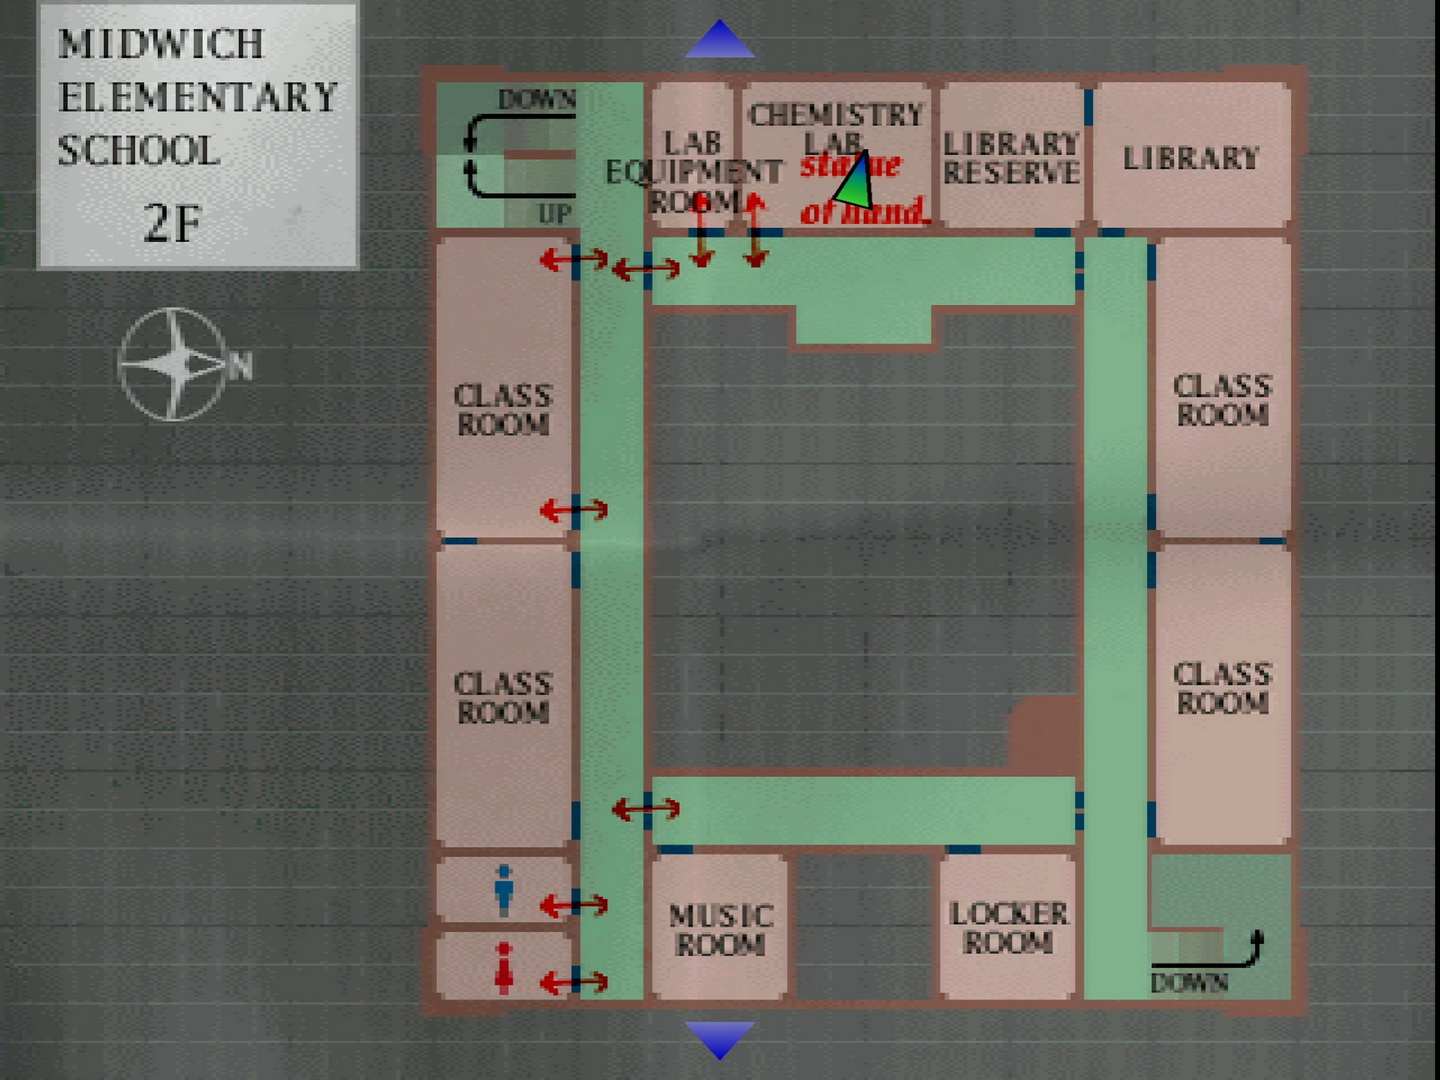
Second Floor Top Hall: "Alchemy Laboratory"
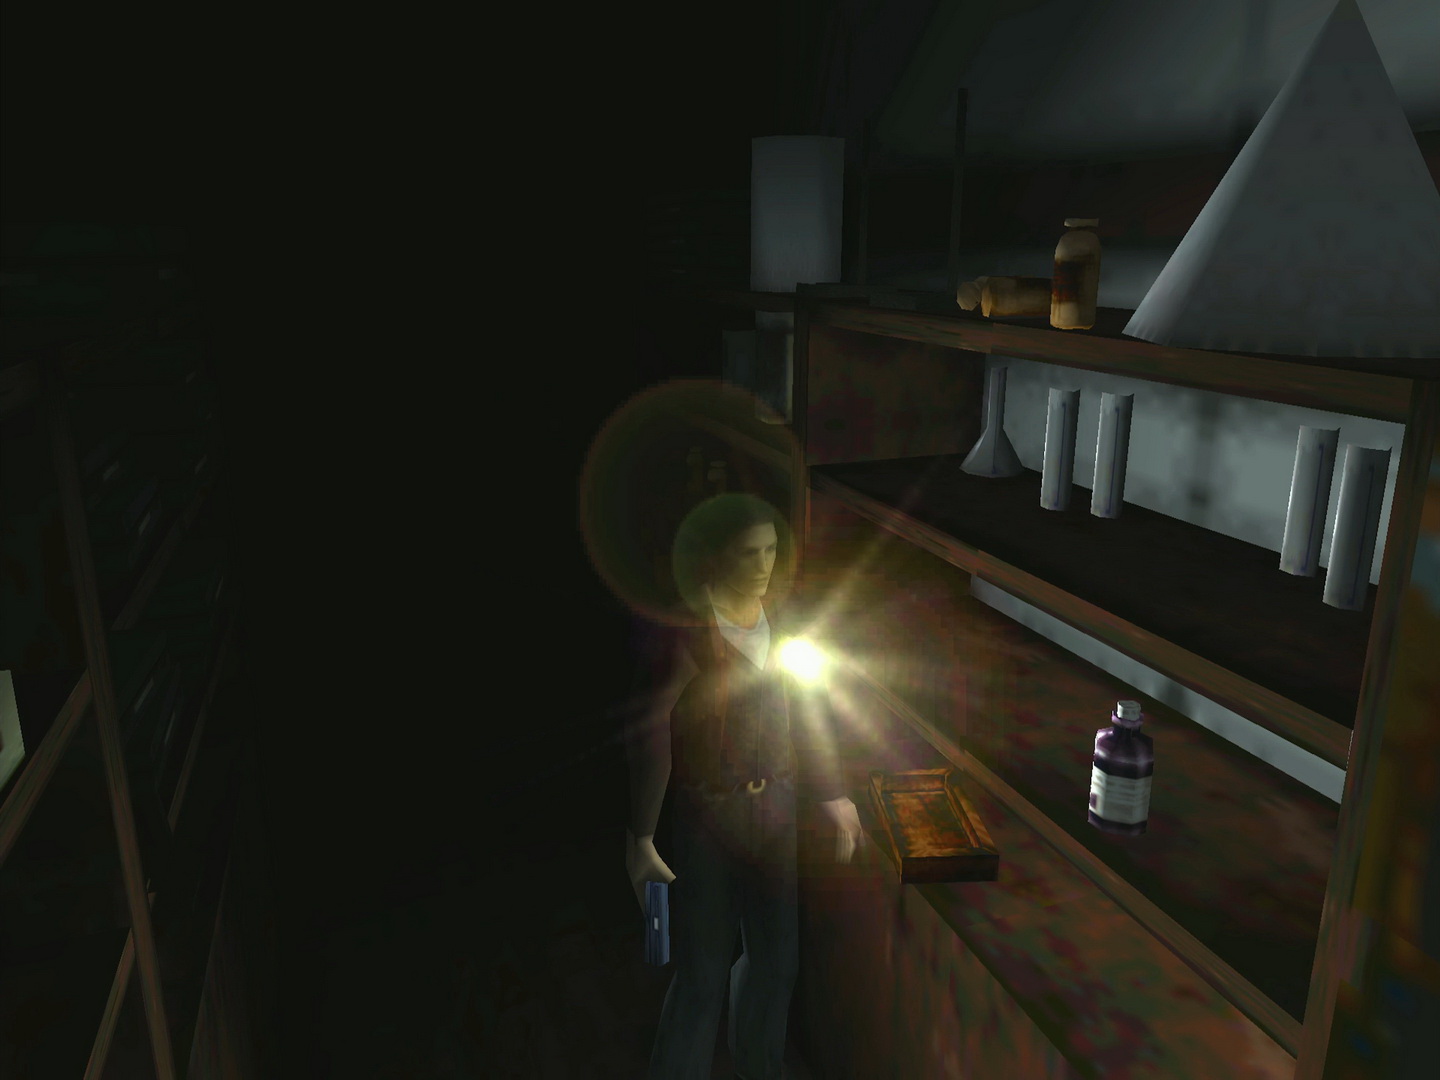
Enter the Lab Equipment Room first, where you'll find a purple 12 Chemical bottle on one of the side shelves, which is hydrochloric acid. Leave, be wary of a Gray Child that appears in the hall and enter the Chemistry Lab next door.
 |
 |
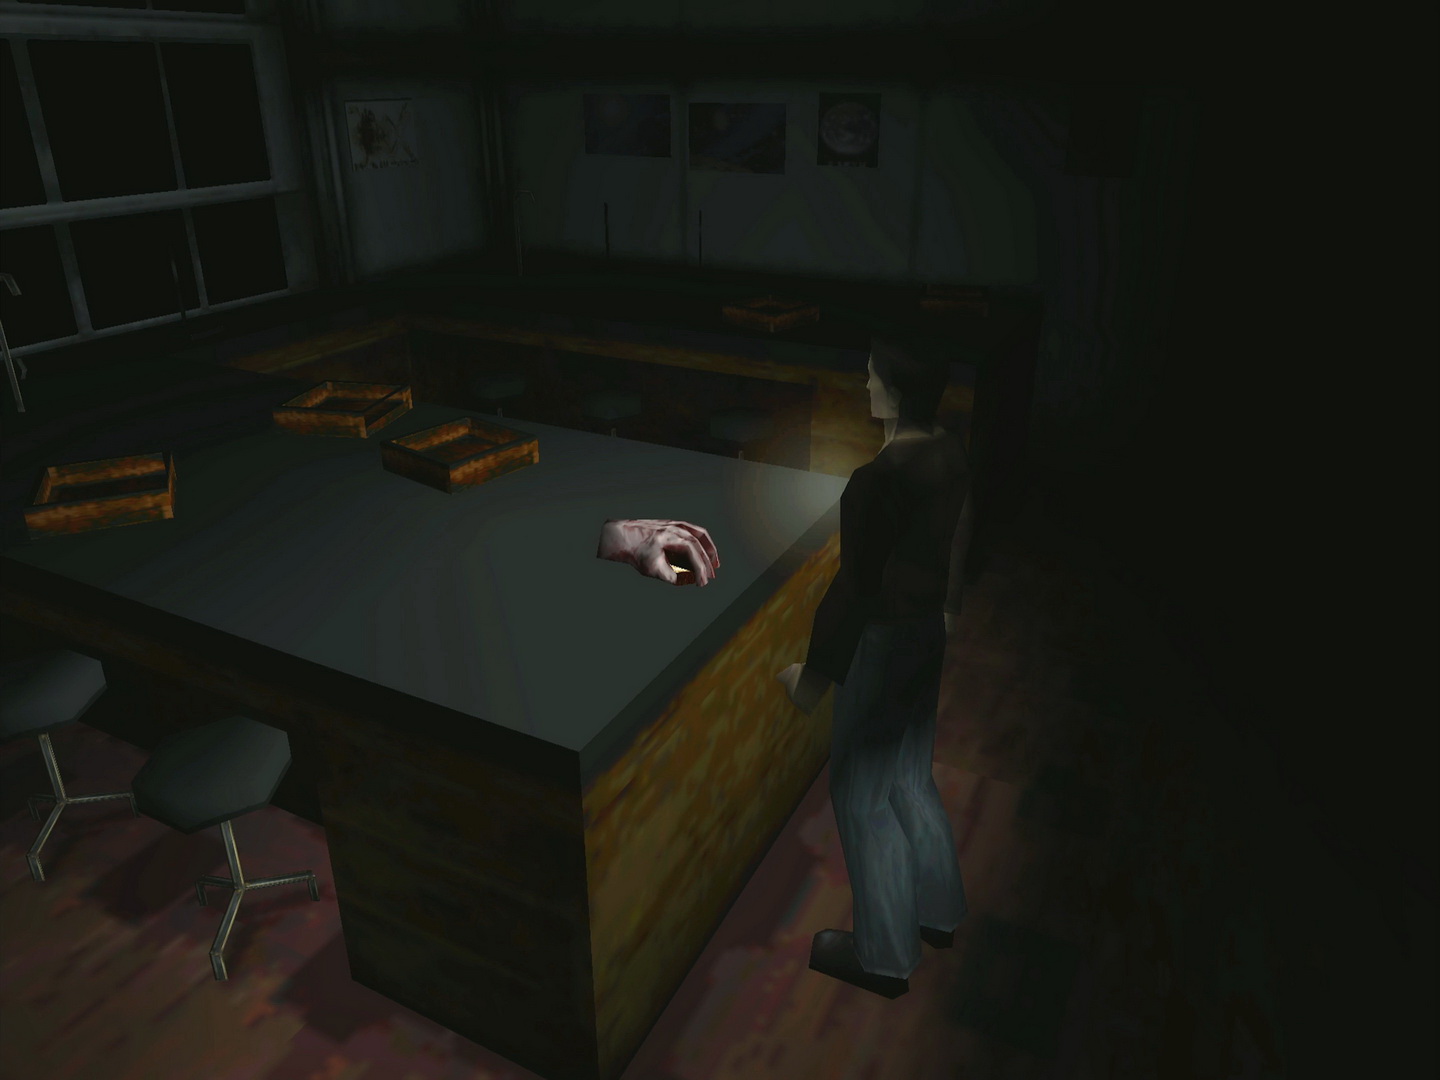
Find the hand statue on the middle lab counter. Remember the 10:00 message said, "Gold in an old man's palm. The future hidden in his fist. Exchange for sage's water." Use the Chemical as the sage's water to vaporize the old man's hand and get the 13 Gold Medallion. There's also a pack of Handgun Bullets deeper on the left side of where it was.
 |
 |
Before rushing back to the Clock Tower, there's a bit more of the second floor to explore while there's another staircase down in the bottom right anyway.
Note that the Library Reserve is locked, as the hallway is repopulated with Grey Children, and pass through the double doors to the right hall.
Second Floor Right Hall
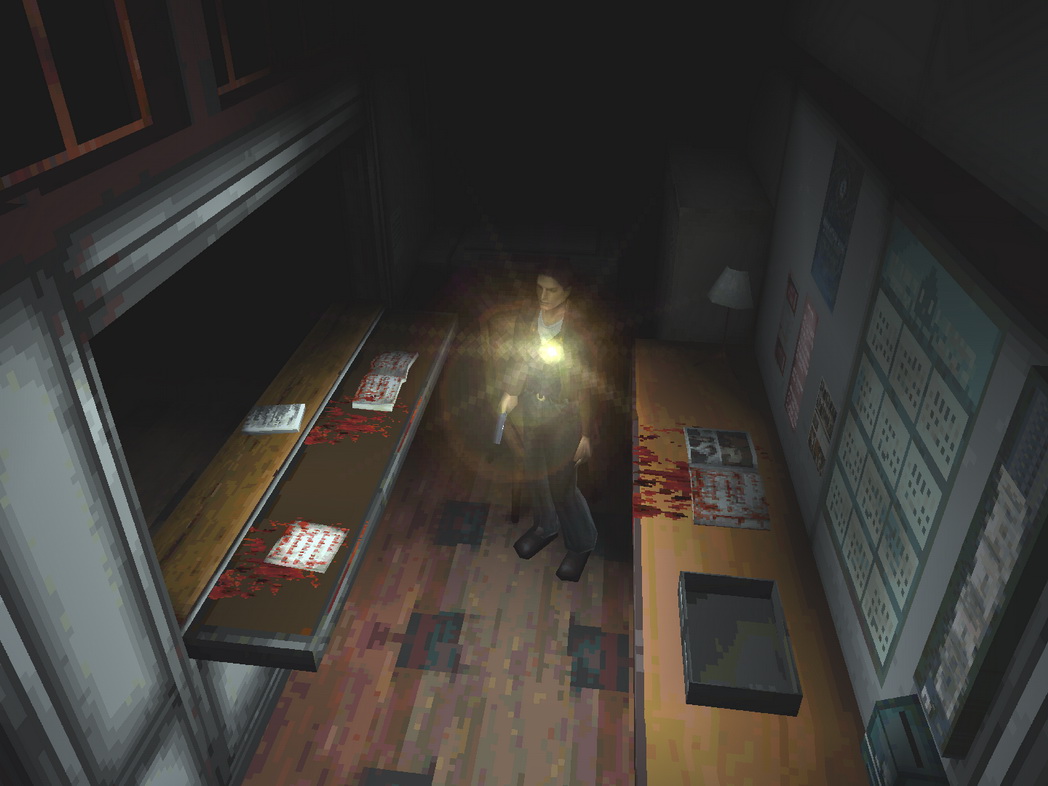
Enter the Library for a First Aid Kit on the desk, while another harmless Larval Stalker is accompanied by more pathetic friends by the back shelves. Inside the Library Reserve through the other door is a solo Grey Child, that's it. Well that was a whole lot of nothing. Unlock the door if you wish and return to the right hall.
The upper Classroom is empty, however there are Handgun Bullets on a table near the window in the lower Classroom, accompanied by two Grey Children. You'll also encounter more Grey Children in the hall and possibly another Larval Stalker.
Note that the bottom hall is unlocked, but we'll be heading there next as soon as the clock strikes 12:00 if you remember the earlier memos. So let's wait for now and head down the stairs on our way to the courtyard.
First Floor Right Hall
Avoid more Grey Children and enter the upper Classroom for Handgun Bullets at the back near another Larval Stalker, while the lower one has nothing for you. Consider unlocking the top hallway doors for convenience, and unlock the lower doors to pass through to the courtyard again.
Courtyard: Placing the Golden Sun
Insert the Gold Medallion into the left slot for "A Golden Sun" and you'll hear the clock hands move. Check the clock again up the steps to see the hands have moved to 12:00. The reception memo reveals your destination to be "A place with songs and sound". Head to the second floor bottom hall with the Music Room, using the quicker bottom right stairs route if you unlocked the 1F double doors there. Otherwise use the top left stairs and enter from the left hall.
Second Floor Bottom Hall: "A Place with Songs and Sound"
Greeted by Grey Children as always, take a brief detour in the Locker Room. Find the source of the banging, which is a locker on the other side. Open it for a nice surprise, followed by a not so nice sound shortly after... Exit, take care of one more Gray Child and now enter the Music Room.
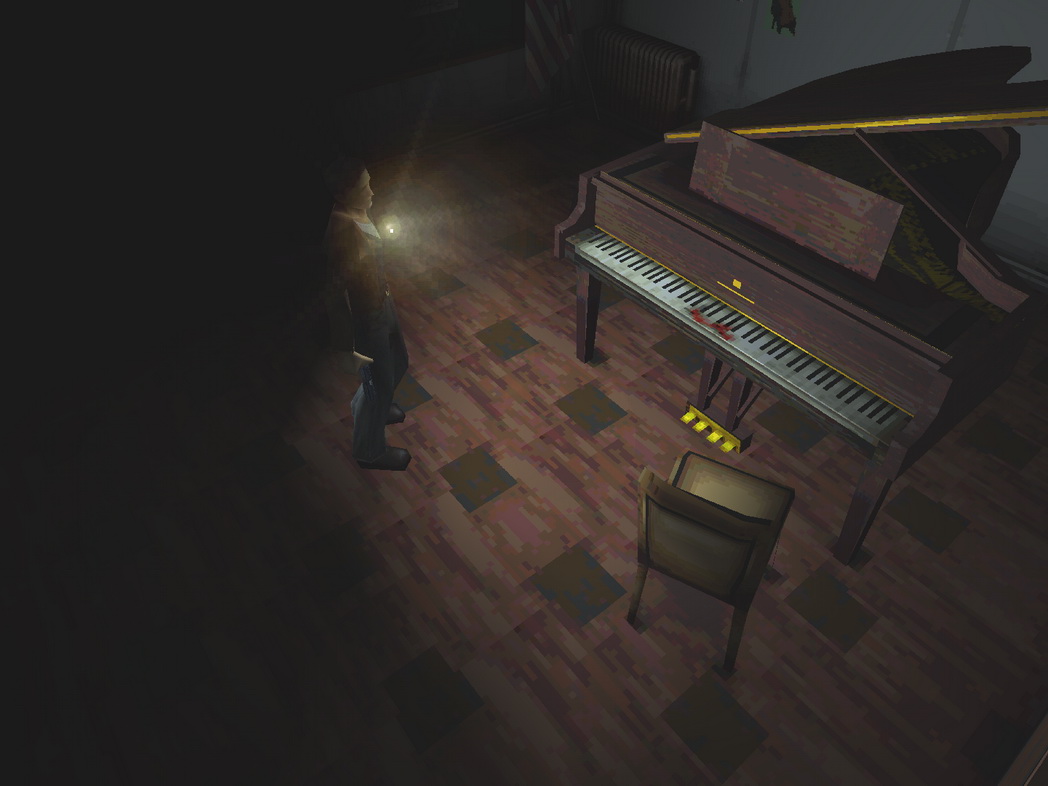
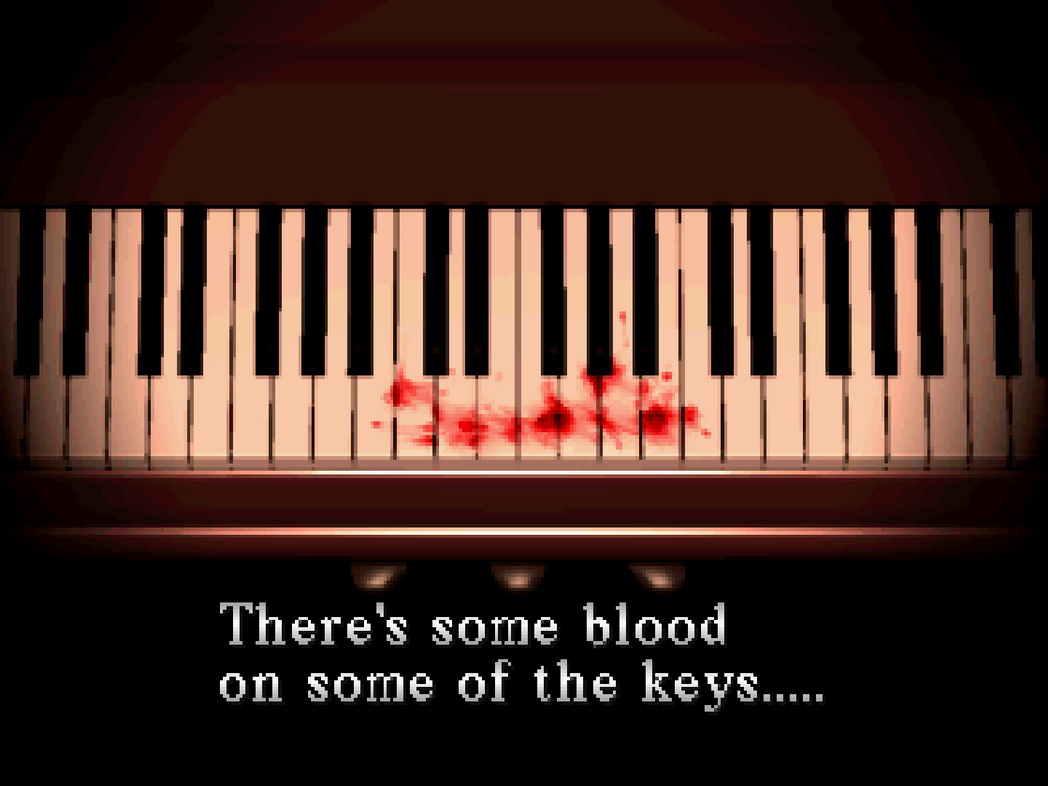
In the Music Room you'll find a riddle posted on the chalkboard while the nearby piano has blood smeared all over its keys. If you came here earlier, the piano keys were covered, but now that the Golden Sun has been placed it's time to solve a puzzle.
Piano Puzzle (Music Room)

|
If you check the piano you're able to press a selection of keys, some which work and play a tune and some that are broken and sound like a thump. Let's turn to the riddle posted on the chalkboard to understand what we must do here:
'A Tale of Birds Without a Voice'
First flew the greedy Pelican,
Eager for the reward,
White wings flailing.Then came a silent Dove,
Flying beyond the Pelican,
As far as he could.A Raven flies in,
Flying higher than the Dove,
Just to show that he can.A Swan glides in,
To find a peaceful spot,
Next to another bird.Finally out comes a Crow,
Coming quickly to a stop,
Yawning and then napping.Who will show the way,
Who will be the key,
Who will lead to
The silver reward.
So this riddle appears to describe the order that we must press a number of piano keys. Note that there are five birds, all known to be either black or white just like the keys of a piano. Let's review them just to be sure:
- Pelican = White
- Dove = White
- Raven = Black
- Swan = White
- Crow = Black
Note that some pelicans may be slightly grey with even some black flashes, but they are most commonly white and the one in this puzzle is specifically described as having white wings. Doves may also come in a slightly brown colour, and sometimes even referred to interchangeably with pigeons, but doves are more known as pure white birds.
Checking the piano, there are 12 keys in total, some working and some broken. You may first think you need to press the working keys in a certain order, but the first sentence of the riddle may have flown right over your head. "A Tale of Birds WITHOUT a Voice". You may also remember the Reception note that said:
A silver guidepost is
untapped in lost tongues.
Awakening at the ordained order.
Lost tongues, eh? And you may also notice that there are seven working keys and precisely five broken keys, the same number of birds in the riddle. And thus we have unlocked the first key to the puzzle. Don't say you weren't given enough clues cause they were all there if you paid any attention.
Now we must determine the order these five broken keys are pressed by reading the posted riddle. Let's get started.
First flew the greedy Pelican,
Eager for the reward,
White wings flailing.
So the Pelican, which clearly represents a white key with its "White wings", represents the first key to be pressed. "Eager for the reward" doesn't help us exactly situate it just yet, while "White wings flailing" suggests it probably didn't get too far. But we'll need to keep reading to be sure.
Then came a silent Dove,
Flying beyond the Pelican,
As far as he could.
This means the Dove, another white bird, takes the final broken white key on the right, key 10, as far beyond the Pelican as possible. Note that it being "silent" is just another hint to use the broken keys that have no voice. And with no other clue for left or right direction, we must assume beyond means farther right, as one would read a book or perhaps a music sheet. We'll still have to wait to exactly place the Pelican.
A Raven flies in,
Flying higher than the Dove,
Just to show that he can.
So the Raven, a black bird, one-ups the white Dove even further. Note the double or even triple entendre of "Flying higher", signalling a higher up black key while also applying to music and thus a key farther right. And while the Dove could only go as far as key 10, there is one broken black key just past it as key 11, which was obviously off limits to the Dove as a bird of the wrong shade.
A Swan glides in,
To find a peaceful spot,
Next to another bird.
And here's our final white bird. Since the Swan must sit beside another bird and is also white, it has to take key 8 beside the Dove in key 10, the only spot two broken keys sit directly next to each other. The fact that it's "a peaceful spot" should also clue you to that spot since the Dove, which sits beside it, is known as a symbol of peace. That also locks in the Pelican at key 3, which is the only remaining broken white key.
Finally out comes a Crow,
Coming quickly to a stop,
Yawning and then napping.
Our last bird the Crow just wants to nap and takes the first open key he can find to do so, which is key 2, the first broken and black key. And thus we are left with the following solution.
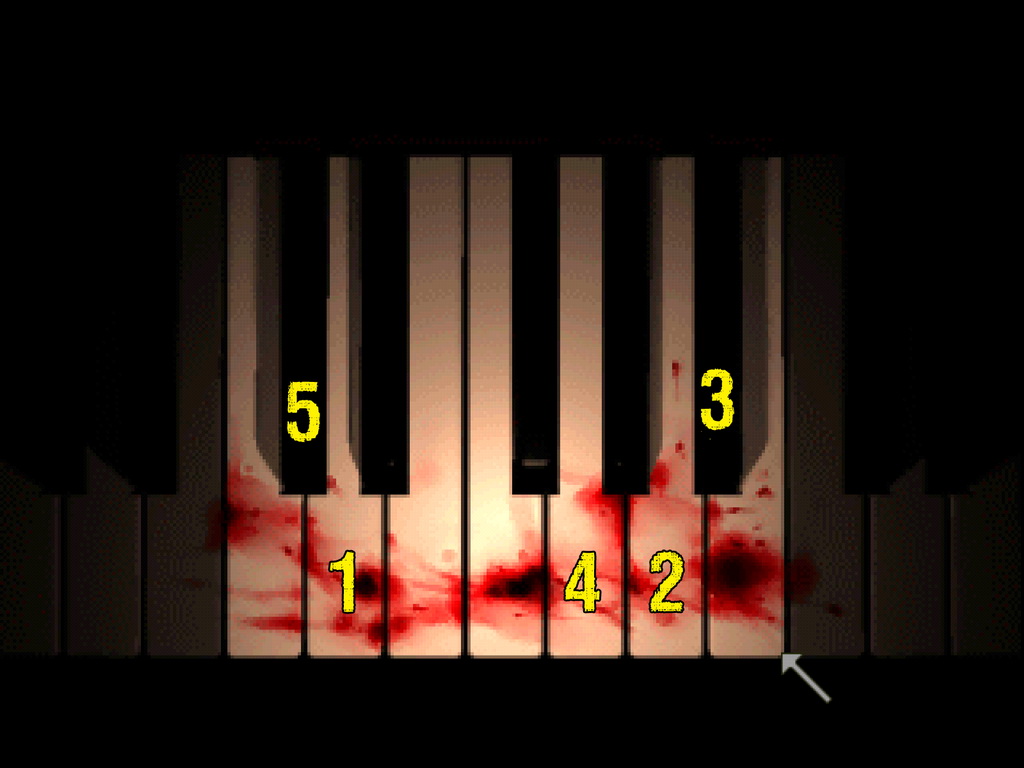
1. Pelican
2. Dove
3. Raven
4. Swan
5. Crow
Once correctly pressed, "The silver reward" (Silver Medallion) will drop from above the chalkboard.
Pick up the 14 Silver Medallion that drops to the floor and make you way back to the courtyard, preferably via the bottom right stairs. Watch out for more Grey Children on your way back.
Courtyard: Placing the Silver Moon
Insert the Silver Medallion into the right slot for "A Silver Moon" and the clock will shift again. Examine the tower to see the time is now 5:00. The Reception message corresponding to that time said, "Darkness that brings the choking heat". How about the Boiler Room in the basement?
Only the bottom right staircase reaches the basement, so head there past any Grey Children to reach it.
Basement: "Darkness that Brings the Choking Heat"
Enter the Boiler Room through the right door and activate the boiler at the illuminated red light. Remember the 5:00 message, "Flames render the silence, awakening the hungry beast. Open time's door to beckon prey."
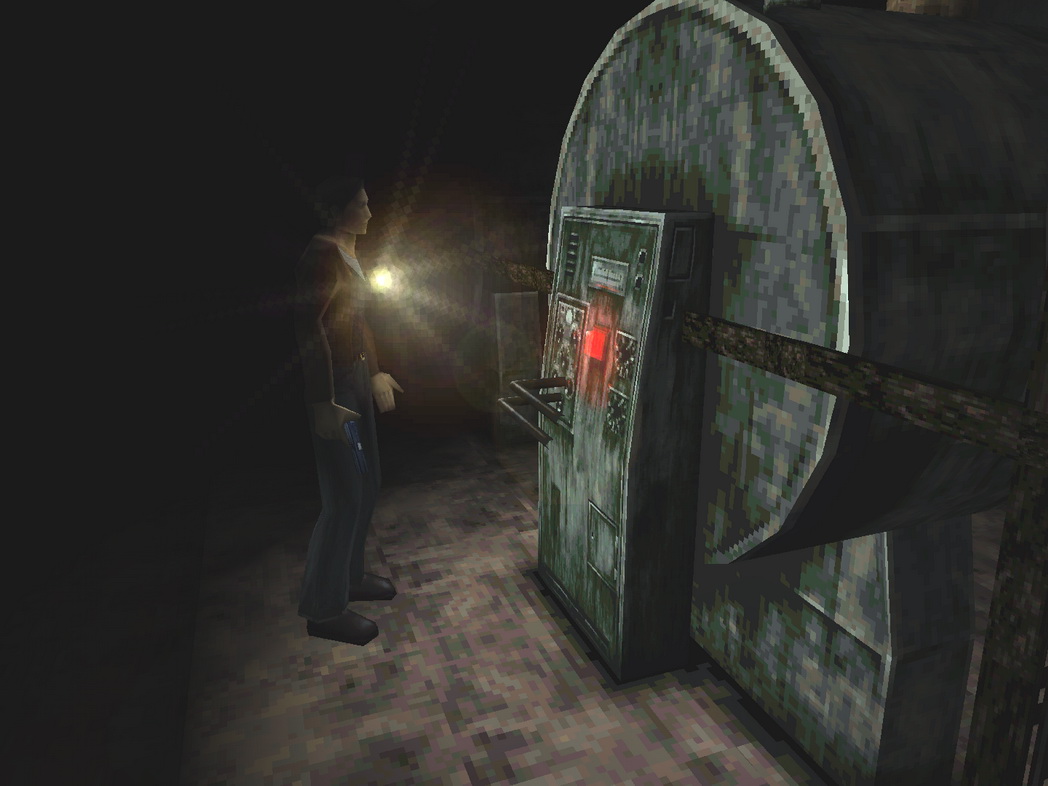
Well, that doesn't sound like the greatest news, but "Open time's door" at least hints that we should now be able to open the Clock Tower's doors. Head back to the courtyard past any Grey Children in the halls.
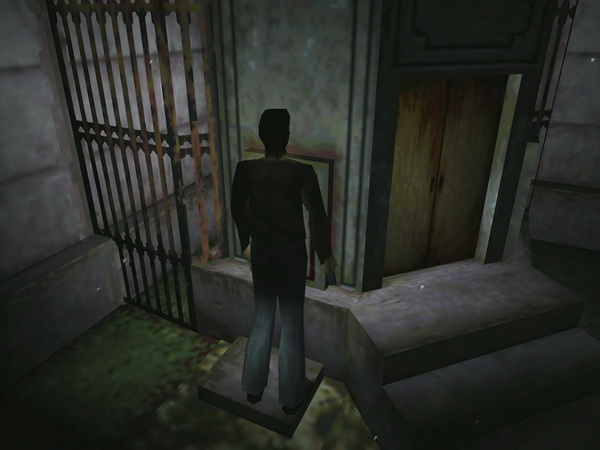
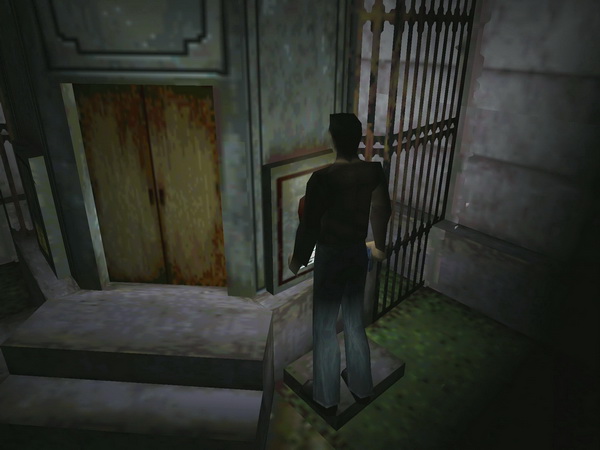
Clock Tower
Slip through the small doors to enter the now unlocked Clock Tower. Step down the ladder as sirens sound and up the ladder at the other end. Don't mind the large KEEP OUT sign before the ladder... Exit through the doors up top to see what's on the other side.
| 01. Old Silent Hill | 03. Nightmare School |