Building World 2nd Time
Welcome to the eleventh chapter of the complete walkthrough guide for Silent Hill 4: The Room (2004, PS2, Xbox, PC), covering the second visit to Building World. This guide provides a comprehensive walkthrough with all item locations, detailed puzzle solutions, and boss strategies. It also includes complete maps with all items and monsters marked for easy reference.
Color legend
Chocolate Milk – items
Wine Bottle – weapons
Pistol Bullets – supplies
First Letter – memos
Portal – Portals connecting Room 302 and various Worlds
Contents
- Complete Maps
- Walkthrough
- B10 Opening Rooftop: The Prick
- B12: Leaving Eileen Behind
- B12 to B15: Staircase to Staircase
- Bar Southfield: Placing the Billiard Ball
- Heading Back to Eileen
- B8 to B5
- Sporting Goods Store: Placing the Volleyball
- B5 to B3
- B3 Birthday Cake Room: Placing the Cake Candles
- B3 to B1: Optional Trip for Items
- B5 to B7
- Pet Shop: Placing the Stuffed Cat
- The Chiming Clock Room
- Beyond the Clock Door: Another Route to Bar Southfield
- Bar Southfield: Escaping Building World with Eileen
- Below Building World
Complete maps |
|
Walkthrough
"I want to go back to that time... Things were so good then..."
B10 Opening Rooftop: The Prick
Surely you can guess who that is in the cutscene. Your old buddy Richard who is now Victim 19. Before he actually shows up, read the Reminisces (41/52) memo on the ground ahead of Henry, and find the Nutrition Drink by the left car before the memo. There's also a Portal on the east wall beside the entry door.
Room 302Find the Red Diary - July 29 (42/52) at your front door. Take the time to clear any hauntings if you wish and return to the Building World. |
Back to business, the reminisces memo found here outlines this world's 2nd trip puzzle.
Reminisces (B10 Elevator Lot)
The nostalgic memo reads as follows:
"I want to go back to that time... Things were so good then... The day of my birthday... The cute cat in the pet store... All those balls in the basket... Playing pool was fun too... The door of time was wide open...
When I see four things, I can't help but remember that time..."
The author refers to five specific things, all corresponding to something found in this world:
- Memory 1: There's a room with a birthday cake on B3.
- Memory 2: There's a pet shop with an open cage on B7.
- Memory 3: There's a large basket of volleyballs in the sporting goods store on B5.
- Memory 4: There's a pool table in Bar Southfield on B15.
- Memory 5: There's a locked door with a clock on it on B8 near the pet shop.
Specifically, the author is recalling four nostalgic times (memories 1-4), implying that the "door of time" (memory 5) will open once they are recreated. Therefore you must find four items and place them in the first four spots mentioned above to unlock the door of time in the fifth spot.
This is how you will open up an alternate route to escape this world with Eileen. Read on below for the location and placement of each item.
Still in the open lot, Richard will enter the party as you near the elevator, whether you wish to fight him or not.
Ghost Victim 19: Richard Braintree (Optional Mini-Boss)
So is he worth fighting? Well, he's not too prolific even in this world, only appearing in a few spots. But he will return in a late staircase and can pose quite a threat there. So if you do have a Silver Bullet remaining, now is the time to use it. If not it's no big deal and you can just ignore him, but feel free to attack him with normal methods if you want to eliminate him. To do so, use your trusty Rusty Axe and unleash charge up attacks on repeat. Note that Richard's teleporting more or less becomes a nonfactor since Henry's charge up attack will always lock onto Richard even if he changes locations in the middle of the swing. Use that to your advantage and beat him down until he doesn't get up anymore, then stab in your Sword of Obedience. Note that Holy Candles will affect him significantly by freezing and damaging him during his stuttery attacks, if in their radius. Already a very unique Ghost though, Richard may bail out and not return (until the later staircase) if you use just one Holy Candle (or sometimes may bail like this during regular fighting if you're not relentless), but two placed together at his feet will drop him no problem before that happens, allowing him to be stabbed. |
 Richard is the most unique Ghost in the game. Not only does he walk on his own two feet, he has a teleporting ability that doesn't keep him in the same spot for long. This makes him a bit unpredictable to fight.
 Make your choice with Richard and then enter the left elevator. Make sure Eileen comes with you inside, and press the bottom button on the panel to descend to B12.
B12: Leaving Eileen Behind
If you move through the elevator's south doors you can find a Holy Candle by the east wall. Otherwise, take the ladder in the elevator to the shower room underneath, leaving Eileen behind for a while.
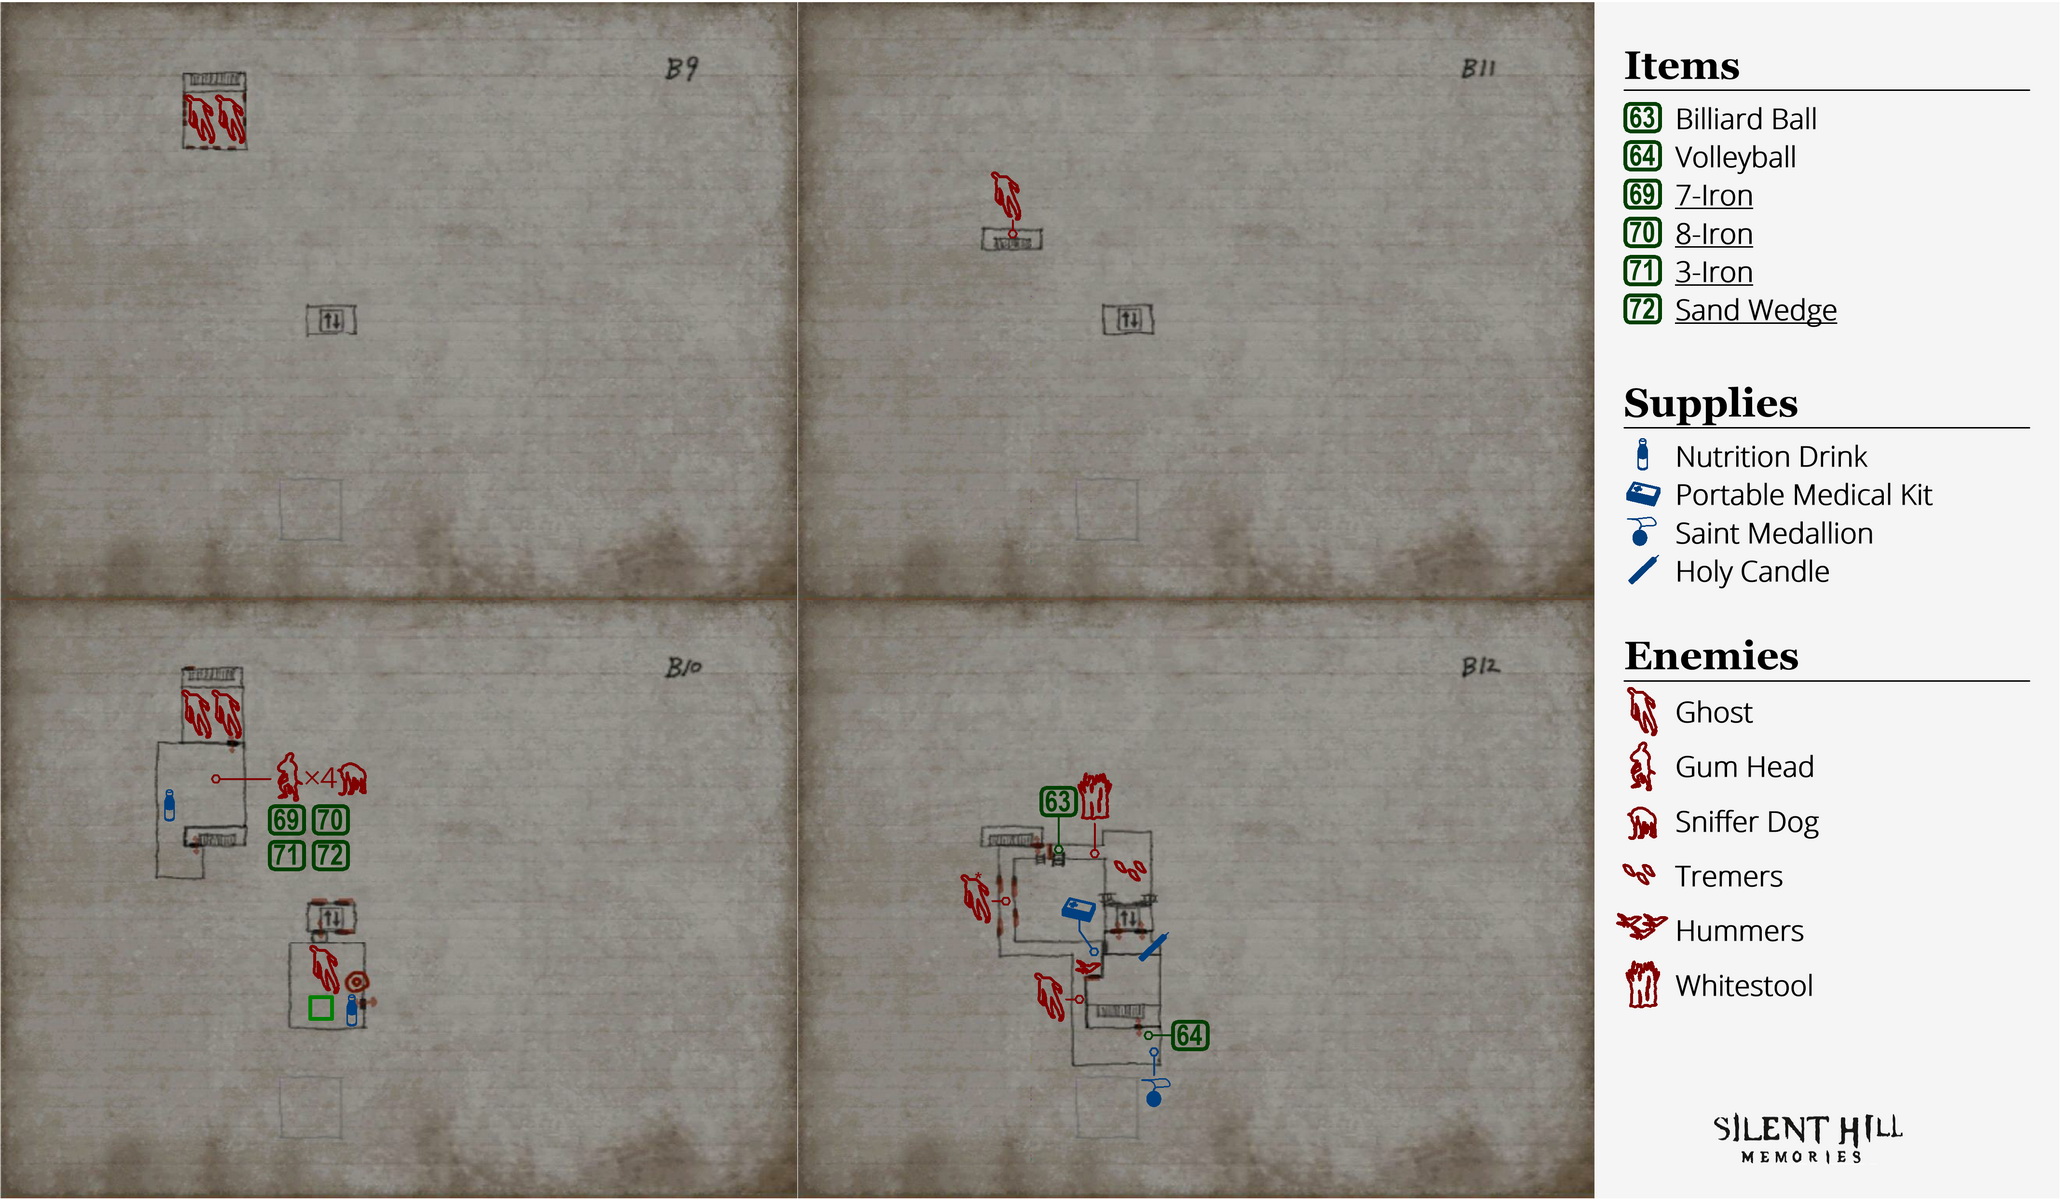
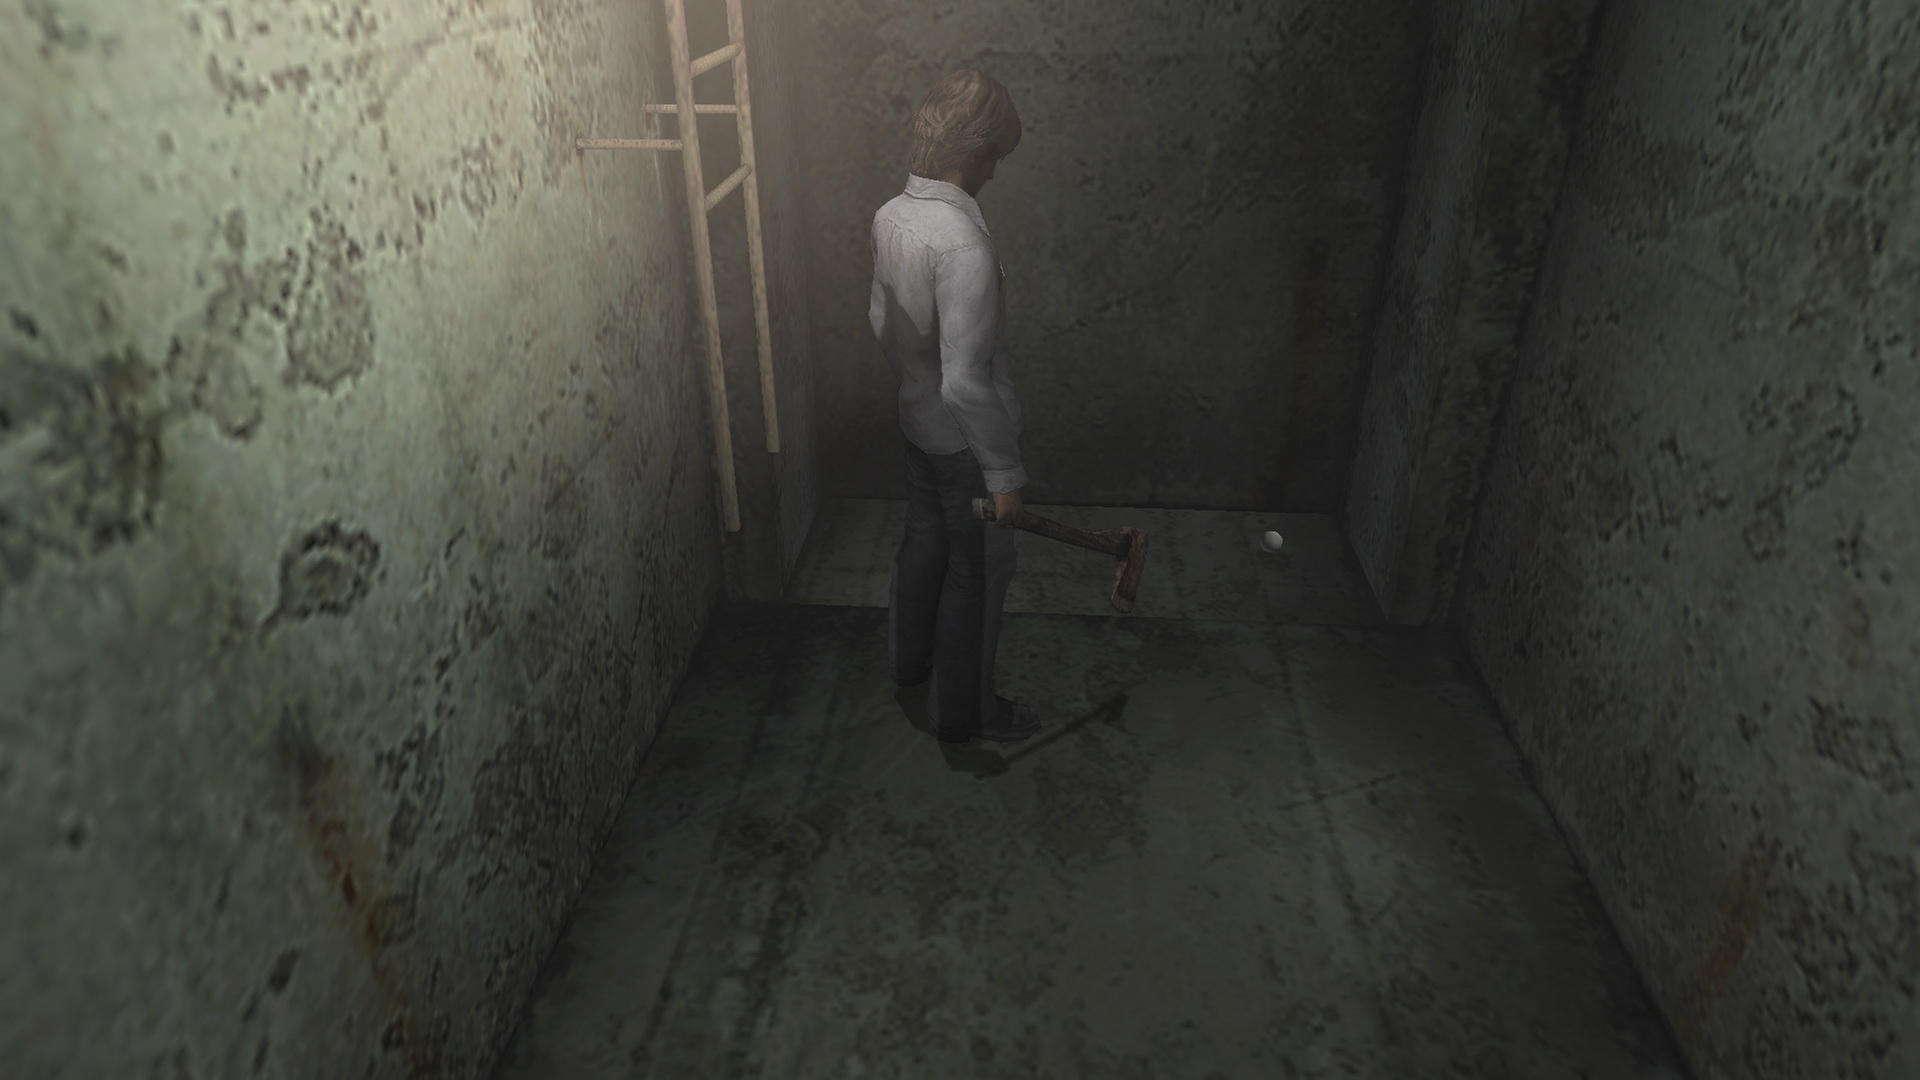 In the shower room, clear the Whitestools blocking the path in the next hall and pick up the 63 Billiard Ball in the corner by the ladder there. This was mentioned in the reminisces memo. Head up the ladder.
Follow the noisy alley around the next two corners and a cutscene will play. After, Cynthia's Ghost will appear if she's still active, along with a regular Ghost. Quickly grab the Portable Medical Kit by the fence, then take a right to the next pathway.
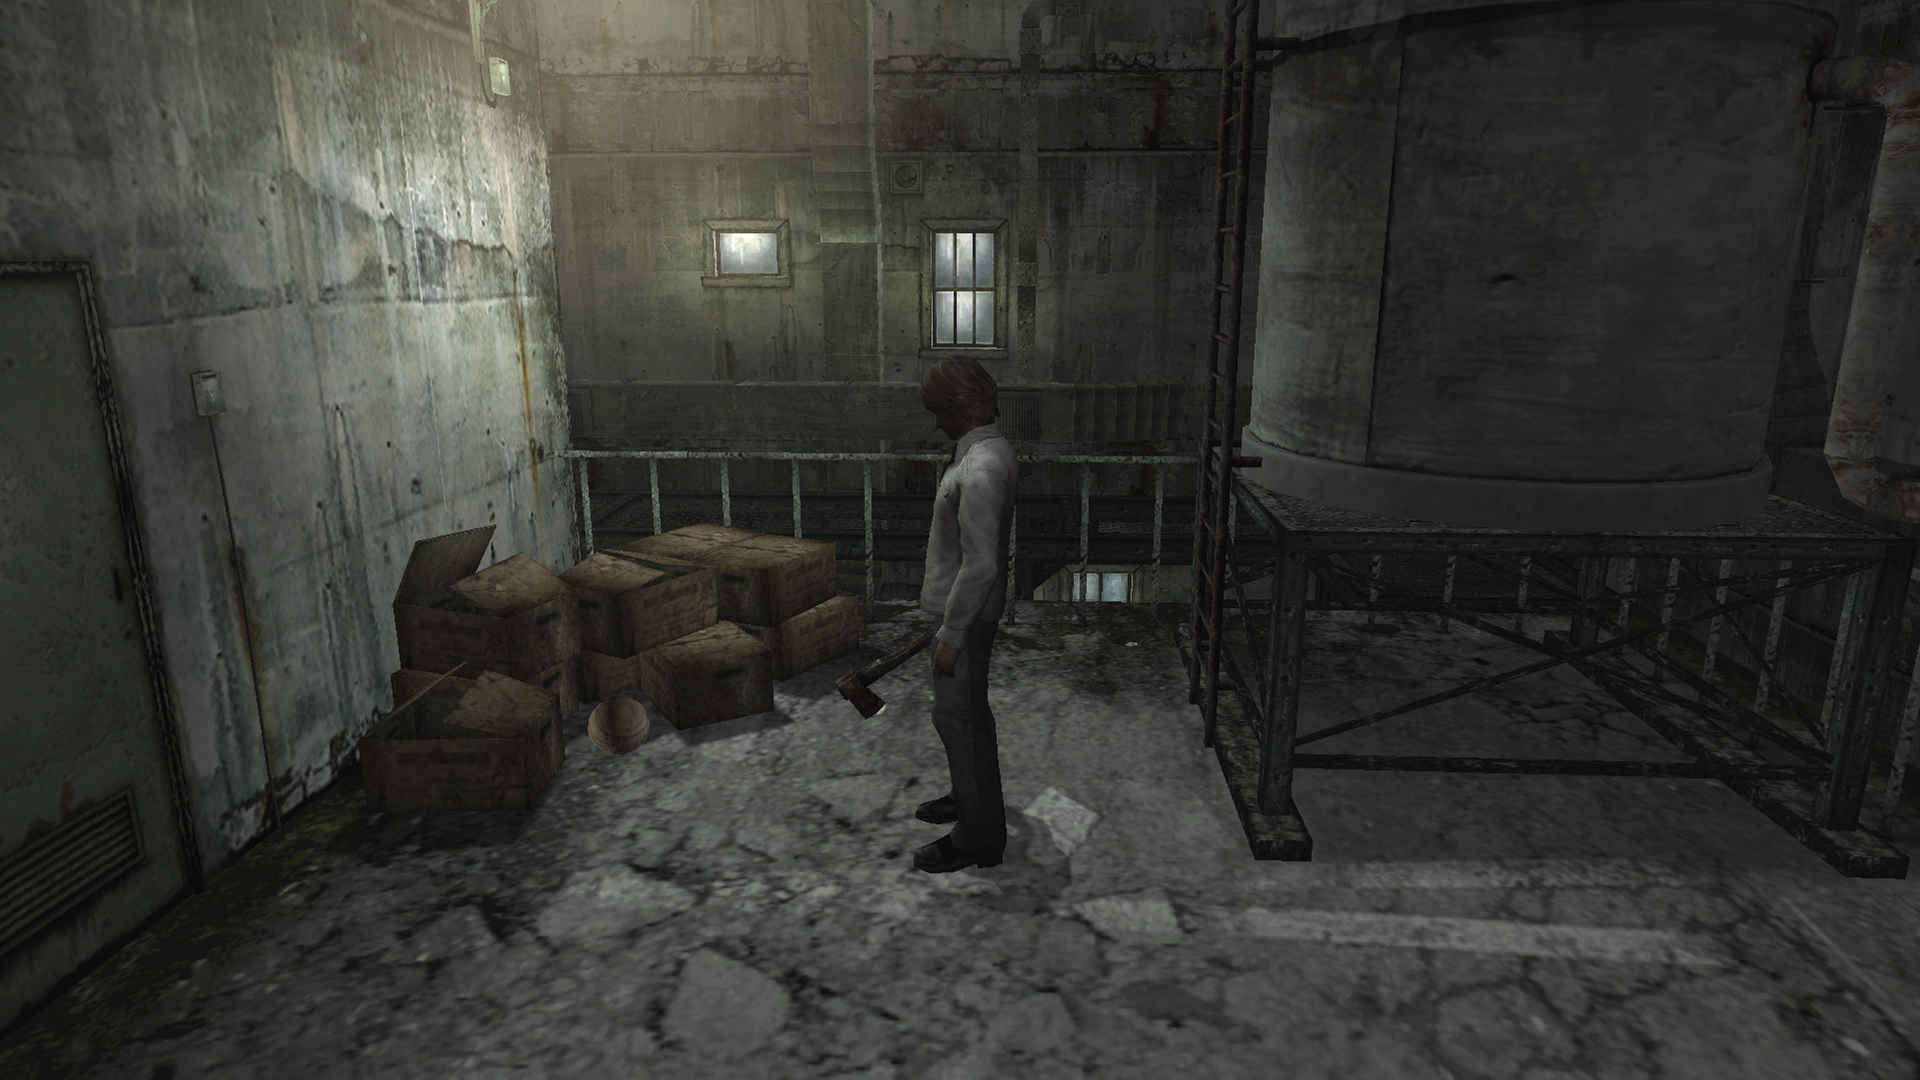 At the other end of this rooftop the camera will change to reveal a 64 Volleyball by the boxes, another part of the reminisces. There's also an easy-to-miss Saint Medallion near the railing past the boxes. Move through the door when ready.
B12 to B15: Staircase to Staircase
Now in the familiar giant fan room, five Wheelchairs are glad to make your acquaintance below. Head to the final steps and wait for the best moment to dart through the door to the left. You'll want an opening by the stairs and the door for best results.
Through that door is another staircase. Before moving down, head around to find a Holy Candle at the other end. Now descend and enter Bar Southfield through the final door on the path.
Bar Southfield: Placing the Billiard Ball
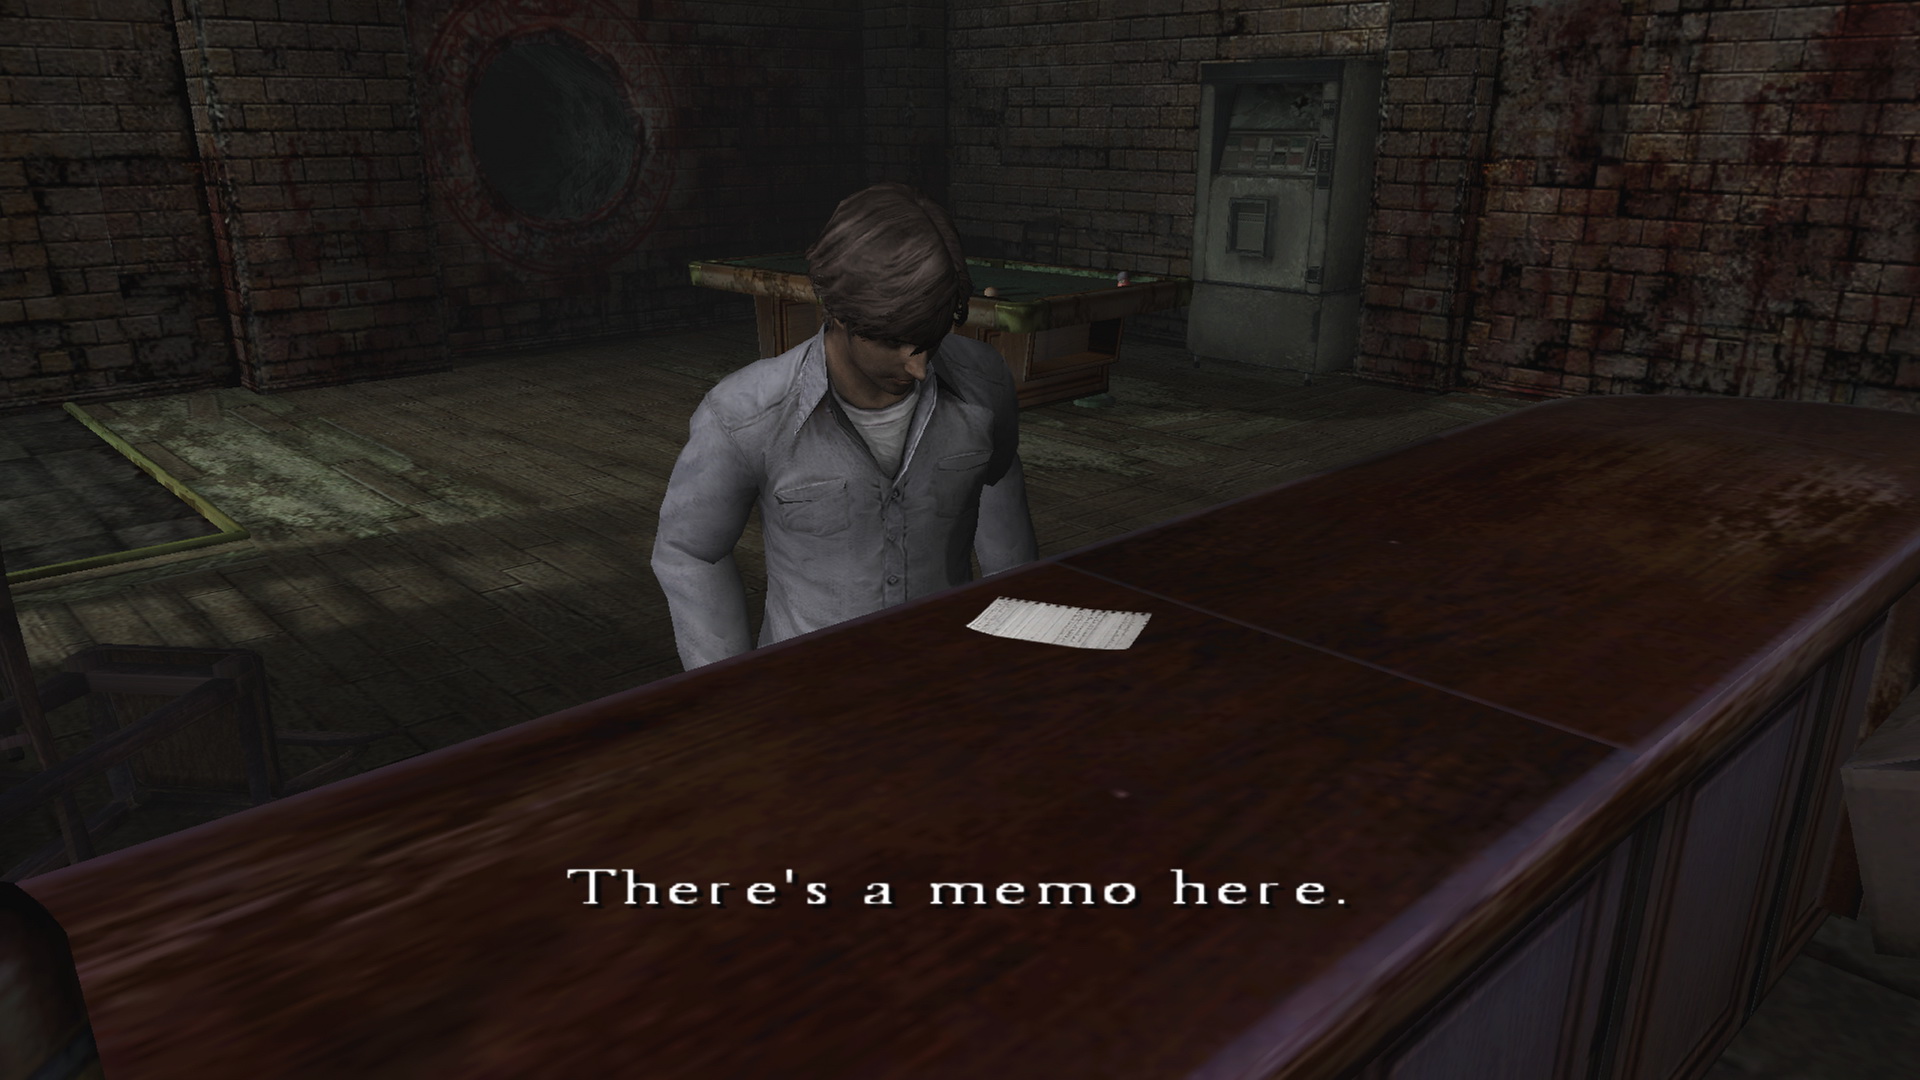
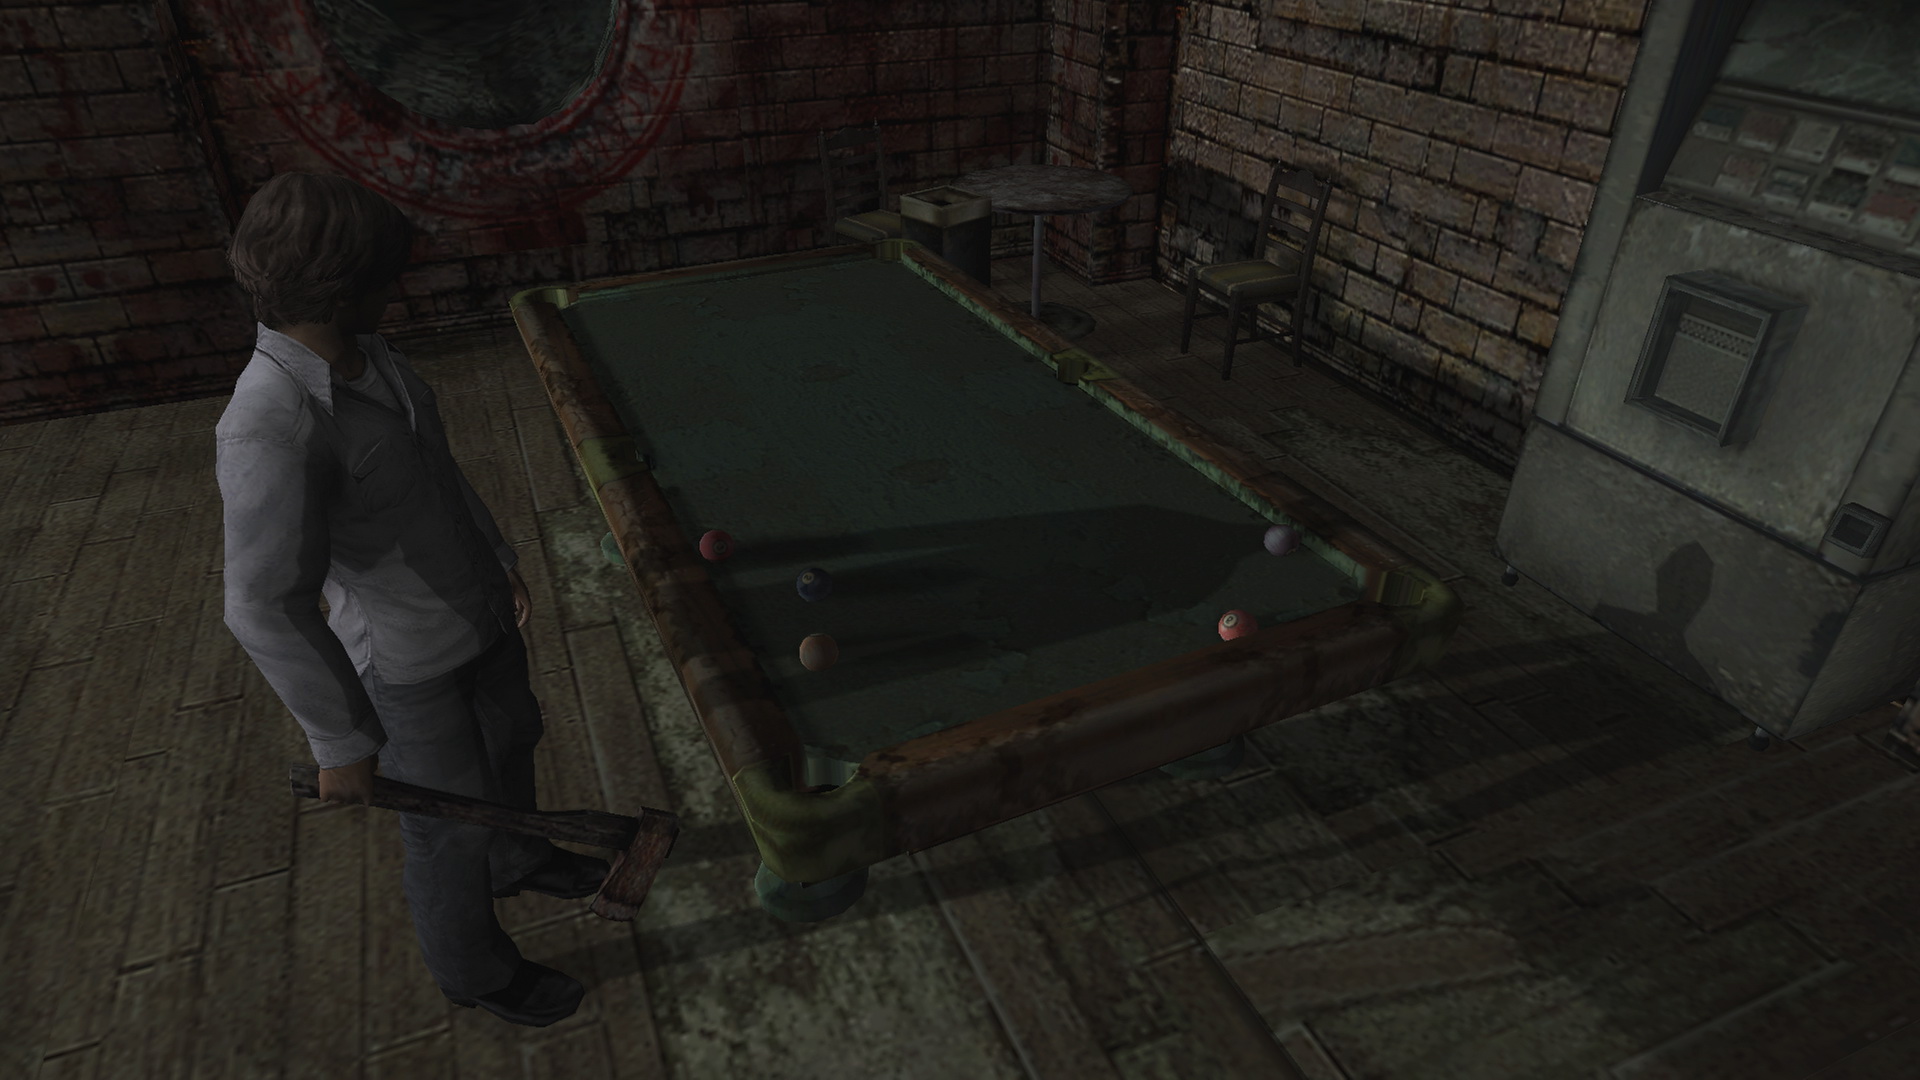 Turn to your right to find the billiard table and place the Billiard Ball there to complete the first reminisce. There's a memo on the bar about the keypad being changed again, but without Eileen we can't advance anyway so we'll come back to it. After all, the whole point of the reminisces puzzle is to open up another route for Eileen to get here.
Heading Back to Eileen
Now it's time to reclaim Eileen and tend to the other reminisces. Head back up the previous staircase on the building side and up the Wheelchair staircase to B12. Now follow the pathway all the way back to the ladder, descend to the shower room and ascend the right side ladder to meet Eileen in the elevator. If you don't see Eileen you may have climbed the wrong ladder to the other elevator beside it.
B8 to B5
Now press the top button on the elevator to head up to B8. If you exit and enter the east elevator, through its north doors you can find Revolver Bullets at the end of the twisting path, however you'll have to deal with three Gum Heads on the way (including a New Type that may steal a Holy Candle or potentially one of your weapons).
Back in the elevator, go through the south doors to the outer ledge and head west past a harassing Richard unless you dealt with him already.
Now on another rooftop with a staircase, you may want to handle the two Sniffers here and pick up the Nutrition Drink by the door. Take the stairs all the way up and pass through the door there.
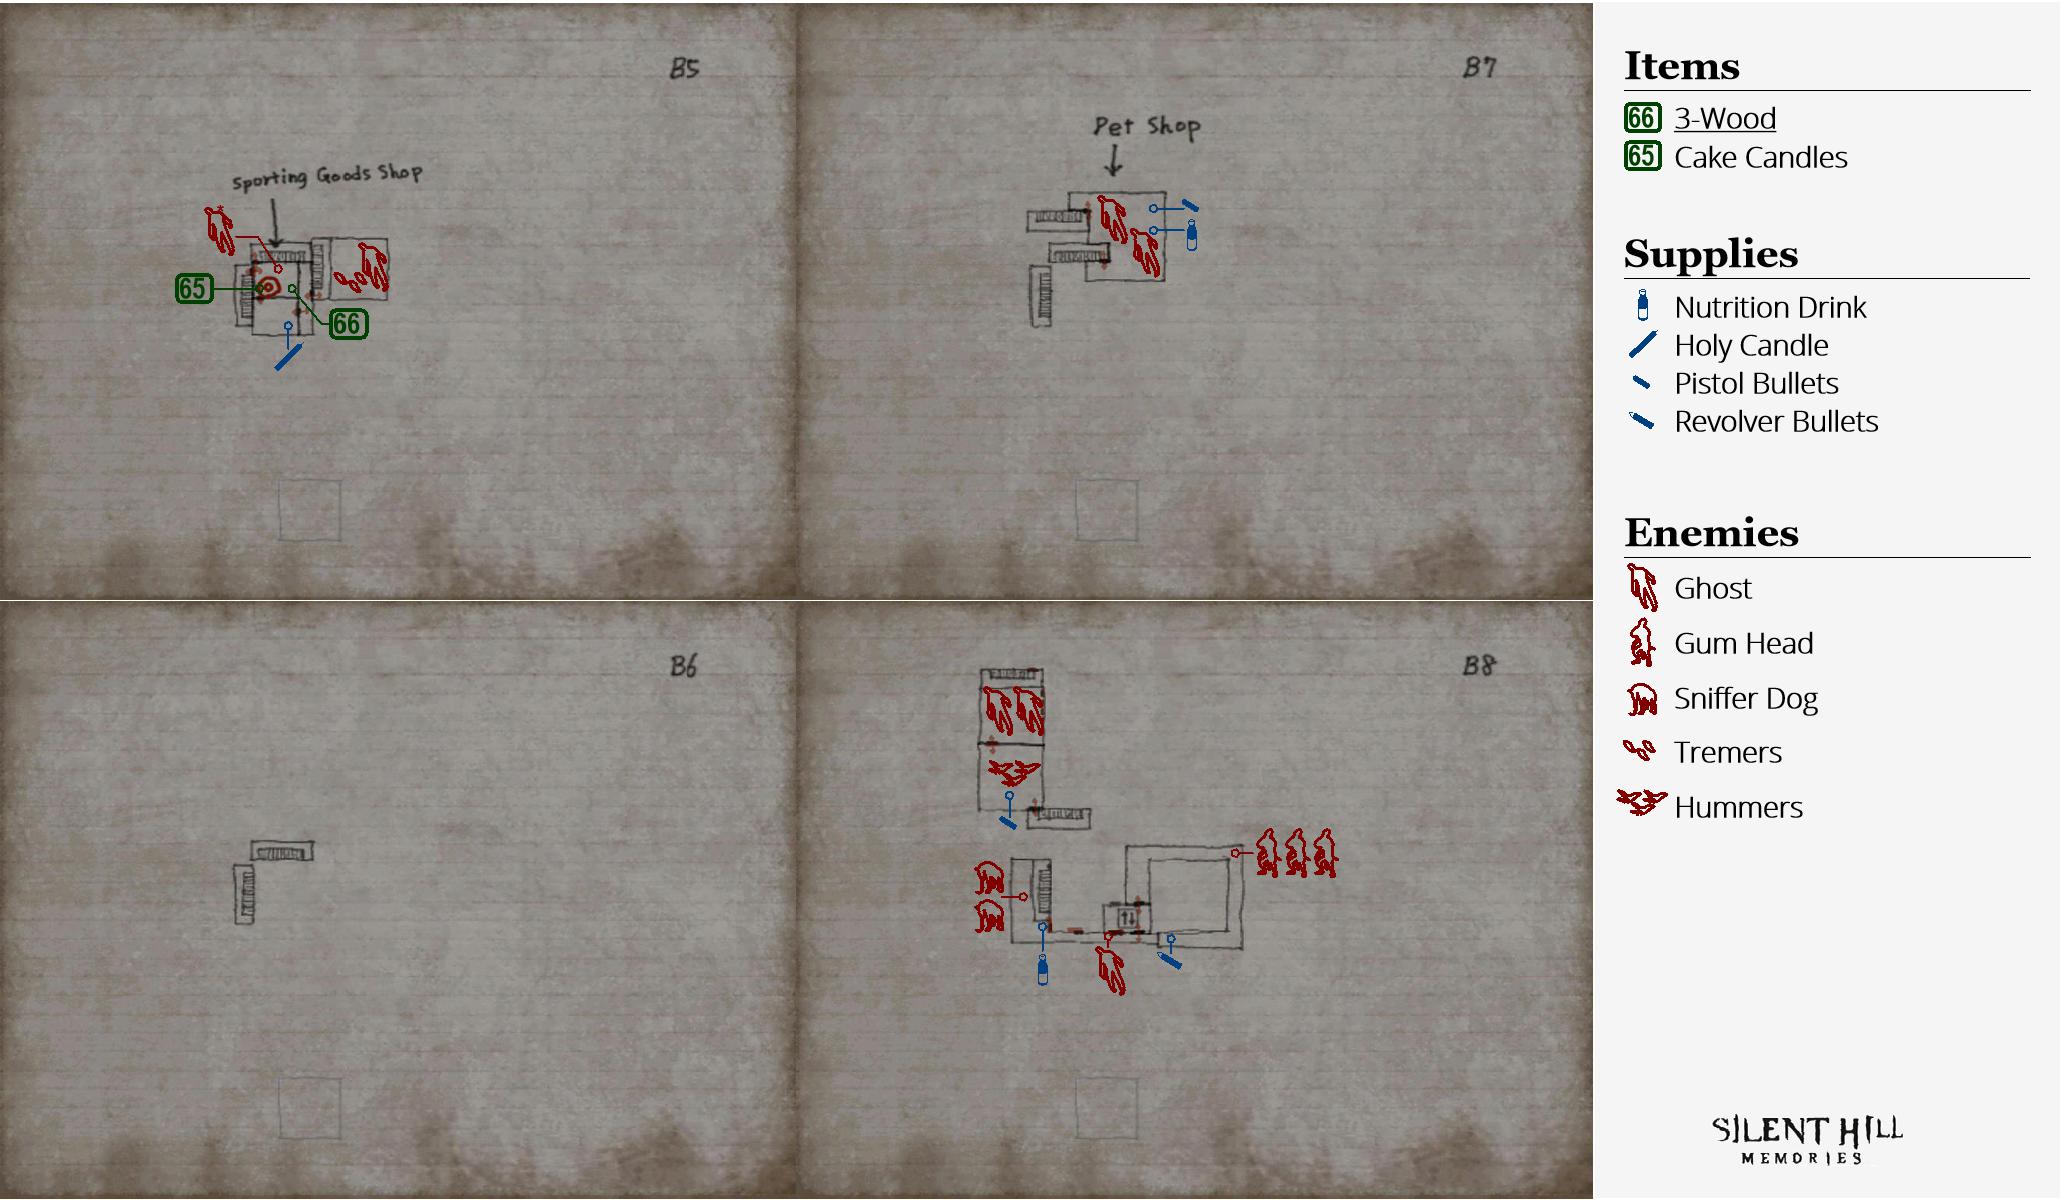
Sporting Goods Store: Placing the Volleyball
 Inside the store, place the Volleyball in the large basket ahead for the second reminisce. There's also a 65 3-Wood club in the other corner, a Portal on the wall, plus very important 66 Cake Candles on the front counter by the door you came in. You'll need those.
B5 to B3
Head through the south door and pick up the Holy Candle on the floor by the shelf in the other corner, then pass through the door there.
Take the other door in the short hall and head up the large staircase past any Ghosts or Tremers hanging about. Head through the door at the top.
B3 Birthday Cake Room: Placing the Cake Candles
If you left the Sword of Obedience in the Ghost here earlier, it'll remain just as you left it. Otherwise that Ghost will pester you here.
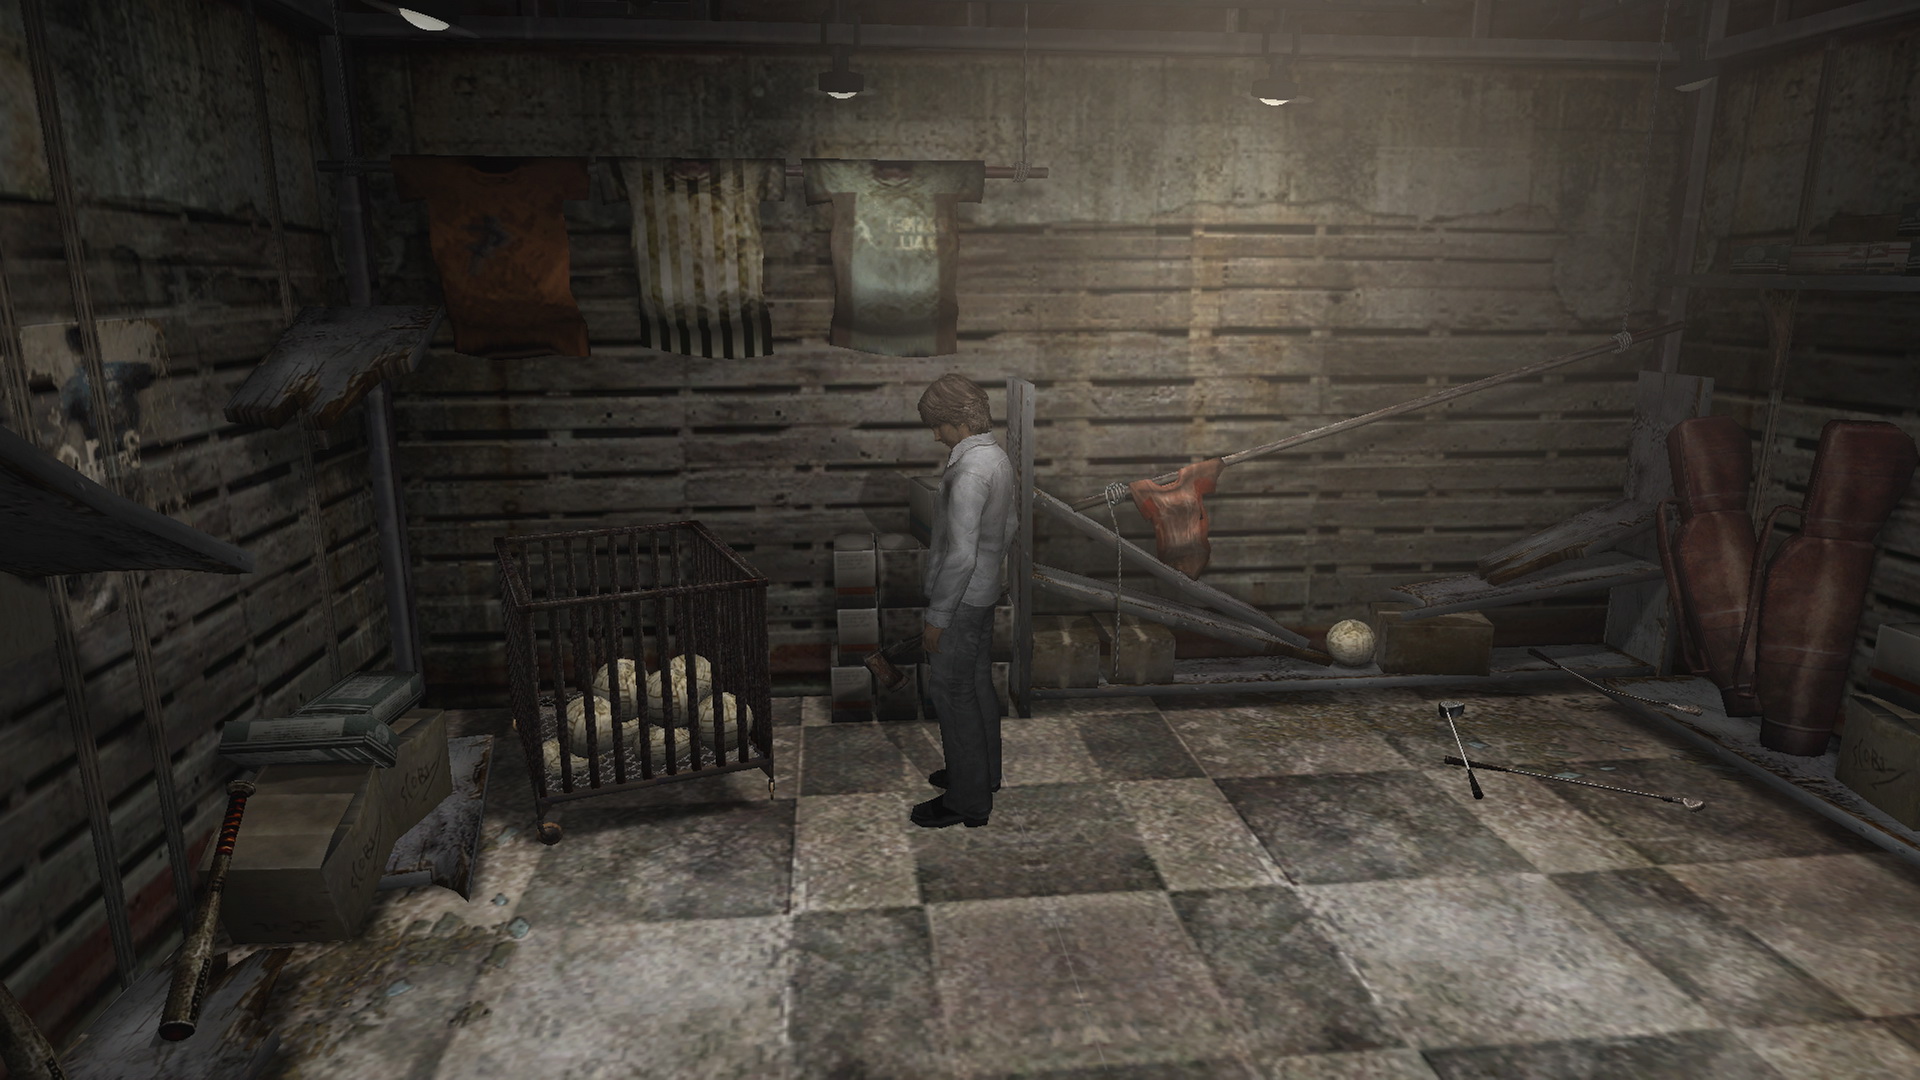
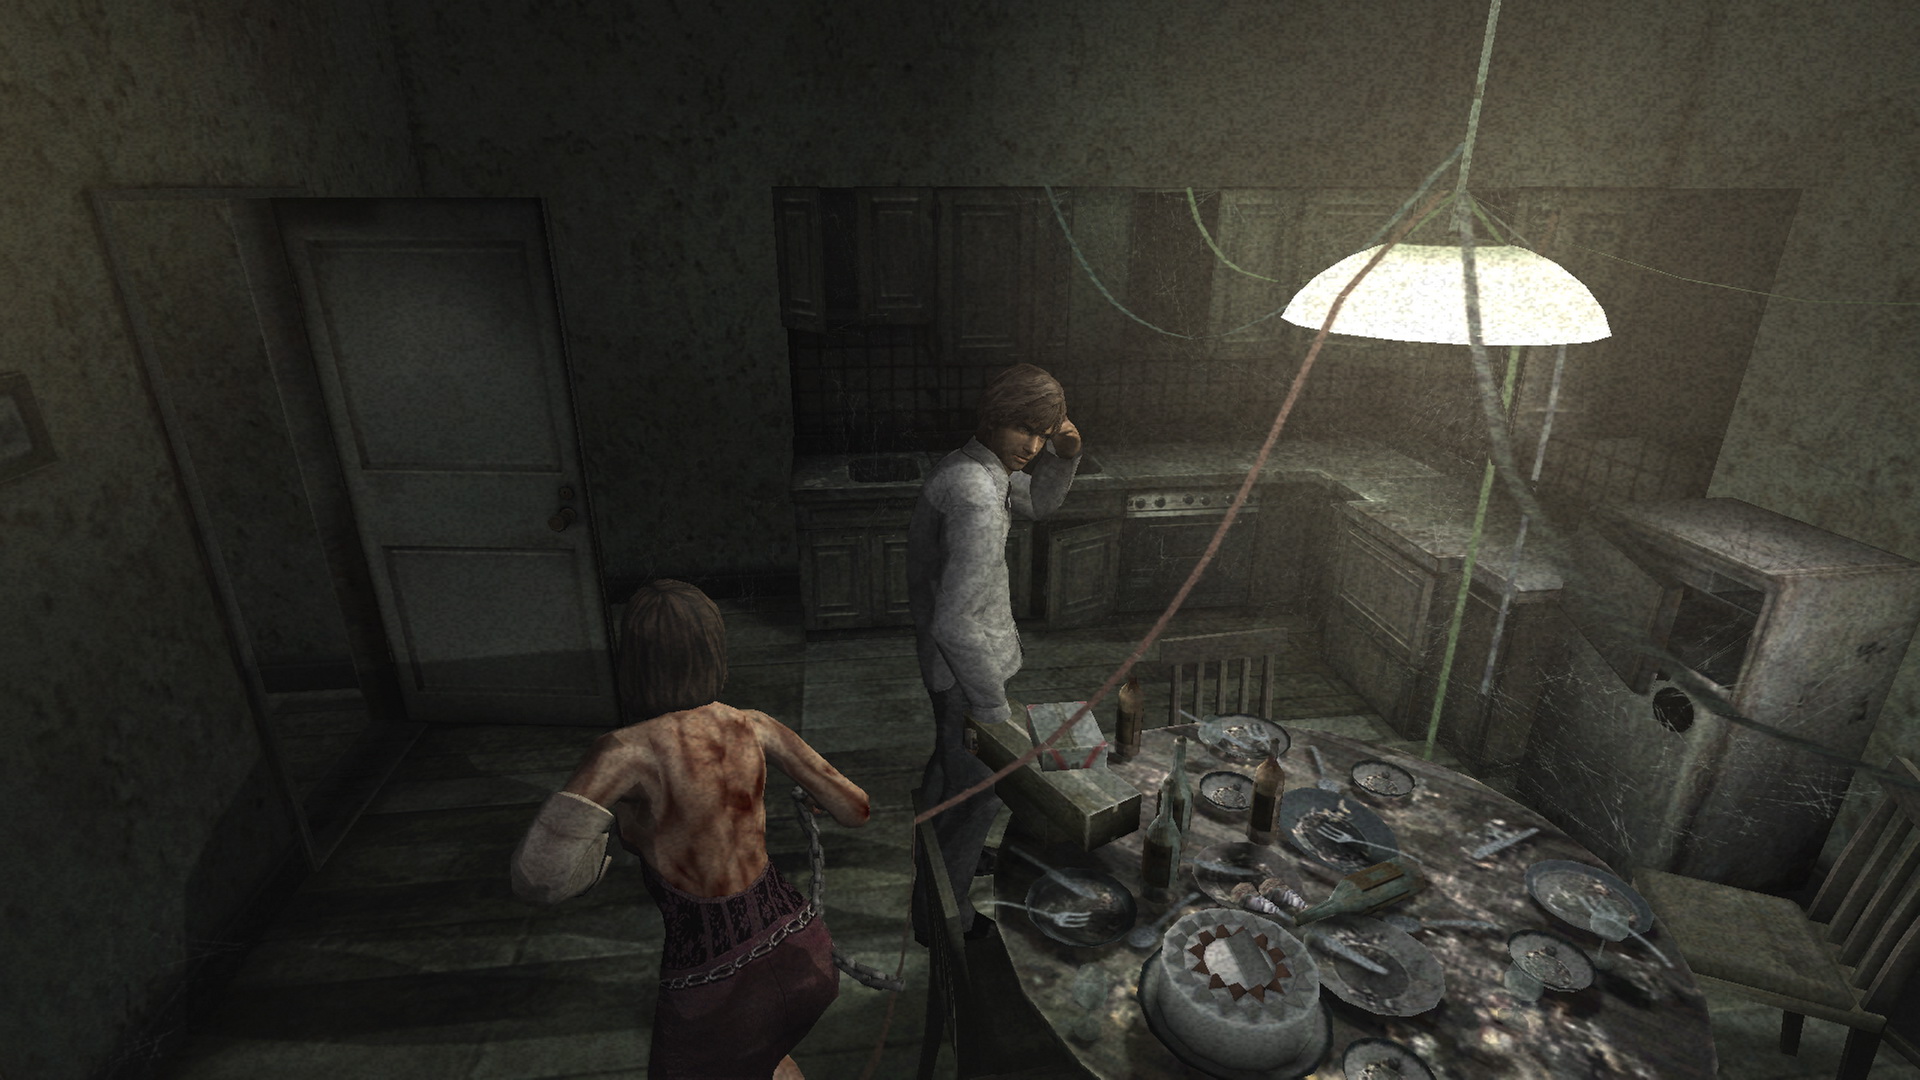 Grab the 67 Stuffed Cat right by the door that you'll need shortly, and quickly locate the birthday cake on the table if there's a Ghost here. Place the Cake Candles on the cake to complete the third reminisce.
You're now done mandatory business in this area and can proceed back, but you can also head through the south door to collect a bunch of items. Otherwise, return to the sporting goods store on B5.
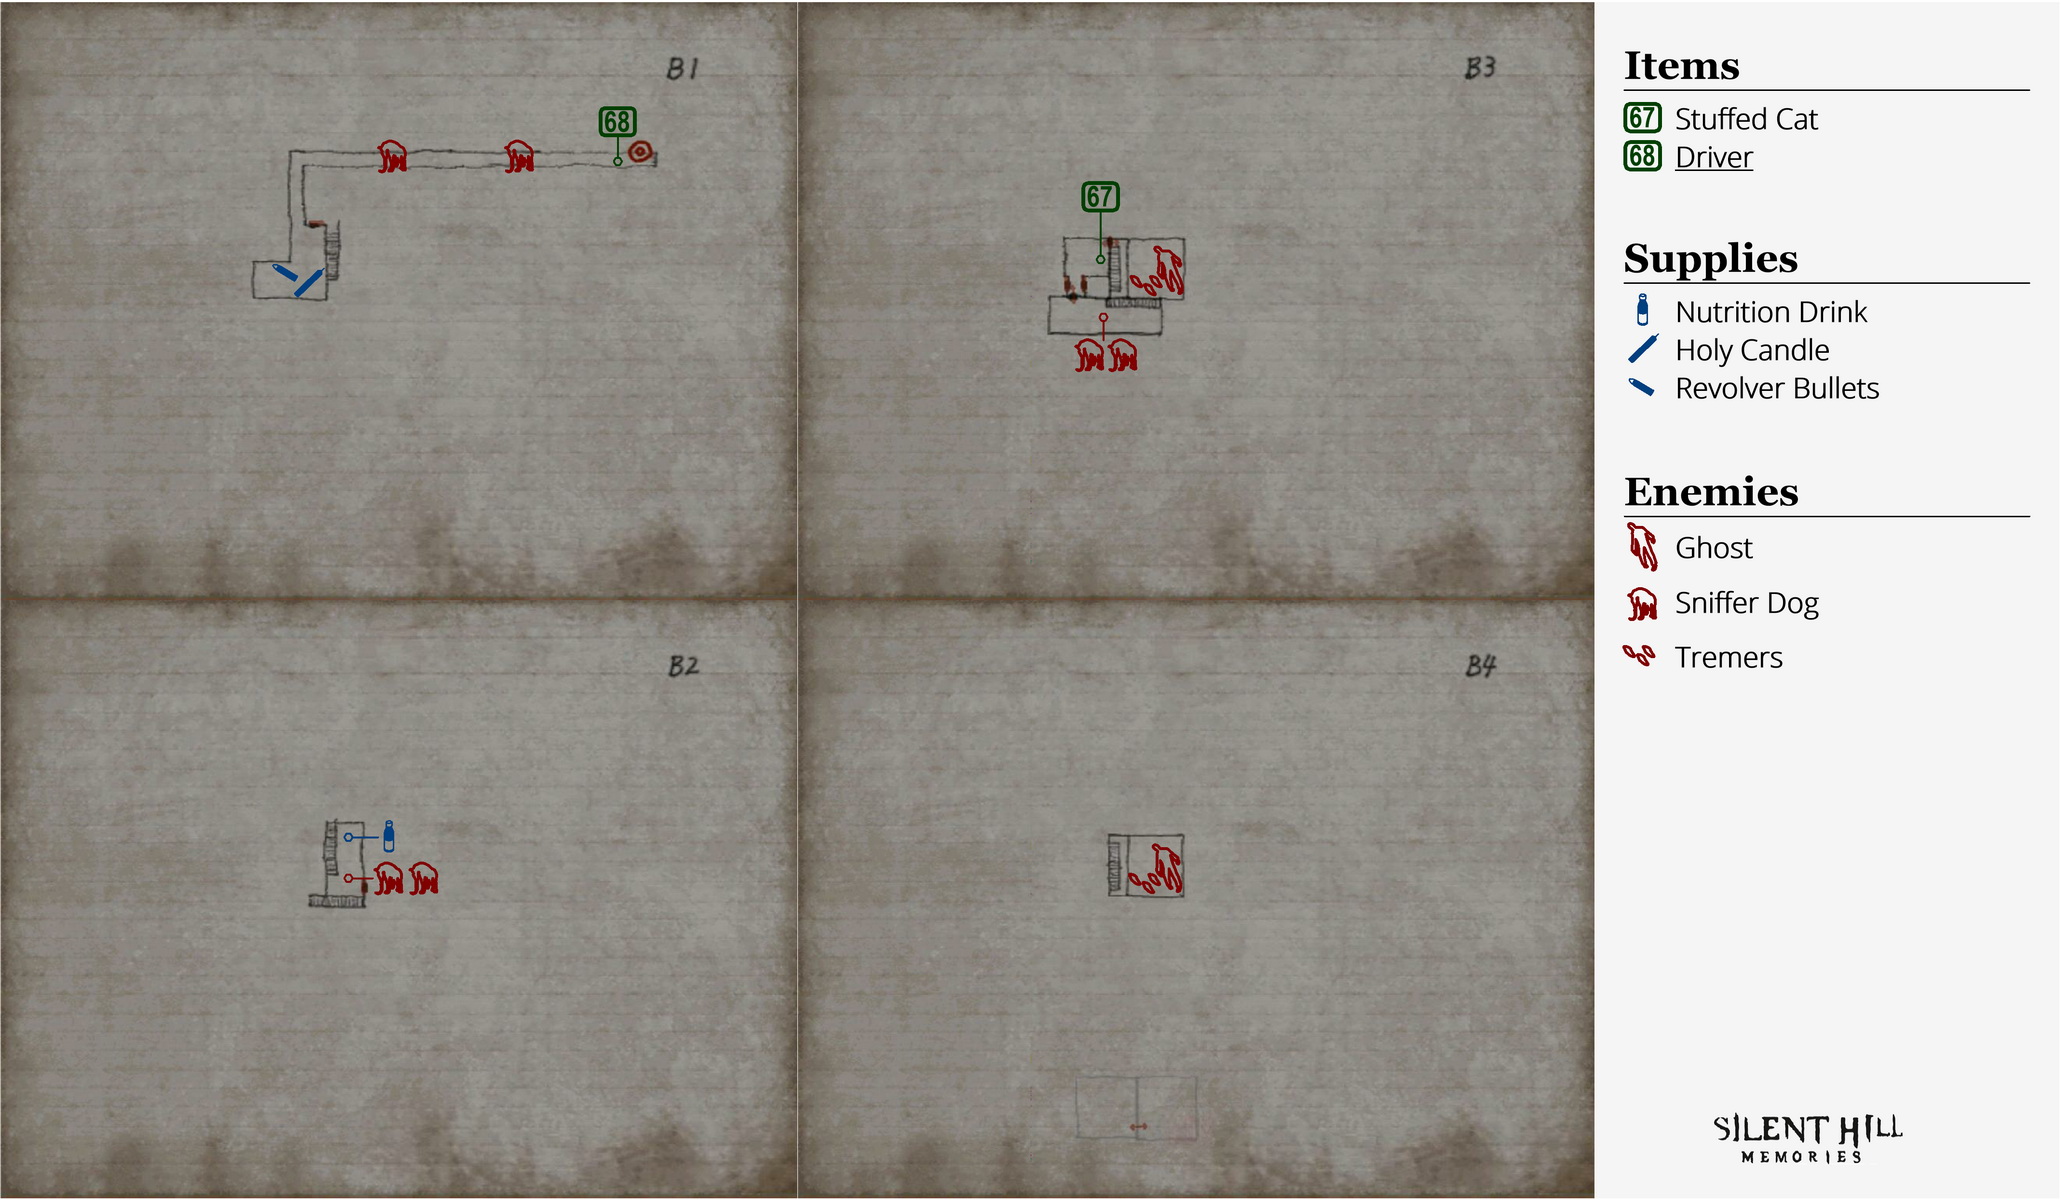
B3 to B1: Optional Trip for Items
Up the stairs in this first area is a Nutrition Drink in between the next set of stairs and the fans, but beware of the two Sniffers. Up these next stairs you can find Revolver Bullets on the hood of the car (far corner) and a Holy Candle by the nearby water tank.
In the next hallway all the way at the end past two Sniffers is a 68 Driver golf club, which isn't really worth it, and a Portal on the wall. Head back to the birthday cake room and then all the way back to the sporting goods store on B5.
B5 to B7
From the sporting goods store, head through the north door to the side staircase painted red. Head through the door at the bottom into the pet shop.
Pet Shop: Placing the Stuffed Cat
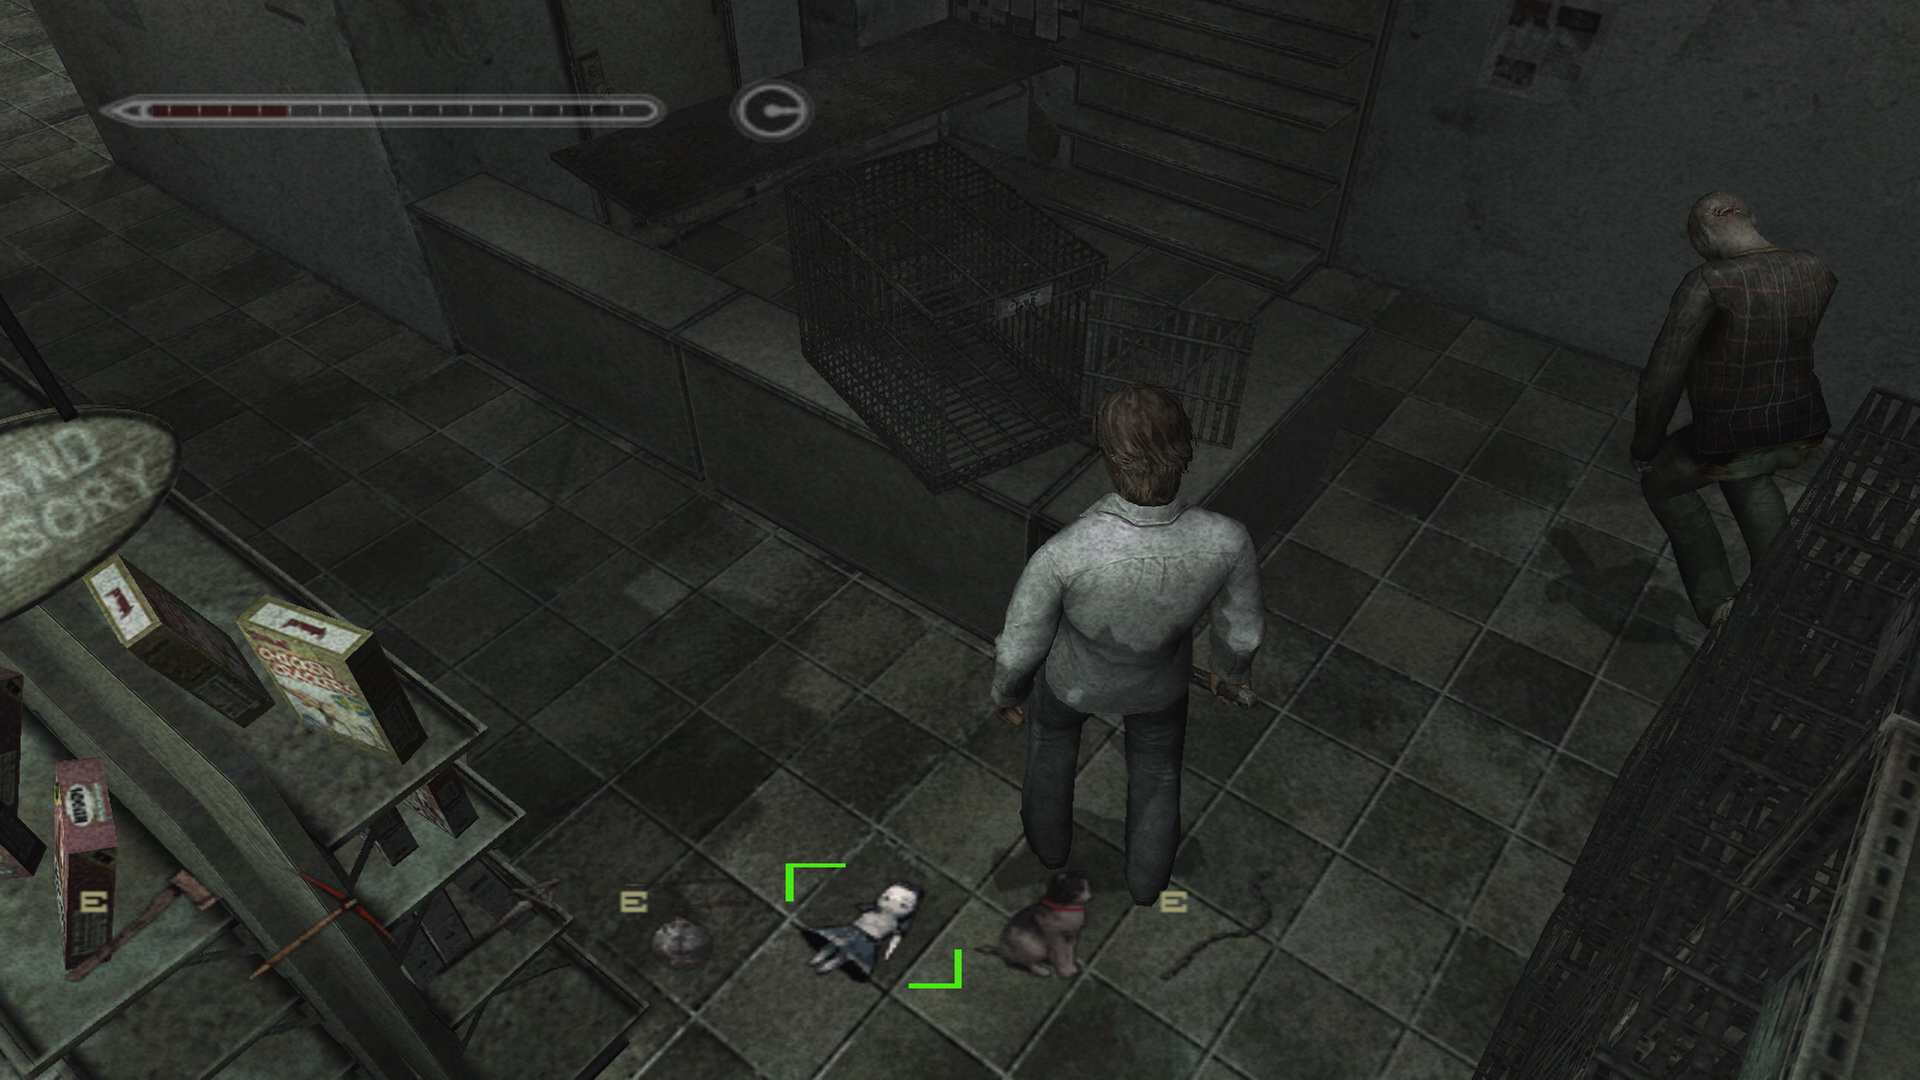 Before any Ghosts bother you, rush to the empty animal cage on the north counter. Place the Stuffed Cat inside. This one can be a bit finicky so just place it from more to the left than directly in front of the opening.
With that, you should have completed the fourth and final reminisce and will start hearing a chiming clock. You may remember an odd upside-down clock room when last here, which is very close by and is now your destination.
Before heading there, there's a Nutrition Drink and Pistol Bullets on separate shelves in the easternmost aisle. When ready, head through the north door near the cage, making sure Eileen is with you.
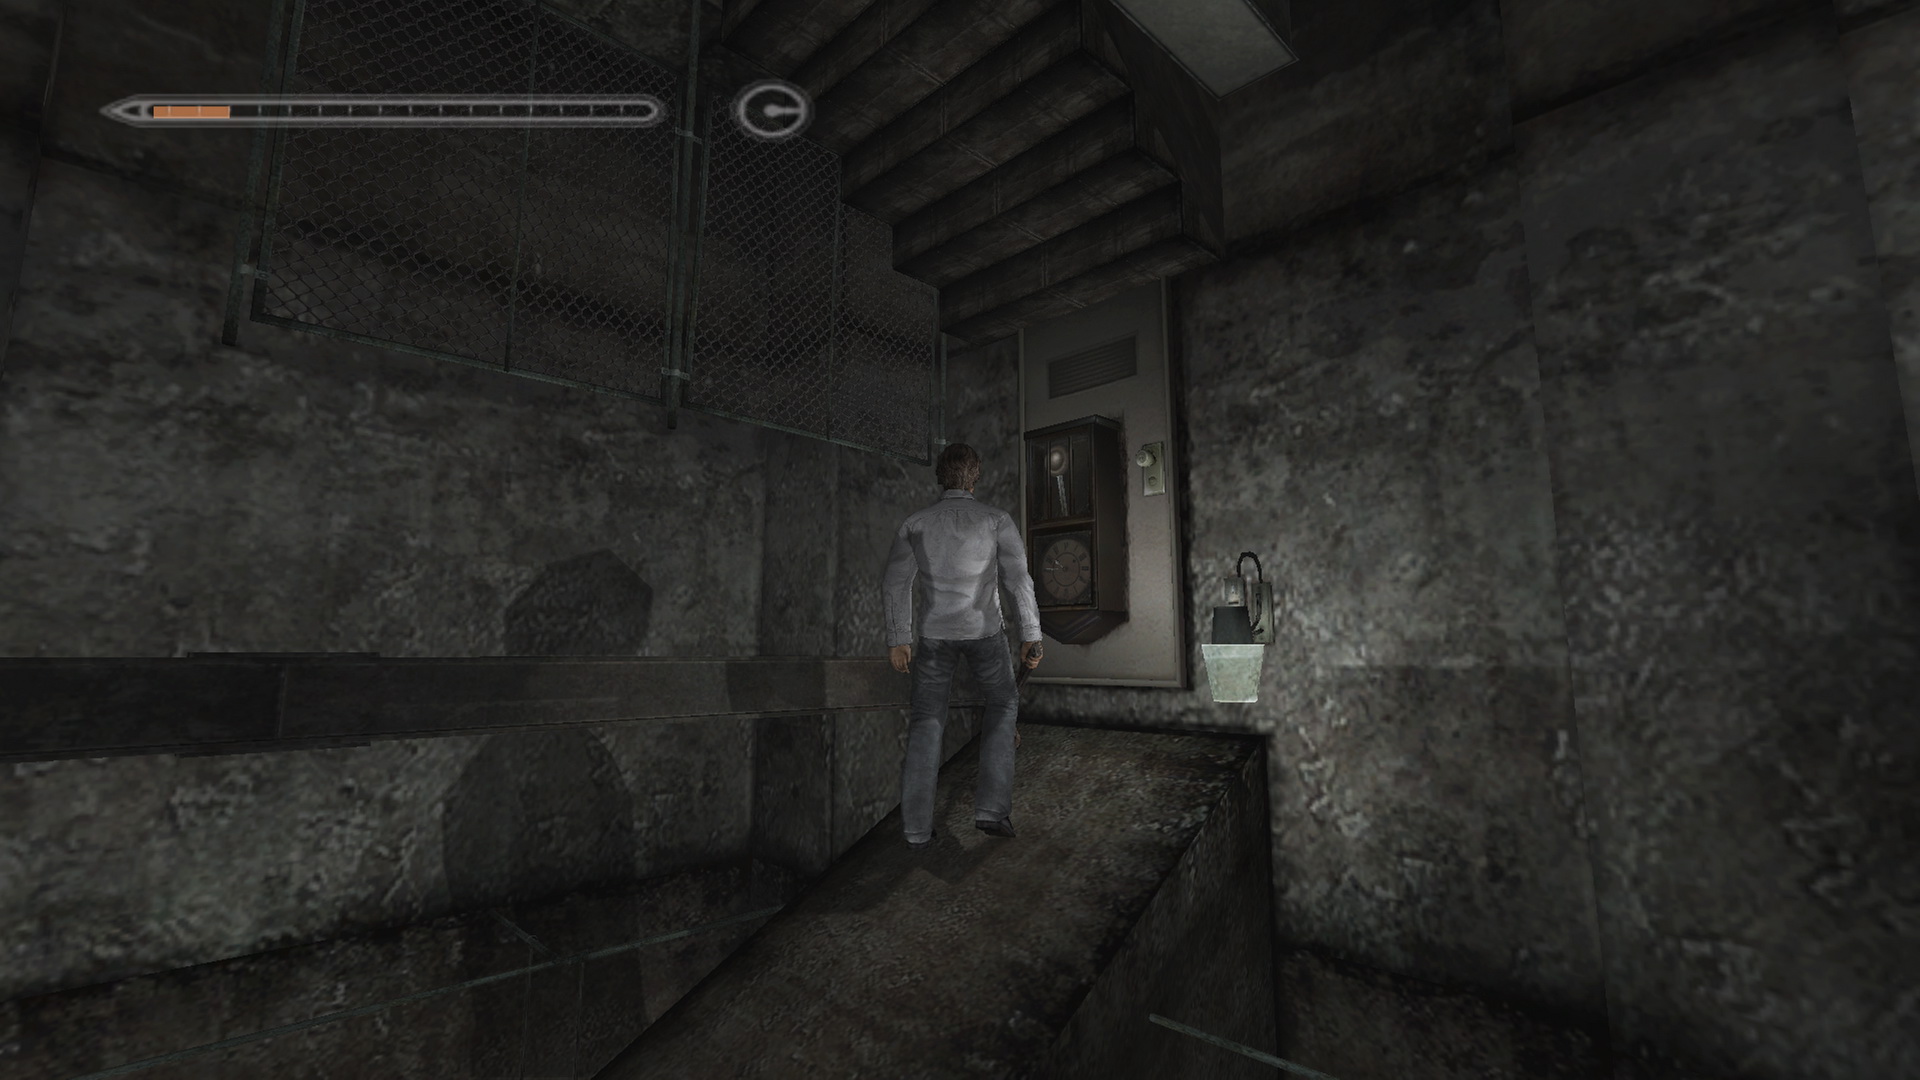
The Chiming Clock Room
 In another red staircase past the pet shop, check the ground for a chilling newspaper article. Then listen in for a surreal experience relevant to what you just read... Wait until it all plays out before checking on the pet shop to see what happened. Awesome.
Back in the staircase, head down the stairs and through the door to the clock room. There will be a few Hummers in here to take care of, along with a pack of Pistol Bullets on the upside-down shelf. Make your way to the ticking clock door in the far corner, which is now unlocked with all reminisces complete. Pass through it with Eileen.
Beyond the Clock Door: Another Route to Bar Southfield
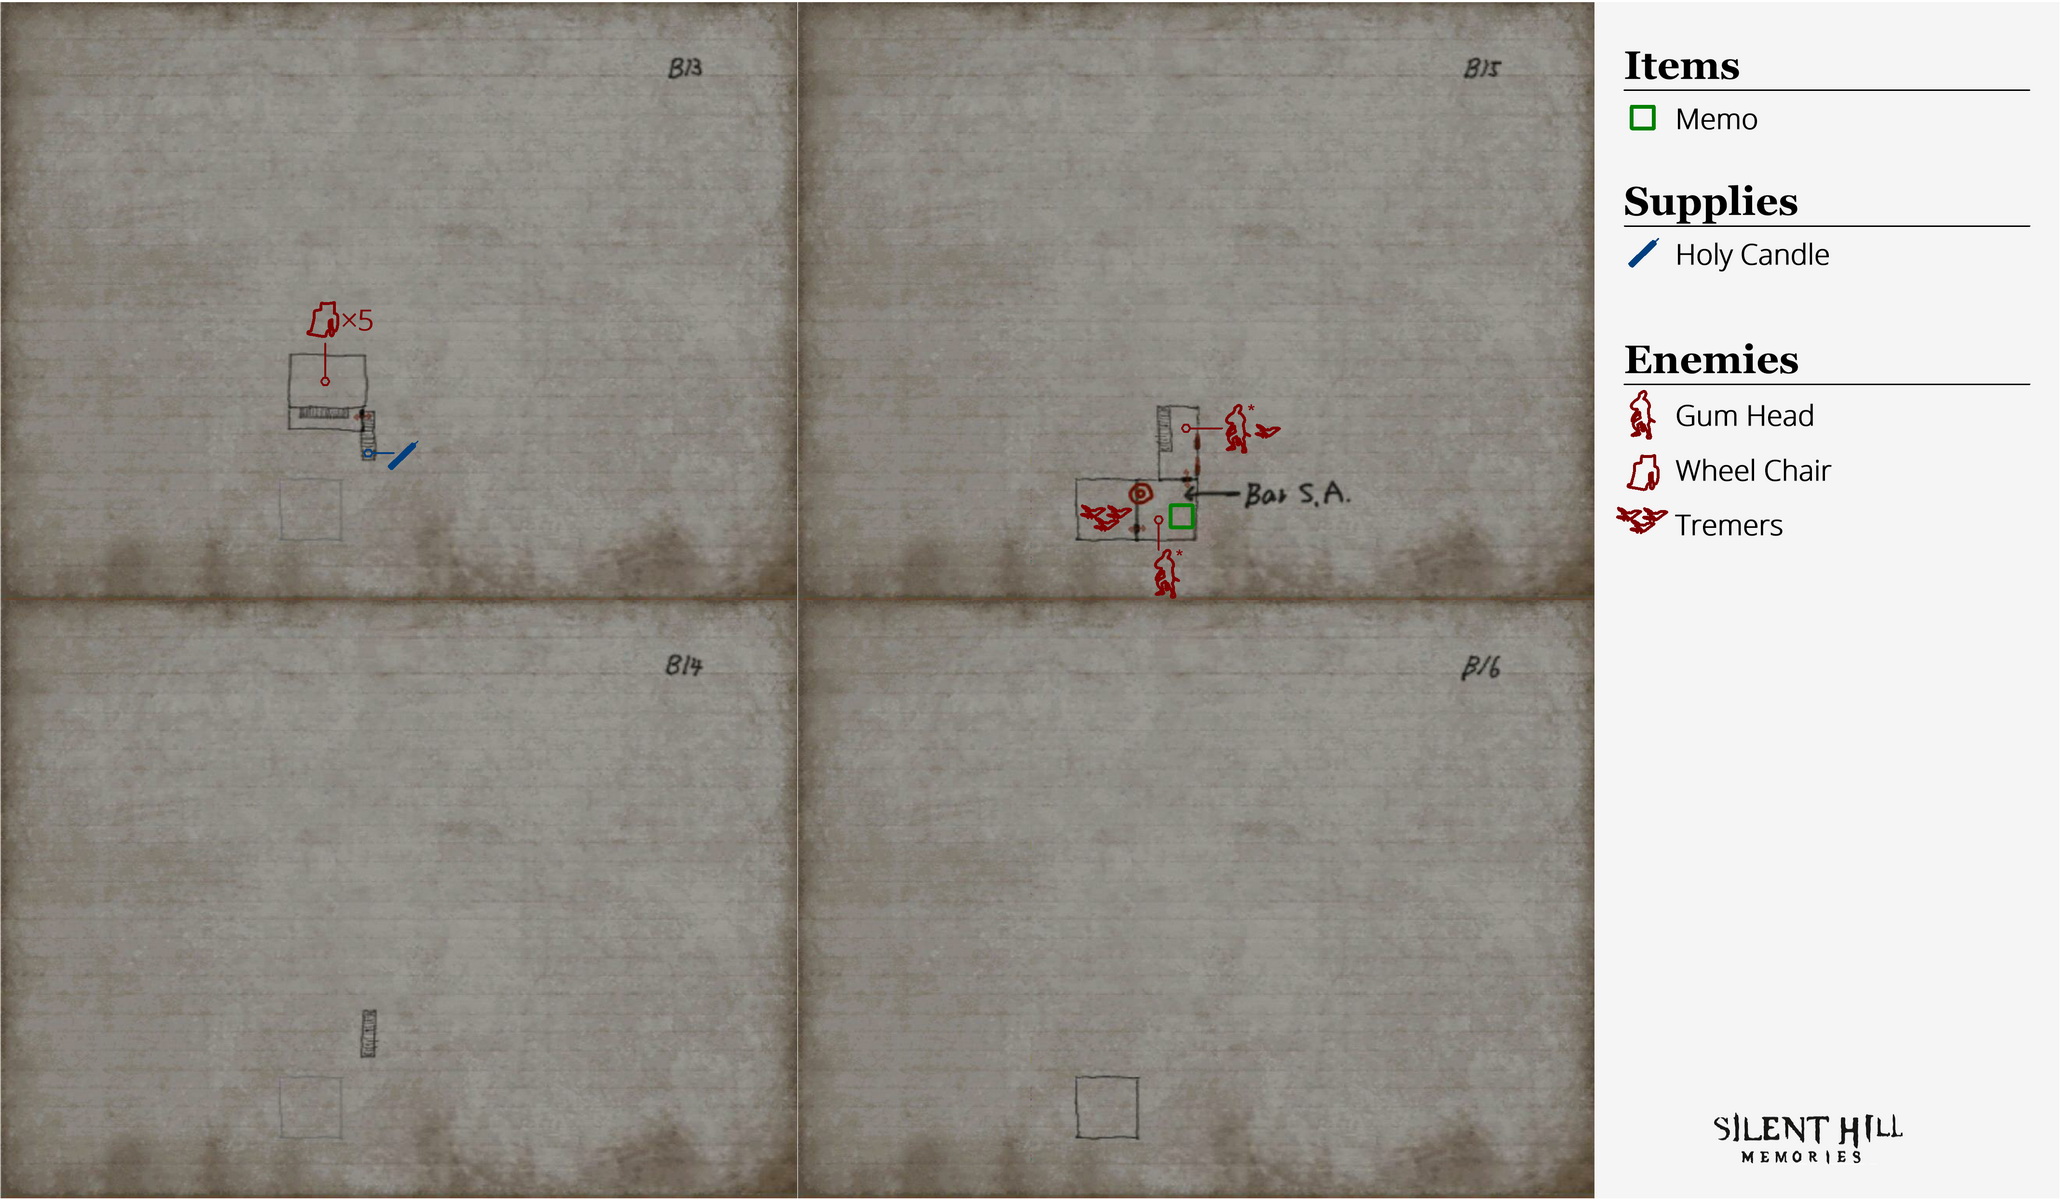
This stairwell is filled with Ghost Victims and has several distracting doors of which none will open, so do your best to zoom through it all the way to the bottom. Down there, head through the south door. The one right under the stairs won't open.
Outside you'll encounter four Gum Heads with golf clubs and a Sniffer Dog. It's really not worth it and I suggest not doing so anyway, but if you kill them you can take their clubs – a 69 7-Iron, 70 8-Iron, 71 3-Iron and 72 Sand Wedge. Run past them and pick up the Nutrition Drink by the fence. Then go through the door in the south to carry on.
In this tight stairway you will be harassed by Richard if you didn't take him out of commission, and it may be difficult to avoid taking damage cause you can't run past him so easily. Try some charge up attacks if you need to clear the way and pass through the door at the bottom of the stairs after unlocking it.
Now you're back in the area that Eileen couldn't reach before. Make your way past any Ghosts and remaining Hummers and proceed to the next rooftop and slip through the door by the boxes.
Back in the Wheelchair staircase, wait for an opportunity and run for the door. Eileen may receive a bump or two but she should be fine. Just keep watch so you don't get run over while waiting for her.
Now take the wall staircase to the bottom, ignoring the Gum Head sounds. One will probably jump and land above you but just keep going down. On the ground level you may have to get past a Hummer to reach the end door, while the Gum Head may jump down here if it's still alive. Enter the bar.
Bar Southfield: Escaping Building World with Eileen
Just inside, quickly beat down the Gum Head. Now that you have Eileen here you can focus on your escape. The exit keypad code from before of 3750 doesn't work anymore, and the Later Bartender's Memo (43/52) on the bar explains that the phone number has been changed. So that's why.
Puzzle: Bar Southfield Keypad New Code (Bar Southfield, B15)
If you actually called the number on the billboard earlier, you may have an idea why people complained about the weird noises and why the number was changed. So with a new number, they'll have to change the billboard. Continue on below to find the answer. |
Use the Portal by the billiard table to return to Room 302.
Room 302
What if you called the old number? Use the bedroom phone to dial in 555-3750 to hear a message explain that the new phone number is 555-4890. There you go, the code is 4890. Consider saving your game and filling up on some health due to an upcoming boss fight, then return to the bar. |
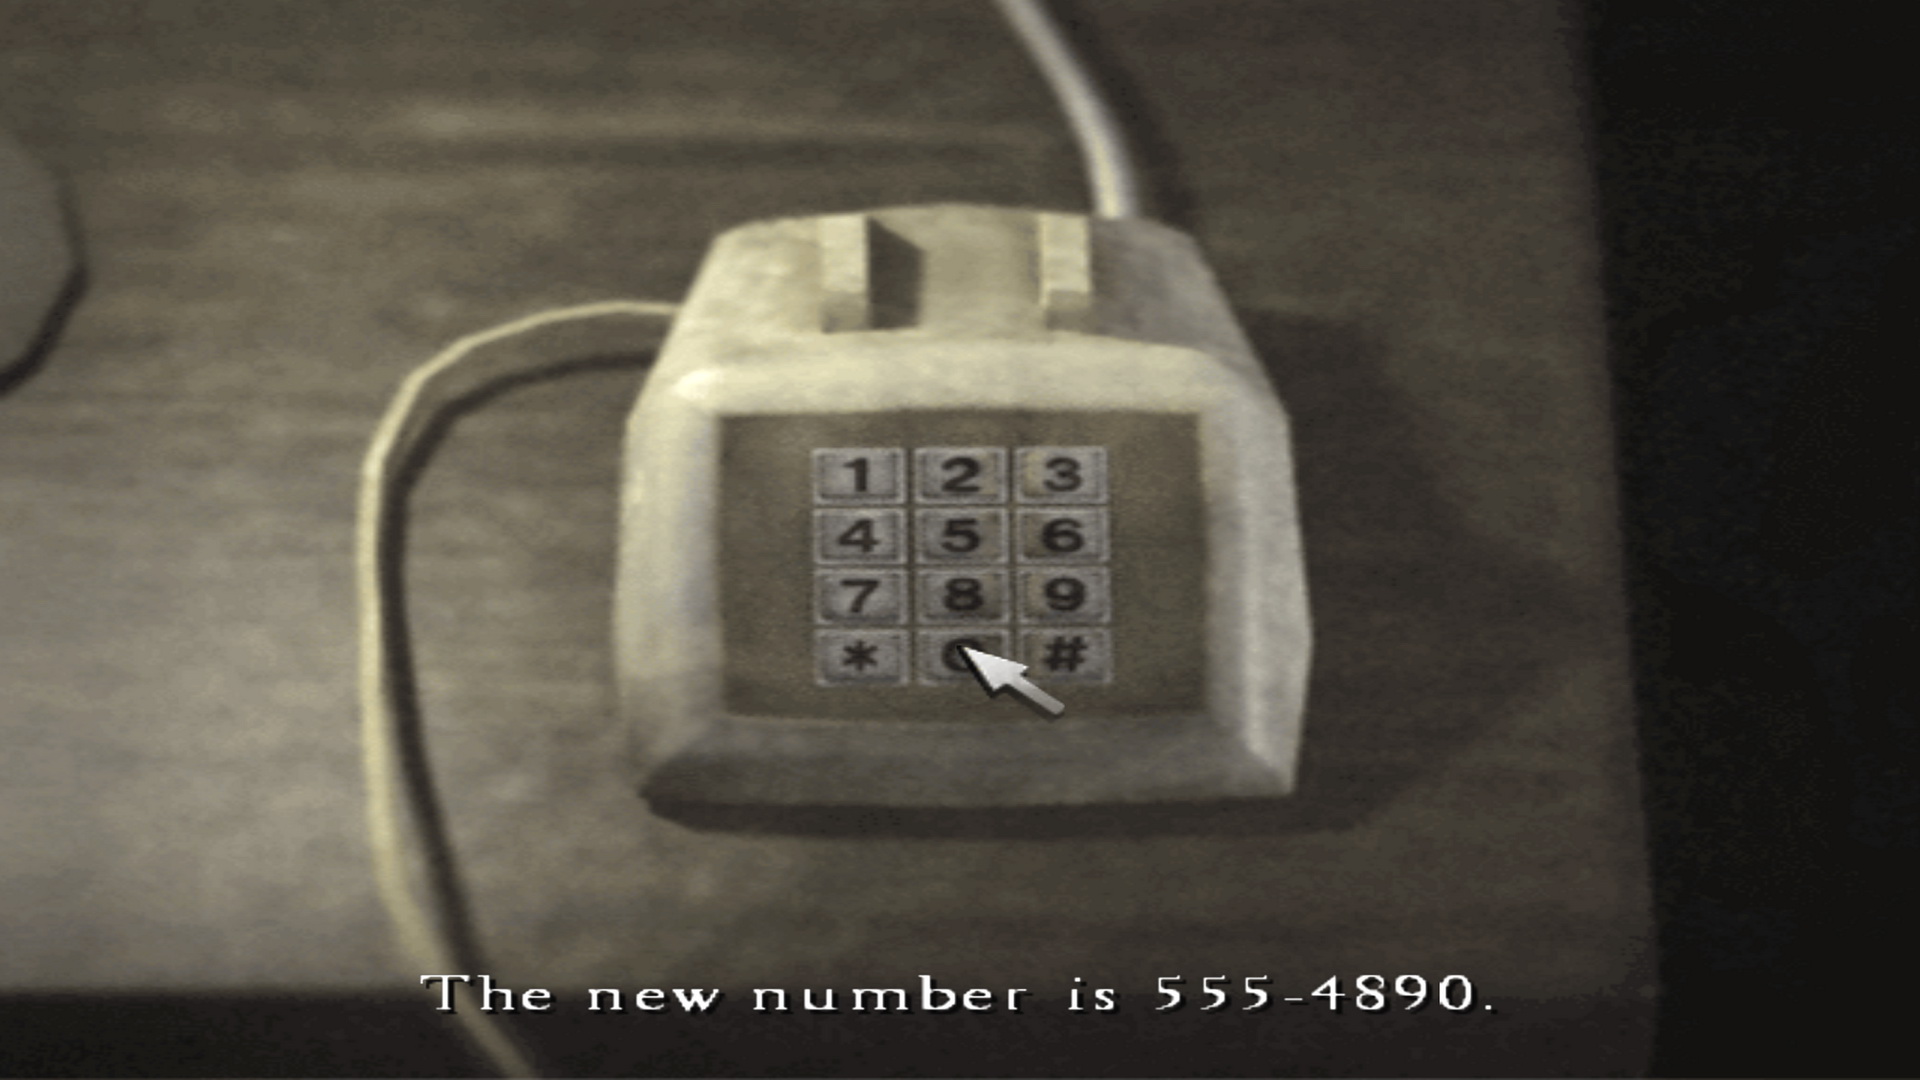
Enter the code 4890 into the keypad and proceed through with Eileen. If you try to head up this large stairwell like last time, you'll find a collapsed wall prevents passage. But if you check right beside the door you'll see that the collapsed wall has covered a gap on the way down. So now you can descend the staircase rather than ascend it.
Whack any Hummers that approach as you make your way down. Whacking them off the ledge will bypass any required kick, giving you an easier time. At the bottom after a long trek is a Portable Medical Kit by the final door.
Take a moment to laugh at all the dead Hummers down here if you sent them this way, then pass through the door.
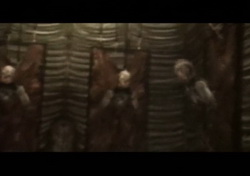
A short cutscene will play of massive Wall Men on moving wall platforms. It'll now be time to endure a boss fight.
Boss 1: The One Truth - Giant Wall Men (Below Building World)
To explain, there are 12 large Wall Men in this room. 11 of them will flinch normally when hit. But one of them when hit will cause every single Wall Man here to flinch, including itself. This is the master Wall Man or "the One Truth". Your goal is to find and destroy it. What you'll want to do is give each Wall Man a swing or a bullet one at a time and move on to the next one if the others don't react. Run over and quickly swing, or wait down below for one to drop down and smack it, then move on if they're not the right one. Perhaps the hard part is avoiding damage while running to the next one if it's ready for you, but you can also wait for them to rise again while tending to the one closest to you to make sure it doesn't hit you. Or you can also use the Pistol to shoot each Wall Man more quickly, but perhaps the targeting system can be finicky and frustrating. Continue clockwise or counter-clockwise one by one, not skipping any, until you uncover the one Wall Man that causes them all to flinch when hit. Once found, continue to bash it over and over while it's down below and within range. Note that Eileen can also chip in if she has a weapon, although she's not very aggressive. Perhaps it's best to go for regular swings back to back with the Rusty Axe since its charge up swing takes a while to land and the Wall Men may take that time to slide back up. Whenever they do slip away though, ready a charge up attack for them as soon as they return. Repeat until all 12 Wall Men are motionless. Giant Wall Men's Attacks: Once all the Wall Men hang lifelessly, the other door will unlock. |
 This boss fight also serves as a bit of a puzzle where you must first uncover something before you can make any progress. Check the door on the other side, which is locked and has this inscription:
 Slip through the now unlocked door to advance.
Below Building World
Back in the usual spiral staircase, you'll find another Portal a way's down.
Room 302At your front door is the Red Diary - August 7 (44/52). This trip can frankly be delayed until the next area just a minute or two away. |
Follow the trail of blood to arrive at ground level this time... There's also the front door to Room 302 down here, along with the Superintendent's Diary (Man with the Coat) (45/52) on the tile floor. Proceed inside with Eileen.
| 10. Water Prison World 2nd Time | 12. Room 302 of the Past |